
vue3+h5+zxing 条形码扫描
环境:vue3+ts+vant 在微信跑得h5页面
其实如果你是微信公众号也可以调用jssdk现成得,不过就是要认证一系列 我感觉更麻烦
需求:扫描快递单号
限制:只支持localhost和https得调试
安装:npm install @zxing/library --save
导入:import { BrowserMultiFormatReader } from "@zxing/library"
因为是vue3直接在setup里面编写了所有得代码
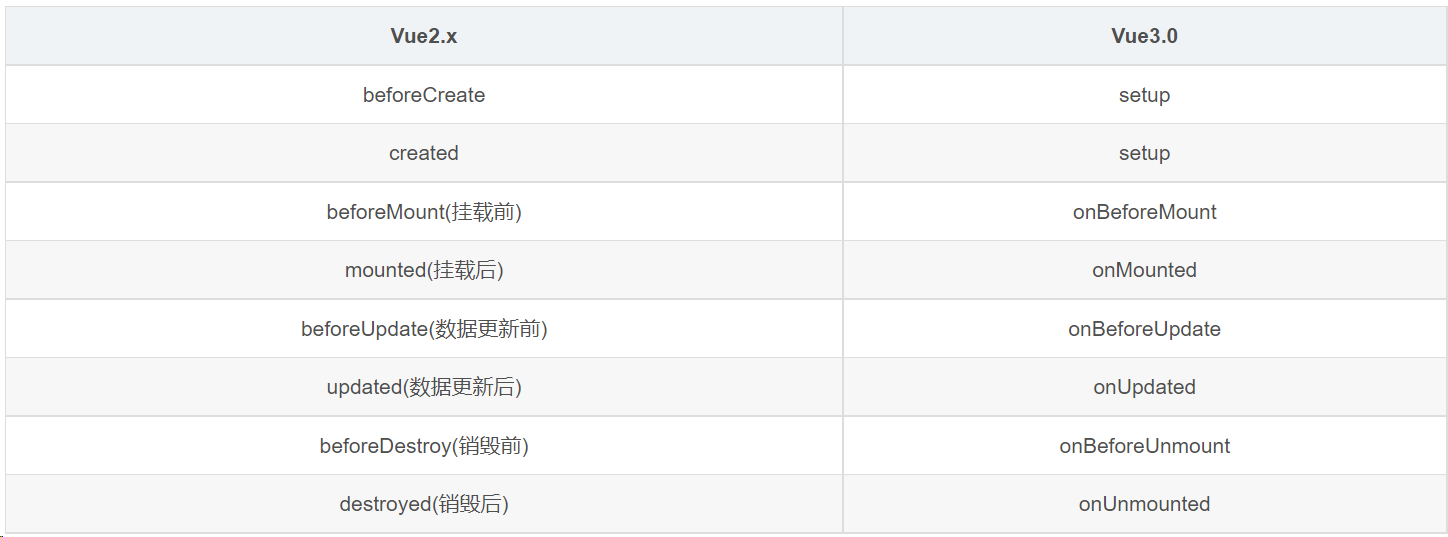
这里放下v2和v3的生命周期图
import { BrowserMultiFormatReader } from "@zxing/library";
import styles from "./leads.module.less";
import { defineComponent, reactive, onUnmounted } from "vue";
import router from "@/router";
import CPage from "@/components/CPage";

export default defineComponent({
  name: "ScanCode",
  setup() {
    const form = reactive({
      loadingShow: false,
      scanText: "",
      vin: null,
      tipMsg: "尝试识别中...",
      tipShow: false
    });
    const onClickLeft = () => {
      codeReader.reset();
      router.push({ name: "Insurance" }); //左滑 进入home
    };

    const codeReader = new BrowserMultiFormatReader();
    const openScan = async () => {
      codeReader
        .getVideoInputDevices()
        .then((videoInputDevices) => {
          form.tipShow = true;
          form.tipMsg = "正在调用摄像头...";
          console.log("videoInputDevices", videoInputDevices);
          // 默认获取第一个摄像头设备id
          let firstDeviceId = videoInputDevices[0].deviceId;
          // 获取第一个摄像头设备的名称
          const videoInputDeviceslablestr = JSON.stringify(
            videoInputDevices[0].label
          );
          if (videoInputDevices.length > 1) {
            // 判断是否后置摄像头
            if (videoInputDeviceslablestr.indexOf("back") > -1) {
              firstDeviceId = videoInputDevices[0].deviceId;
            } else {
              firstDeviceId = videoInputDevices[1].deviceId;
            }
          }
          decodeFromInputVideoFunc(firstDeviceId);
        })
        .catch((err) => {
          form.tipShow = false;
          console.log(`失败出错: ${err}`);
        });
    };
    openScan();

    const decodeFromInputVideoFunc = (firstDeviceId: any) => {
      codeReader.reset(); // 重置
      form.scanText = "";
      codeReader.decodeFromInputVideoDeviceContinuously(
        firstDeviceId,
        "video",
        (result, err) => {
          form.tipMsg = "正在尝试识别...";
          form.scanText = "";
          if (result) {
            console.log("扫描结果", result);
            // form.scanText = result.text;
            form.scanText = result.getText();
            if (form.scanText) {
              form.tipShow = false;
              router.push({
                name: "Insurance",
                params: { codeResult: form.scanText }
              });
              // this.$store.commit('app/SET_SCANTEXT', result.text);
              // console.log('已扫描的小票列表', this.$store.getters.scanTextArr);
            }
          }
          if (err && !err) {
            form.tipMsg = "识别失败";
            setTimeout(() => {
              form.tipShow = false;
            }, 2000);
            console.error(err);
          }
        }
      );
    };

    //销毁组件
    onUnmounted(() => {
      codeReader.reset();
      console.log("销毁组件");
    });

    return () => (
      <CPage>
        <div class={`${styles.pageScan}`}>
          {/*  扫码区域  */}
          <video
            ref="video"
            id="video"
            class={`${styles.scanVideo}`}
            autoplay
          ></video>
          {/*  提示语 */}
          <div v-show={(form.tipShow = true)} class={`${styles.scanTip}`}>
            {form.tipMsg}
          </div>
          {/* 扫码样式一 */}
          <div class={`${styles.scanner}`}>
            <div class={`${styles.box}`}>
              <div class={`${styles.line}`}></div>
              <div class={`${styles.angle}`}></div>
            </div>
            <div class={`${styles.backarrow}`} onClick={onClickLeft}>
              <span>返回</span>
            </div>
          </div>
        </div>
      </CPage>
    );
  }
});
下面是css也是借鉴了各大博主得思路
// 扫码组件
.scan-index-bar{
    background-image: linear-gradient( -45deg, #42a5ff ,#59cfff);
}
.van-nav-bar__title{
color: #fff !important;
}
.scanVideo{
height: 80vh;
}
.scanTip{
width: 100vw;
text-align: center;
margin-bottom: 10vh;
color: white;
font-size: 4vw;
}
.pageScan{
overflow-y: hidden;
background-color: #363636;
//transparent
}


.scanner {
    background-image: linear-gradient(
            0deg,
            transparent 24%,
            rgba(32, 255, 77, 0.1) 25%,
            rgba(32, 255, 77, 0.1) 26%,
            transparent 27%,
            transparent 74%,
            rgba(32, 255, 77, 0.1) 75%,
            rgba(32, 255, 77, 0.1) 76%,
            transparent 77%,
            transparent
        ),
        linear-gradient(
            90deg,
            transparent 24%,
            rgba(32, 255, 77, 0.1) 25%,
            rgba(32, 255, 77, 0.1) 26%,
            transparent 27%,
            transparent 74%,
            rgba(32, 255, 77, 0.1) 75%,
            rgba(32, 255, 77, 0.1) 76%,
            transparent 77%,
            transparent
        );
    background-size: 3rem 3rem;
    background-position: -1rem -1rem;
    // width: 100%;
    // height: 100%;
    // position: relative;
    // background-color: #111;

    position: fixed;
    top: 0;
    left: 0;
    right: 0;
    bottom: 0;
    z-index: 9;
    width: 100%;
    height: 100%;
    background-color: rgba(0, 0, 0, 0.5);
}
.scanner .box {
    width: 75vw;
    height: 75vw;
    max-height: 75vh;
    max-width: 75vh;
    position: relative;
    left: 50%;
    top: 50%;
    transform: translate(-50%, -50%);
    overflow: hidden;
    border: 0.1rem solid rgba(0, 255, 51, 0.2);
}
.scanner .line {
    height: calc(100% - 2px);
    width: 100%;
    background: linear-gradient(180deg, rgba(0, 255, 51, 0) 43%, #00ff33 211%);
    border-bottom: 3px solid #00ff33;
    transform: translateY(-100%);
    animation: radar-beam 2s infinite;
    animation-timing-function: cubic-bezier(0.53, 0, 0.43, 0.99);
    animation-delay: 1.4s;
}
.scanner .box:after,
.scanner .box:before,
.scanner .angle:after,
.scanner .angle:before {
    content: '';
    display: block;
    position: absolute;
    width: 3vw;
    height: 3vw;
    border: 0.2rem solid transparent;
}
.scanner .box:after,
.scanner .box:before {
    top: 0;
    border-top-color: #00ff33;
}
.scanner .angle:after,
.scanner .angle:before {
    bottom: 0;
    border-bottom-color: #00ff33;
}
.scanner .box:before,
.scanner .angle:before {
    left: 0;
    border-left-color: #00ff33;
}
.scanner .box:after,
.scanner .angle:after {
    right: 0;
    border-right-color: #00ff33;
}
@keyframes radar-beam {
    0% {
        transform: translateY(-100%);
    }
    100% {
        transform: translateY(0);
    }
}

.scanner .backarrow {
    position: fixed;
    top: 20px;
    left: 20px;
    width: 50px;
    height: 50px;
    border-radius: 100%;
    background-color: rgba(0, 0, 0, 0.3);
    z-index: 999;
    display: flex;
    justify-content: center;
    align-items: center;
    color: #fff;
}
具体实现效果如图
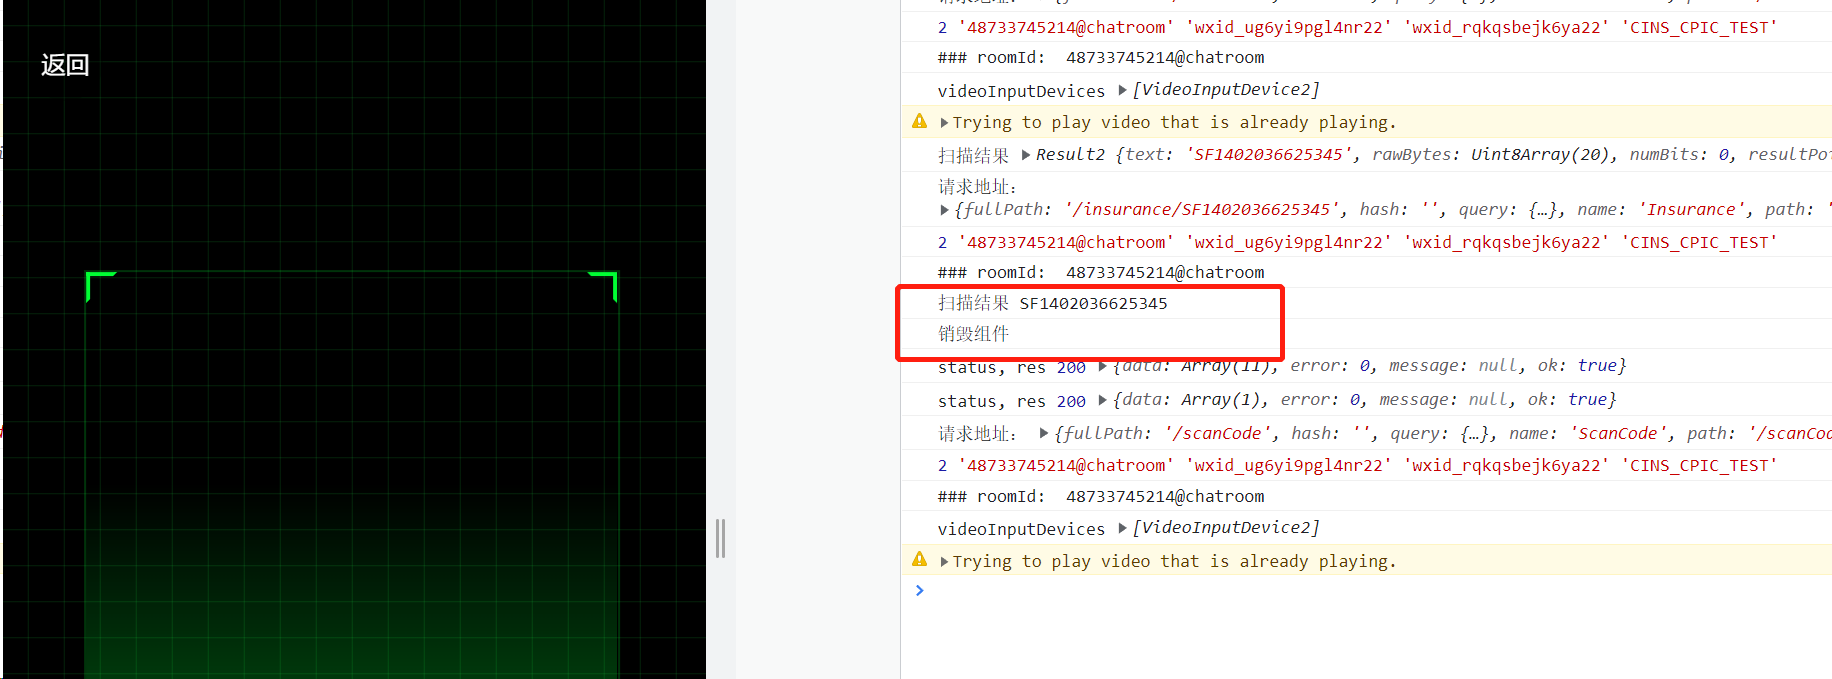
其实整个就2个方法一点也不复杂
本来方案一是 vue-barcode-render 奈何我一build它就报错只好放弃(急着上线没有过多得研究)
这里放下npm得链接,它整个实现也就2行代码且实现了样式无需自己编写,因为它也是集成zxing得所以也是只能loclahost和https 域名下访问调用
https://www.npmjs.com/package/vue-barcode-reader
在线调试路径:
https://codesandbox.io/s/vue-barcode-reader-demo-guj3f?file=/src/components/HelloWorld.vue
github得demo:
https://github.com/olefirenko/vue-barcode-reader-example/blob/master/package.json

 浙公网安备 33010602011771号