零拷贝
一、简介
1、零拷贝
零拷贝是减少cpu进行存储区域之间拷贝操作的技术,通常零拷贝还能减少用户空间和内核空间的上下文切换(在linux网络IO中对用户空间和内核空间进行了说明)
在linux中零拷贝的实现方式主要有直接I/O、mmap、sendfile、sendfile+gather、splice、tee、vmsplice
在java中主要方式是mmap、sendfile、sendfile+gather,java的零拷贝实现依赖于操作系统的支持
2、DMA
DMA的全称叫直接内存存取(Direct Memory Access),是一种允许外围设备直接访问系统主内存的机制,原来需要依赖cpu进行的数据传输现在可以交给DMA控制器来做,DMA控制传输的过程中cpu可以去做其他的工作,使效率大大提升,目前大多数的硬件设备,包括磁盘控制器、网卡、显卡以及声卡等都支持 DMA 技术
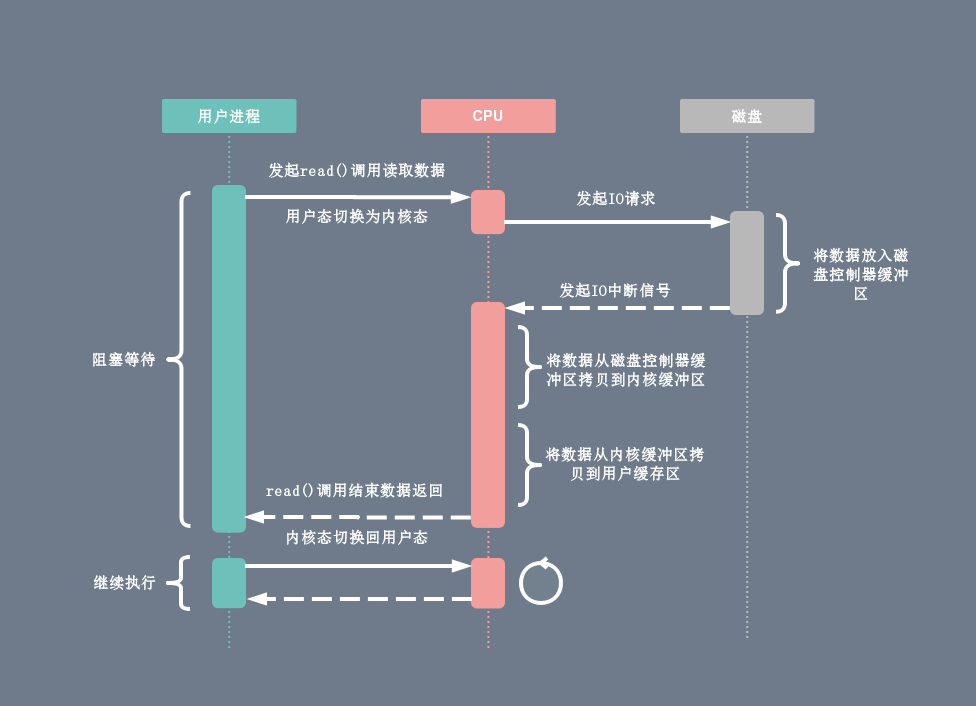
在DMA技术出现之前,应用程序与磁盘之间的I/O操作都是通过cpu的中断完成的,如图:
有了DMA技术以后:
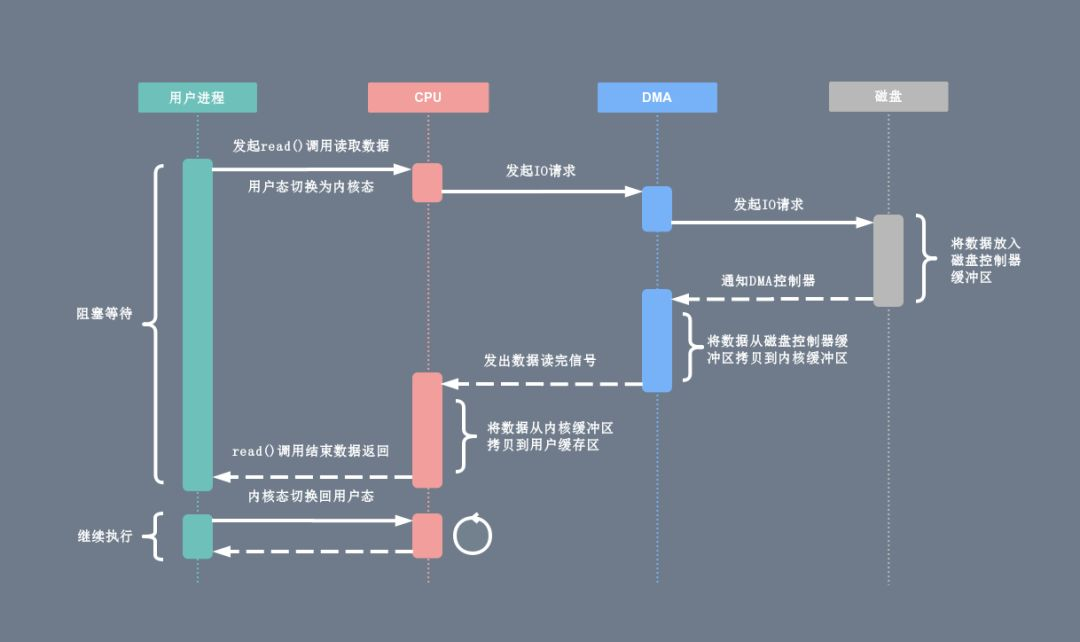
DMA控制器接过了将数据从磁盘控制器缓冲区拷贝到内核缓冲区的工作,解放了cpu
二、java中的零拷贝
1、传统IO
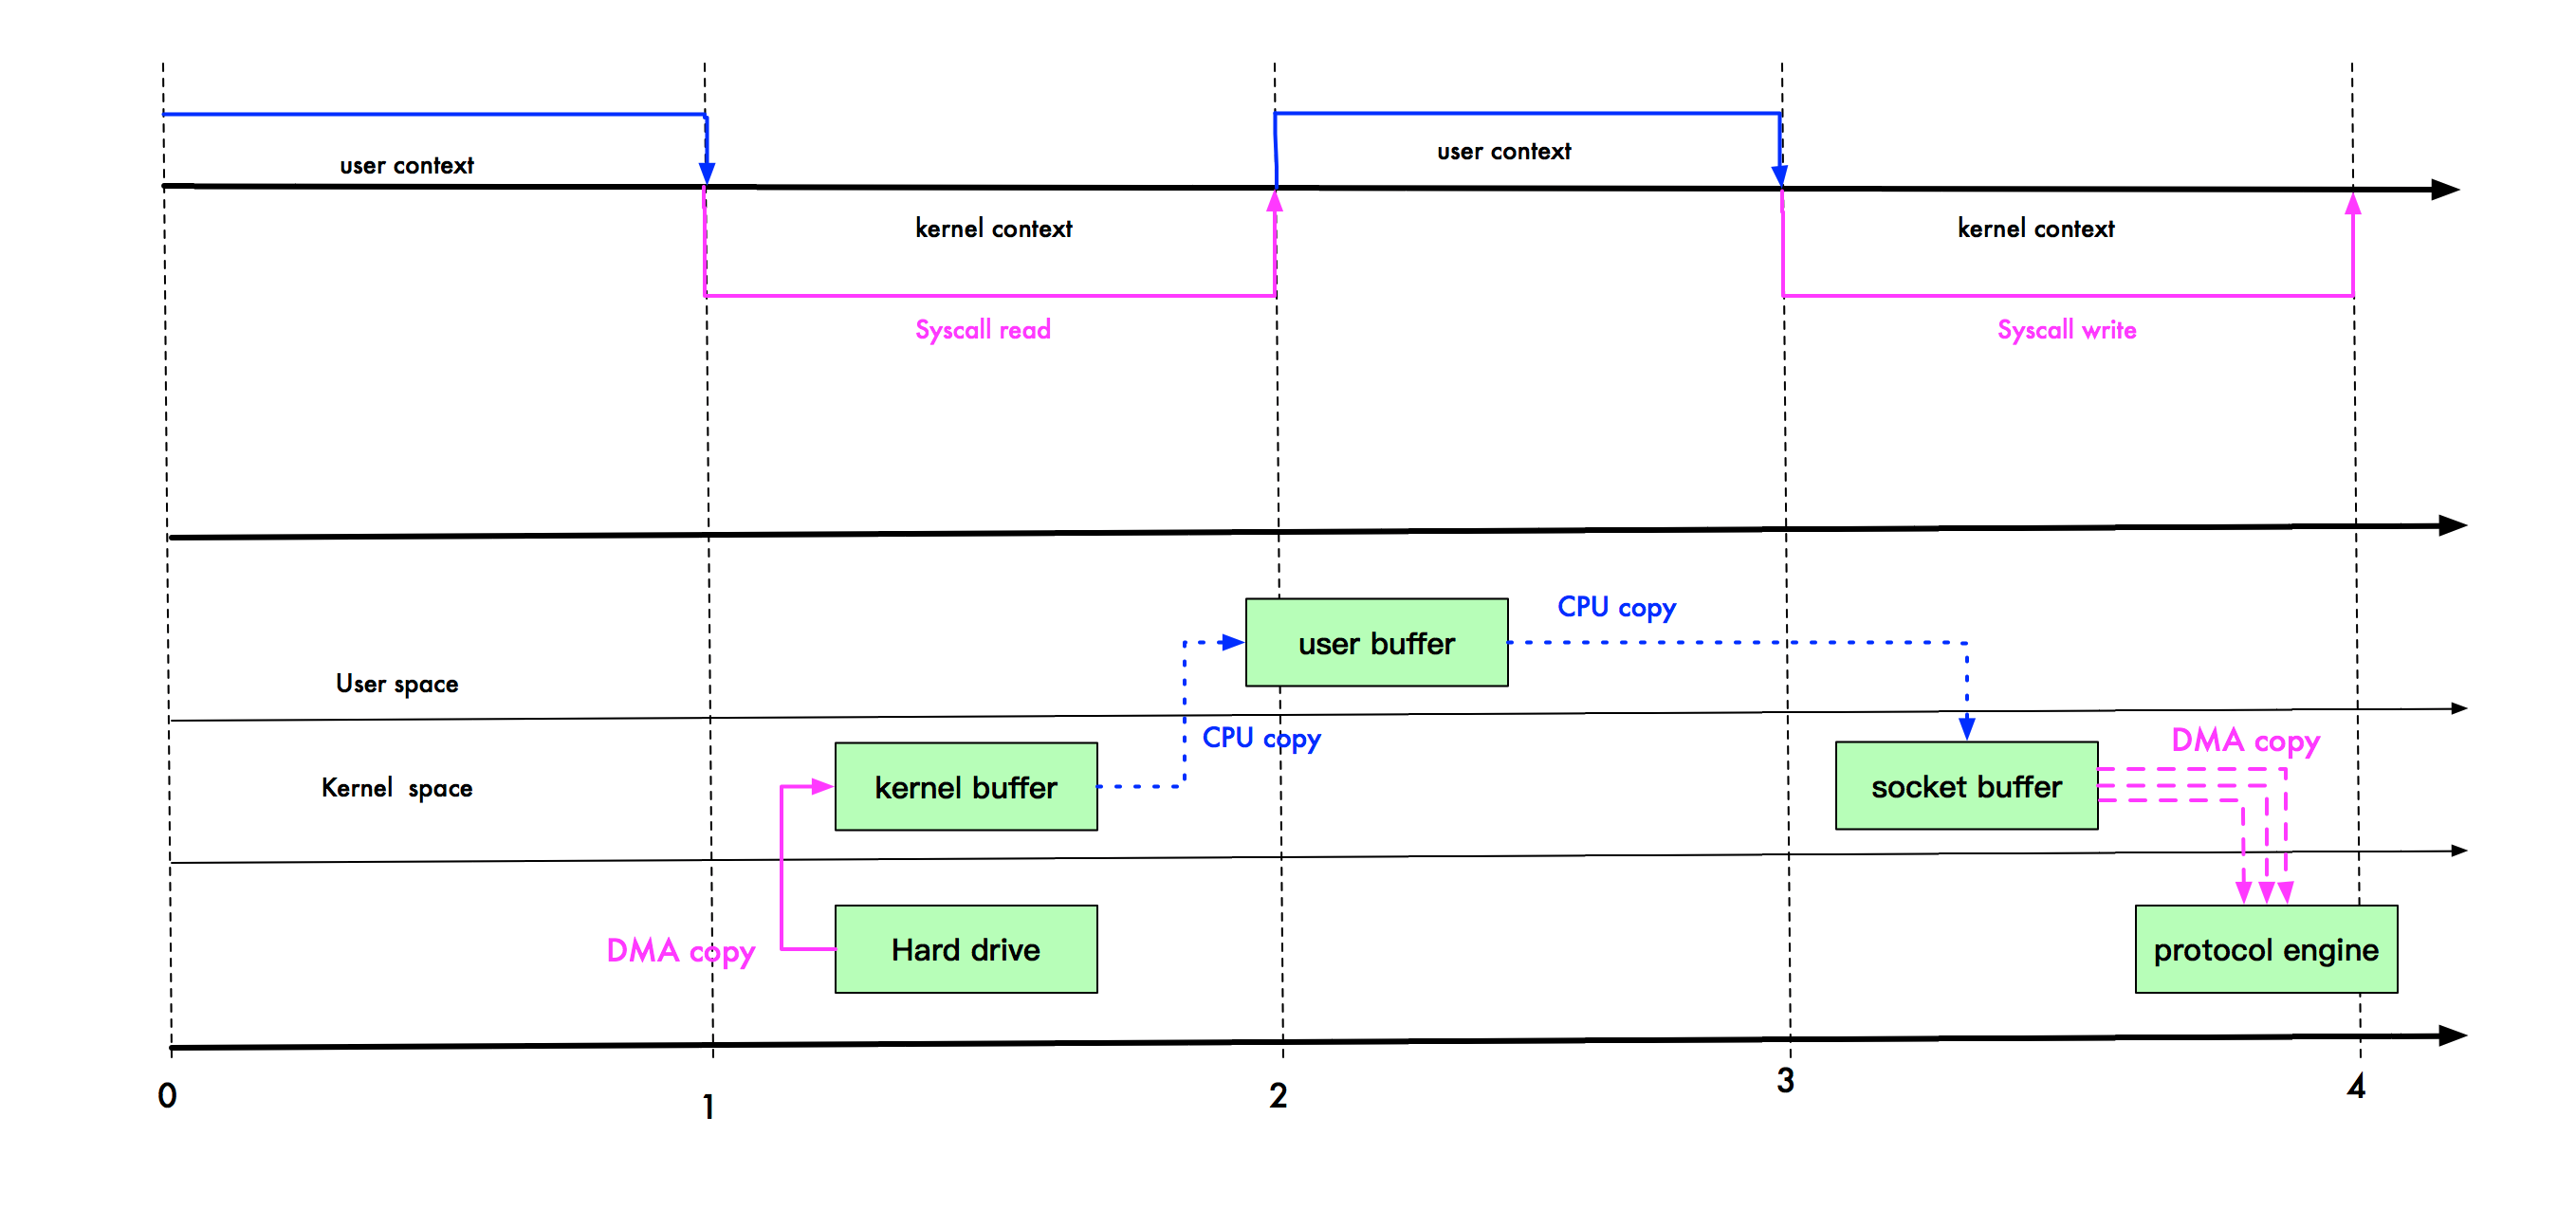
上半部分表示应用进程在用户态和内核态的上下文切换,下半部分表示数据复制操作
可以看到图中是一次读取本地文件并通过网络传输文件的过程,在硬盘、内核缓冲区与网卡、socket缓冲区之间都是通过DMA拷贝的
在linux系统中,传统的访问方式是通过 write() 和 read() 两个系统调用实现的,通过 read() 函数读取文件到到缓存区中,然后通过 write() 方法把缓存中的数据输出到网络端口
一共会发生4次上下文切换、2次cpu拷贝、2次DMA拷贝
2、mmap优化

使用mmap+write代替原来的read+write方式,可以减少1次cpu拷贝操作
mmap也叫内存映射,可以将内核中读缓冲区(read buffer)的地址与用户空间的缓冲区(user buffer)进行映射,从而实现内核缓冲区与应用程序内存的共享,省去了将数据从内核读缓冲区(read buffer)拷贝到用户缓冲区(user buffer)的过程,不过内核读缓冲区(read buffer)仍需将数据拷贝到内核写缓冲区(socket buffer)
mmap 主要的用处是提高I/O性能,特别是针对大文件,对于小文件,内存映射文件反而会导致碎片空间的浪费
整个拷贝过程会发生4次上下文切换、1次cpu拷贝、2次DMA拷贝
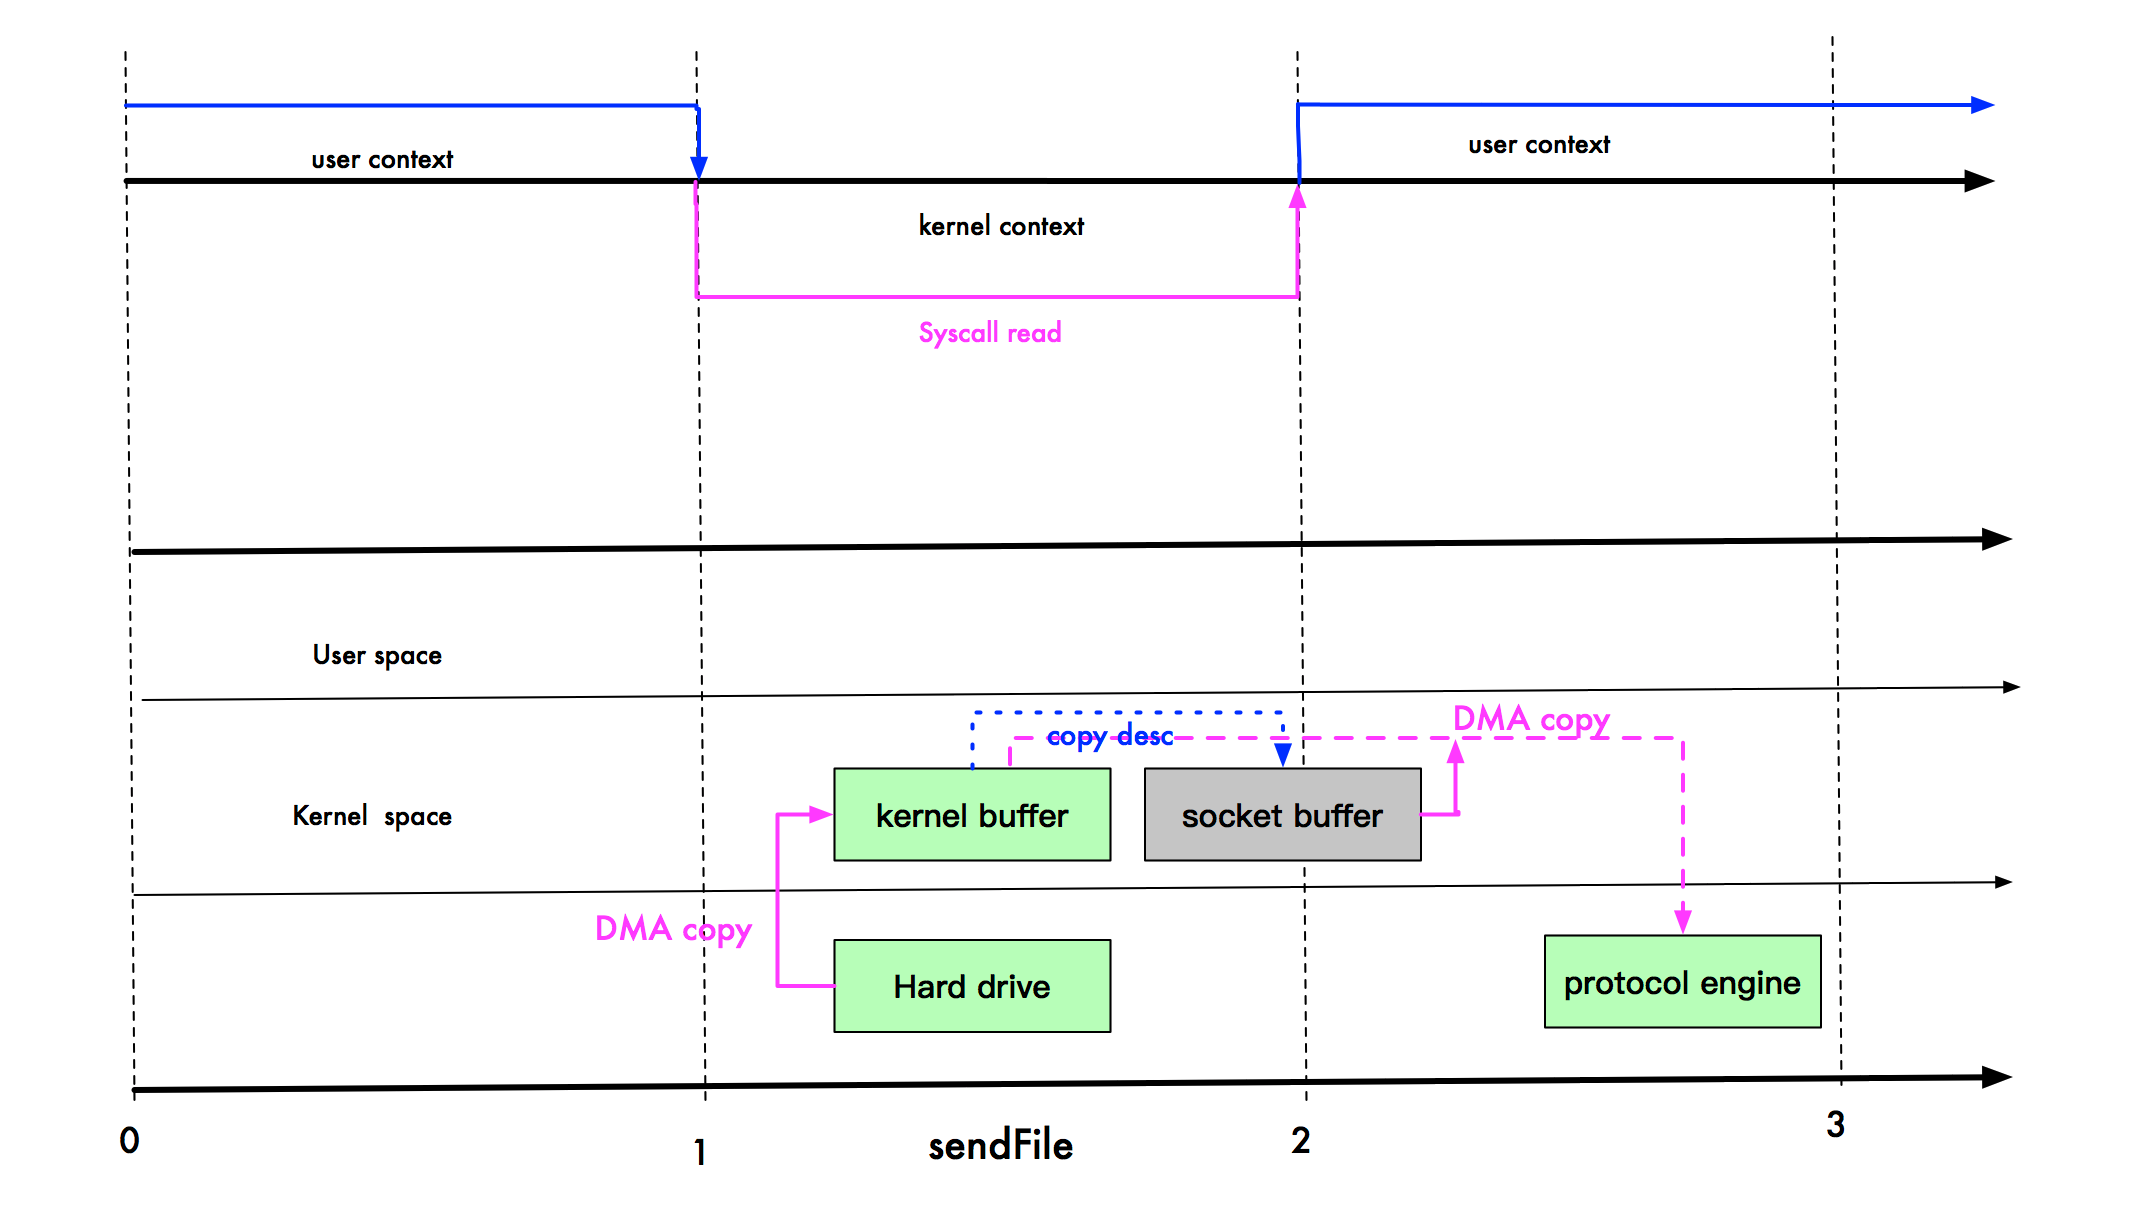
3、sendfile优化

linux 2.1版本引入了sendFile系统调用,目的是简化在通道之间进行的数据传输过程
数据不经过用户态,直接从内核缓冲区进入到Socket Buffer,由于缓冲区之间的拷贝和用户态完全无关,也减少了2次上下文切换
sendfile调用中I/O数据对用户空间是完全不可见的,是一次完全意义上的数据传输过程,所以它也存在问题是用户程序不能对数据进行修改
还有一个限制是sendfile是在两个文件描述符之间传输数据,但输入的描述符必须是真正的文件, 输出的文件描述符可以是 socket,所以nginx这类http服务器在作为静态服务器时使用sendfile很适合(直接把htm源文件读出来发送给客户可对应的socket),作为反向代理服务器时使用没有意义
拷贝过程会发生2次上下文切换、1次cpu拷贝、2次DMA拷贝
4、sendfile+gather优化
linux2.4版本的内核对sendfile系统调用进行修改,为 DMA 拷贝引入了gather操作,也叫DMA收集拷贝功能
它将内核空间(kernel space)的读缓冲区(read buffer)中对应的数据描述信息(内存地址、地址偏移量)记录到相应的网络缓冲区( socket buffer)中,由 DMA 根据内存地址、地址偏移量将数据批量地从读缓冲区(read buffer)拷贝到网卡设备中,这样又省去了内核空间里最后的1次cpu拷贝
在硬件的支持下,sendfile拷贝方式不再从内核缓冲区的数据拷贝到socket缓冲区,取而代之的仅仅是缓冲区文件描述符和数据长度的拷贝
这样 DMA引擎直接利用gather操作将页缓存中数据打包发送到网络中即可,本质就是和虚拟内存映射的思路类似
但是它也存在用户程序不能对数据进行修改的问题,还需要硬件的支持
基于sendfile+DMA gather copy系统调用的零拷贝方式,整个拷贝过程会发生2次上下文切换、0次cpu拷贝、2次DMA拷贝
5、splice优化
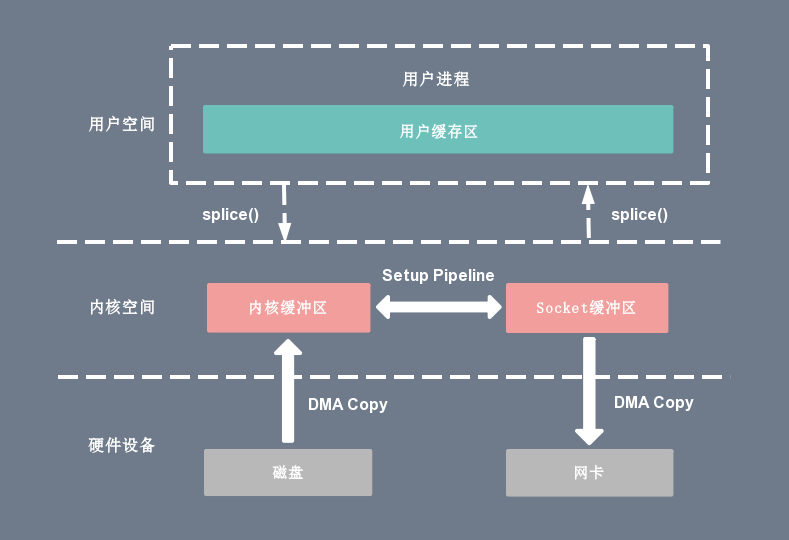
linux 在2.6.17版本引入splice系统调用,不仅不需要硬件支持,还实现了两个文件描述符之间的数据零拷贝
splice系统调用可以在内核空间的读缓冲区(read buffer)和网络缓冲区(socket buffer)之间建立管道(pipeline),从而避免了两者之间的 CPU 拷贝操作
splice可以在任意两个文件描述符之间传输数据(如socket到socket),但输入和输出文件描述符必须有一个是pipe。也就是说如果你需要从一个socket 传输数据到另外一个socket,是需要使用 pipe来做为中介的,等于要调用两个splice才能把数据从一个socket移到另外一个socket。所以没太找到splice的使用例子
6、零拷贝对比
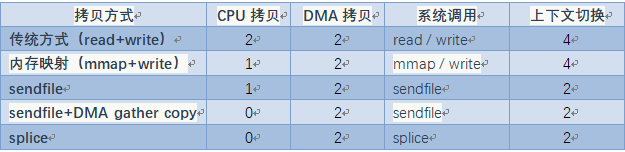
无论是传统 I/O 拷贝方式还是引入零拷贝的方式,2 次 DMA Copy 是都少不了的,因为两次 DMA 都是依赖硬件完成的
三、java nio零拷贝实现
1、说明
在 Java NIO 中的通道(Channel)就相当于操作系统的内核空间(kernel space)的缓冲区
缓冲区(Buffer)对应的相当于操作系统的用户空间(user space)中的用户缓冲区(user buffer)
nio的FileChannel利用 transferTo() 和 transferFrom() 方法进行数据传输,FileChannelImpl.java定义了3个常量,用于标示当前操作系统的内核是否支持 Sendfile 以及 Sendfile 的相关特性
//用于标记当前的系统内核是否支持 sendfile() 调用,默认为 true
private static volatile boolean transferSupported = true;
//用于标记当前的系统内核是否支持文件描述符(fd)基于管道(pipe)的 sendfile() 调用,默认为 true
private static volatile boolean pipeSupported = true;
//用于标记当前的系统内核是否支持文件描述符(fd)基于文件(file)的 sendfile() 调用,默认为 true
private static volatile boolean fileSupported = true;
以 transferTo() 的源码实现为例。FileChannelImpl 首先执行 transferToDirectly() 方法,以 Sendfile 的零拷贝方式尝试数据拷贝。
如果系统内核不支持 Sendfile,进一步执行 transferToTrustedChannel() 方法,以 mmap 的零拷贝方式进行内存映射,这种情况下目的通道必须是 FileChannelImpl 或者 SelChImpl 类型。
如果以上两步都失败了,则执行 transferToArbitraryChannel() 方法,基于传统的 I/O 方式完成读写,具体步骤是初始化一个临时的 DirectBuffer,将源通道 FileChannel 的数据读取到 DirectBuffer,再写入目的通道 WritableByteChannel 里面
2、传统IO代码
数据发送方
package sendfile;

import java.io.DataOutputStream;
import java.io.FileInputStream;
import java.io.IOException;
import java.net.Socket;
import java.net.UnknownHostException;

public class TraditionalClient {
    public static void main(String[] args) {
        int port = 2000;
	String server = "localhost";
	Socket socket = null;
	String lineToBeSent;

	DataOutputStream output = null;
	FileInputStream inputStream = null;
	int ERROR = 1;

	// 连接数据接收方
	try {
	    socket = new Socket(server, port);
	    System.out.println("Connected with server " + socket.getInetAddress() +
				   ":" + socket.getPort());
	}catch (UnknownHostException e) {
	    System.out.println(e);
	    System.exit(ERROR);
	}catch (IOException e) {
	    System.out.println(e);
	    System.exit(ERROR);
	}

        try {
	    String fname = "/tmp/test-file.txt";
  	    inputStream = new FileInputStream(fname);

	    output = new DataOutputStream(socket.getOutputStream());
	    long start = System.currentTimeMillis();
	    byte[] b = new byte[4096];
	    long read = 0, total = 0;

	    // 核心的硬盘读取和数据发送逻辑 -- 开始
	    while((read = inputStream.read(b))>=0) {
		total = total + read;
	    	output.write(b);
	    }
	    // 核心的硬盘读取和数据发送逻辑 -- 结束

	    System.out.println("bytes send--"+total+" and totaltime--"+(System.currentTimeMillis() - start));
	}catch (IOException e) {
	    System.out.println(e);
	}

	try {
            output.close();
	    socket.close();
	    inputStream.close();
	}catch (IOException e) {
	    System.out.println(e);
	}
    }
}
数据接收方
package sendfile;

import java.io.IOException;
import java.net.InetSocketAddress;
import java.net.ServerSocket;
import java.nio.ByteBuffer;
import java.nio.channels.ServerSocketChannel;
import java.nio.channels.SocketChannel;


public class TransferToServer  {
    ServerSocketChannel listener = null;
    public static void main(String[] args){
        TransferToServer dns = new TransferToServer();
        dns.mySetup();
        dns.readData();
    }

    private void mySetup(){
        InetSocketAddress listenAddr =  new InetSocketAddress(9026);

        try {
            listener = ServerSocketChannel.open();
            ServerSocket ss = listener.socket();
            ss.setReuseAddress(true);
            ss.bind(listenAddr);
            System.out.println("Listening on port : "+ listenAddr.toString());
        } catch (IOException e) {
            System.out.println("Failed to bind, is port : "+ listenAddr.toString()
                + " already in use ? Error Msg : "+e.getMessage());
            e.printStackTrace();
        }
    }

    private void readData()  {
        ByteBuffer dst = ByteBuffer.allocate(4096);
	try {
            while(true) {
	        SocketChannel conn = listener.accept();
		System.out.println("Accepted : "+conn);
		conn.configureBlocking(true);
		int nread = 0;
		while (nread != -1)  {
		    try {
		        nread = conn.read(dst);
		    } catch (IOException e) {
		        e.printStackTrace();
			nread = -1;
		    }
		    dst.rewind();
		}
	    }
	 } catch (IOException e) {
	     e.printStackTrace();
	 }
    }
}
3、nio零拷贝代码
数据发送方
package org.yout.test.rxjava.copy;

import java.io.FileInputStream;
import java.io.IOException;
import java.net.InetSocketAddress;
import java.net.SocketAddress;
import java.nio.channels.FileChannel;
import java.nio.channels.SocketChannel;

public class TransferToClient {

	public static void main(String[] args) throws IOException{
	    TransferToClient sfc = new TransferToClient();
	    sfc.testSendfile();
	}

	public void testSendfile() throws IOException {
	    String host = "localhost";
	    int port = 9026;
	    SocketAddress sad = new InetSocketAddress(host, port);
	    SocketChannel sc = SocketChannel.open();
	    sc.connect(sad);
	    sc.configureBlocking(true);

	    String fname = "/Users/youtna/test2";
	    long fsize = 183678375L;

	    FileChannel fc = new FileInputStream(fname).getChannel();
	    long start = System.currentTimeMillis();

	    // 核心的硬盘读取和数据发送逻辑
	    long curnset =  fc.transferTo(0, fsize, sc);

	    System.out.println("total bytes transferred--"+curnset+" and time taken in MS--"+(System.currentTimeMillis() - start));
	    fc.close();
	}
}
数据接收方
package org.yout.test.rxjava.copy;

import java.io.IOException;
import java.net.InetSocketAddress;
import java.net.ServerSocket;
import java.nio.ByteBuffer;
import java.nio.channels.ServerSocketChannel;
import java.nio.channels.SocketChannel;


public class TransferToServer  {
    ServerSocketChannel listener = null;
    protected void mySetup(){
        InetSocketAddress listenAddr =  new InetSocketAddress(9026);

        try {
            listener = ServerSocketChannel.open();
            ServerSocket ss = listener.socket();
            ss.setReuseAddress(true);
            ss.bind(listenAddr);
            System.out.println("Listening on port : "+ listenAddr.toString());
        } catch (IOException e) {
            System.out.println("Failed to bind, is port : "+ listenAddr.toString()
                + " already in use ? Error Msg : "+e.getMessage());
            e.printStackTrace();
        }
    }

    public static void main(String[] args){
        TransferToServer dns = new TransferToServer();
        dns.mySetup();
        dns.readData();
    }

    private void readData()  {
        ByteBuffer dst = ByteBuffer.allocate(4096);
	try {
	    while(true) {
	        SocketChannel conn = listener.accept();
	        System.out.println("Accepted : "+conn);
                conn.configureBlocking(true);
		int nread = 0;
		while (nread != -1)  {
		    try {
		        nread = conn.read(dst);
		    }catch (IOException e) {
		        e.printStackTrace();
	                nread = -1;
		    }
	            dst.rewind();
                }
            }
        } catch (IOException e) {
	    e.printStackTrace();
        }
    }
}
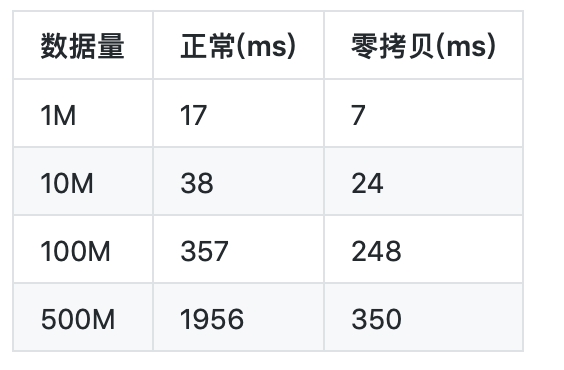
4、性能测试
四、RocketMQ 和 Kafka 对比
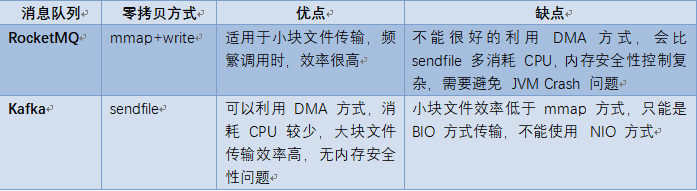
RocketMQ 选择了 mmap+write 这种零拷贝方式,适用于业务级消息这种小块文件的数据持久化和传输
而 Kafka 采用的是 Sendfile 这种零拷贝方式,适用于系统日志消息这种高吞吐量的大块文件的数据持久化和传输,kafka中存在大量的网络数据持久化到磁盘和磁盘文件通过网络发送的过程
但是值得注意的一点是,Kafka 的索引文件使用的是 mmap+write 方式,数据文件使用的是 Sendfile 方式
参考:
https://blog.csdn.net/wypblog/article/details/101731752
https://www.cnblogs.com/ericli-ericli/articles/12923420.html
https://zhuanlan.zhihu.com/p/54777490

 浙公网安备 33010602011771号