

根据官方文档使用Visual Studio Code创建代码组件的一些总结
1、安装组件Visual Studio Code
Download Visual Studio Code - Mac, Linux, Windows
2、安装Node.js
Download | Node.js (nodejs.org)
3、安装Microsoft Power Platform CLI可以在Visual Studio Code的扩展安装
Microsoft Power Platform CLI - Power Apps | Microsoft Docs
下载后会提示是否打开Visual Studio Code
在cmd中运行
创建名为“LinearInput”文件夹
mkdir LinearInput
在 Visual Studio Code 中打开文件夹。最快的启动方法是在项目目录中使用命令提示符,然后从命令提示符运行。此命令将在 Visual Studio Code 中打开组件项目。LinearInputcd LinearInputcode 注:这段没看懂
所以直接在Visual Studio Code中
文件-->打开文件夹
也是一样
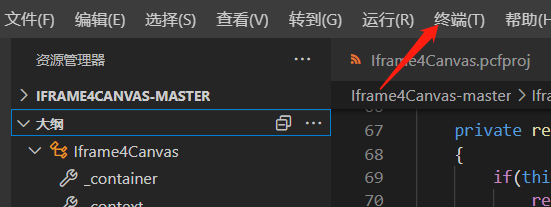
终端Running 'npm install' for you...需要先选择目录后再打开,确保是对一个目录的命令
在终端提示符下,通过使用该命令传递基本参数来创建新的组件项目。

pac pcf init --namespace SampleNamespace --name LinearInputControl --template field
会提示Running 'npm install' for you...
如果运行npm install报错或不成功可能因为没有安装Node.js
清单定义组件
namespace:代码组件的命名空间。

Constructor:代码组件的构造函数。

Version:组件的版本。每当更新组件时,都需要更新版本以查看运行时中的最新更改。

display-name-key:UI 上显示的代码组件的名称。

description-name-key:UI 上显示的代码组件的说明。

control-type:代码组件类型。仅支持标准类型的代码组件
<?xml version="1.0" encoding="utf-8" ?>
<manifest>
<control namespace="SampleNamespace" constructor="LinearInputControl" version="1.1.0" display-name-key="LinearInputControl_Display_Key" description-key="LinearInputControl_Desc_Key" control-type="standard">
属性节点
name:属性的名称。

display-name-key:UI 上显示的属性的显示名称。

description-name-key:UI 上显示的属性的说明。

of-type-group:当您希望具有两个以上的数据类型列时,将使用 of-type-group。将 of-group 元素作为同级元素添加到清单中的元素。指定组件值,可以包含整数值、货币值、浮点值或十进制值。propertyof-type-group

usage:具有两个属性:绑定和输入。绑定属性仅绑定到列的值。输入属性要么绑定到列,要么允许静态值。

required:定义属性是否为必需属性。
<property name="controlValue" display-name-key="controlValue_Display_Key" description-key="controlValue_Desc_Key" of-type-group="numbers" usage="bound" required="true" />
代码:指所有资源文件所在的路径。
<resources>
   <code path="index.ts" order="1" />
   <css path="css/LinearInputControl.css" order="1" />
</resources>
如果写官方的示例的话可以直接直接将此ControlManifest.Input.xml文件写
<?xml version="1.0" encoding="utf-8" ?>
<manifest>
  <control namespace="SampleNamespace" constructor="LinearInputControl" version="1.1.0" display-name-key="LinearInputControl_Display_Key" description-key="LinearInputControl_Desc_Key" control-type="standard">
       <type-group name="numbers">
           <type>Whole.None</type>
           <type>Currency</type>
           <type>FP</type>
           <type>Decimal</type>
       </type-group>
       <property name="controlValue" display-name-key="controlValue_Display_Key" description-key="controlValue_Desc_Key" of-type-group="numbers" usage="bound" required="true" />
    <resources>
      <code path="index.ts" order="1" />
      <css path="css/LinearInputControl.css" order="1" />
    </resources>
  </control>
</manifest>
修改index.ts文件会报一些错误但是可以忽略,可以继续执行,执行正常的话错误没有影响
import { IInputs, IOutputs } from "./generated/ManifestTypes";

export class LinearInputControl implements ComponentFramework.StandardControl<IInputs, IOutputs> {
    private _value: number;
    private _notifyOutputChanged: () => void;
    private labelElement: HTMLLabelElement;
    private inputElement: HTMLInputElement;
    private _container: HTMLDivElement;
    private _context: ComponentFramework.Context<IInputs>;
    private _refreshData: EventListenerOrEventListenerObject;

    public init(context: ComponentFramework.Context<IInputs>, notifyOutputChanged: () => void, state: ComponentFramework.Dictionary, container: HTMLDivElement): void {
        this._context = context;
        this._container = document.createElement("div");
        this._notifyOutputChanged = notifyOutputChanged;
        this._refreshData = this.refreshData.bind(this);

        // creating HTML elements for the input type range and binding it to the function which refreshes the control data
        this.inputElement = document.createElement("input");
        this.inputElement.setAttribute("type", "range");
        this.inputElement.addEventListener("input", this._refreshData);

        //setting the max and min values for the control.
        this.inputElement.setAttribute("min", "1");
        this.inputElement.setAttribute("max", "1000");
        this.inputElement.setAttribute("class", "linearslider");
        this.inputElement.setAttribute("id", "linearrangeinput");

        // creating a HTML label element that shows the value that is set on the linear range control
        this.labelElement = document.createElement("label");
        this.labelElement.setAttribute("class", "LinearRangeLabel");
        this.labelElement.setAttribute("id", "lrclabel");

        // retrieving the latest value from the control and setting it to the HTMl elements.
        this._value = context.parameters.controlValue.raw!;
        this.inputElement.setAttribute("value", context.parameters.controlValue.formatted ? context.parameters.controlValue.formatted : "0");
        this.labelElement.innerHTML = context.parameters.controlValue.formatted ? context.parameters.controlValue.formatted : "0";

        // appending the HTML elements to the control's HTML container element.
        this._container.appendChild(this.inputElement);
        this._container.appendChild(this.labelElement);
        container.appendChild(this._container);
    }

    public refreshData(evt: Event): void {
        this._value = (this.inputElement.value as any) as number;
        this.labelElement.innerHTML = this.inputElement.value;
        this._notifyOutputChanged();
    }

    public updateView(context: ComponentFramework.Context<IInputs>): void {
        // storing the latest context from the control.
        this._value = context.parameters.controlValue.raw!;
        this._context = context;
        this.inputElement.setAttribute("value", context.parameters.controlValue.formatted ? context.parameters.controlValue.formatted : "");
        this.labelElement.innerHTML = context.parameters.controlValue.formatted ? context.parameters.controlValue.formatted : "";
    }

    public getOutputs(): IOutputs {
        return {
            controlValue: this._value
        };
    }

    public destroy(): void {
        this.inputElement.removeEventListener("input", this._refreshData);
    }
}
官方的
样式:
需要在根目录下创建一个css文件夹然后添加LinearInputControl.css
.SampleNamespace\.LinearInputControl input[type=range].linearslider {
    margin: 1px 0;
    background:transparent;
    -webkit-appearance:none;
    width:100%;padding:0;
    height:24px;
    -webkit-tap-highlight-color:transparent
}
.SampleNamespace\.LinearInputControl input[type=range].linearslider:focus {
    outline: none;
}
.SampleNamespace\.LinearInputControl input[type=range].linearslider::-webkit-slider-runnable-track {
    background: #666;
    height:2px;
    cursor:pointer
}
.SampleNamespace\.LinearInputControl input[type=range].linearslider::-webkit-slider-thumb {
    background: #666;
    border:0 solid #f00;
    height:24px;
    width:10px;
    border-radius:48px;
    cursor:pointer;
    opacity:1;
    -webkit-appearance:none;
    margin-top:-12px
}
.SampleNamespace\.LinearInputControl input[type=range].linearslider::-moz-range-track {
    background: #666;
    height:2px;
    cursor:pointer
}
.SampleNamespace\.LinearInputControl input[type=range].linearslider::-moz-range-thumb {
    background: #666;
    border:0 solid #f00;
    height:24px;
    width:10px;
    border-radius:48px;
    cursor:pointer;
    opacity:1;
    -webkit-appearance:none;
    margin-top:-12px
}
.SampleNamespace\.LinearInputControl input[type=range].linearslider::-ms-track {
    background: #666;
    height:2px;
    cursor:pointer
}
.SampleNamespace\.LinearInputControl input[type=range].linearslider::-ms-thumb {
    background: #666;
    border:0 solid #f00;
    height:24px;
    width:10px;
    border-radius:48px;
    cursor:pointer;
    opacity:1;
    -webkit-appearance:none;
}
这个名字和xml里的相对应
<resources>
  <code path="index.ts" order="1"/>
  <css path="css/LinearInputControl.css" order="1"/>
</resources>
生成代码组件
npm run build
调试代码组件
npm start watch
打包:创建解决方案文件后生成压缩文件
在根目录下创建文件夹:Solutions
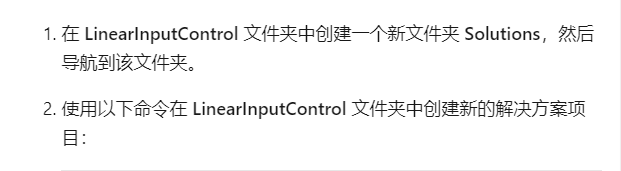
pac solution init --publisher-name Samples --publisher-prefix samples
此命令会在文件夹中创建解决方案的必要文件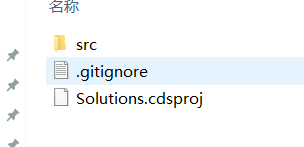
创建完成后执行此命令 path..\:为根目录需要指向cdsproj文件目录
pac solution add-reference --path ..\
注:指向Solutions文件夹的话会显示找不到cdsproj的datavarse文件
可以在根目录中执行创建解决方案的命令
然后指向根目录
生成zip文件命令有两个
msbuild /t:restore
dotnet build
如果有.NET 5 SDK的话可以使用第二个
第一个我没有使用成功过
最后执行
msbuild
压缩包在bin--Debug下
然后在powerapp中导入解决方案,指向生成的压缩包就可以了

 浙公网安备 33010602011771号