
Centos/Linux下调整分区大小(以home和根分区为例)
在安装新系统的时候,有时候没法预估或者说错误的划分了分区大小,常常会导致我们后面的操作出现极大地不方便,比如某个分区分的太小了,导致
软件安装的时候会报安装空间不够,这就很麻烦。在这里我就记录一下错误分区后对home和根分区存储空间大小调整的整个过程!
1.查看我们机器现有的分区状况

注意红色框中的信息,这是我们后面要更改的分区路径。
通过上面我们可以发现根分区和home分区产生极大的不合理性,home分区太大了,所以这里我们将对home分区缩小存储空间并把压缩的存储空间添加到root下面。
2.卸载我们的home分区,并压缩我们的home分区大小
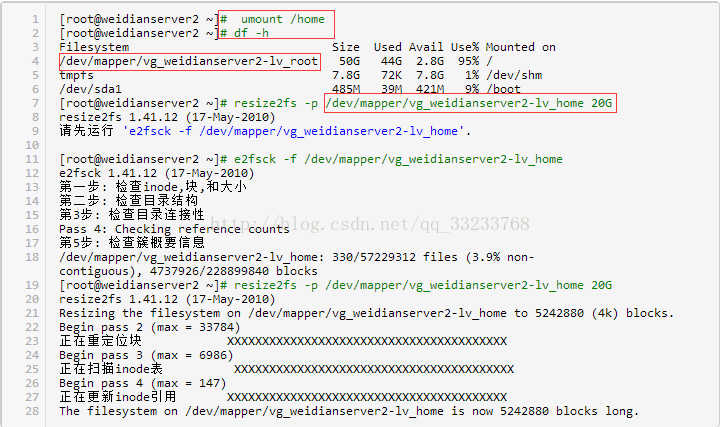
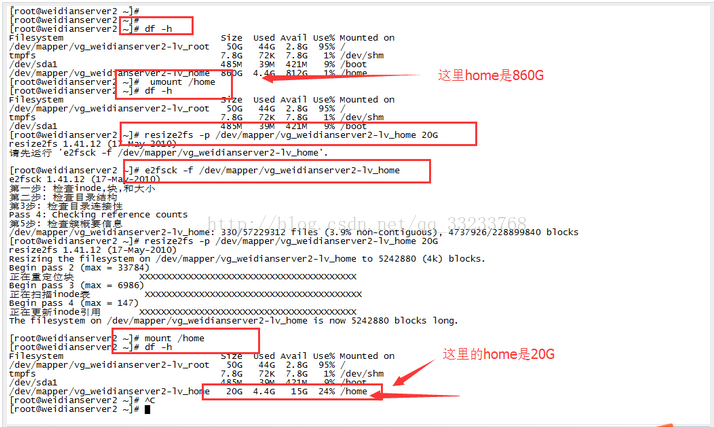
3.这个时候我们重新装载我们的home目录,通过运行结果可以看到我们将home分区压缩到20G

这样对home的压缩并重新装载就完成了,如下图:
4.我们上面的三步将home的块处理好了,但是我们空闲的硬盘并没有添加到root下,所以下面的步骤就是将压缩出来的磁盘空间添加到root下:

这个重新加载和挂载的过程中需要花费一点时间,不过我们也可以在这段时间中不断的查看盘符的大小,这个时候我们会发现root盘符的大小会一点点的增加上来,如下图:

从上图最后的结果我们可以看出我们将home中的空闲盘符压缩出来812G添加到了root下面,这样我们的root空间就瞬间增加了。这样我们的目的就达到了。
空间无损调整实例
情况:
- home:500G
- root:50G
- root分区不够用
思路:把home分区的空间划一部分到root分区
|
1
2
3
4
5
6
7
8
|
# 设置home分区大小为200G,释放300G空间$ lvreduce -L 200G /dev/centos/home# 将空闲空间扩展到root分区$ lvextend -l +100%FREE /dev/centos/root# 使用XFS文件系统自带的命令集增加分区空间$ xfs_growfs /dev/mapper/centos-root |
实例
situation
挂载在根目录的分区 /dev/mapper/centos-root 爆满,占用100%
|
1
2
3
4
5
6
7
8
9
10
|
$ df -hFilesystem Size Used Avail Use% Mounted on/dev/mapper/centos-root 50G 50G 19M 100% /devtmpfs 32G 0 32G 0% /devtmpfs 32G 0 32G 0% /dev/shmtmpfs 32G 2.5G 29G 8% /runtmpfs 32G 0 32G 0% /sys/fs/cgroup/dev/mapper/centos-home 476G 33M 476G 1% /home/dev/sda1 497M 238M 259M 48% /boottmpfs 6.3G 0 6.3G 0% /run/user/0 |
analyze
挂载在根目录的分区空间太小,只有50G,而服务器 home 目录为非常用目录,挂在了近500G的空间。
思路:从 centos-home 分区划出300G空间到 centos-root 分区。
operation
1.查看各分区信息
|
1
2
3
4
5
6
7
8
9
10
11
12
13
14
15
16
17
18
19
20
21
22
23
24
25
26
27
28
29
30
31
32
33
34
|
$ lvdisplay--- Logical volume ---LV Path /dev/centos/homeLV Name homeVG Name centosLV UUID 1fAt1E-bQsa-1HXR-MCE2-5VZ1-xzBz-iI1SLvLV Write Access read/writeLV Creation host, time localhost, 2016-10-26 17:23:47 +0800LV Status available# open 0LV Size 475.70 GiBCurrent LE 121778Segments 1Allocation inheritRead ahead sectors auto- currently set to 256Block device 253:2--- Logical volume ---LV Path /dev/centos/rootLV Name rootVG Name centosLV UUID lD64zY-yc3Z-SZaB-dAjK-03YM-2gM8-pfj4ooLV Write Access read/writeLV Creation host, time localhost, 2016-10-26 17:23:48 +0800LV Status available# open 1LV Size 50.00 GiBCurrent LE 12800Segments 1Allocation inheritRead ahead sectors auto- currently set to 256Block device 253:0 |
2.减少/home分区空间
|
1
2
3
4
5
6
7
8
|
# 释放 /dev/centos/home 分区 300G 的空间# 命令设置 /dev/centos/home 分区 200G空间$ lvreduce -L 200G /dev/centos/homeWARNING: Reducing active logical volume to 200.00 GiB. THIS MAY DESTROY YOUR DATA (filesystem etc.)Do you really want to reduce centos/home? [y/n]: y Size of logical volume centos/home changed from 475.70 GiB (121778 extents) to 200.00 GiB (51200 extents). Logical volume centos/home successfully resized. |
3.增加/root分区空间
|
1
2
3
|
$ lvextend -l +100%FREE /dev/centos/rootSize of logical volume centos/root changed from 50.06 GiB (12816 extents) to 325.76 GiB (83394 extents).Logical volume centos/root successfully resized. |
4.扩展XFS文件空间大小
|
1
2
3
4
5
6
7
8
9
10
11
|
$ xfs_growfs /dev/mapper/centos-rootmeta-data=/dev/mapper/centos-root isize=256 agcount=4, agsize=3276800 blks = sectsz=512 attr=2, projid32bit=1 = crc=0 finobt=0 spinodes=0data = bsize=4096 blocks=13107200, imaxpct=25 = sunit=0 swidth=0 blksnaming =version 2 bsize=4096 ascii-ci=0 ftype=0log =internal bsize=4096 blocks=6400, version=2 = sectsz=512 sunit=0 blks, lazy-count=1realtime =none extsz=4096 blocks=0, rtextents=0data blocks changed from 13107200 to 85395456 |

 浙公网安备 33010602011771号