rehl7安装zabbix4.0
一、关闭selinux和firewall
1、修改/etc/selinux/config文件中的SELINUX="" 为 disabled ,然后重启
 1 [root@csm yum.repos.d]# cat /etc/selinux/config
 2
 3 # This file controls the state of SELinux on the system.
 4 # SELINUX= can take one of these three values:
 5 #     enforcing - SELinux security policy is enforced.
 6 #     permissive - SELinux prints warnings instead of enforcing.
 7 #     disabled - No SELinux policy is loaded.
 8 SELINUX=disabled
 9 # SELINUXTYPE= can take one of three values:
10 #     targeted - Targeted processes are protected,
11 #     minimum - Modification of targeted policy. Only selected processes are protected.
12 #     mls - Multi Level Security protection.
13 SELINUXTYPE=targeted
2、查看selinux状态


[root@csm yum.repos.d]# getenforce
Disabled
3、关闭firewalled
[root@csm yum.repos.d]# systemctl stop firewalld.service
[root@csm yum.repos.d]# systemctl status firewalld.service
● firewalld.service - firewalld - dynamic firewall daemon
   Loaded: loaded (/usr/lib/systemd/system/firewalld.service; disabled; vendor preset: enabled)
   Active: inactive (dead)
     Docs: man:firewalld(1)
二、安置配置zabbix仓库
1、进入www.zabbix.com,下载相应的zabbix版本
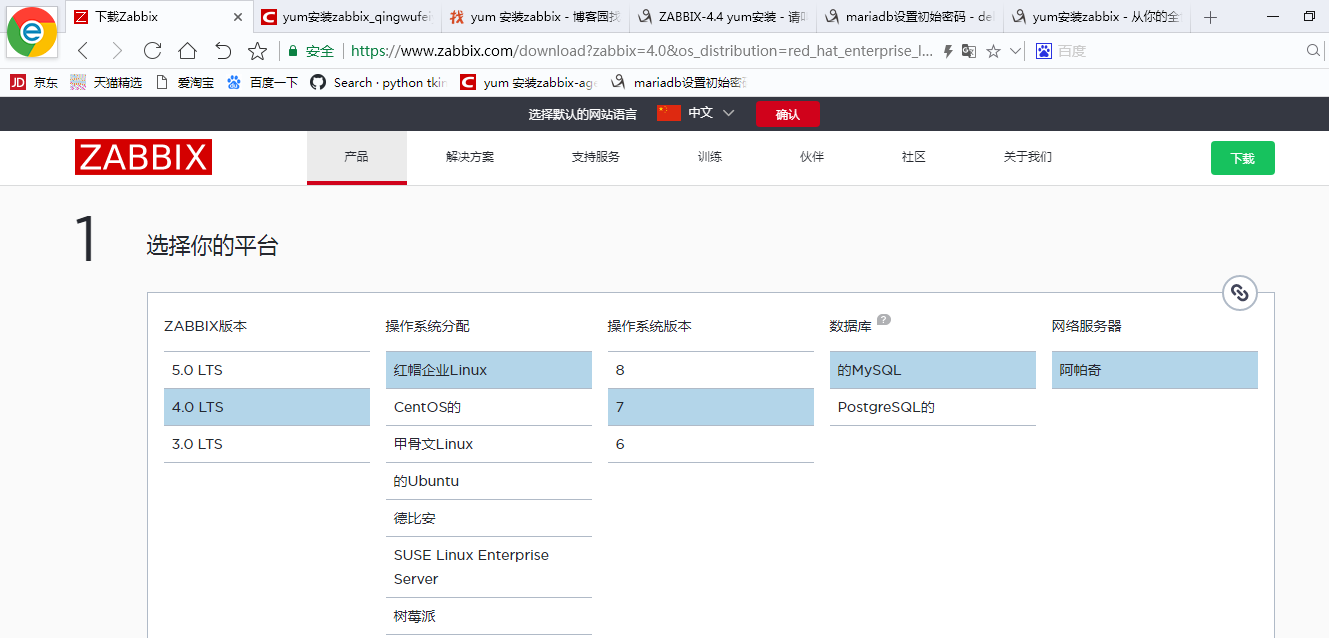
3、选好版本后复制下载链接,进入rehat 7 系统下载

rpm -Uvh https://repo.zabbix.com/zabbix/4.0/rhel/7/x86_64/zabbix-release-4.0-2.el7.noarch.rpm
三、安装zabbix服务器和代理
1、进入/etc/yum.repos.d/zabbix.repo,可以看到,原先的源是国外的源,建议全部换成国内的阿里源,不然下载其他相关服务器可能出现异常
[zabbix]
name=Zabbix Official Repository - $basearch
baseurl=http://repo.zabbix.com/zabbix/4.0/rhel/7/$basearch/
enabled=1
gpgcheck=1
gpgkey=file:///etc/pki/rpm-gpg/RPM-GPG-KEY-ZABBIX-A14FE591

[zabbix-debuginfo]
name=Zabbix Official Repository debuginfo - $basearch
baseurl=http://repo.zabbix.com/zabbix/4.0/rhel/7/$basearch/debuginfo/
enabled=0
gpgkey=file:///etc/pki/rpm-gpg/RPM-GPG-KEY-ZABBIX-A14FE591
gpgcheck=1

[zabbix-non-supported]
name=Zabbix Official Repository non-supported - $basearch
baseurl=http://repo.zabbix.com/non-supported/rhel/7/$basearch/
enabled=1
gpgkey=file:///etc/pki/rpm-gpg/RPM-GPG-KEY-ZABBIX
gpgcheck=1
国内阿里源
[zabbix]
name=Zabbix Official Repository - \$basearch
baseurl=https://mirrors.aliyun.com/zabbix/zabbix/4.0/rhel/7/\$basearch/
enabled=1
gpgcheck=1
gpgkey=file:///etc/pki/rpm-gpg/RPM-GPG-KEY-ZABBIX-A14FE591
[zabbix-non-supported]
name=Zabbix Official Repository non-supported - \$basearch
baseurl=https://mirrors.aliyun.com/zabbix/non-supported/rhel/7/\$basearch/
enabled=1
gpgkey=file:///etc/pki/rpm-gpg/RPM-GPG-KEY-ZABBIX
2、安装zabbix服务器、前端、和代理
yum install zabbix-server-mysql zabbix-web-mysql zabbix-agent
四、创建初始数据库
1、安装mariadb数据库代替mysql数据库
yum -y install mariadb-server
2、启动数据库
[root@localhost ~]# systemctl start mariadb.service

#将数据库加入开机启动项
[root@localhost ~]# systemctl enable mariadb.service
3、进入数据库并修改初始密码
# 方法一
[root@localhost ~]# mysql -uroot
MariaDB [(none)]> use mysql;
MariaDB [mysql]> UPDATE mysql.user SET password = PASSWORD('newpassward') WHERE user = 'root';
MariaDB [mysql]> FLUSH PRIVILEGES;

# 方法二
[root@localhost ~]# mysql -uroot
MariaDB [(none)]> use mysql;
MariaDB [mysql]> SET password=PASSWORD('newpassward');
MariaDB [mysql]> FLUSH PRIVILEGES;

# 方法三
[root@localhost ~]# mysqladmin -u root password 'newpassword'
#如果root已经设置过密码,采用如下方法
[root@localhost ~]# mysqladmin -u root -p 'oldpassword' password 'newpassword'
4、创建zabbix数据库并创建用户及授权
# 创建zabbix数据库 MariaDB [mysql]> create database zabbix character set utf8 collate utf8_bin; Query OK, 1 row affected (0.00 sec) #创建数据库管理用户zabbix,密码zabbix MariaDB [mysql]> create user 'zabbix'@'localhost' identified by 'zabbix'; MariaDB [mysql]>grant all privileges on zabbix.* to 'zabbix'@'localhost' with grant option;
# 在zabbix数据库中导入相应的表信息
[root@localhost ~]# zcat /usr/share/doc/zabbix-server-mysql-4.0.23/create.sql.gz|mysql -uzabbix -pzabbix zabbix
5、编辑zabbix-server配置文件,配置数据库账户密码
# 备份
[root@localhost zabbix]# cp zabbix_server.conf zabbix_server.conf.bak

#配置zabbix数据库密码
[root@localhost zabbix]# vim zabbix_server.conf
DBuser=zabbix
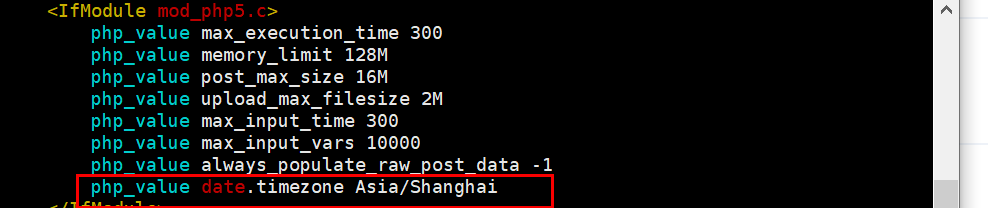
6、编辑httpd的子配置文件zabbix.conf,将时区进行更改(20行)
[root@localhost zabbix]# vim /etc/httpd/conf.d/zabbix.conf
7、启动服务并加入开机启动项
[root@localhost zabbix]# systemctl start zabbix-server.service
[root@localhost zabbix]# systemctl enable zabbix-server.service
[root@localhost zabbix]# systemctl start httpd.service
[root@localhost zabbix]# systemctl enable httpd.service
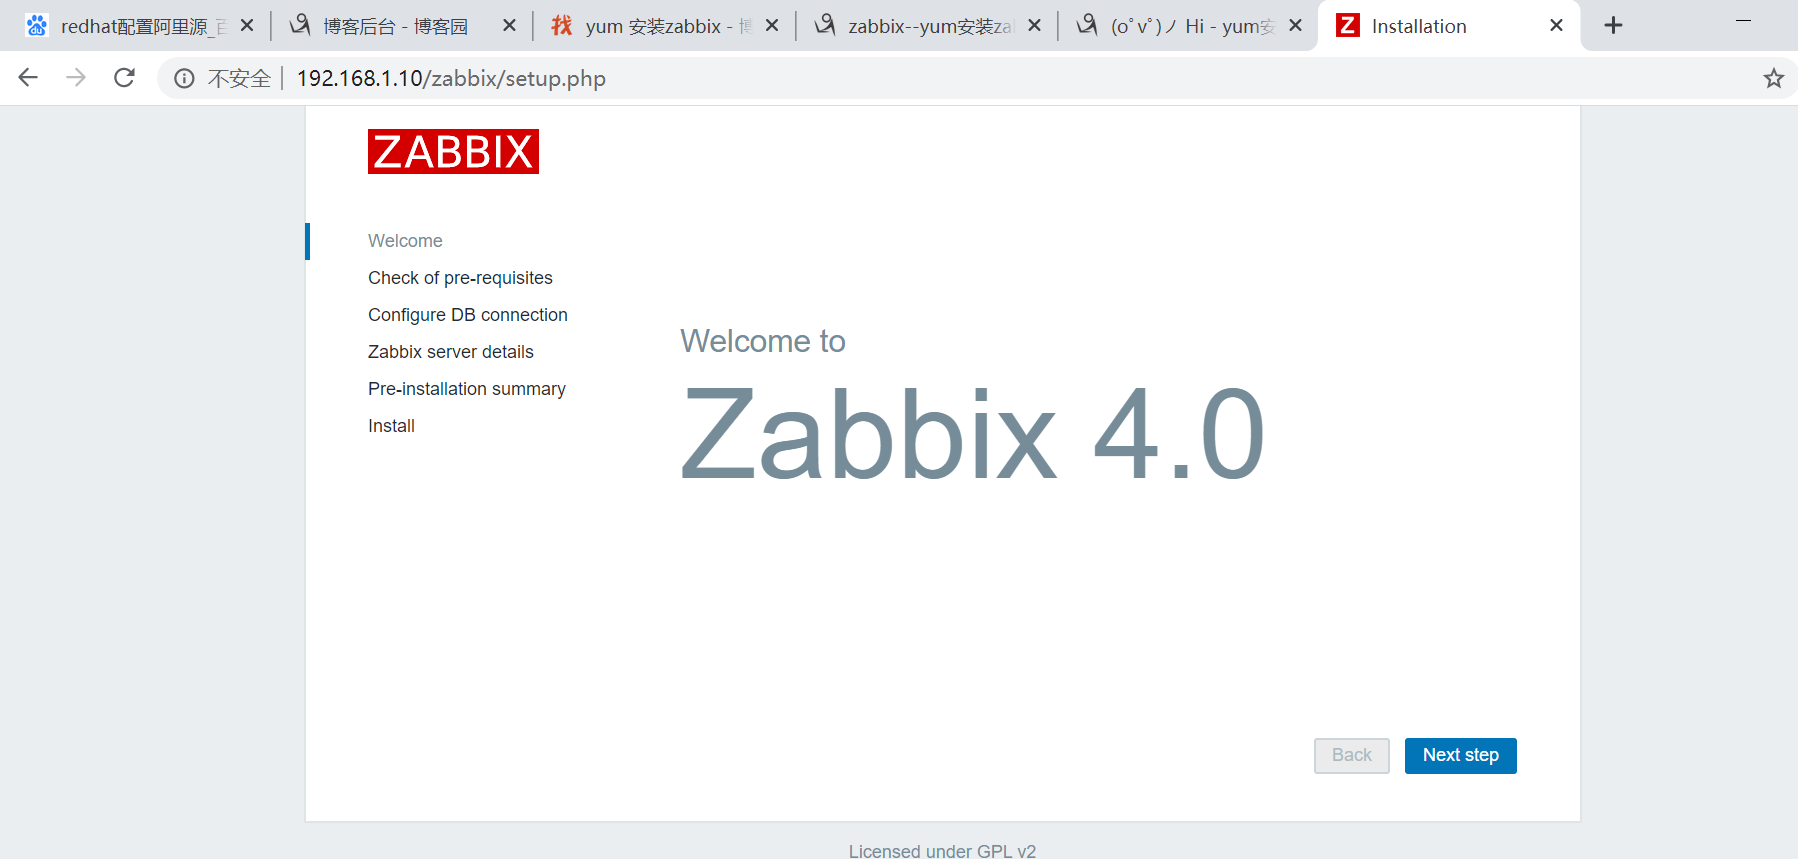
8、启动之后在浏览器上输入http://192.168.1.10/zabbix,进入web界面,Admin/zabbix

 浙公网安备 33010602011771号