Linux 典型应用之WebServer 安装和配置
Apache的基本操作
安装
yum install httpd
启动
service httpd start
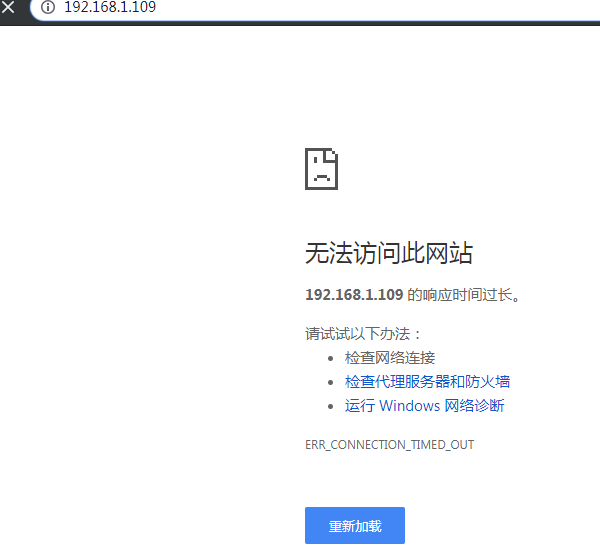
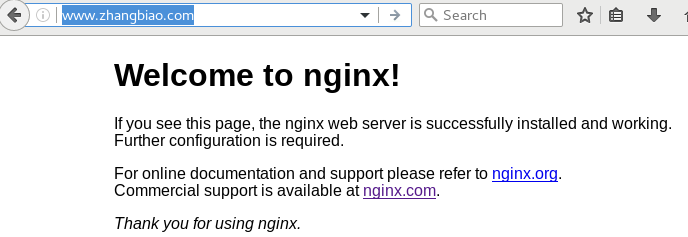
在浏览器中输入以下Ip 发现无法访问
http://192.168.1.109/
输入以下命令进行网络统计
netstat -anpl | grep 'http'

发现此时80端口和httpd都已经启动了,这时候只需要把防火墙关闭即可
service firewalld stop
再次刷新页面,启动成功
停止
service httpd stop
Apache的虚拟主机配置及伪静态操作
虚拟主机一般在配置多个域名的时候才会使用,比如一个服务器上部署多个网站,保证每个域名访问的内容和源代码是不一样的。
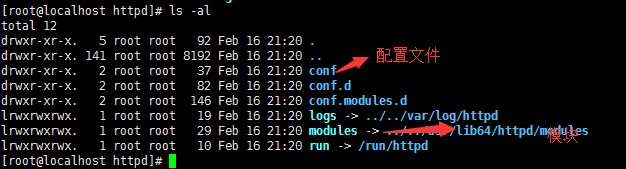
进入httpd目录
cd /etc/httpd/

ls
打开conf/httpd.conf
cd conf

vi httpd.conf
- DocumentRoot "/var/www/html" 表示文件根目录的路径(代码目录都是放在这里的),配置虚拟主机的时候我们可以自己指定代码目录
- port 80 指的是监听的端口是80
配置虚拟主机
<VirtualHost *:80>
        ServerName www.zhangbiao.com
        DocumentRoot /data/www
</VirtualHost>

创建/data/www 文件 ,因为把跟文件的目录指定到了/data/www
sudo mkdir -p /data/www
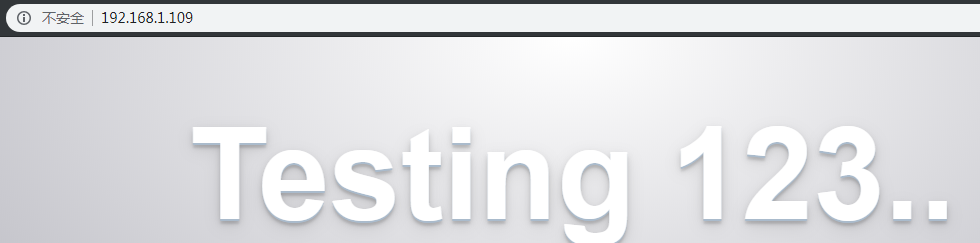
在data/www 目录下创建index.html 文件
cd /data/www

vi index.html
输入以下内容
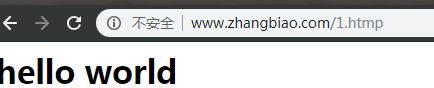
<h1> hello world </h1>
重启httpd服务
service httpd restart
配置 hosts linux hosts 路径 /etc/hosts windos hosts路径 C:\Windows\System32\drivers\etc
192.168.1.109 www.zhangbiao.com
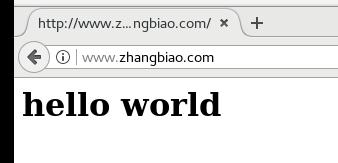
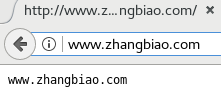
在浏览器输入
www.zhangbiao.com

发现页面显示的并不是我们输入的 hello world
查看log 日志
cd /etc/httpd/logs/
ls -al
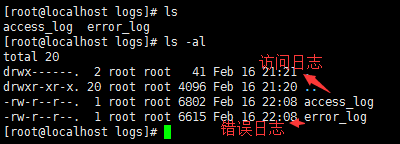
查看访问日志
tail -f access_log
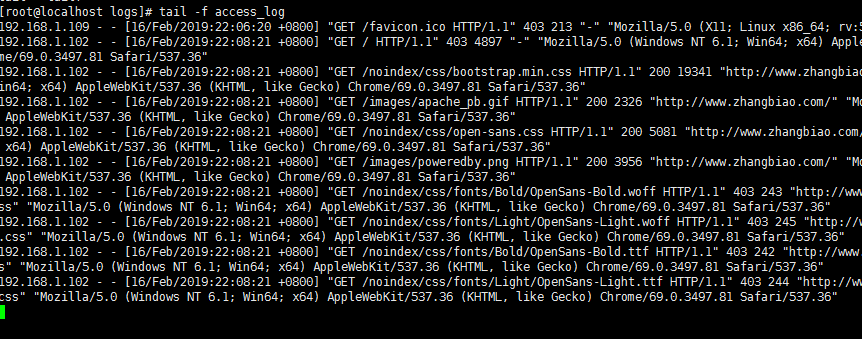
查看错误日志
tail -f error_log
在浏览器访问
www.zhangbiao.com
错误日志中出现以下提示信息

vi /etc/httpd/conf/httpd.conf
在上面配置虚拟主机的代码段添加以下信息
<VirtualHost *:80>
        ServerName www.zhangbiao.com
        DocumentRoot /data/www
        <Directory "/data/www">
                Options Indexes FollowSymLinks
                AllowOverride None
                Require all granted
        </Directory>
</VirtualHost>
再次刷新页面

需要注意的是如果不能访问请进行以下检查
DocumentRoot 和 Directory 中的字符串必须相等
data , www 必须是可执行的权限 755
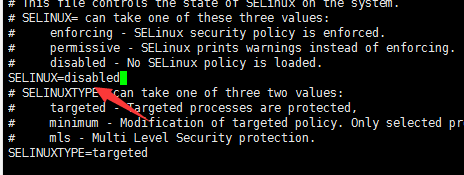
selinux的问题 ,你可以把你的目录进行一下selinux权限设置
sudo setenforce 0
这条命令只是临时的,如果想要永久有效可以修改其配置文件
vi /etc/selinux/config
把 SELINUX=disabled
配置多个虚拟主机
只需要照着上面配置一个虚拟主机进行以下配置即可,在/etc/httpd/conf/httpd.cof
<VirtualHost *:80>
        ServerName www.zhangbiao.com
        DocumentRoot /data/www
        <Directory "/data/www">
                Options Indexes FollowSymLinks
                AllowOverride None
                Require all granted
        </Directory>
</VirtualHost>

<VirtualHost *:80>
        ServerName www.zhangbiao1.com
        DocumentRoot /data/www1
        <Directory "/data/www1">
                Options Indexes FollowSymLinks
                AllowOverride None
                Require all granted
        </Directory>
</VirtualHost>
在创建 /data/www1目录再起www1下创建index.html即可
Apach伪静态
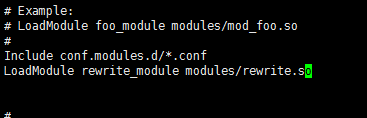
伪静态是基于 rewrite 实现的
在 /etc/httpd/conf/httpd.cof 添加以下配置
LoadModule rewrite_module modules/rewrite.so
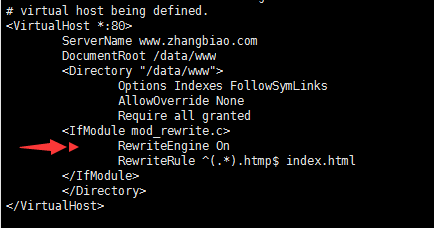
<VirtualHost *:80>
        ServerName www.zhangbiao.com
        DocumentRoot /data/www
        <Directory "/data/www">
                Options Indexes FollowSymLinks
                AllowOverride None
                Require all granted
        <IfModule mod_rewrite.c>
                RewriteEngine On
                RewriteRule ^(.*).htmp$ index.html
        </IfModule>
        </Directory>
</VirtualHost>
重启服务
service httpd restart
访问已 htmp结尾的都会转到index.html文件
http://www.zhangbiao.com/1.htmp
Nginx的基本操作
安装
yum install nginx
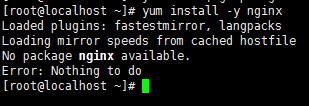
需要安装 Nginx 源
sudo rpm -ivh http://nginx.org/packages/centos/7/noarch/RPMS/nginx-release-centos-7-0.el7.ngx.noarch.rpm
安装该rpm后,我们就能在/etc/yum.repos.d/ 目录中看到一个名为nginx.repo 的文件
再次安装
yum install nginx
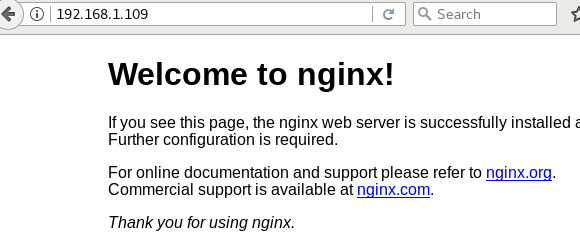
启动
service nginx start
访问
http://192.168.1.109/
停止
service nginx stop
重载,一般都有reload无负载的迁移,因为要用restart重新启动的时候,需要关闭程序在程序启动,需要一定的时间
service nginx reload
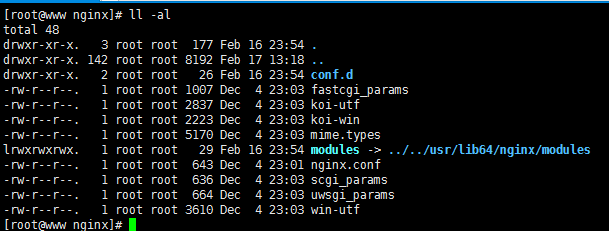
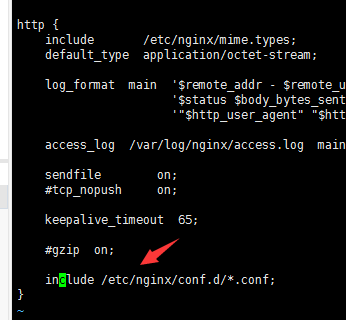
nginx 的配置文件存放在 /etc/nginx 下面
nginx 配置虚拟主机
打开 配置文件 nginx,conf
vi /etc/nginx/nginx.conf
可以看到会默认加载/etc/nginx/conf.d/ 下面已conf结尾的文件
进入 /etc/nginx/conf.d/ 下面
cd  /etc/nginx/conf.d/

ls
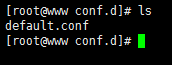
查看 default.conf 文件
cat default.conf
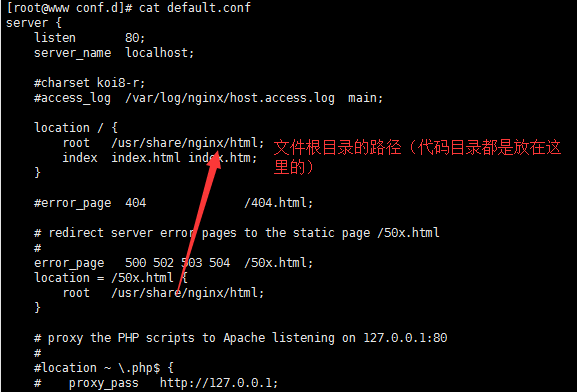
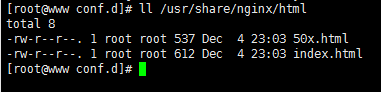
查看 /usr/share/nginx/html 下的文件
ll /usr/share/nginx/html
把default.conf 复制一份到zhang.conf
cp default.conf zhang.conf
内容如下
server {
    listen       80;
    server_name  www.zhangbiao.com;
    root   /data/www;
    index  index.html index.htm;

}
访问
http://www.zhangbiao.com/
nginx配置多个端口和域名访问
在zhangbiao.conf 中配置多监听一个端口和servername如下
server {
    listen       80;
    listen       9999;
    server_name  www.zhangbiao.com www.zhangtao.com;
    root   /data/www;
    index  index.html index.htm;

}
配置hosts

重启nginx
service nginx restart
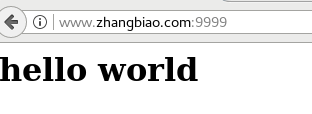
访问新增的端口
http://www.zhangbiao.com:9999
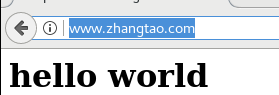
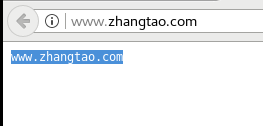
访问新填的域名
http://www.zhangtao.com/
Nginx 伪静态的实现
修改zhang.conf 增加location配置
server {
    listen       80;
    listen       9999;
    server_name  www.zhangbiao.com www.zhangtao.com;
    root   /data/www;
    index  index.html index.htm;
    location / {
	rewrite ^(.*)\.htmp$ /index.html;
    }

}
重启Nginx
service nginx restart
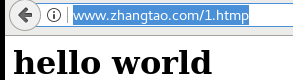
访问
http://www.zhangtao.com/1.htmp
Nginx 日志格式化
打开 /etc/nginx/nginx.conf
vi /etc/nginx/nginx.conf
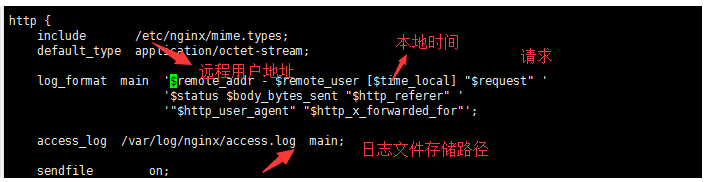
添加自定义的log_format 和修改access_log 关键字
    log_format  zhang  '$remote_addr - "$http_user_agent"';

    access_log  /var/log/nginx/access.log  zhang;

重写加载nginx
service nginx reload
打开日志文件存储的路径
tail -f /var/log/nginx/access.log

访问
http://www.zhangbiao.com/
可以看到日志信息如下

我们可以把不同的虚拟主机存储各自的 log 文件 ,在 /etc/nginx/conf.d/zhang.conf ,添加以下日志配置
access_log /var/log/nginx/access_zhang.log zhang;

重启 Nginx 服务
service nginx reload
访问
http://www.zhangbiao.com/
这时在 /var/log/nginx 下多了 access_zhang.log 文件

更多的nginx log_formt 配置可以百度检索
nginx log_formt
Nginx 反向代理 和 负载均衡
反向代理
访问 www.zhangbiao.com 进行反向代理的我的博客页面
进入 /etc/nginx/conf.d 目录
编辑 zhang.conf
upstream imooc_hosts{
    server 118.89.106.129:80;
}


server {
    listen       80;
    listen       9999;
    server_name  www.zhangbiao.com www.zhangtao.com;
    root   /data/www;
    index  index.html index.htm;
    access_log  /var/log/nginx/access_zhang.log zhang;

    location / {
        #rewrite ^(.*)\.htmp$ /index.html;
        proxy_set_header Host www.54php.cn;
        proxy_pass http://118.89.106.129;
    }

}
重启
service nginx reload
访问
http://www.zhangbiao.com/

负载均衡
主要作用是减少网站的压力,进行分流
访问同一个url 第一次是server1 返回的结果,第二次是server2返回的结果
进入 /etc/nginx/conf.d 目录
编辑 zhang.conf 加入以下配置
upstream zhang_hosts{
    server 118.89.106.129:80;
    server 192.168.1.109;
}


server {
    listen       80;
    listen       9999;
    server_name  www.zhangbiao.com www.zhangtao.com;
    root   /data/www;
    index  index.html index.htm;
    access_log  /var/log/nginx/access_zhang.log zhang;

    location / {
        #rewrite ^(.*)\.htmp$ /index.html;
        proxy_set_header Host www.54php.cn;
        proxy_pass http://zhang_hosts;
    }

}
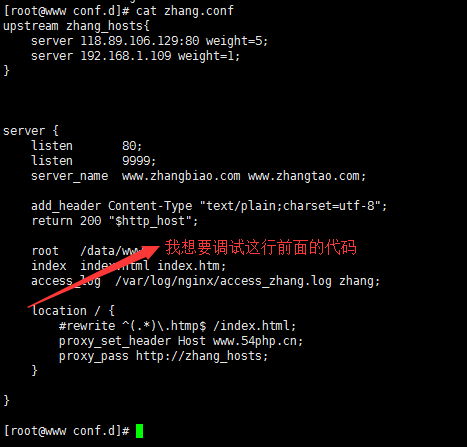
扩展 配置weight 权重,访问5次server1 才切换到server2
upstream zhang_hosts{
    server 118.89.106.129:80 weight=5;
    server 192.168.1.109 weight=1;
}
重启
service nginx reload
访问
www.zhangbiao.com
再次刷新
Nginx 调试
有时我们对Nginx 配置出错的时候,我们可以逐行的进行调试找到错误出现的位置
Nginx 可以通过 return 关键字 返回请求的域名这个可以自己设置 ,返回成功即以上的代码没问题
在 /etc/nginx/conf.d/zhang.conf
添加以下代码
    add_header Content-Type "text/plain;charset=utf-8";
    return 200 "$http_host";
访问
http://www.zhangbiao.com/
返回
访问
http://www.zhangtao.com/
反向代理转向不同的机器,nginx 报 502 的错误
可以尝试输入以下命令
setsebool -P httpd_can_network_connect 1

 浙公网安备 33010602011771号