linux 综合架构 ansible 剧本
剧本的作用: 可以一键化完成多个任务
剧本编写规范:
(1)合理的信息缩进 两个空格表示一个缩进关系
PS: 在ansible中一定不能用tab进行缩进
标题一
 标题二
   标题三
(2)冒号的使用方法
PS: 使用冒号时后面要有空格信息
hosts: 172.16.1.41
tasks:
yum: name=xx
(3)短横线应用 -(列表功能)
PS: 使用短横线构成列表信息,短横线后面需要有空格
- 张三
 男
   - 打游戏
   - 运动

- 李四
 女
   学习
      湖南
- 王五
 男
   运动
      深圳
使用 ansible 命令手动部署剧本
自动化部署rsync服务:
服务端的操作
第一个历程安装软件:
ansible 172.16.1.41 -m yum -a "name=rsync state=installed"

第二个历程编写文件:
ansible 172.16.1.41 -m copy -a "src=/xxx/rsyncd.conf dest=/etc/"

第三个历程创建用户
ansible 172.16.1.41 -m user -a "name=rsync create_home=no shell=/sbin/nologin"

第四个历程创建目录
ansible 172.16.1.41 -m file -a "dest=/backup state=directory owner=rsync group=rsync"

第五个历程创建密码文件
ansible 172.16.1.41 -m copy -a "content='rsync_backup:oldboy123' dest=/etc/rsync.password mode=600"

第六个历程启动服务
ansible 172.16.1.41 -m service -a "name=rsyncd state=started enabled=yes"

客户端的操作:
第一个历程: 创建密码文件
ansible 客户端地址 -m copy -a "content='rsync_backup:oldboy123' dest=/etc/rsync.password mode=600"
开始编写剧本
mkdir /etc/ansible/ansible-playbook
cd /etc/ansible/ansible-playbook
编写 rsync_server.ymal
- hosts: 172.16.1.41
  tasks:
    - yum: name=rsync state=installed
    - copy: src=/etc/hosts dest=/etc/
第一个步骤: 检查剧本的语法格式
ansible-playbook --syntax-check rsync_server.ymal

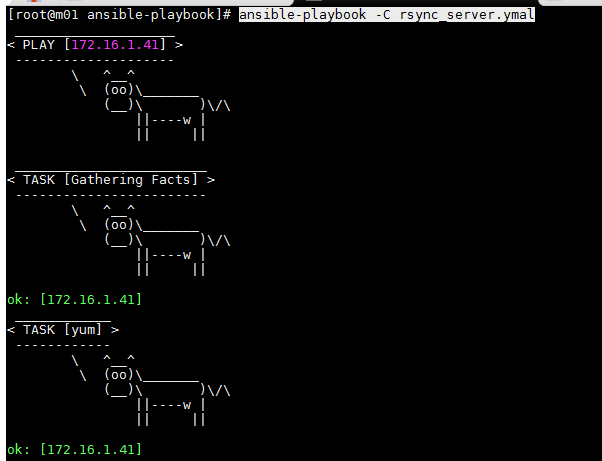
第二个步骤: 模拟执行剧本
ansible-playbook -C rsync_server.ymal
第三个步骤: 直接执行剧本
ansible-playbook rsync_server.ymal
改写剧本给每个具体的子任务命名
- hosts: 172.16.1.41
  tasks:
    - name: 01-install rsync
      yum: name=rsync state=installed
    - name: 02-push conf file
      copy: src=/etc/hosts dest=/root/
模拟执行
ansible-playbook -C rsync_server.ymal

配置主机清单
ansible 主机清单配置文件 /etc/ansible/hosts
第一种方式: 分组配置主机信息
[web]
172.16.1.7

[data]
172.16.1.31
172.16.1.41
操作过程
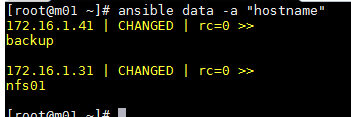
ansible data -a "hostname"
第二种方式: 主机名符号匹配配置
[web]
172.16.1.[7:9]
[web]
web[01:03]
第三种方式: 跟上非标准远程端口 (ssh服务端口自定义这里是 52113)
[web]
web01:52113
172.16.1.7:52113
第四种方式: 主机使用特殊的变量 (在没有分发公钥的情况下使用)
[web]
172.16.1.7 ansible_ssh_port=52113 ansible_ssh_user=root ansible_ssh_pass=123456
[web]
web01 ansible_ssh_host=172.16.1.7 ansible_ssh_port=52113 ansible_ssh_user=root ansible_ssh_pass=123456
第五种方式: 主机组名嵌入配置
[rsync:children]    --- 嵌入子组信息
rsync_server
rsync_client

[rsync_server]
172.16.1.41

[rsync_client]
172.16.1.31
172.16.1.7

[web:vars]         --- 嵌入式变量信息
ansible_ssh_host=172.16.1.7
ansible_ssh_port=52113
ansible_ssh_user=root
ansible_ssh_pass=123456
[web]
web01
主机清单的配置方法
https://docs.ansible.com/ansible/latest/user_guide/intro_inventory.html
rsync服务剧本编写
rsync_server.yaml
- hosts: rsync_server
  tasks:
    - name: 01-install rsync
      yum: name=rsync state=installed
    - name: 02-push conf file
      copy: src=/etc/ansible/server_file/rsync_server/rsyncd.conf dest=/etc/
    - name: 03-create user
      user: name=rsync create_home=no shell=/sbin/nologin
      #shell: useradd rsync -M -s /sbin/nologin
    - name: 04-create backup dir
      file: path=/backup state=directory owner=rsync group=rsync
    - name: 05-create password file
      copy: content=rsync_backup:oldboy123 dest=/etc/rsync.password mode=600
    - name: 06-start rsync server
      service: name=rsyncd state=started enabled=yes

- hosts: rsync_clients
  tasks:
    - name: 01-install rsync
      yum: name=rsync state=installed
    - name: 02-create password file
      copy: content=oldboy123 dest=/etc/rsync.password mode=600
    - name: 03-create test file
      file: dest=/tmp/test.txt  state=touch
    - name: 04-check test
      shell: rsync -avz /tmp/test.txt rsync_backup@172.16.1.41::backup --password-file=/etc/rsync.password
剧本中设置变量信息
方式一:直接在剧本文件编写
vars:
  oldboy01: data01
  oldboy02: data02
方式二:在命令行中进行指定
# -e 简写
ansible-playbook --extra-vars=oldboy01=data01
方式三:在主机清单文件编写
[oldboy]
oldboy01=data01
oldboy02=data02
三种变量设置方式都配置了,三种方式的优先级
-
最优先: 命令行变量设置
-
次优先: 剧本中变量设置
-
最后: 主机清单变量设置
如何全局设置变量: roles 剧本整合
剧本中设置注册信息
功能:输出信息
显示进程信息,表示服务已经正常启动
在剧本中设置判断信息
如何指定判断条件: when
- hosts: oldboy
  remote_user: root
  tasks:
    - name: Check File
      file: path=/tmp/this_is_{{ ansible_hostname }}_file state=touch
      when: (ansible_hostname == "nfs") or (ansible_hostname == "backup")

    - name: install httpd
      yum: name=httpd state=installed
      when: (系统情况 == "CentOS")

    - name: install httpd2
      yum: name=httpd2 state=installed
      when: (系统情况 == "ubuntu")
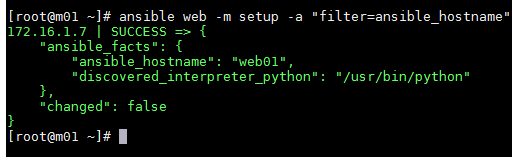
获取内置变量方法
ansible web -m setup -a "filter=ansible_hostname"
常见主机信息
-
ansible_all_ipv4_addresses: 仅显示ipv4的信息。
-
ansible_devices: 仅显示磁盘设备信息。
-
ansible_distribution: 显示是什么系统,例:centos,suse等。
-
ansible_distribution_major_version: 显示是系统主版本。
-
ansible_distribution_version: 仅显示系统版本。
-
ansible_machine: 显示系统类型,例:32位,还是64位。
-
ansible_eth0: 仅显示eth0的信息。
-
ansible_hostname: 仅显示主机名。
-
ansible_kernel: 仅显示内核版本。
-
ansible_lvm: 显示lvm相关信息。
-
ansible_memtotal_mb: 显示系统总内存。
-
ansible_memfree_mb: 显示可用系统内存。
-
ansible_memory_mb: 详细显示内存情况。
-
ansible_swaptotal_mb: 显示总的swap内存。
-
ansible_swapfree_mb: 显示swap内存的可用内存。
-
ansible_mounts: 显示系统磁盘挂载情况。
-
ansible_processor: 显示cpu个数(具体显示每个cpu的型号)。
-
ansible_processor_vcpus: 显示cpu个数(只显示总的个数)。
在剧本中设置循环信息
- hosts: all
  remote_user: root
  tasks:
    - name: Add Users
      user: name={{ item.name }} groups={{ item.groups }} state=present
      with_items:
        - { name: 'testuser1', groups: 'bin' }
        - { name: 'testuser2', groups: 'root' }

vim test05.yml
- hosts: all
  remote_user: root
  tasks:
    - name: Installed Pkg
      yum: name={{ item }}  state=present
      with_items:
        - wget
        - tree
        - lrzsz
在剧本中设置忽略错误
默认playbook会检查命令和模块的返回状态,如遇到错误就中断playbook的执行,可以加入ignore_errors: yes忽略错误
- hosts: all
  remote_user: root
  tasks:
    - name: Ignore False
      command: /bin/false
      ignore_errors: yes
    - name: touch new file
      file: path=/tmp/oldboy_ignore state=touch
剧本中设置标签功能
功能:
-
指定执行哪个标签任务 ansible-playbook --tags=t2 test05.yml
-
跳过指定标签任务 ansible-playbook --skip-tags=t2 test05.yml
- hosts: oldboy
  ignore_errors: yes
  remote_user: root
  tasks:
    - name: Check File
      file: path=/tmp/this_is_{{ ansible_hostname }}_file state=touch
      when: (ansible_hostname == "nfs01") or (ansible_hostname == "backup")
      tags: t1

    - name: bad thing
      command: ech 123
      #ignore_errors: yes
      tags: t2

    - name: install httpd
      yum: name=httpd state=installed
      when: (ansible_all_ipv4_addresses == ["172.16.1.7","10.0.0.7"])
      tags: t3

    - name: install httpd2
      yum: name=httpd2 state=installed
      when: (ansible_distribution == "ubuntu")
      tags: t4
剧本中设置触发功能
- hosts: backup
  remote_user: root
  tasks:
    - name: 01 Install rsync
      yum: name=rsync state=present

    - name: 02 push config file
      copy: src=./file/{{ item.src }} dest=/etc/{{ item.dest }} mode={{ item.mode }}
      with_items:
        - { src: "rsyncd.conf", dest: "rsyncd.conf", mode: "0644" }
        - { src: "rsync.password", dest: "rsync.password", mode: "0600" }
      notify: restart rsync server

  handlers:
    - name: restart rsync server
      service: name=rsyncd state=restarted
将多个剧本进行整合
方式一:include_tasks: f1.yml
- hosts: all
  remote_user: root
  tasks:
    - include_tasks: f1.yml
    - include_tasks: f2.yml
方式二:include: f1.yml
- include:f1.yml
- include:f2.yml
方式三:- import_playbook main.yml
- import_playbook: base.yml
- import_playbook: rsync.yml
- import_playbook: nfs.yml
- import_playbook: oxxx.yml
- import_playbook: rsync.yml
- import_playbook: nfs.yml
编写NFS服务剧本
第一个历程: 创建几个目录
[root@m01 ansible-playbook]# tree nfs-file/
nfs-file/
├── nfs-client
└── nfs-server
第二个历程: 编写剧本信息
[nfs:children]
nfs_server
nfs_client
[nfs_server]
172.16.1.31
[nfs_client]
172.16.1.7
#172.16.1.8
#172.16.1.9
nfs_server.yaml
- hosts: nfs
tasks:
- name: 01-install nfs software
yum:
name: ['nfs-utils','rpcbind']
state: installed
- hosts: nfs_server
#vars:
# Data_dir: /data
tasks:
- name: 01-copy conf file
copy: src=/etc/ansible/ansible-playbook/nfs-file/nfs-server/exports dest=/etc
notify: restart nfs server
- name: 02-create data dir
file: path={{ Data_dir }} state=directory owner=nfsnobody group=nfsnobody
# path: ['data01','data02','data03']
# state: directory
# owner: nfsnobody
# group: nfsnobody
- name: 03-boot server
#service: name=rpcbind state=started enabled=yes
#service: name=nfs state=started enabled=yes
service: name={{ item }} state=started enabled=yes
with_items:
- rpcbind
- nfs
handlers:
- name: restart nfs server
service: name=nfs state=restarted
- hosts: nfs_client
#vars:
# Data_dir: /data
tasks:
- name: 01-mount
mount: src=172.16.1.31:{{ Data_dir }} path=/mnt fstype=nfs state=mounted
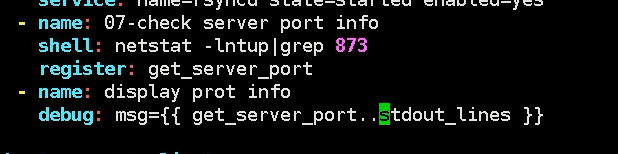
- name: 02-check mount info
shell: df -h|grep /data
register: mount_info
- name: display mount info
debug: msg={{ mount_info.stdout_lines }}
ansible程序roles
剧本编写完问题
-
1. 目录结构不够规范
-
2. 编写好的任务如何重复调用
-
3. 服务端配置文件改动,客户端参数信息也自动变化
-
4. 汇总剧本中没有显示主机角色信息
-
5. 一个剧本内容信息过多,不容易进行阅读,如何进行拆分
第一个历程: 规范目录结构
cd /etc/ansible/roles
mkdir {rsync,nfs}   --- 创建相应角色目录
mkdir {nfs,rsync}/{vars,tasks,templates,handlers,files}  --- 创建角色目录下面的子目录
[root@m01 roles]# tree
.
├── nfs
│   ├── files       --- 保存需要分发文件目录
│   ├── handlers	--- 保存触发器配置文件信息
│   ├── tasks       --- 保存要执行的动作信息文件   ok
│   ├── templates   --- 保存需要分发模板文件 模板文件中可以设置变量信息
│   └── vars        --- 保存变量信息文件
└── rsync
    ├── files
    ├── handlers
    ├── tasks
    ├── templates
    └── vars
第二个历程: 在roles目录中创建相关文件
( 1 ) 编写tasks目录中的main.yml文件
- name: 01-copy conf file
  copy: src=exports dest=/etc
  notify: restart nfs server
- name: 02-create data dir
  file: path={{ Data_dir }} state=directory owner=nfsnobody group=nfsnobody
  # path: ['data01','data02','data03']
  # state: directory
  # owner: nfsnobody
  # group: nfsnobody
- name: 03-boot server
  service: name={{ item }} state=started enabled=yes
  with_items:
    - rpcbind
    - nfs

vim main.yml
- include_tasks: copy_info.yml
- include_tasks: create_dir.yml
- include_tasks: boot_server.yml

vim copy_info.yml
- name: 01-copy conf file
  copy: src=exports dest=/etc
  notify: restart nfs server

vim create_dir.yml
- name: 02-create data dir
  file: path={{ Data_dir }} state=directory owner=nfsnobody group=nfsnobody

vim boot_server.yml
- name: 03-boot server
  service: name={{ item }} state=started enabled=yes
  with_items:;
    - rpcbind
    - nfs
(2)编写vars目录中的main.yml文件
[root@m01 vars]# vim main.yml
Data_dir: /data
(3)编写files目录中的文件
[root@m01 files]# ll
total 4
-rw-r--r-- 1 root root 29 May 17 15:23 exports
(4)编写handlers目录中的main.yml文件
vim main.yml
- name: restart nfs server
service: name=nfs state=restarted
目录中文件编写好汇总结构
[root@m01 nfs]# tree
.
├── files
│   └── exports
├── handlers
│   └── main.yml
├── tasks
│   └── main.yml
├── templates
└── vars
    └── main.yml
第三个历程: 编写一个主剧本文件
[root@m01 roles]# cat site.yml
- hosts: nfs_server
  roles:
    - nfs-server

- hosts: rsync_server
  roles:
    - rsync
剧本编写常见错误:
-
01. 剧本语法规范是否符合(空格 冒号 短横线)
-
02. 剧本中模块使用是否正确
-
03. 剧本中一个name标识下面只能写一个模块任务信息
-
04. 剧本中尽量不要大量使用shell模块

 浙公网安备 33010602011771号