

spring中自带的观察者模式
参考地址:https://mp.weixin.qq.com/s/HrNEI3WcUKVcgbM3CaJmSg
1、介绍
观察者模式是软件设计模式的一种。在此种模式中,一个目标对象管理所有相依于它的观察者对象,并且在它本身的状态改变时主动发出通知。这通常透过呼叫各观察者所提供的方法来实现。
此种模式通常被用来实时事件处理系统。
在我们日常业务开发中,观察者模式对我们很大的一个作用,在于实现业务的解耦。以用户注册的场景来举例子,假设在用户注册完成时,需要给该用户发送邮件、发送优惠劵等等操作,
如下图所示:

- UserService 在完成自身的用户注册逻辑之后,仅仅只需要发布一个 UserRegisterEvent 事件,而无需关注其它拓展逻辑。
- 其它 Service 可以自己订阅 UserRegisterEvent 事件,实现自定义的拓展逻辑。
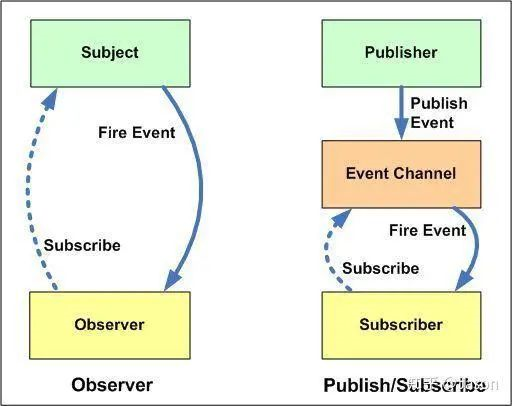
友情提示:很多时候,我们会把观察者模式和发布订阅模式放在一起对比。
简单来说,发布订阅模式属于广义上的观察者模式,在观察者模式的 Subject 和 Observer 的基础上,引入 Event Channel 这个中介,进一步解耦。如下图所示:
2、spring事件机制
Spring 基于观察者模式,实现了自身的事件机制,由三部分组成:
- 事件 ApplicationEvent:通过继承它,实现自定义事件。另外,通过它的
source属性可以获取事件源,timestamp属性可以获得发生时间。 - 事件发布者 ApplicationEventPublisher:通过它,可以进行事件的发布。
- 事件监听器 ApplicationListener:通过实现它,进行指定类型的事件的监听。
友情提示:JDK 也内置了事件机制的实现,考虑到通用性,Spring 的事件机制是基于它之上进行拓展。因此,ApplicationEvent 继承自 java.util.EventObject,ApplicationListener 继承自 java.util.EventListener。
3、入门示例
以用户注册为例子
3.1、引入依赖
<?xml version="1.0" encoding="UTF-8"?>
<project xmlns="http://maven.apache.org/POM/4.0.0"
         xmlns:xsi="http://www.w3.org/2001/XMLSchema-instance"
         xsi:schemaLocation="http://maven.apache.org/POM/4.0.0 http://maven.apache.org/xsd/maven-4.0.0.xsd">
    <parent>
        <groupId>org.springframework.boot</groupId>
        <artifactId>spring-boot-starter-parent</artifactId>
        <version>2.2.2.RELEASE</version>
        <relativePath/> <!-- lookup parent from repository -->
    </parent>
    <modelVersion>4.0.0</modelVersion>

    <artifactId>lab-54-demo</artifactId>

    <dependencies>
        <!-- 实现对 Spring MVC 的自动化配置 -->
        <dependency>
            <groupId>org.springframework.boot</groupId>
            <artifactId>spring-boot-starter-web</artifactId>
        </dependency>
    </dependencies>

</project>
引入 spring-boot-starter-web 依赖的原因,是稍后会提供示例 API 接口,方便测试。
3.2 UserRegisterEvent
创建 UserRegisterEvent 事件类,继承 ApplicationEvent 类,用户注册事件。代码如下:
public class UserRegisterEvent extends ApplicationEvent {

    /**
     * 用户名
     */
    private String username;

    public UserRegisterEvent(Object source) {
        super(source);
    }

    public UserRegisterEvent(Object source, String username) {
        super(source);
        this.username = username;
    }

    public String getUsername() {
        return username;
    }

}
通过在 UserRegisterEvent 类中,定义成员变量 username,将用户名附带上。
3.3 UserService
创建 UserService 类,用户 Service。代码如下:
@Service
public class UserService implements ApplicationEventPublisherAware { // <1>

    private Logger logger = LoggerFactory.getLogger(getClass());

    private ApplicationEventPublisher applicationEventPublisher;

    @Override
    public void setApplicationEventPublisher(ApplicationEventPublisher applicationEventPublisher) {
        this.applicationEventPublisher = applicationEventPublisher;
    }

    public void register(String username) {
        // ... 执行注册逻辑
        logger.info("[register][执行用户({}) 的注册逻辑]", username);

        // <2> ... 发布
        applicationEventPublisher.publishEvent(new UserRegisterEvent(this, username));
    }

}
<1> 处,实现 ApplicationEventPublisherAware 接口,从而将 ApplicationEventPublisher 注入到其中。
<2> 处,在执行完注册逻辑后,调用 ApplicationEventPublisher 的 #publishEvent(ApplicationEvent event) 方法,发布「3.2 UserRegisterEvent」事件。
3.4 EmailService
创建 EmailService 类,邮箱 Service。代码如下:
@Service
public class EmailService implements ApplicationListener<UserRegisterEvent> { // <1>

    private Logger logger = LoggerFactory.getLogger(getClass());

    @Override
    @Async // <3>
    public void onApplicationEvent(UserRegisterEvent event) { // <2>
        logger.info("[onApplicationEvent][给用户({}) 发送邮件]", event.getUsername());
    }
}
<1> 处,实现 ApplicationListener 接口,通过 E 泛型设置感兴趣的事件。
<2> 处,实现 #onApplicationEvent(E event) 方法,针对监听的 UserRegisterEvent 事件,进行自定义处理。
【可以不加】<3> 处,锦上添花,设置 @Async 注解,声明异步执行。毕竟实际场景下,发送邮件可能比较慢,又是非关键逻辑。
3.5 CouponService
创建 CouponService 类,优惠劵 Service。代码如下:
@Service
public class CouponService {

    private Logger logger = LoggerFactory.getLogger(getClass());

    @EventListener // <1>
    public void addCoupon(UserRegisterEvent event) {
        logger.info("[addCoupon][给用户({}) 发放优惠劵]", event.getUsername());
    }
}
<1> 处,在方法上,添加 @EventListener 注解,并设置监听的事件为 UserRegisterEvent。这是另一种使用方式!
4. Spring 内置事件
在 Spring 框架中,自定义了非常多的自定义事件,让我们更容易的进行拓展。下面,我们来简单举一些例子。
4.1 ApplicationContextEvent
ApplicationContextEvent 是 Spring Context 相关的事件基类,如下图所示:
友情提示:Spring Context 可以简单理解成 IoC 容器。

- ContextStartedEvent:Spring Context 启动完成事件。
- ContextStoppedEvent:Spring Context 停止完成事件。
- ContextClosedEvent:Spring Context 停止开始事件。
- ContextRefreshedEvent:Spring Context 初始化或刷新完成事件。
也就是说,在 Spring Context 的整个生命周期中,会发布相应的 ApplicationContextEvent 事件。
SpringApplicationEvent 是 Spring Boot Application(应用)相关的事件基类,如下图所示:
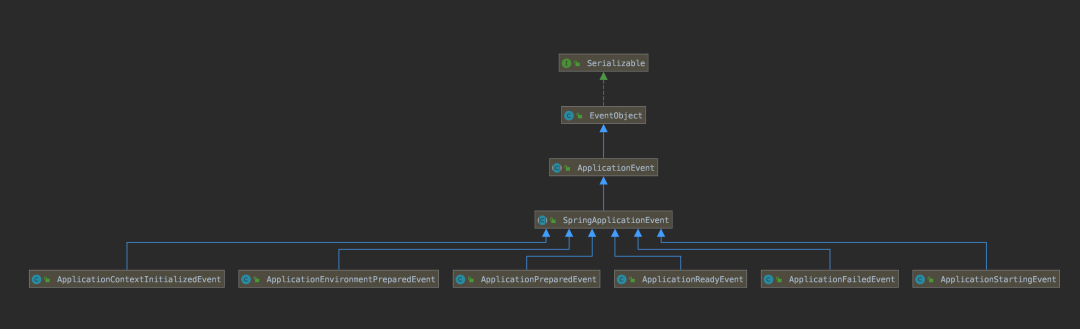
- ApplicationStartingEvent:Application 启动开始事件。
- ApplicationEnvironmentPreparedEvent:Spring Environment 准备完成的事件。
- ApplicationContextInitializedEvent:Spring Context 准备完成,但是 Bean Definition 未加载时的事件
- ApplicationPreparedEvent:Spring Context 准备完成,但是未刷新时的事件。
- ApplicationReadyEvent:Application 启动成功事件。
- ApplicationFailedEvent:Application 启动失败事件。
也就是说,在 Application 的整个生命周期中,会发布相应的 SpringApplicationEvent 事件。
4.2 RouteRefreshListener
Spring Cloud Gateway 通过监听 RefreshRoutesEvent 事件,结合 Nacos 作为配置中心,实现网关路由动态刷新的功能。

友情提示:Spring Cloud Zuul 也是通过监听 RoutesRefreshedEvent 事件,实现网关路由动态刷新的功能。
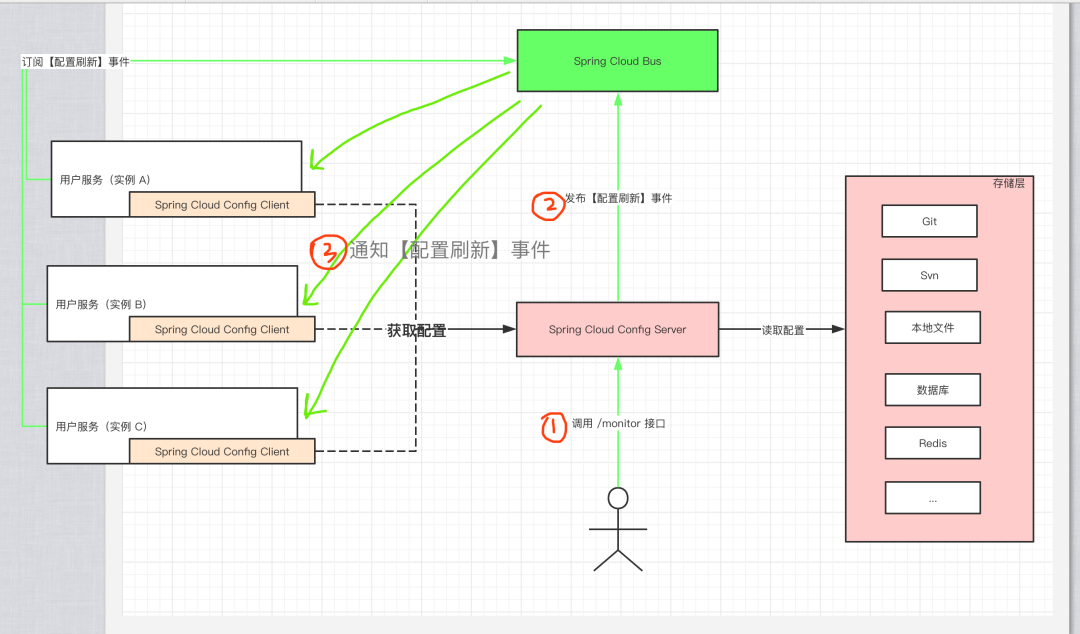
4.3 RefreshRemoteApplicationEvent
Spring Cloud Config Client 通过监听 RefreshRemoteApplicationEvent 事件,结合 RabbitMQ 作为 Spring Cloud Bus 消息总线,实现本地配置刷新的功能。
5、总结
① 如果想要多个监听器按照指定顺序执行,可以通过实现 Ordered 接口,指定其顺序。
② 如果想要监听多种 ApplicationContext 事件,可以实现 SmartApplicationListener 接口,具体示例可以看看 SourceFilteringListener 类。
③ @TransactionalEventListener 注解,可以声明在当前事务“结束”时,执行相应的监听逻辑。
④ 可以通过实现 ApplicationEventMulticaster 接口,定义自定义的事件广播器,可以往里面添加和移除监听器,并发布事件给注册在其中的监听器。使用比较少,基本可以忽略。

 浙公网安备 33010602011771号