gerrit部署使用
前言
gerrit是基于git的工具,code review功能是开发中很方便,此外它可以配合Jenkins进行自动化的编译工作。今天给大家分享一下gerrit在ubuntu的安装使用
作者:良知犹存
转载授权以及围观:欢迎关注微信公众号:羽林君
或者添加作者个人微信:become_me
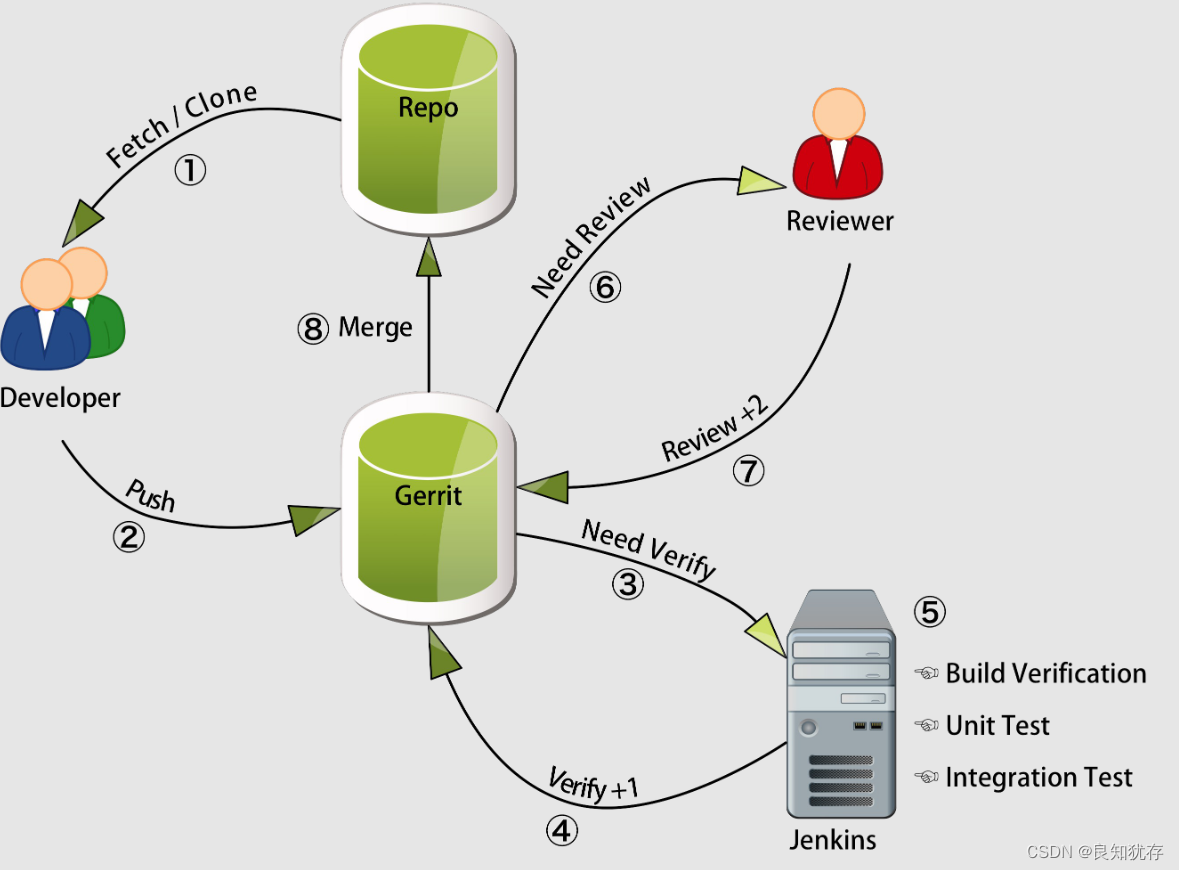
Gerrit简介
Gerrit 是建立在Git版本控制系统之上并且基于Web的一个免费开源的轻量级代码审查工具。 作为开发者和Git之间的一层屏障,不允许直接将本地修改内容同步到远程仓库中。 与Jenkins集成后,可以在每次提交代码后,人工审核代码前,通过Jenkins任务自动运行单元测试、构建以及自动化测试,如果Jenkins任务失败,会自动打回本次提交。
一般Git、Gerrit和Jenkins集成后的使用流程
- 1.开发者提交代码到Gerrit
- 2.触发对应的Jenkins任务,通过以后Verified加1
- 3.人工审核,审核通过后code review加2,触发对应的Jenkins任务
- 4.通过以后确认本次提交,Gerrit执行与Git仓库的代码同步操作
- 5.代码进入Git仓库
Gerrit 安装
安装需要内容,gerrit文件,环境有git、jdk环境、反向代理工具nginx(帮助登录网页)
本文在nginx安装部分是最后解决问题时候,才发现反向代理工具的是必须的,最后才安装。
先下载 gerrit文件
下载链接:https://www.gerritcodereview.com/#download,官网可达 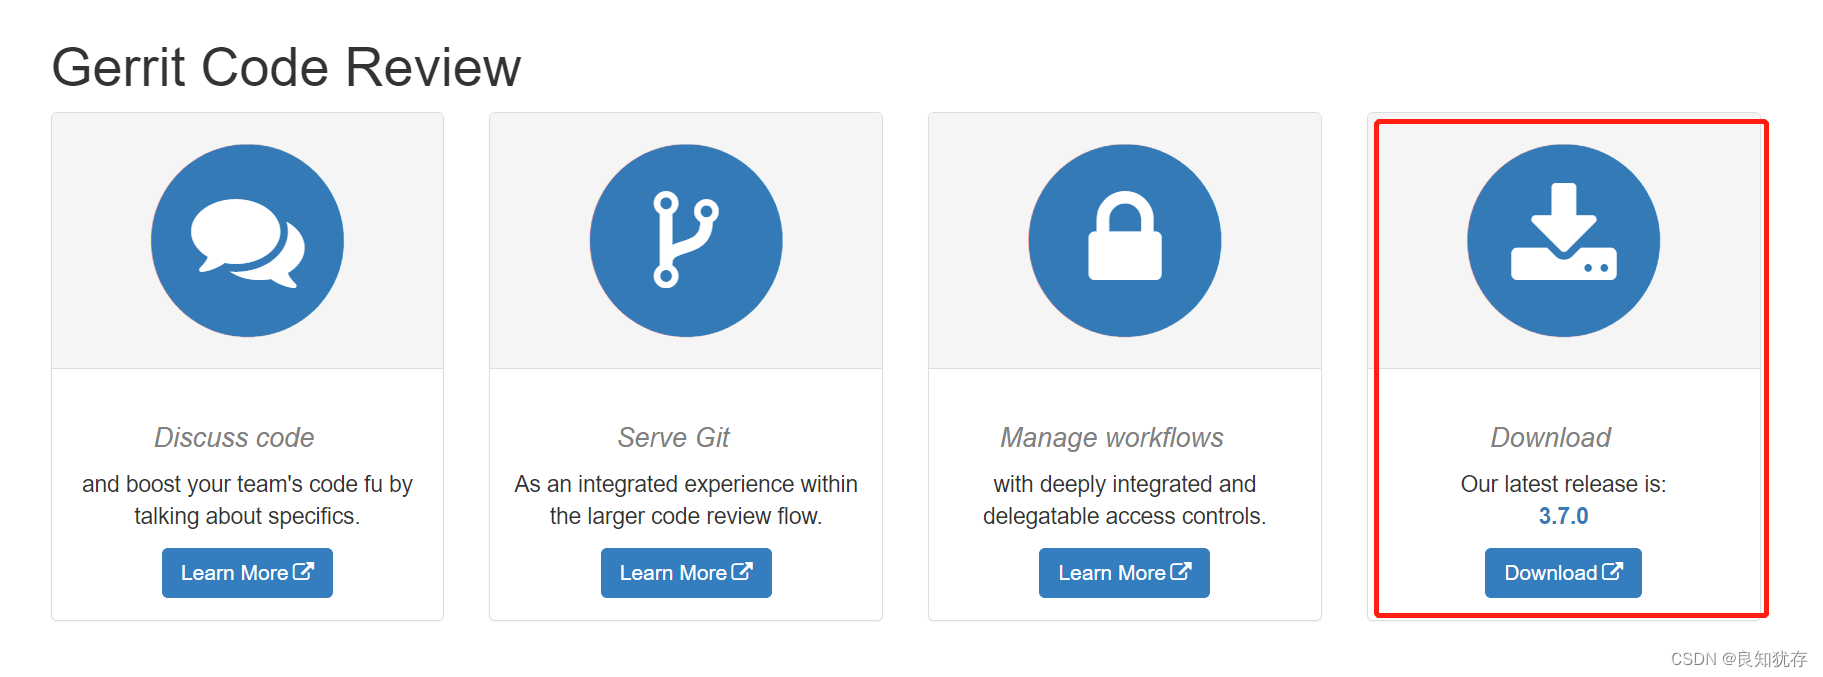 也可以使用wget工具命令行下载:
wget https://gerrit-releases.storage.googleapis.com/gerrit-3.1.3.war
官网安装指导文档:
-
https://gerrit-review.googlesource.com/Documentation/index.html
-
https://gerrit-documentation.storage.googleapis.com/Documentation/3.6.2/install.html
下载下来等待其他环境安装好之后进行使用。
jdk环境
直接apt install进行安装sudo apt install openjdk-11-jdk 安装之后使用java -version命令查看是否安装成功 
git环境
gerrit需要git环境,直接安装git sudo apt-get install git

gerrit启动
进入到gerrit*.war文件所在目录,执行以下命令进行交互式安装 java -jar ~/Downloads/gerrit*.war init -d ~/Gerrit/
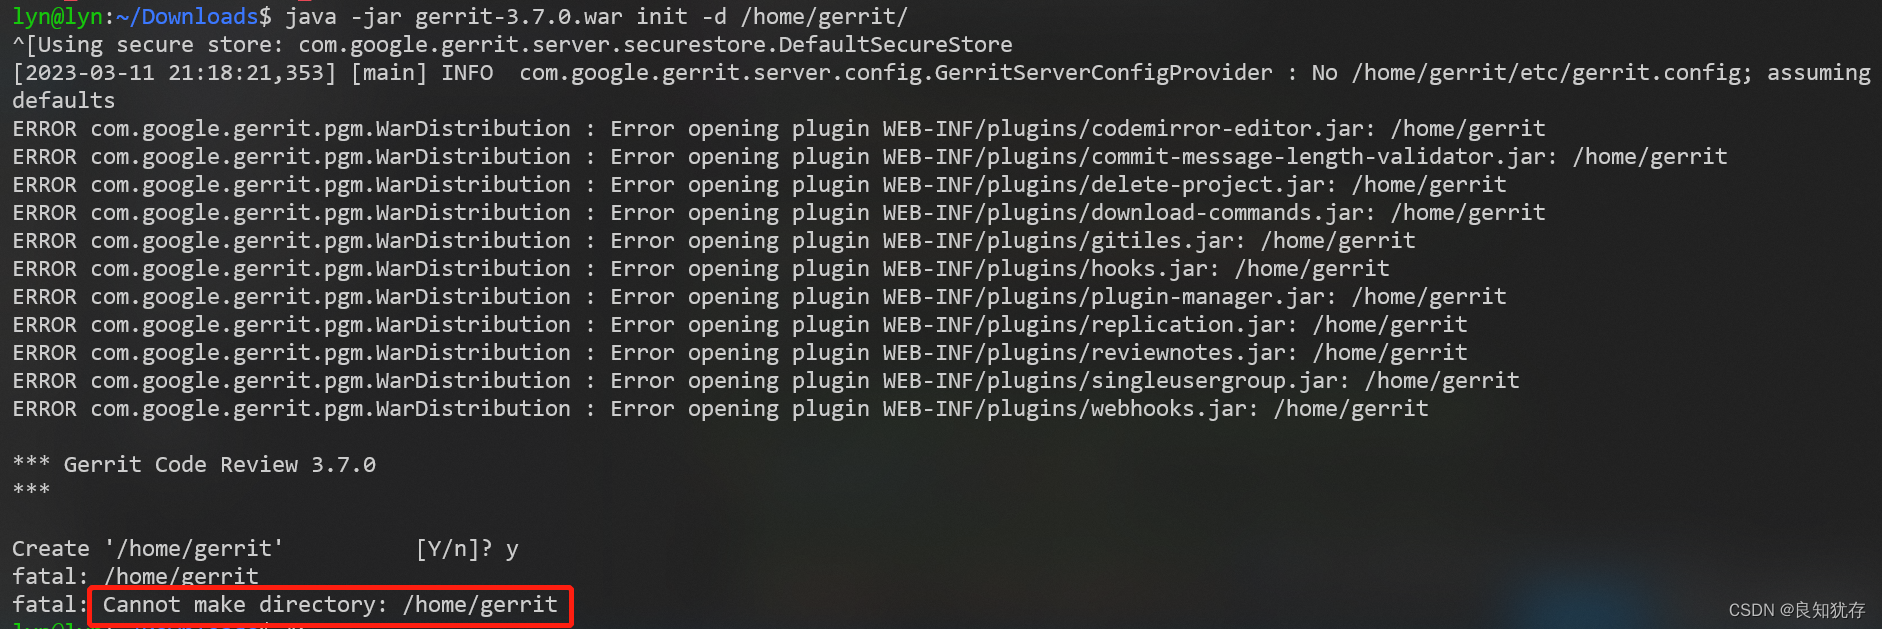 很多人是把gerrit放入/home/gerrit/目录,但是无法创建,需要创建一个gerrit账号进行访问。
sudo adduser gerrit
sudo su gerrit
类似于如此操作就可以创建一个gerrit目录
最后我选择了本地目录建立 Gerrit ,操作执行 java -jar gerrit*.war init -d ~/Gerrit/
注意: 1、gerrit可以将数据保存到mysql或其他的数据中,如果你需要使用mysql,则需要安装gerrit之前安装mysql,我这里直接使用默认的数据库类型 H2。如果你需要使用其他类型数据库,可以参考下面这个链接:
- https://gerrit-documentation.storage.googleapis.com/Documentation/2.12.2/install.html
2、如果gerrit需要结合jenkins做CI持续构建的话,在交互式安装过程中需要安装Verified label,默认是不安装的:Install Verified label [y/N]? y 这里选择y,安装Verified label。
启动执行具体细节如下:(比较复杂,后期使用需要反复观看里面配置以及解释)
lyn@lyn:~/Downloads$ java -jar gerrit*.war init -d ~/Gerrit/
Using secure store: com.google.gerrit.server.securestore.DefaultSecureStore
[2023-03-11 21:25:46,286] [main] INFO  com.google.gerrit.server.config.GerritServerConfigProvider : No /home/lyn/Gerrit/etc/gerrit.config; assuming defaults

*** Gerrit Code Review 3.7.0
***

Create '/home/lyn/Gerrit'      [Y/n]? y

*** Git Repositories
***

Location of Git repositories   [git]:  git       #指定Git存储库,最好指定一个不存在的目录,他会自动创建

*** JGit Configuration
***

Auto-configured "receive.autogc = false" to disable auto-gc after git-receive-pack.

*** Index
***

Type                           [lucene]:       #默认即可。

*** User Authentication
***

Authentication method          [openid/?]: HTTP       #认证方法输入HTTP,我们要使用反向代理
Get username from custom HTTP header [y/N]?
SSO logout URL                 :
Enable signed push support     [y/N]?
Use case insensitive usernames [Y/n]?

*** Review Labels
***

Install Verified label         [y/N]?  y

*** Email Delivery
***

SMTP server hostname           [localhost]:       #输入自动发送邮件的smtp服务器
SMTP server port               [(default)]:       #465/994时SSL协议端口后,25是非SSL协议端口号
SMTP encryption                [none/?]:       #如果上一步输入的是465/994,此处输入SSL,否则直接回车即可
SMTP username                  :       #此处是你定义自动发送邮件的邮箱地址
                                       #接着我们需要输入2次咱们邮箱的授权码,而非邮箱密码!

*** Container Process
***

Run as                         [lyn]: gerrit
Java runtime                   [/usr/lib/jvm/java-11-openjdk-amd64]:
Copy gerrit-3.7.0.war to /home/lyn/Gerrit/bin/gerrit.war [Y/n]?
Copying gerrit-3.7.0.war to /home/lyn/Gerrit/bin/gerrit.war

*** SSH Daemon
***

Listen on address              [*]:       #指定SSH后台服务的监听地址
Listen on port                 [29418]:       #指定SSH后台服务的端口号
Generating SSH host key ... rsa... ed25519... ecdsa 256... ecdsa 384... ecdsa 521... done

*** HTTP Daemon
***
Behind reverse proxy           [Y/n]? y        #使用发向代理
Proxy uses SSL (https://)      [Y/n]?       #不适用SSL
Subdirectory on proxy server   [/]:       #指定代理服务器的子目录,默认为"/"路径,默认即可
Listen on address              [*]:       #只当gerrit服务的监听地址
Listen on port                 [8080]: 8088       #指定gerrit的服务端口
Canonical URL                  [http://lyn:8080/]: http://lyn:8088       #指定标准连接


*** Cache
***


*** Plugins
***

Installing plugins.       #接下来就是询问我们是否安装插件,我们一路”y“ 即可~
Install plugin codemirror-editor version v3.7.0 [y/N]? y
Installed codemirror-editor v3.7.0
Install plugin commit-message-length-validator version v3.7.0 [y/N]? y
Installed commit-message-length-validator v3.7.0
Install plugin delete-project version v3.7.0 [y/N]? y
Installed delete-project v3.7.0
Install plugin download-commands version v3.7.0 [y/N]? y
Installed download-commands v3.7.0
Install plugin gitiles version v3.7.0 [y/N]? y
Installed gitiles v3.7.0
Install plugin hooks version v3.7.0 [y/N]? y
Installed hooks v3.7.0
Install plugin plugin-manager version v3.7.0 [y/N]? y
Installed plugin-manager v3.7.0
Install plugin replication version v3.7.0 [y/N]? y
Installed replication v3.7.0
Install plugin reviewnotes version v3.7.0 [y/N]? y
Installed reviewnotes v3.7.0
Install plugin singleusergroup version v3.7.0 [y/N]? y
Installed singleusergroup v3.7.0
Install plugin webhooks version v3.7.0 [y/N]? y
Installed webhooks v3.7.0
Initializing plugins.

============================================================================
Welcome to the Gerrit community

Find more information on the homepage: https://www.gerritcodereview.com
Discuss Gerrit on the mailing list: https://groups.google.com/g/repo-discuss
============================================================================
Initialized /home/lyn/Gerrit
Init complete, reindexing accounts,changes,groups,projects with: reindex --site-path /home/lyn/Gerrit --threads 1 --index accounts --index changes --index groups --index projects --disable-cache-statsReindexed 0 documents in accounts index in 0.0s (0.0/s)
Index accounts in version 12 is ready
Reindexing groups:      100% (2/2)
Reindexed 2 documents in groups index in 0.8s (2.5/s)
Index groups in version 9 is ready
Reindexing changes: Slicing projects: 100% (2/2), done
Reindexed 0 documents in changes index in 0.0s (0.0/s)
Index changes in version 79 is ready
Reindexing projects:    100% (2/2)
Reindexed 2 documents in projects index in 0.1s (14.6/s)
Index projects in version 5 is ready
Executing /home/lyn/Gerrit/bin/gerrit.sh start
Starting Gerrit Code Review: WARNING: Could not adjust Gerrit's process for the kernel's out-of-memory killer.
         This may be caused by /home/lyn/Gerrit/bin/gerrit.sh not being run as root.
         Consider changing the OOM score adjustment manually for Gerrit's PID=193375 with e.g.:
         echo '-1000' | sudo tee /proc/193375/oom_score_adj
OK
创建gerrit.password文件,并创建用户
htpasswd -c /home/lyn/Gerrit/etc/gerrit.password admin      # 创建第一个用户admin,同时会生成一个gerrit.password文件

htpasswd -m /home/lyn/Gerrit/etc/gerrit.password lyn     # 在gerrit.password增加用户用 -m
执行上面的命令,会要求多次输入密码,改密码就是对应用户的登录密码。  htpasswd 是apache密码生成工具,如果你的电脑没有这个命令,可以直接安装apache2
sudo apt-get install apache2
运行gerrit
在之前安装gerrit的目录下执行脚本,启动gerrit
# 启动gerrit
$ ~/Gerrit/bin/gerrit.sh start
# 停止gerrit
$ ~/Gerrit/bin/gerrit.sh stop
# 重启gerrit
$ ~/Gerrit/bin/gerrit.sh restart
 成功之后使用8088端口进行访问:
这个时候我没有开启反向代理,会提示如下问题:
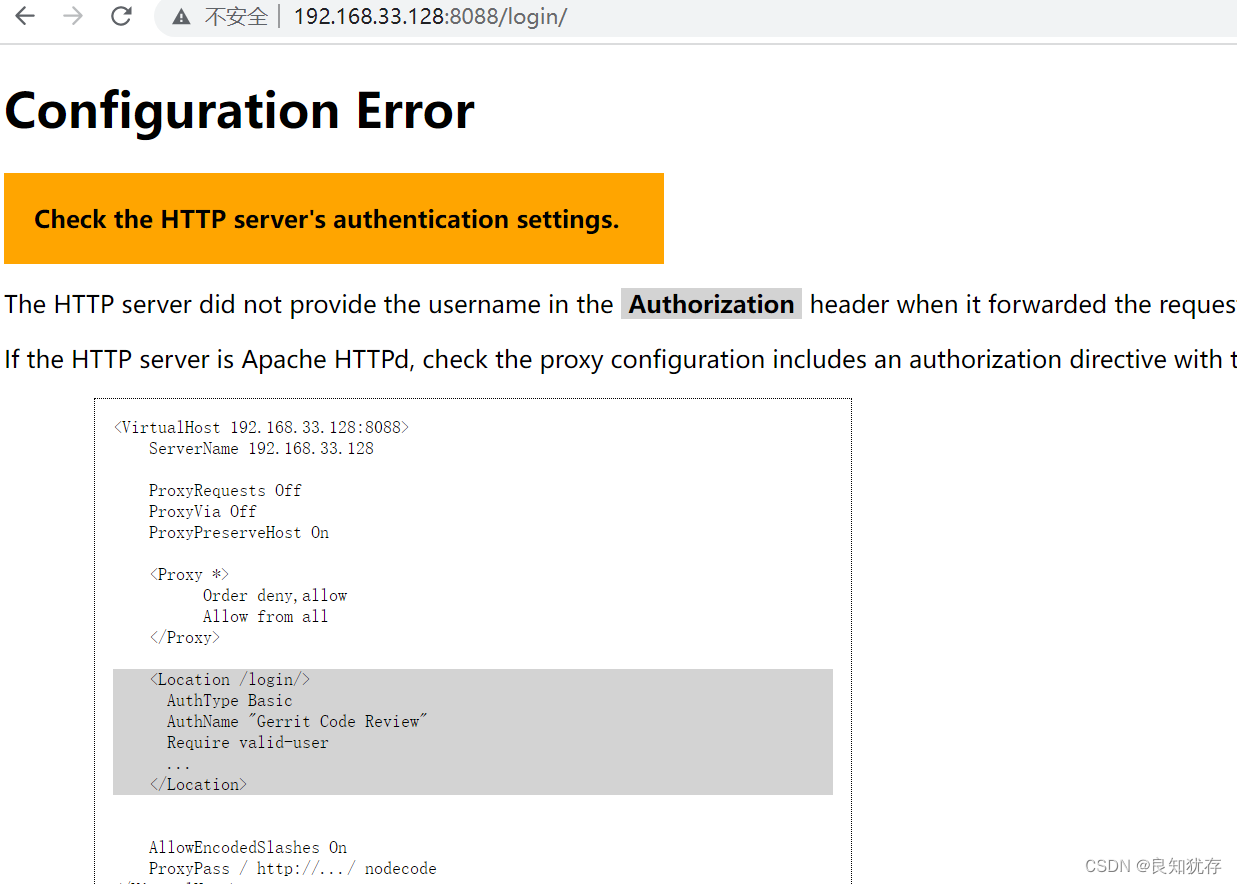
Configuration Error
Check the HTTP server’s authentication settings.
The HTTP server did not provide the username in the Authorization header when it forwarded the request to Gerrit Code Review.

If the HTTP server is Apache HTTPd, check the proxy configuration includes an authorization directive with the proper location, ensuring it ends with ‘/’:
后面还遇到了反向代理设置后,502,403问题。 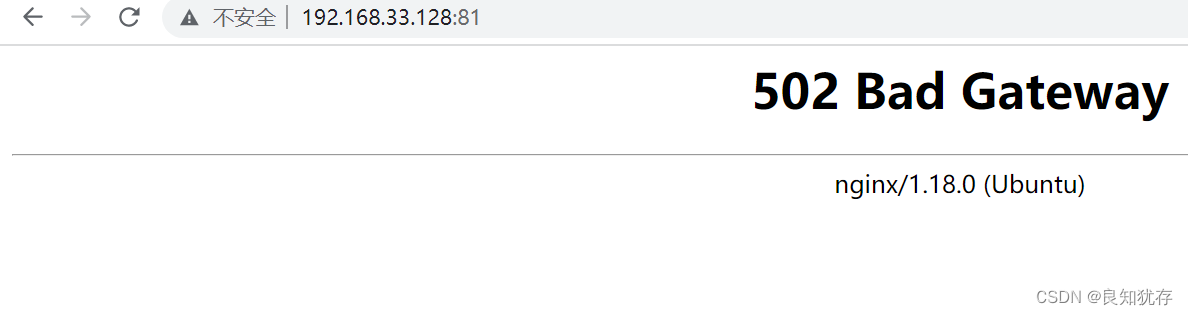 但都可以归结为一个原因。
错误原因:gerrit.conf 配置错误
gerrit相关配置文件修改,gerrit目录的gerrit.config和nginx的gerrit.conf修改解决。
原因是Gerrit有两种工作方式,我们要采用 http 的工作方式,也就是代码审核人员,可以直接通过Web页面对提交的代码进行评审以及后续的操作。
然后Gerrit要求不能直接请求其端口,必须要使用反向代理才能正确登录。而我们知道Nginx的成功正在于其高效、轻量级以及 反向代理 ,虽然Apache也有反向代理的功能,但是如果你在安装Apache时没有开启,后续的开启过程要相对复杂一点,而Nginx就简单的多了。
https://blog.csdn.net/zhoulr000/article/details/114173876
方法一:安装ngnix sudo apt-get install nginx
设置nginx的gerrit反向代理文件 sudo vi /etc/nginx/conf.d/gerrit.conf
- 配置nginx反向代理,文件内容如下
server {
    listen 81;
    server_name localhost;
    allow all;
    deny all;

    auth_basic "Welcome to Gerrit Code Review Site!";
    auth_basic_user_file /home/lyn/Gerrit/etc/gerrit.password;


    location / {
        proxy_pass http://127.0.0.1:8088;
        proxy_set_header X-Forwarded-For $remote_addr;
        proxy_set_header Host $host;
    }
}
需要注意的部分:
- listen 81: nginx server 监听的端口,尽量不要使用知名端口80,我这里面换成了81端口
- /home/lyn/Gerrit/etc/gerrit.password: 这个是http认证使用的文件,后面需要配置 对应
- gerrit 端口配置为8088
其中还修改了gerrit中etc目录的gerrit.config文件,内容如下:
[gerrit]
        basePath = git
        canonicalWebUrl = http://lyn:8088/
        serverId = f0858671-052c-4ea0-9883-032a598c9aae
[container]
        javaOptions = "-Dflogger.backend_factory=com.google.common.flogger.backend.log4j.Log4jBackendFactory#getInstance"
        javaOptions = "-Dflogger.logging_context=com.google.gerrit.server.logging.LoggingContext#getInstance"
        user = lyn
        javaHome = /usr/lib/jvm/java-11-openjdk-amd64
[index]
        type = lucene
[auth]
        type = HTTP
[receive]
        enableSignedPush = false
[sendemail]
        smtpServer = localhost
[sshd]
        listenAddress = *:29418
[httpd]
        listenUrl = proxy-https://*:8088/
[cache]
        directory = cache
配置完成后重启gerrit~/Gerrit/bin/gerrit.sh restart
配置完成后重启ngnix服务
sudo /etc/init.d/nginx restart       # 重启nginx
sudo /etc/init.d/nginx status        # 查看状态
或者执行
systemctl restart nginx.service
systemctl status nginx.service
启动之后可以使用工具查看一下自己配置的端口有没有正常工作: sudo netstat -ltpn 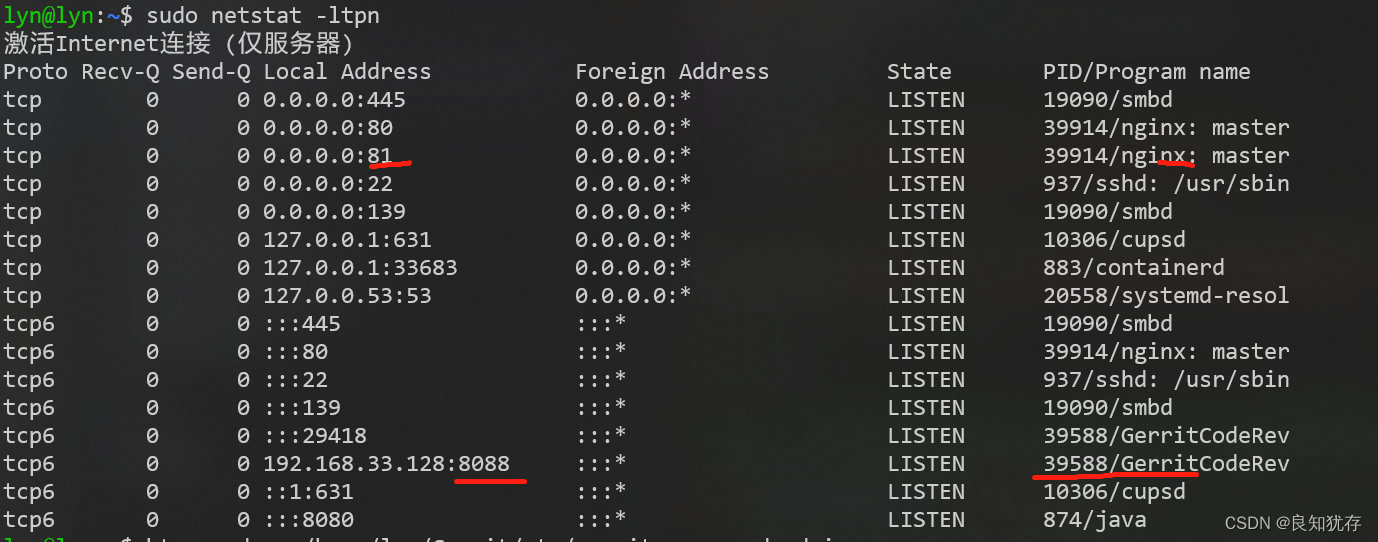
ps $(fuser 8088/tcp)这个工具可以直接查看有没有占据这个端口的进程
方法二:安装apache2
我们也可以让Apache2作为反向代理服务器访问Gerrit, 这个没有验证,所以没有过多描述,大家也可以参考此文:https://www.jianshu.com/p/0808559e6e2b 进行apache2配置

登录gerrit
输入下面链接,就可以登录到gerrit页面。
http://192.168.33.128:81/
- 192.168.33.128:是主机地址
- 81: 是nginx监听的地址,不是gerrit配置的8088(这就是反向代理的作用)。
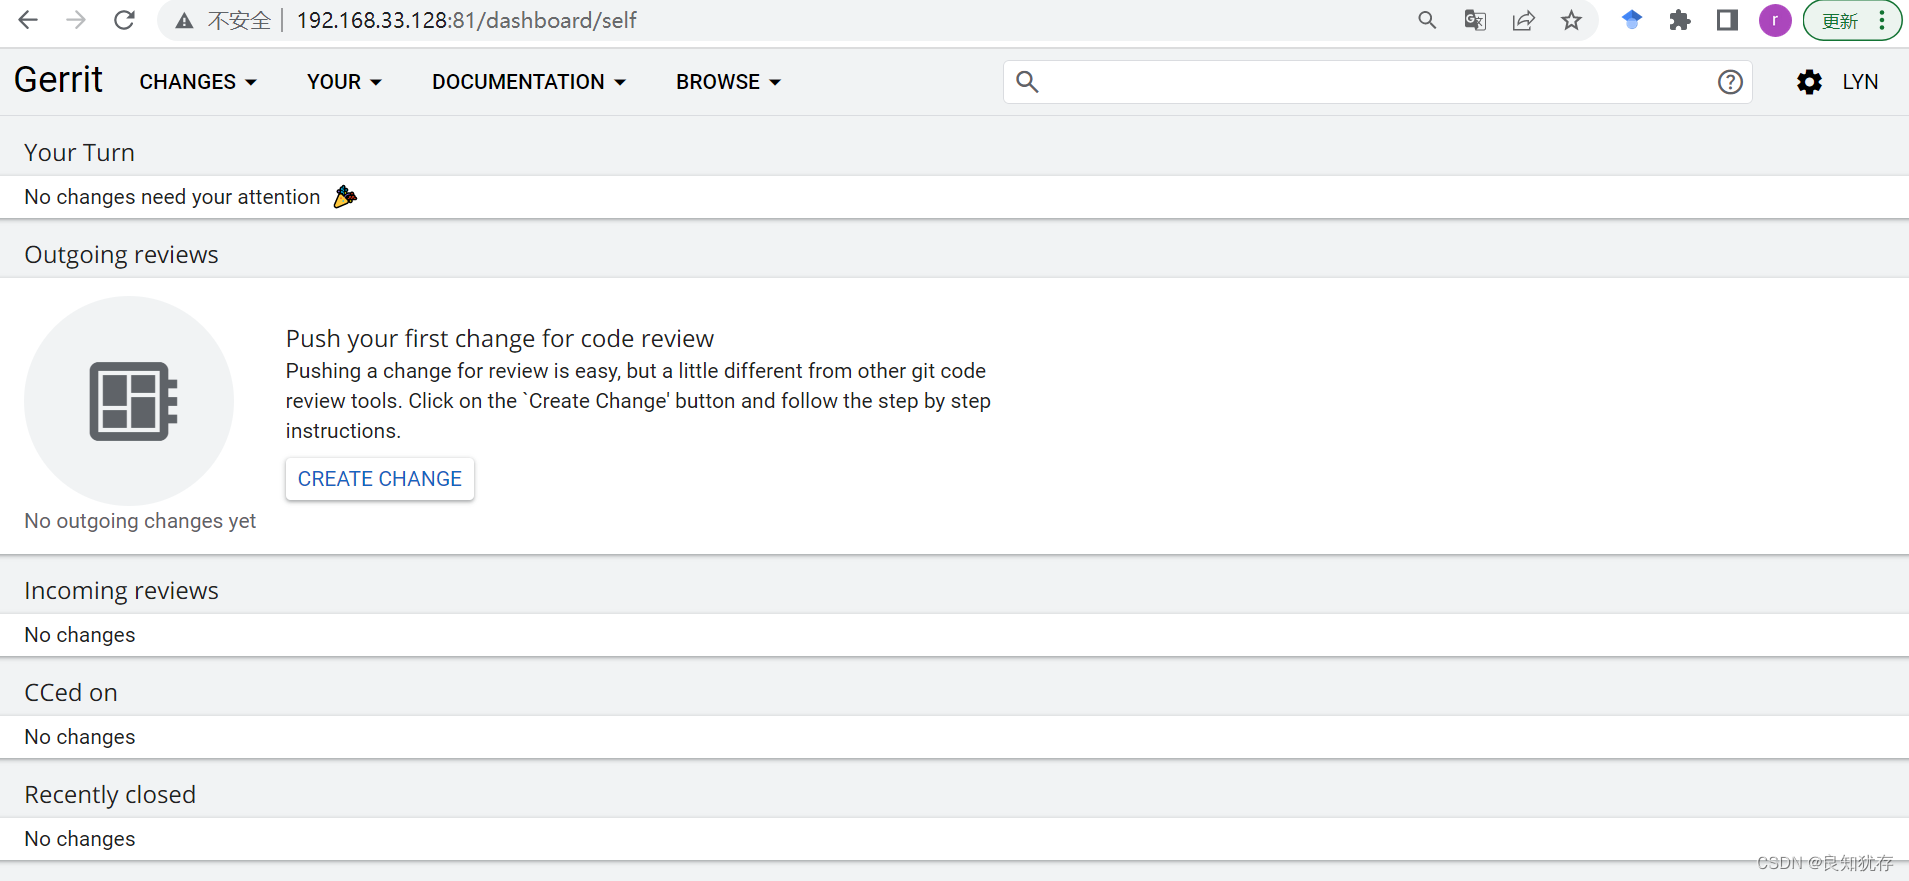
输入刚才htpasswd设置好的用户名和密码登录: 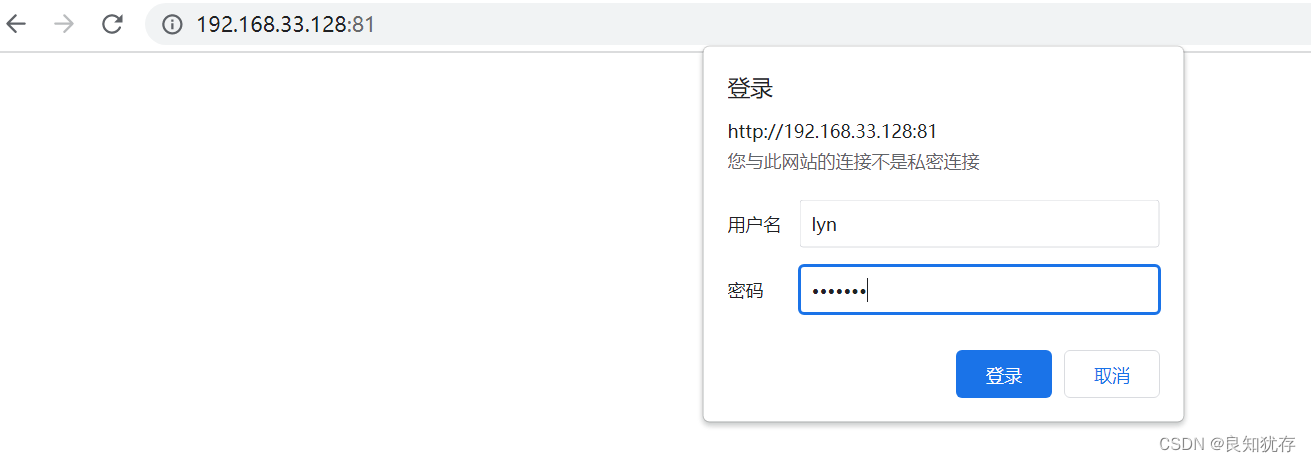 gerrit就可以看到了:
gerrit插件小知识
gerrit 使用过程中,当进行 commit时,必须要生成一个 Change-Id,否则,push到gerrit服务器时,会收到一个错误提醒,而生成Change-Id可以用hooks工具。hooks钩子工具中commit-msg hook可以帮我们生成Change-Id,就是运行gerrit使用安装的插件  插件安装情况可以在gerrit管理员的界面看到
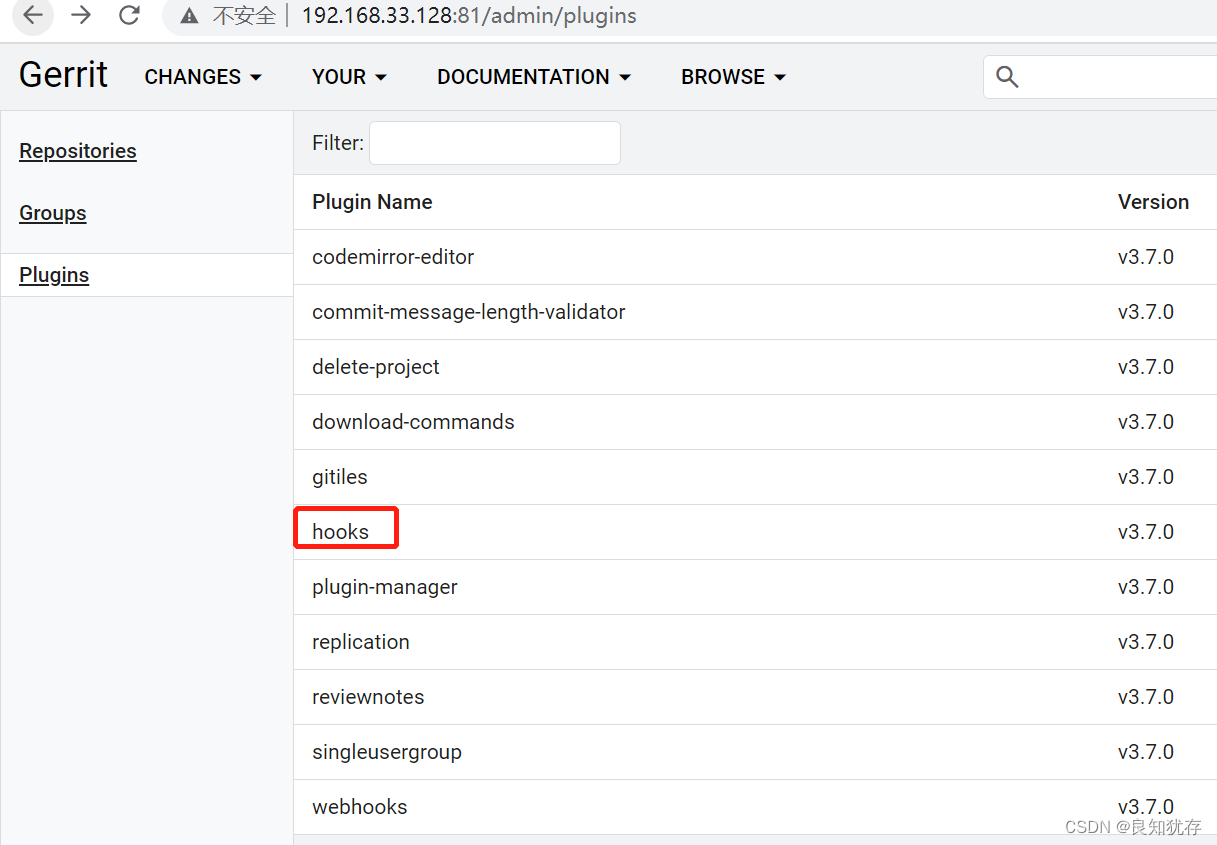 但是当我们想看插件里面的指导文档时候会遇到打不开情况:
 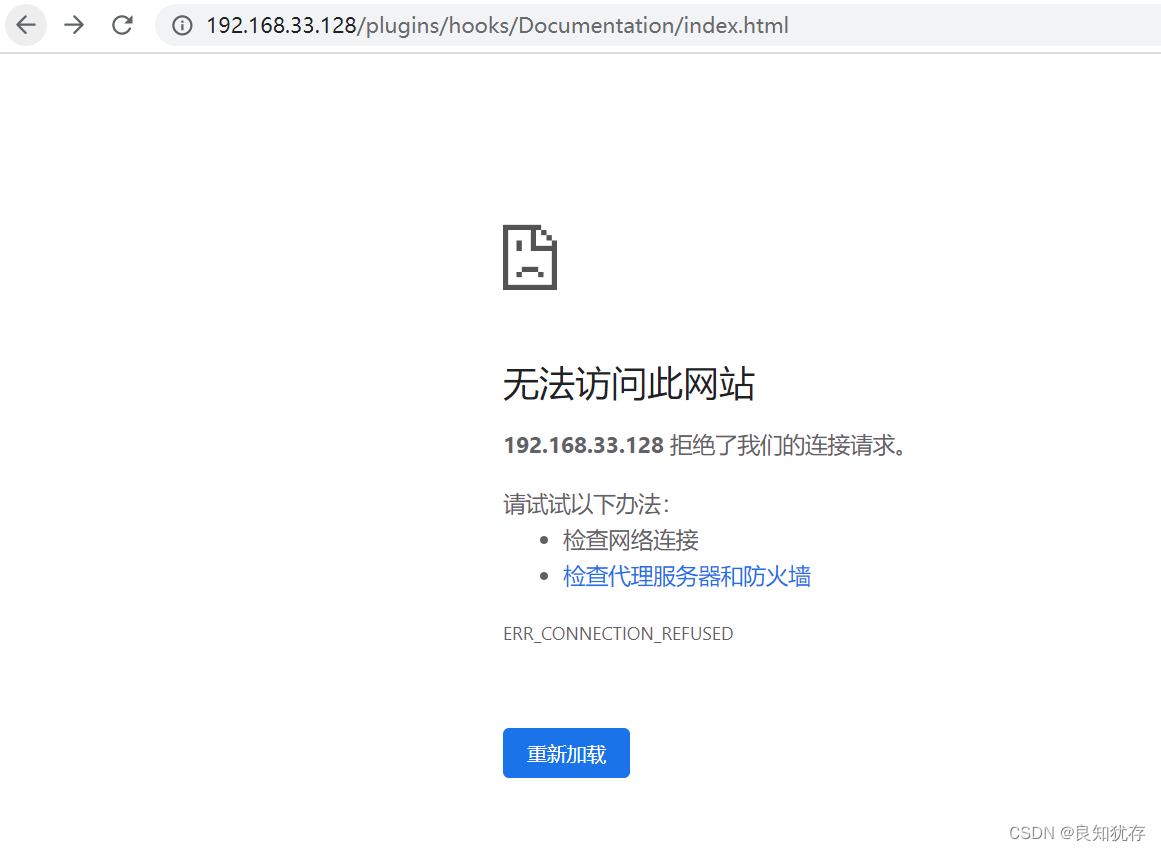 这个时候需要我们修改一下访问方式:如下修改
 http://192.168.33.128:81/plugins/hooks/Documentation/index.html
这样修改就可以看到插件的指导网页了 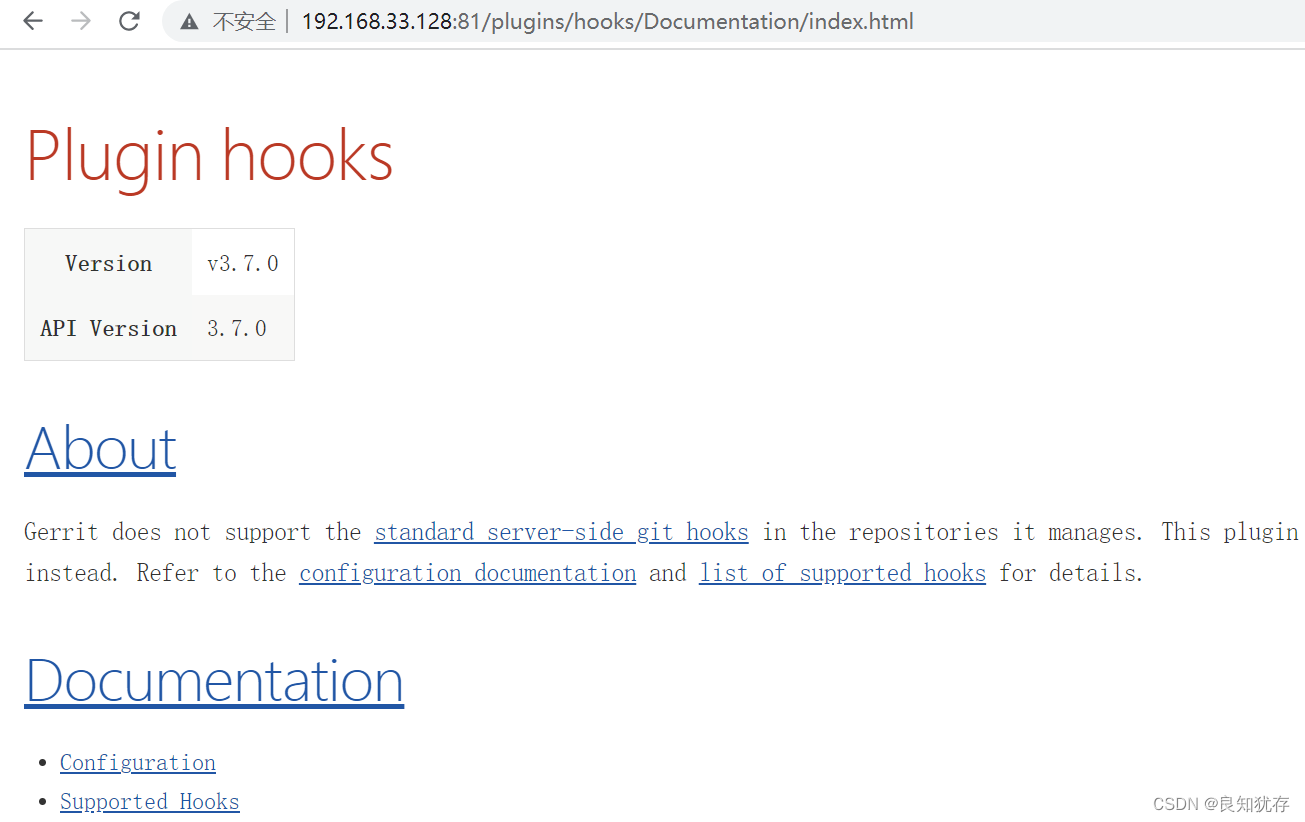 此外还有将Gerrit服务器设置开机自启动,Jenkins配置等等,后面我们再描述
结语
这就是我在gerrit部署基本操作的使用分享。如果大家有更好的想法,也欢迎大家加我好友交流分享哈。
作者:良知犹存,白天努力工作,晚上原创公号号主。公众号内容除了技术还有些人生感悟,一个认真输出内容的职场老司机,也是一个技术之外丰富生活的人,摄影、音乐 and 篮球。关注我,与我一起同行。
‧‧‧‧‧‧‧‧‧‧‧‧‧‧‧‧ END ‧‧‧‧‧‧‧‧‧‧‧‧‧‧‧‧
推荐阅读
【3】CPU中的程序是怎么运行起来的 必读
本公众号全部原创干货已整理成一个目录,回复[ 资源 ]即可获得。

 浙公网安备 33010602011771号