
Tomcat中容器的pipeline机制
本文主要目的是讲解tomcat中的pipeline机制,涉及部分源码分析
之前我们在前面的文章介绍过,tomcat中Container有4种,分别是Engine,Host,Context,Wrapper,这4个Container的实现类分别是StandardEngine,StandardHost,StandardContext,StandardWrapper。4种容器的关系是包含关系,Engine包含Host,Host包含Context,Context包含Wrapper,Wrapper则代表最基础的一个Servlet。
之前在tomcat架构简述那篇文章中介绍过,tomcat由Connector和Container两部分组成,而当网络请求过来的时候Connector先将请求包装为Request,然后将Request交由Container进行处理,最终返回给请求方。而Container处理的第一层就是Engine容器,但是在tomcat中Engine容器不会直接调用Host容器去处理请求,那么请求是怎么在4个容器中流转的,4个容器之间是怎么依次调用的,我们今天来讲解下。
当请求到达Engine容器的时候,Engine并非是直接调用对应的Host去处理相关的请求,而是调用了自己的一个组件去处理,这个组件就叫做pipeline组件,跟pipeline相关的还有个也是容器内部的组件,叫做valve组件。
Pipeline的作用就如其中文意思一样管道,可以把不同容器想象成一个独立的个体,那么pipeline就可以理解为不同容器之间的管道,道路,桥梁。那Valve这个组件是什么东西呢?Valve也可以直接按照字面意思去理解为阀门。pipeline是通道,valve是阀门,他们两有什么关系呢?
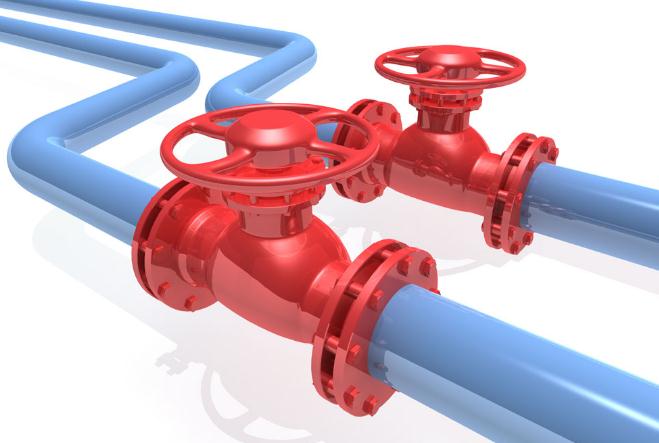
就像上图那样,每个管道上面都有阀门,Pipeline和Valve关系也是一样的。Valve代表管道上的阀门,可以控制管道的流向,当然每个管道上可以有多个阀门。如果把Pipeline比作公路的话,那么Valve可以理解为公路上的收费站,车代表Pipeline中的内容,那么每个收费站都会对其中的内容做一些处理(收费,查证件等)。
好了举例说完了,我们继续回归tomcat。在Catalina中,我们有4种容器,每个容器都有自己的Pipeline组件,每个Pipeline组件上至少会设定一个Valve(阀门),这个Valve我们称之为BaseValve(基础阀)。基础阀的作用是连接当前容器的下一个容器(通常是自己的自容器),可以说基础阀是两个容器之间的桥梁。
Pipeline定义对应的接口Pipeline,标准实现了StandardPipeline。Valve定义对应的接口Valve,抽象实现类ValveBase,4个容器对应基础阀门分别是StandardEngineValve,StandardHostValve,StandardContextValve,StandardWrapperValve。在实际运行中Pipeline,Valve运行机制如下图。
在单个容器中Pipeline,Valve运行图

Catalina中Pipeline,Valve运行图
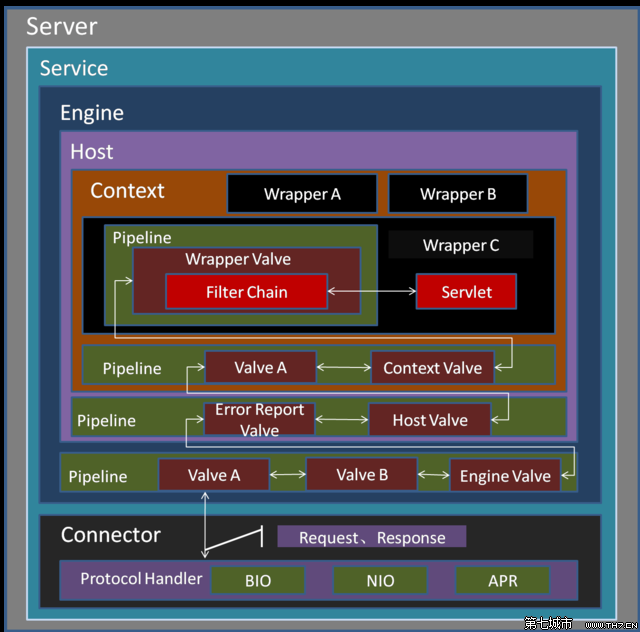
可以看到在同一个Pipeline上可以有多个Valve,每个Valve都可以做一些操作,无论是Pipeline还是Valve操作的都是Request和Response。而在容器之间Pipeline和Valve则起到了桥梁的作用,那么具体内部原理是什么,我们开始查看源码。
Valve
public interface Valve {
public String getInfo();
public Valve getNext();
public void setNext(Valve valve);
public void backgroundProcess();
public void invoke(Request request, Response response) throws IOException, ServletException;
public void event(Request request, Response response, CometEvent event) throws IOException,ServletException;
public boolean isAsyncSupported();
}
先看Valve接口的方法定义,方法不是很多,这里只介绍setNext(),getNext()。在上面我们也看到了一个Pipeline上面可以有很多Valve,这些Valve存放的方式并非统一存放在Pipeline中,而是像一个链表一个接着一个。当你获取到一个Valve实例的时候,调用getNext()方法即可获取在这个Pipeline上的下个Valve实例。
Pipeline
//pipeline 接口
public interface Pipeline {
public Valve getBasic();
public void setBasic(Valve valve);
public void addValve(Valve valve);
public Valve[] getValves();
public void removeValve(Valve valve);
public Valve getFirst();
public boolean isAsyncSupported();
public Container getContainer();
public void setContainer(Container container);
}
可以看出Pipeline中很多的方法都是操作Valve的,包括获取,设置,移除Valve,getFirst()返回的是Pipeline上的第一个Valve,而getBasic(),setBasic()则是获取/设置基础阀,我们都知道在Pipeline中,每个pipeline至少都有一个阀门,叫做基础阀,而getBasic(),setBasic()则是操作基础阀的。
StandardPipeline
public class StandardPipeline extends LifecycleBase implements Pipeline, Contained {
private static final Log log = LogFactory.getLog(StandardPipeline.class);
// ----------------------------------------------------------- Constructors
public StandardPipeline() {
this(null);
}
public StandardPipeline(Container container) {
super();
setContainer(container);
}
// ----------------------------------------------------- Instance Variables
protected Valve basic = null;
protected Container container = null;
protected static final String info = "org.apache.catalina.core.StandardPipeline/1.0";
protected Valve first = null;
//1111111111
@Override
protected synchronized void startInternal() throws LifecycleException {
// Start the Valves in our pipeline (including the basic), if any
Valve current = first;
if (current == null) {
current = basic;
}
while (current != null) {
if (current instanceof Lifecycle)
((Lifecycle) current).start();
current = current.getNext();
}
setState(LifecycleState.STARTING);
}
// ------------------------------------------------------- Pipeline Methods
//2222222222222222222222
@Override
public void setBasic(Valve valve) {
// Change components if necessary
Valve oldBasic = this.basic;
if (oldBasic == valve)
return;
// Stop the old component if necessary
if (oldBasic != null) {
if (getState().isAvailable() && (oldBasic instanceof Lifecycle)) {
try {
((Lifecycle) oldBasic).stop();
} catch (LifecycleException e) {
log.error("StandardPipeline.setBasic: stop", e);
}
}
if (oldBasic instanceof Contained) {
try {
((Contained) oldBasic).setContainer(null);
} catch (Throwable t) {
ExceptionUtils.handleThrowable(t);
}
}
}
// Start the new component if necessary
if (valve == null)
return;
if (valve instanceof Contained) {
((Contained) valve).setContainer(this.container);
}
if (getState().isAvailable() && valve instanceof Lifecycle) {
try {
((Lifecycle) valve).start();
} catch (LifecycleException e) {
log.error("StandardPipeline.setBasic: start", e);
return;
}
}
// Update the pipeline
Valve current = first;
while (current != null) {
if (current.getNext() == oldBasic) {
current.setNext(valve);
break;
}
current = current.getNext();
}
this.basic = valve;
}
//3333333333333333333
@Override
public void addValve(Valve valve) {
// Validate that we can add this Valve
if (valve instanceof Contained)
((Contained) valve).setContainer(this.container);
// Start the new component if necessary
if (getState().isAvailable()) {
if (valve instanceof Lifecycle) {
try {
((Lifecycle) valve).start();
} catch (LifecycleException e) {
log.error("StandardPipeline.addValve: start: ", e);
}
}
}
// Add this Valve to the set associated with this Pipeline
if (first == null) {
first = valve;
valve.setNext(basic);
} else {
Valve current = first;
while (current != null) {
if (current.getNext() == basic) {
current.setNext(valve);
valve.setNext(basic);
break;
}
current = current.getNext();
}
}
container.fireContainerEvent(Container.ADD_VALVE_EVENT, valve);
}
//44444444444
@Override
public Valve[] getValves() {
ArrayList
Valve current = first;
if (current == null) {
current = basic;
}
while (current != null) {
valveList.add(current);
current = current.getNext();
}
return valveList.toArray(new Valve[0]);
}
//5555555555555555
@Override
public void removeValve(Valve valve) {
Valve current;
if(first == valve) {
first = first.getNext();
current = null;
} else {
current = first;
}
while (current != null) {
if (current.getNext() == valve) {
current.setNext(valve.getNext());
break;
}
current = current.getNext();
}
if (first == basic) first = null;
if (valve instanceof Contained)
((Contained) valve).setContainer(null);
if (valve instanceof Lifecycle) {
// Stop this valve if necessary
if (getState().isAvailable()) {
try {
((Lifecycle) valve).stop();
} catch (LifecycleException e) {
log.error("StandardPipeline.removeValve: stop: ", e);
}
}
try {
((Lifecycle) valve).destroy();
} catch (LifecycleException e) {
log.error("StandardPipeline.removeValve: destroy: ", e);
}
}
container.fireContainerEvent(Container.REMOVE_VALVE_EVENT, valve);
}
//666666666666
@Override
public Valve getFirst() {
if (first != null) {
return first;
}
return basic;
}
}
在StandardPipeline标准实现类中我们看到了对Pipeline接口的实现,我们选了几个比较重要的方法做源码的解析。
方法1是startInternal()
//1111111111
@Override
protected synchronized void startInternal() throws LifecycleException {
// Start the Valves in our pipeline (including the basic), if any
Valve current = first;
if (current == null) {
current = basic;
}
while (current != null) {
if (current instanceof Lifecycle)
((Lifecycle) current).start();
current = current.getNext();
}
setState(LifecycleState.STARTING);
}
组件的start()方法,将first(第一个阀门)赋值给current变量,如果current为空,就将basic(也就是基础阀)赋值给current,接下来如果一个标准的遍历单向链表,调用每个对象的start()方法,最后将组件(pipeline)状态设置为STARTING(启动中)。
方法2
//2222222222222222222222
@Override
public void setBasic(Valve valve) {
// Change components if necessary
//如果已经有基础阀(basic已经有值并且跟要设置的值一样)那么直接return
Valve oldBasic = this.basic;
if (oldBasic == valve)
return;
// Stop the old component if necessary
//旧的基础阀非空 那么调用其stop方法取消和对应container的关联。(销毁旧的基础阀)
if (oldBasic != null) {
if (getState().isAvailable() && (oldBasic instanceof Lifecycle)) {
try {
((Lifecycle) oldBasic).stop();
} catch (LifecycleException e) {
log.error("StandardPipeline.setBasic: stop", e);
}
}
if (oldBasic instanceof Contained) {
try {
((Contained) oldBasic).setContainer(null);
} catch (Throwable t) {
ExceptionUtils.handleThrowable(t);
}
}
}
// Start the new component if necessary
//非空判断
if (valve == null)
return;
//和Container进行关联
if (valve instanceof Contained) {
((Contained) valve).setContainer(this.container);
}
//启动新的阀门
if (getState().isAvailable() && valve instanceof Lifecycle) {
try {
((Lifecycle) valve).start();
} catch (LifecycleException e) {
log.error("StandardPipeline.setBasic: start", e);
return;
}
}
//遍历阀门链表将新的阀门取代旧的阀门
// Update the pipeline
Valve current = first;
while (current != null) {
if (current.getNext() == oldBasic) {
current.setNext(valve);
break;
}
current = current.getNext();
}
//将基础阀设置为新的阀门
this.basic = valve;
}
方法2是用来设置基础阀的方法,这个方法在每个容器的构造函数中调用,代码逻辑也比较简单,稍微注意的地方就是阀门链表的遍历。
方法3
//3333333333333333333
@Override
public void addValve(Valve valve) {
// Validate that we can add this Valve
// 验证Valve 关联Container
if (valve instanceof Contained)
((Contained) valve).setContainer(this.container);
// Start the new component if necessary
// 验证组件状态,如果对的话 启动需要添加的Valve,调用start方法。
if (getState().isAvailable()) {
if (valve instanceof Lifecycle) {
try {
((Lifecycle) valve).start();
} catch (LifecycleException e) {
log.error("StandardPipeline.addValve: start: ", e);
}
}
}
//如果 first变量为空,将valve赋值给first变量,并且设置 valve的下一个阀门为基础阀
//之所以这样是因为,如果first为空说明这个容器只有一个基础阀,所以此次添加的阀门肯定是第一个非基础阀阀门
// Add this Valve to the set associated with this Pipeline
if (first == null) {
first = valve;
valve.setNext(basic);
} else {
//否则 遍历阀门链表,将要被添加的阀门设置在 基础阀之前。
Valve current = first;
while (current != null) {
if (current.getNext() == basic) {
current.setNext(valve);
valve.setNext(basic);
break;
}
current = current.getNext();
}
}
//container触发添加阀门事件
container.fireContainerEvent(Container.ADD_VALVE_EVENT, valve);
}
这方法是像容器中添加Valve,在server.xml解析的时候也会调用该方法,具体代码可以到Digester相关的文章中寻找。
方法4
//44444444444
@Override
public Valve[] getValves() {
ArrayList
Valve current = first;
if (current == null) {
current = basic;
}
while (current != null) {
valveList.add(current);
current = current.getNext();
}
return valveList.toArray(new Valve[0]);
}
获取所有的阀门,其实就是将阀门链表添加到一个集合内,最后转成数组返回。
方法5
//5555555555555555
@Override
public void removeValve(Valve valve) {
Valve current;
//如果first 是需要被移除的valve 那么将first的下一个阀门赋值给first
//并且current 赋值null,否则current 赋值first
if(first == valve) {
first = first.getNext();
current = null;
} else {
current = first;
}
//遍历阀门链表 查找需要被移除的阀门
//如果之前first是被移除的话 current = null是不会进入该循环
while (current != null) {
if (current.getNext() == valve) {
current.setNext(valve.getNext());
break;
}
current = current.getNext();
}
//如果first(此时已经指向下一个阀门)此时 == 基础阀,那么first置空
//从这里可以看出来 first指的是第一个阀门,即使整个container只有一个基础阀门也不会指向基础阀。
//first严格定义是 除了基础阀的第一个阀门。
if (first == basic) first = null;
//验证需要被移除的阀门 取消container关联
if (valve instanceof Contained)
((Contained) valve).setContainer(null);
//调用阀门的生命周期 stop destroy 方法。
if (valve instanceof Lifecycle) {
// Stop this valve if necessary
if (getState().isAvailable()) {
try {
((Lifecycle) valve).stop();
} catch (LifecycleException e) {
log.error("StandardPipeline.removeValve: stop: ", e);
}
}
try {
((Lifecycle) valve).destroy();
} catch (LifecycleException e) {
log.error("StandardPipeline.removeValve: destroy: ", e);
}
}
//触发container的移除valve事件。
container.fireContainerEvent(Container.REMOVE_VALVE_EVENT, valve);
}
方法666666
//666666666666
@Override
public Valve getFirst() {
if (first != null) {
return first;
}
return basic;
}
在方法5中我们也看到了,first指向的是容器第一个非基础阀门的阀门,从方法6中也可以看出来,first在只有一个基础阀的时候并不会指向基础阀,因为如果指向基础阀的话就不需要判断非空然后返回基础阀了,这是个需要注意的点!
关于tomcat的pipeline机制就讲那么多,其实涉及的非常基础,最关键的pipeline的invoke()方法也没有看,主要invoke()方法和其他的点比较重复,准备还是放到请求在容器中的流转讲解!敬请期待!

 浙公网安备 33010602011771号