canvas-网页蜘蛛网特效代码解读
1.效果

2.代码
<!DOCTYPE html>
<html lang="en">

<head>
    <meta charset="UTF-8">
    <meta http-equiv="X-UA-Compatible" content="IE=edge">
    <meta name="viewport" content="width=device-width, initial-scale=1.0">
    <title>Document</title>
</head>

<body>

</body>
<script>
    !function () {
        function n(n, e, t) {
            return n.getAttribute(e) || t
        }

        function e(n) {
            return document.getElementsByTagName(n)
        }

        function t() {
            var t = e("script"), o = t.length, i = t[o - 1];
            return { l: o, z: n(i, "zIndex", -1), o: n(i, "opacity", .5), c: n(i, "color", "0,0,0"), n: n(i, "count", 99) }
        }

        function o() {
            a = m.width = window.innerWidth || document.documentElement.clientWidth || document.body.clientWidth, c = m.height =
                window.innerHeight || document.documentElement.clientHeight || document.body.clientHeight
        }

        function i() {
            r.clearRect(0, 0, a, c);
            var n, e, t, o, m, l;
            s.forEach(function (i, x) {
                for (i.x += i.xa, i.y += i.ya, i.xa *= i.x > a || i.x < 0 ? -1 : 1, i.ya *= i.y > c || i.y < 0 ? -1 : 1, r.fillRect(i.x -
                    .5, i.y - .5, 1, 1), e = x + 1; e < u.length; e++) n = u[e], null !== n.x && null !== n.y && (o = i.x - n.x, m = i.y -
                        n.y, l = o * o + m * m, l < n.max && (n === y && l >= n.max / 2 && (i.x -= .03 * o, i.y -= .03 * m), t = (n.max - l)
                            / n.max, r.beginPath(), r.lineWidth = t / 2, r.strokeStyle = "rgba(" + d.c + "," + (t + .2) + ")", r.moveTo(i.x,
                                i.y), r.lineTo(n.x, n.y), r.stroke()))
            }), x(i)
        }

        var a, c, u, m = document.createElement("canvas"), d = t(), l = "c_n" + d.l, r = m.getContext("2d"),
            x = window.requestAnimationFrame || window.webkitRequestAnimationFrame || window.mozRequestAnimationFrame ||
                window.oRequestAnimationFrame || window.msRequestAnimationFrame || function (n) {
                    window.setTimeout(n, 1e3 / 45)
                }, w = Math.random, y = { x: null, y: null, max: 2e4 };

        m.id = l, m.style.cssText = "position:fixed;top:0;left:0;z-index:" + d.z + ";opacity:" + d.o,
            e("body")[0].appendChild(m), o(), window.onresize = o, window.onmousemove = function (n) {
                n = n || window.event, y.x = n.clientX, y.y = n.clientY
            }, window.onmouseout = function () {
                y.x = null, y.y = null
            };
        for (var s = [], f = 0; d.n > f; f++) {
            var h = w() * a, g = w() * c, v = 2 * w() - 1, p = 2 * w() - 1;
            s.push({ x: h, y: g, xa: v, ya: p, max: 6e3 })
        }
        u = s.concat([y]), setTimeout(function () {
            i()
        }, 100)
    }();
</script>

</html>
拿到代码第一感觉就是:这是人写的代码?感觉像是经过打包后的代码,但是看吧又能看得懂一点点。尝试下将其拆分成正常人能看懂的代码,发现还是有可能的,经过了一个下午的拆分,慢慢拆卸及修改变量名,改成了下面这样能让人基本不会害怕的代码:
<!DOCTYPE html>
<html lang="en">
<head>
<meta charset="UTF-8">
<meta http-equiv="X-UA-Compatible" content="IE=edge">
<meta name="viewport" content="width=device-width, initial-scale=1.0">
<title>Document</title>
</head>
<body>
</body>
<script>
!function () {
function getAttr(node, attrName, nullVal) {
return node.getAttribute(attrName) || nullVal
}
function getTags(n) {
return document.getElementsByTagName(n)
}
function canvasConfig() {
var allScriptTag = getTags("script"); // 取当前所有的<script>标签
var scriptTagLength = allScriptTag.length; // <script>标签的数量
var lastScriptTag = allScriptTag[scriptTagLength - 1]; // 最后一个<script>标签的索引(由于页面默认带了一个<script>标签,所以自己写的script标签是排在第二)
return {
scriptTagLength,
zIndex: getAttr(lastScriptTag, "zIndex", -1), // canvas在页面上的z轴索引
opacity: getAttr(lastScriptTag, "opacity", .9), // 线段的透明度
lineColor: getAttr(lastScriptTag, "color", "255,0,0"), // 线段的颜色
count: getAttr(lastScriptTag, "count", 50) // 最大蜘蛛网数量
}
}
function setCanvasWidthAndHeight() {
width = canvas.width = window.innerWidth || document.documentElement.clientWidth || document.body.clientWidth;
height = canvas.height = window.innerHeight || document.documentElement.clientHeight || document.body.clientHeight;
}
function draw() {
ctx.clearRect(0, 0, width, height); // 老规矩,画之前清空画布
var withMouseItem, t, sx, sy, length;
itemArr.forEach(function (item, index) {
// 绘制点
{
// x,y坐标点开始偏移(正或负)
item.x += item.xa;
item.y += item.ya;
// 如果某个点超出屏幕高度或者宽度的话,将这个偏移量取其反值(乘以 -1)。这样某个点就会做个镜面反射,在窗口内弹来弹去。
item.xa *= item.x > width || item.x < 0 ? -1 : 1;
item.ya *= item.y > height || item.y < 0 ? -1 : 1;
// 绘制这个点(-0.5是为了让点的直径是0.5像素)
ctx.fillRect(item.x - .5, item.y - .5, 1, 1);
}
for (var j = index + 1; j < withMouseArr.length; j++) {
withMouseItem = withMouseArr[j];
if (withMouseItem.x !== null && withMouseItem.y !== null) {
sx = item.x - withMouseItem.x;
sy = item.y - withMouseItem.y;
length = Math.sqrt(sx * sx + sy * sy); // 求出两个点之间的直线距离(勾股定理)
if (length < withMouseItem.max) {
if (withMouseItem === mouse && length >= withMouseItem.max / 2) {
// 由于mouse对象是按地址传递,所以这里通过判断mouse对象是否是withMouseArr里面的mouse对象判断。
item.x -= .03 * sx, item.y -= .03 * sy
/* 如果当前点和鼠标这个点之间的距离大于鼠标的max一半,(即当已经连上的处于mouse的max之内的点,如果超出max/2,将那个点的x,y值降低,使其保持在鼠标周围) */
}
t = (withMouseItem.max - length) / withMouseItem.max;
ctx.beginPath();
ctx.lineWidth = t / 2; // 距离越远,线段越细
ctx.strokeStyle = "rgba(" + d.lineColor + "," + (t + .2) + ")"; // 线段透明度随距离远变淡
ctx.moveTo(item.x, item.y);
ctx.lineTo(withMouseItem.x, withMouseItem.y);
ctx.stroke(); // 将这两个点连起来
}
}
}
});
requestAnimationFrame(draw);
}
var width;
var height;
var d = canvasConfig();
var requestAnimationFrame = window.requestAnimationFrame || window.webkitRequestAnimationFrame || window.mozRequestAnimationFrame ||
window.oRequestAnimationFrame || window.msRequestAnimationFrame || function (n) {
window.setTimeout(n, 1e3 / 45)
};
var mouse = { x: null, y: null, max: 300 }; // 鼠标的坐标对象。20000是鼠标最大可吸附距离
/*canvas相关设置*/
{
var canvas = document.createElement("canvas");
var ctx = canvas.getContext('2d');
canvas.id = "c_n" + d.scriptTagLength;
canvas.style.cssText = "position:fixed;top:0;left:0;z-index:" + d.zIndex + ";opacity:" + d.opacity;
getTags("body")[0].appendChild(canvas);
setCanvasWidthAndHeight();
}
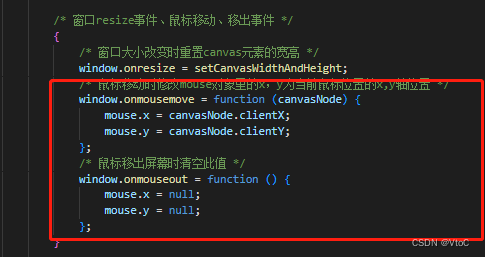
/* 窗口resize事件、鼠标移动、移出事件 */
{
/* 窗口大小改变时重置canvas元素的宽高 */
window.onresize = setCanvasWidthAndHeight;
/* 鼠标移动时修改mouse对象里的x,y为当前鼠标位置的x,y轴位置 */
window.onmousemove = function (canvasNode) {
mouse.x = canvasNode.clientX;
mouse.y = canvasNode.clientY;
};
/* 鼠标移出屏幕时清空此值 */
window.onmouseout = function () {
mouse.x = null;
mouse.y = null;
};
}
var itemArr = []; // 所有的点数组
for (var f = 0; f < d.count; f++) {
// 取随机x,y轴位置
var x = Math.random() * width;
var y = Math.random() * height;
// 取[-1,1]之间的随机x,y轴偏移量
var xa = 2 * Math.random() - 1;
var ya = 2 * Math.random() - 1;
itemArr.push({
x, // x/y轴位置
y,
xa,
ya, // -1 到 1 之间的随机值
max: 150 // 最大线段长度
})
};
var withMouseArr = itemArr.concat([mouse]);
setTimeout(function () {
draw()
}, 100);
}();
</script>
</html>
做完这一步,基本功能的实现逻辑就能懂一大半了。
3.功能思路
3.1 如何运动
整个功能的基本实现是在页面上所有的随机点的随机运动下实现的。就类似下面这图:
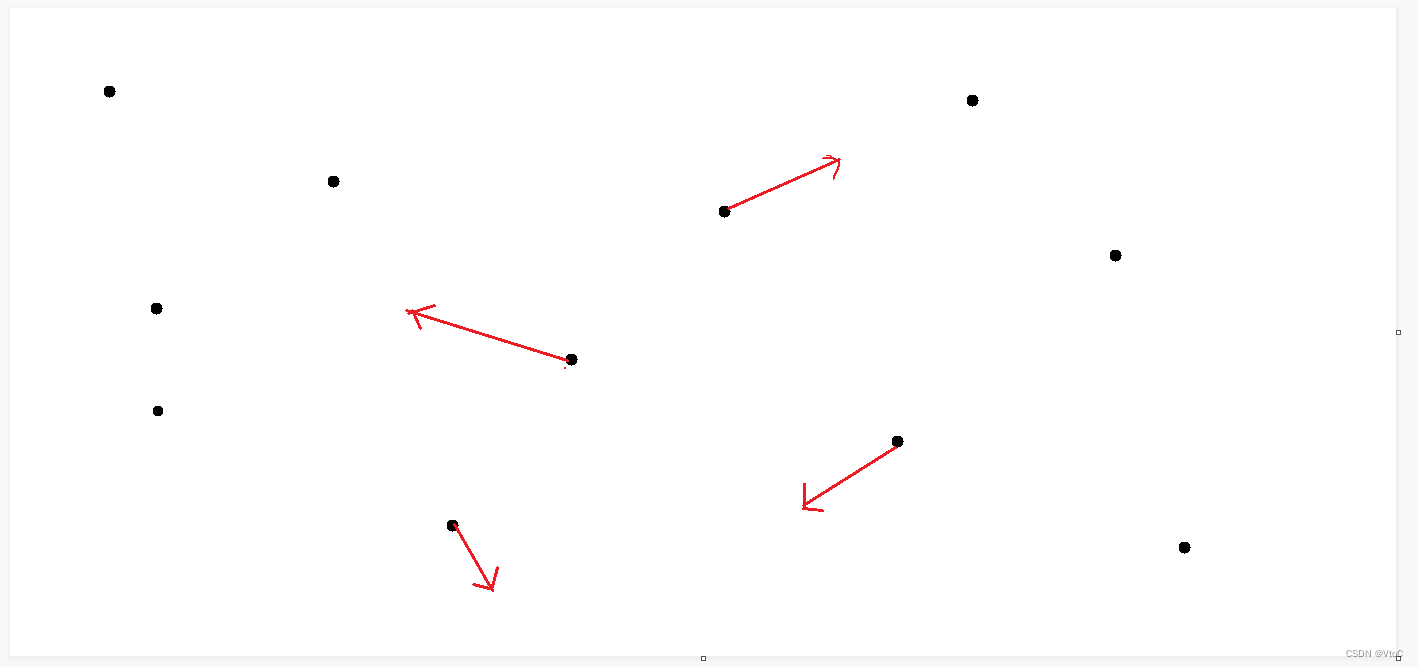
页面初始化时,给每个随机点都给一个随机方向。当这个点撞到屏幕边界时再做个镜面反射反弹继续运动。
3.2.如何连线
3.2.1 没有鼠标时如何连线
当没有鼠标时,如果某个点移动到另一个点的指定距离内时,将这两个点用线段链接起来,一个点可连多条线。当这两个点之间的距离超出指定距离时,不再绘制这两个点之间的线。
3.2.2 有鼠标时如何连线
当存在鼠标时,鼠标也算一个点,它的连线范围比普通的点大。且连上鼠标的点在某个范围内会自动偏移使得这个点始终保持在和鼠标这个点一定距离内,从而不会断开链接。所以当鼠标移动速度过快时就会断开鼠标与点之间的连线。
4.代码解读
4.1两个关键的数组
基本的配置canvas代码很容易看懂。看下这两个关键的数组:

其中itemArr是保存了所有的点的数组,每个点给了它初始的x,y轴坐标数据,以及它的运动方向的数据。
withMouseArr就是比itemArr多了一个mouse对象,这个mouse对象就是鼠标,其中包含了鼠标的x,y轴坐标数据。在鼠标的mousemove事件中实时更新鼠标在mouse对象中:
为什么要两个数组?继续往下看:
在所有的准备工作完成以后就要开始绘制了(draw()):

可以看到这里有两个for循环,外层的是那个不包含鼠标对象的所有点的数组。内层遍历的是包含鼠标对象的数组。
- 每次遍历内层数组之前,先把当前遍历的这个点绘制出来,宽高是1个像素;
- 接着根据当前这个点(j = index + 1),在包含鼠标对象的数组中继续向后遍历。
- 先算出其他点(withMouseItem)与当前点(item)之间的距离。如果距离小于设定的指定值(max),将这两个点链接起来。一个点可连接多个其他点。
- 如果是这个点是鼠标的话,鼠标的可连接范围要大一点。且如果鼠标和其他点之间的距离在鼠标的最大值和最大值一半的位置之间,让非鼠标的那个点无法远离鼠标(
item.x -= .03 * sx, item.y -= .03 * sy)。
- 最后就是根据指定条件绘制线啦。怎么样,是不是没有那么复杂啦!

 浙公网安备 33010602011771号