ipvs--eBPF转载
https://lwn.net/Articles/740157/
http://arthurchiao.art/blog/ebpf-and-k8s-zh/
https://elixir.bootlin.com/linux/v4.15/source/tools/bpf/bpftool/Documentation/bpftool.rst
https://elixir.bootlin.com/linux/v4.15/source/tools/bpf/bpftool
参考书籍:https://files.cnblogs.com/files/codestack/OReilly-Linux-Observability-with-BPF-2019.rar
腾讯云在其使用内核版本中实现了ipvs+ebpf 提升性能 , 解决了iptable-snat对其性能的影响
patch如下:
https://github.com/Tencent/TencentOS-kernel/blob/master/net/netfilter/ipvs/ip_vs_bpf_proc.c#L56
https://github.com/Tencent/TencentOS-kernel/blob/master/net/netfilter/ipvs/ip_vs_bpf_proc.c#L402
https://github.com/Tencent/TencentOS-kernel/commit/d1a590ff8758af2fc1055899c9bf49f3028243d5#diff-1a592df245508d5f30565cf2860fa670bf1ae15b0d69d07e5328a0b880fc1024
https://cloud.tencent.com/developer/inventory/600/article/1685332
iptables模式
存在的问题:
1.可扩展性差。随着service数据达到数千个,其控制面和数据面的性能都会急剧下降。原因在于iptables控制面的接口设计中,每添加一条规则,需要遍历和修改所有的规则,使得其控制面性能是O(n²)。在数据面,规则是用链表组织的,使得其数据面的性能是O(n)
2.LB调度算法仅支持随机转发。
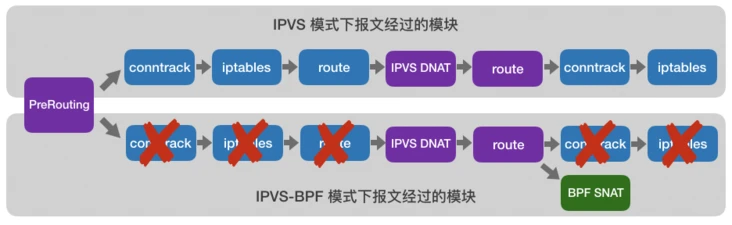
IPVS模式
IPVS 是专门为LB设计的。它用hash table管理service,对service的增删查找都是O(1)的时间复杂度。不过IPVS内核模块没有SNAT功能,因此借用了iptables的SNAT功能。IPVS 针对报文做DNAT后,将连接信息保存在nf_conntrack中,iptables据此接力做SNAT。该模式是目前Kubernetes网络性能最好的选择。但是由于nf_conntrack的复杂性,带来了很大的性能损耗
基于eBPF的IPVS-BPF优化方案
针对nf_conntrack带来的性能问题,腾讯TKE团队设计实现了IPVS-BPF。核心思想是绕过nf_conntrack,减少处理每个报文的指令数目,从而节约CPU,提高性能。其主要逻辑如下:
- 在IPVS内核模块中引入开关,支持原生IPVS逻辑和IPVS-BPF逻辑的切换
- 在IPVS-BPF模式下,将IPVS hook点从LOCALIN前移到PREROUTING,使访问service的请求绕过nf_conntrack
- 在IPVS新建连接和删除连接的代码中,相应的增删eBPF map中的session信息
- 在qdisc挂载eBPF的SNAT代码,根据eBPF map中的session信息执行SNAT
优化前后报文处理流程的对比
来自:https://segmentfault.com/a/1190000023012440
在腾讯云的技术实现细节中,就有通过IPVS模块向BPF Map插入数据的逻辑,其关键代码如下所示:
// https://github.com/Tencent/TencentOS-kernel/blob/master/net/netfilter/ipvs/ip_vs_bpf_proc.c#L56
struct bpf_map  *conntrack_map;


// https://github.com/Tencent/TencentOS-kernel/blob/master/net/netfilter/ipvs/ip_vs_bpf_proc.c#L402
static ssize_t ip_vs_bpf_write(struct file *file,
                   const char __user *ubuf,
                   size_t count,
                   loff_t *ppos)
{
    int err = 0;
    struct bpf_map *map = NULL;
    struct bpf_prog *prog1 = NULL;
    struct bpf_prog *prog2 = NULL;
    const char delim[2] = ":";
    char ids[5][20];
    char *token;
    int tag, pid;
    unsigned int mapid, progid1, progid2;
    char buf[100];
    int i = 0;
    char *s = buf;
...

    /* singleton:conntrack_map is assigned once,
     * and be nulled in module exit
     */
    if (conntrack_map) {
        pr_err("%s %d conntrack_map exists\n",
               __func__, __LINE__);
        return -EEXIST;
    }
...

    err = bpf_conntrack_map_get(pid, mapid,
                    (long long)(resolve_addrs.bpf_map_fops),
                    &map);
    if (err != 0 || !map) {
        pr_err("%s acquire bpf_map failed\n", __func__);
        return -EINVAL;
    }
...

    bpf_map_fd = mapid;
...
    // got the target bpf map via fd
    conntrack_map = map;
...
}

// https://github.com/Tencent/TencentOS-kernel/blob/master/net/netfilter/ipvs/ip_vs_bpf_proc.c#L306
static int bpf_conntrack_map_get(int pid,
                 unsigned int fd,
                 unsigned long long addr,
                 struct bpf_map **map)
{
    struct files_struct *files;
    struct task_struct *task;
    struct file *file;
    int err = 0;

...
    file = fcheck_files(files, fd);
...
    *map = file->private_data;
    if (*map)
        bpf_map_inc2(*map);
...
}
简单说明下ip_vs_bpf_proc.c文件:
- 在
ip_vs_bpf_proc.c这个文件开头声明了一个bpf_map结构(来自内核bpf体系)的变量conntrack_map,这个就是将来被IPVS操作的BPF Map对象。 - 同样是在
ip_vs_bpf_proc.c这个文件里,函数ip_vs_bpf_write()内调用了bpf_conntrack_map_get()方法,而它的入参之一mapid在这里就是BPF Map的fd,这个方法内容就是通过fd找到了背后相关数据,并序列化为bpf_map结构的对象,最终赋值给conntrack_map,完成目标BPF Map的获取。
然后在IPVS模块创建新connection时,对上面conntrack_map插入了必要的元素,关键代码如下所示:
// https://github.com/Tencent/TencentOS-kernel/blob/master/net/netfilter/ipvs/ip_vs_conn.c#L1098
static bool ip_vs_conn_new_bpf(struct ip_vs_dest *dest,
                   unsigned int flags,
                   const struct ip_vs_conn_param *p,
                   int *skip)
{
    int i;
    struct ip_vs_service *svc;
    struct bpf_lb_conn_key key = {};
    struct bpf_lb_conn_key reply_key = {};
    struct bpf_lb_conn_value value = {};
    struct bpf_lb_conn_value reply_value = {};
    struct bpf_lb_conn_value *v;
    int inserted = 0;
    struct bpf_map *map;

...
    if (!bpf_mode_on)
        return true;
...
    // conntrack_map is the same one
    map = conntrack_map;
...
    lip = alloc_localip();
    reply_key.sip = key.dip;
    reply_key.sport = key.dport;
    reply_key.dip = lip;
    reply_key.dport = key.sport;
    reply_key.proto = p->protocol;
    reply_key.vip = 0;
    reply_key.vport = 0;
    reply_key.pad = 0;

    atomic_set(&reply_value.ref, 0);
    reply_value.sip = key.dip;
    reply_value.sport = key.dport;
    reply_value.dip = key.sip;
    reply_value.dport = key.sport;
    reply_value.proto = p->protocol;
...
    if (likely(!map->ops->map_lookup_elem(map, &reply_key))) {
        if (likely(map->ops->map_update_elem(map,
                                 &reply_key,
                                 &reply_value,
                                 BPF_ANY) == 0)) {
                /* the common case! break the loop */
                inserted = 1;
                nf_conntrack_single_unlock(&reply_key,
                               map->key_size);
                break;
            }
            /* if lookup ok, shall insert ok since lock is held!*/
            pr_err("map insert key failed\n");

            BPF_STAT_INC(p->ipvs, BPF_NEW_INSERT);
            nf_conntrack_single_unlock(&reply_key, map->key_size);
            return false;
        }
...
}
上面的代码里使用了map_lookup_elem()和map_update_elem()两个操作BPF Map的方法——先查询后更新(插入新的元素),完成对BPF Map的操作

 浙公网安备 33010602011771号