android,java實現NanoHTTPD 輕量級服務器
android,java實現NanoHTTPD 輕量級服務器
NanoHTTPD.java下載地址 https://download.csdn.net/download/qq_36355271/10478872
下面用到的 HanoHTTPD可通過上面地址下載:
1,服務現實類:
/**
 * Created by zjp on 2018/6/11.
 */
這個類就是在運行的小型服務器了。serve方法用於獲取客戶端請求的數據,和返回請求結果。
 public class HttpServer extends NanoHTTPD {
  public HttpServer(String hostname,int port) {
   super(hostname,port);
  }
 public HttpServer(int port) {
       super(port);
 }
 @Override
 public Response serve(IHTTPSession session) {
       /*我在這裏做了一個限制,只接受POST請求。這個是項目需求。*/
   if (Method.POST.equals(session.getMethod())) {
          Map<String, String> files = new HashMap<String, String>();
         /*獲取header信息,NanoHttp的header不僅僅是HTTP的header,還包括其他信息。*/
       Map<String, String> header = session.getHeaders();
 try {
     /*這句尤爲重要就是將將body的數據寫入files中,大家可以看看parseBody具體實現,倒現在我也不明白爲啥這樣寫。*/
            session.parseBody(files);
     /*看就是這裏,POST請教的body數據可以完整讀出*/
       String body = session.getQueryParameterString();//
           CNTrace.d("header : " + header);//
   CNTrace.d("body : " + body);
   /*這裏是從header裏面獲取客戶端的IP地址。NanoHttpd的header包含的東西不止是HTTP heaer的內容*/
       header.get("http-client-ip");
   } catch (IOException e) {
     e.printStackTrace();
   } catch (ResponseException e) {
            e.printStackTrace();
   }
  /*這裏就是爲客戶端返回的信息了。我這裏返回了一個200和一個HelloWorld*/
這裏的返回值可以 自定義返回值可以直接去 NanoHTTPd 文件中去修改增加,下面會有介紹
return new NanoHTTPD.Response(Response.Status.OK, "text/html", "HelloWorld"); }else return new NanoHTTPD.Response(Response.Status.NOT_USE_POST, "text/html", "use post");// 這裏的
//Response.Status.NOT_USE_POST 就是我自定義的。
; }}
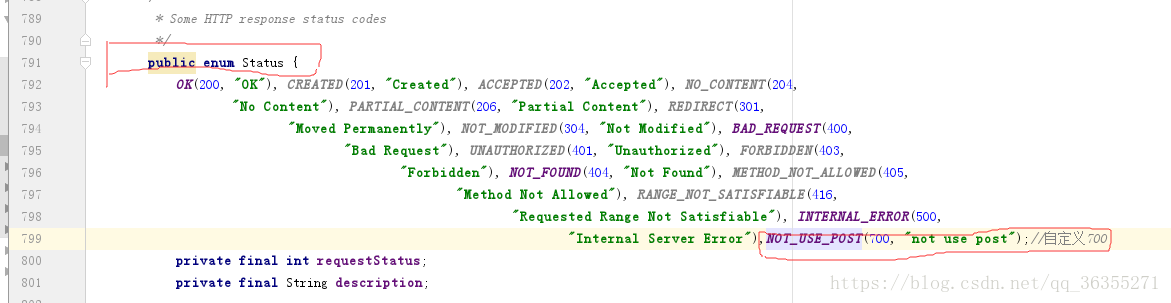
2,自定義服務訪問返回值類型。
在NanoHTTPD。java文件中找到 Status 方法,這裏面就是訪問返回的狀態定義,如下圖,最後的紅線框爲我自定義的部分,您也可以按這個格式添加你要的狀態和返回值,中間用逗號隔開,調用時按上面提到的
Response.Status.NOT_USE_POST 即可。
3,服務啓動類
/**
 * Created by zjp on 2018/6/11.
 */
//服務啓動相當簡單,可以像下面在service中啓動,也可以在activity中啓動,要注意需在onDestroy方法中添加 stop方法。 下面的 8888 爲設置
的端口,一般http支持的端口號都可以。
 public class MainService extends Service {
    private HttpServer mHttpServer = null;//這個是HttpServer的句柄。

    @Override
    public void onCreate() {
        //在這裏開啓HTTP Server。
        mHttpServer = new HttpServer(8888);
        try {
            mHttpServer.start();
        } catch (IOException e) {
            e.printStackTrace();
        }
    }

    @Override
    public void onDestroy() {
        //在這裏關閉HTTP Server
        if(mHttpServer != null)
            mHttpServer.stop();
    }

    @Nullable
    @Override
    public IBinder onBind(Intent intent) {
        return null;
    }
}
下載NANOHTTPD 文件放到項目包中,這個小型服務器就OK了,你的手機就可以唄其他局域網設備訪問了。
4,訪問方法:
// 客戶端訪問方法  ip爲局域網ip  端口爲MainService設定DE端口

 class MySender extends Thread {
    @Override
    public void run() {
        // TODO Auto-generated method stub
        super.run();
        Log.i("ss","MySender");
        try {
            JSONObject jb = new JSONObject();
            jb.put("我是參數名", "我是參數");
            OkHttpClient client = new OkHttpClient();
            RequestBody requestBody = new FormBody.Builder()
                    .add("username","admin")
                    .add("password","123456")
                    .build();
            Request request = new Request.Builder()
                    .url("http://" + ed.getText().toString().trim() + ":8888")
                    .post(requestBody)
                    .build();
            Call call  = client.newCall(request);
            Response response = null;
            try{
                response = call.execute();
                if(response.isSuccessful()){
                    //The call was successful.print it to the log
                    Log.i("OKHttp",response.body().string());
                }
            }catch(IOException e){
                e.printStackTrace();
            }
            String res = response.body().string();
            Log.i("ss","res");
            Message msg = new Message();
            msg.obj = res;
            handler.sendMessage(msg);
//                HttpPost post = new HttpPost("http://" + ip + ":8888");
//                post.setEntity(new StringEntity(request.toString()));
//                HttpResponse response = new DefaultHttpClient().execute(post);
//                String res = EntityUtils.toString(response.getEntity());

        } catch (Exception e) {
            // TODO Auto-generated catch block
            Log.i("ss","catch");
            e.printStackTrace();
        }
    }
}
}
在你的訪問設備 調用上面的線程就可以訪問 你的服務器了。重點注意1,ip爲局域網下服務器設備的ip,2,端口必須和訪問端設置的一樣。3,傳輸的數據可以根據自己需要自己設定。


 浙公网安备 33010602011771号