LVS之NAT模式
LVS之NAT模式实现
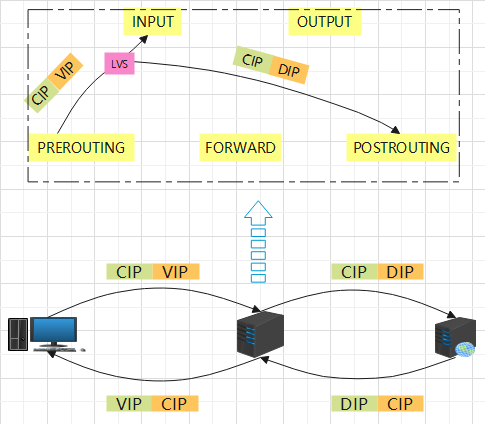
原理图:
拓扑图:
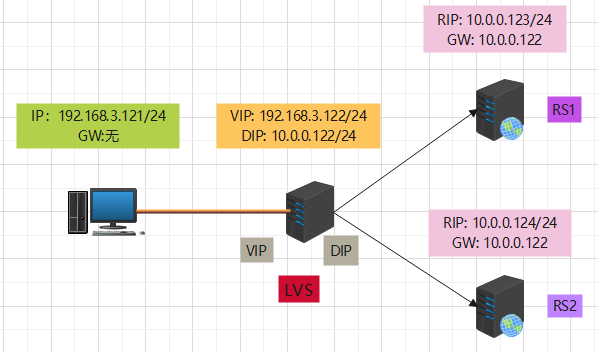
环境说明:
1、基于DNAT实现lvs,LVS需要开启ip_forward
2、lvs和RS之间可以跨路由
3、本实验基于虚拟机实验,client与VIP直连,不用配置网关;实际环境client和lvs之间有路由,client需要配置直连路由的为网关
4、client端无法ping通RS,client没有指定网关。原因:比对目标RIP和本机不在同网段,需发给网关,但是没有网关
5、 lvs没有对后端服务器状态健康检查功能
各主机路由情况:
[root@client ~]# route -n
Kernel IP routing table
Destination     Gateway         Genmask         Flags Metric Ref    Use Iface
192.168.3.0    0.0.0.0         255.255.255.0   U     100    0        0 ens33

[root@lvs ~]# route -n
Kernel IP routing table
Destination     Gateway         Genmask         Flags Metric Ref    Use Iface
10.0.0.0        0.0.0.0         255.255.255.0   U     102    0        0 ens33
192.168.3.0    0.0.0.0         255.255.255.0   U     101    0        0 ens37

[root@rs1 ~]# route -n
Kernel IP routing table
Destination     Gateway         Genmask         Flags Metric Ref    Use Iface
0.0.0.0         10.0.0.122      0.0.0.0         UG    100    0        0 ens33
10.0.0.0        0.0.0.0         255.255.255.0   U     100    0        0 ens33

[root@rs2 ~]# route -n
Kernel IP routing table
Destination     Gateway         Genmask         Flags Metric Ref    Use Iface
0.0.0.0         10.0.0.122      0.0.0.0         UG    100    0        0 ens33
10.0.0.0        0.0.0.0         255.255.255.0   U     100    0        0 ens33
示例:基于轮询算法、NAT模式配置验证
【注意】示例中添加VIP的方法是临时添加,永久添加需要写入配置文件,或者使用nmcli命令添加VIP
1、lvs配置
 1 [root@lvs ~]#  sysctl -p
 2 net.ipv4.ip_forward = 1
 3 [root@lvs ~]# yum install -y ipvsadm
 4 [root@lvs ~]# ipvsadm -A -t 192.168.3.122:80 -s rr                  #添加VIP,指定算法为rr轮询
 5 [root@lvs ~]# ipvsadm -a -t 192.168.3.122:80 -r 10.0.0.123:80 -m    #-m masquerade lvs nat模式
 6 [root@lvs ~]# ipvsadm -a -t 192.168.3.122:80 -r 10.0.0.124:8080 -m  #lvs nat 模式可以映射指定端口
 7 [root@lvs ~]# ipvsadm -ln
 8 IP Virtual Server version 1.2.1 (size=4096)
 9 Prot LocalAddress:Port Scheduler Flags
10   -> RemoteAddress:Port           Forward Weight ActiveConn InActConn
11 TCP  192.168.3.122:80 rr
12   -> 10.0.0.123:80                Masq    1      0          0
13   -> 10.0.0.124:8080              Masq    1      0          0
14 [root@lvs boot]# route -n
15 Kernel IP routing table
16 Destination     Gateway         Genmask         Flags Metric Ref    Use Iface
17 10.0.0.0        0.0.0.0         255.255.255.0   U     102    0        0 ens33
18 192.168.3.0    0.0.0.0         255.255.255.0   U     101    0        0 ens37
2、RS 配置:
1 [root@rs1 html]# yum install -y httpd
2 [root@rs1 html]# echo httpd on RS1 >/var/www/html/index.html
3 [root@rs1 ~]# route -n
4 Kernel IP routing table
5 Destination     Gateway         Genmask         Flags Metric Ref    Use Iface
6 0.0.0.0         10.0.0.122      0.0.0.0         UG    100    0        0 ens33
7 10.0.0.0        0.0.0.0         255.255.255.0   U     100    0        0 ens33
1 [root@rs2 html]# yum install -y httpd
2 [root@rs2 html]# echo httpd on RS2 >/var/www/html/index.html
3 [root@rs2 html]# grep ^Listen /etc/httpd/conf/httpd.conf
4 Listen 8080
5 [root@rs2 ~]# route -n
6 Kernel IP routing table
7 Destination     Gateway         Genmask         Flags Metric Ref    Use Iface
8 0.0.0.0         10.0.0.122      0.0.0.0         UG    100    0        0 ens33
9 10.0.0.0        0.0.0.0         255.255.255.0   U     100    0        0 ens33
3、验证(可以调整lvs配置,验证其他算法)
1 [root@client ~]# while true;do curl 192.168.3.122; sleep 1; done
2 httpd on RS2
3 httpd on RS1
4 httpd on RS2
5 httpd on RS1
6 httpd on RS2
7 ...

 浙公网安备 33010602011771号