
使用C#winform编写渗透测试工具--端口扫描
 主要介绍使用C#winform编写渗透测试工具--端口扫描器,端口扫描器则是一种检测服务器或者主机虚拟端口是开启或关闭的工具。由于连接到局域网或互联网的计算机运行着不同服务,端口的存在允许同一台计算机上的不同应用程序同时共享网络资源。端口的范围为0到65535,0到1023的端口数最常用,它们中有许多是为FTP、SS-H、HTTP、telnet和DNS等服务保留的,1024到49151端口是注册端口,49152到65535则分配给动态或私人端口。
使用C#winform编写渗透测试工具--端口扫描器
主要介绍使用C#winform编写渗透测试工具--端口扫描器,端口扫描器则是一种检测服务器或者主机虚拟端口是开启或关闭的工具。由于连接到局域网或互联网的计算机运行着不同服务,端口的存在允许同一台计算机上的不同应用程序同时共享网络资源。端口的范围为0到65535,0到1023的端口数最常用,它们中有许多是为FTP、SS-H、HTTP、telnet和DNS等服务保留的,1024到49151端口是注册端口,49152到65535则分配给动态或私人端口。
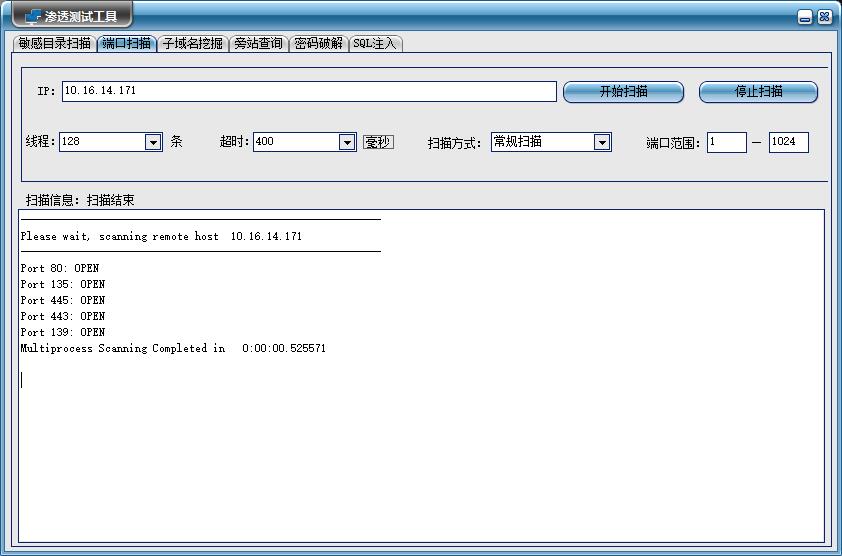
- 下面是软件运行的整体效果图,ip地址是一台本地主机,扫描结果显示该主机的80、135、445、443、139端口开启,并大概耗费0.52秒完成扫描。
目录
- 实现原理
- 功能介绍
- 代码实现
一、实现原理
扫描技术
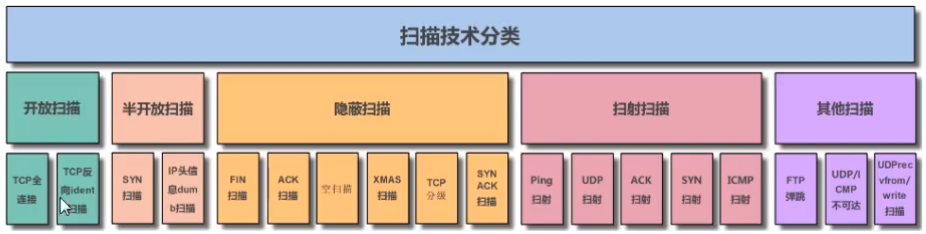
TCP端口扫描一般分为以下几种类型:
-
TCP connect扫描:也称为全连接扫描,这种方式直接连接到目标端口,完成了TCP三次握手的过程,这种方式扫描结果比较准确,但速度比较慢而且可轻易被目标系统检测到。
-
TCP SYN扫描:也称为半开放扫描,这种方式将发送一个SYN包,启动一个TCP会话,并等待目标响应数据包。如果收到的是一个RST包,则表明端口是关闭的,而如果收到的是一个SYN/ACK包,则表示相应的端口是打开的。
-
Tcp FIN扫描:这种方式发送一个表示断开TCP连接的FIN包,让对方关闭连接。如果收到了一个RST包,则表明相应的端口是关闭的。
-
TCP XMAS扫描:这种方式通过发送PSH、FIN、URG、和TCP标志位被设为1的数据包。如果收到了一个RST包,则表明相应的端口是关闭的。
本篇则是使用TCP connect扫描进行端口检测
二、功能介绍
-
线程数:选择线程数实现多线程扫描;
-
超时时间:如果在超时时间范围内没有收到回复,表示端口关闭;
-
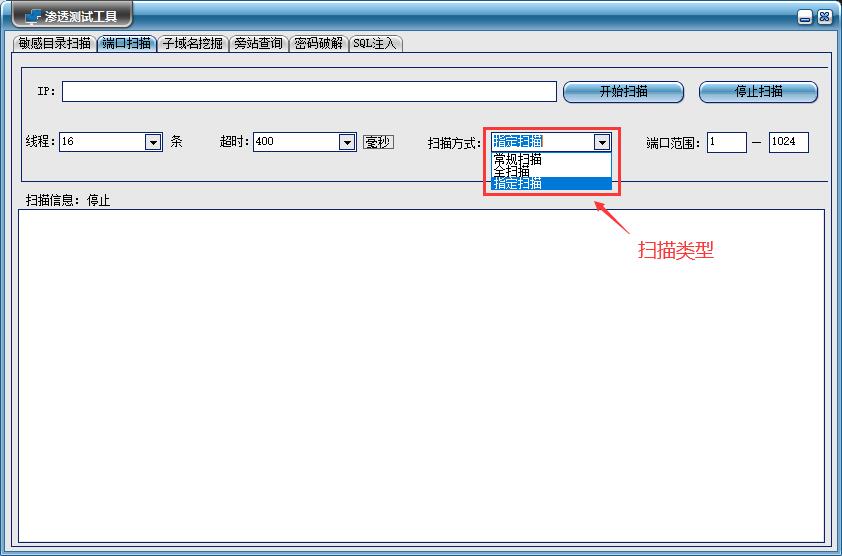
扫描方式:扫描方式分为常规扫描、全扫描和指定扫描
①常规扫描:对20, 21, 22, 23, 25, 53, 80, 81等常用端口进行扫描;
②全扫描:对0到65535端口进行扫描;
③指定扫描:对指定端口进行扫描。
三、代码实现
python脚本实现端口扫描
使用内建的库 multiprocessing.dummy 来实现多线程扫描
# coding: utf-8
import socket
from datetime import datetime
from multiprocessing.dummy import Pool as ThreadPool
import sys

def scan_port(port):
    ip = sys.argv[1]
    try:
        s = socket.socket(2, 1)
        res = s.connect_ex((ip, port))
        if res == 0:  # 如果端口开启 发送 hello 获取banner
            print('Port {}: OPEN'.format(port))
        s.close()
    except Exception as e:
        print(str(e.message))

def init_set(ip_adress, threads, time, type, port_s, port_e):
    remote_server_ip = ip_adress  # ip地址
    ports = []
    print('-' * 60)
    print('Please wait, scanning remote host ', remote_server_ip)
    print('-' * 60)
    socket.setdefaulttimeout(float(time)/1000.0)  # 设置超时时间
    if type == "全扫描":
        for i in range(1, 65535):
            ports.append(i)
    elif type == "常规扫描":
        ports = [20, 21, 22, 23, 25, 53, 80, 81, 102, 109, 110, 119, 135, 137, 138, 139, 161, 443, 445, 554, 1024, 1080,
                 1755, 4000, 5554, 5632, 8080]  # 常规端口
    else:
        for i in range(int(port_s), int(port_e)+1):
            ports.append(i)
    # Check what time the scan started
    t1 = datetime.now()
    pool = ThreadPool(processes=int(threads))  # 创建进程
    results = pool.map(scan_port, ports)
    pool.close()
    pool.join()
    print('Multiprocess Scanning Completed in  ', datetime.now() - t1)  # 显示运行的时间

#  传递参数,包括 ip地址,线程数、超时时间、扫描类型、扫描起始端口和终止端口
init_set(sys.argv[1], sys.argv[2], sys.argv[3], sys.argv[4], sys.argv[5], sys.argv[6])
C#调用脚本
对于python脚本中包含第三方模块的情况,同样,通过直接创建Process进程,调用python脚本,返回扫描结果。
- 创建按钮按下事件button1_Click,运行“调用python脚本”函数runPythonScan()
private void button4_Click(object sender, EventArgs e)
  {
    richTextBox2.Clear();
    runPythonScan();//运行python函数
    label17.Text = "开始扫描...";
  }
- 实例化一个python进程 调用.py 脚本
void runPythonScan()
        {
            string ip = textBox2.Text;
            string thread = comboBox4.Text;
            string time = comboBox2.Text;
            string type = comboBox5.Text;
            string port_start = textBox3.Text;
            string port_end = textBox4.Text;
            p = new Process();
            string path = "port_scan.py";//待处理python文件的路径,本例中放在debug文件夹下
            string sArguments = path;
            ArrayList arrayList = new ArrayList();
            arrayList.Add(ip);//需要渗透的网站
            arrayList.Add(thread);//线程数
            arrayList.Add(time);//超时时间
            arrayList.Add(type);//扫描类型
            arrayList.Add(port_start);//起始端口
            arrayList.Add(port_end);//终止端口
            foreach (var param in arrayList)//拼接参数
            {
                sArguments += " " + param;
            }
            p.StartInfo.FileName = @"D:\Anaconda\python.exe"; //没有配环境变量的话,可以写"xx\xx\python.exe"的绝对路径。如果配了,直接写"python"即可
            p.StartInfo.Arguments = sArguments;//python命令的参数
            p.StartInfo.UseShellExecute = false;
            p.StartInfo.RedirectStandardOutput = true;
            p.StartInfo.RedirectStandardInput = true;
            p.StartInfo.RedirectStandardError = true;
            p.StartInfo.CreateNoWindow = true;
            p.StartInfo.WindowStyle = ProcessWindowStyle.Hidden;
            p.Start();//启动进程
            //MessageBox.Show("启动成功");
            p.BeginOutputReadLine();
            p.OutputDataReceived += new DataReceivedEventHandler(p_OutputDataReceived_scan);
            Console.ReadLine();
            //p.WaitForExit();
        }
- 输出接收事件函数
void p_OutputDataReceived_scan(object sender, DataReceivedEventArgs e)
        {
            var printedStr = e.Data;
            Action at = new Action(delegate ()
            {
                //接受.py进程打印的字符信息到文本显示框
                richTextBox2.AppendText(printedStr + "\n");
                label7.Text = "扫描结束";
            });
            Invoke(at);
        }

 浙公网安备 33010602011771号