深入解析:【JUnit实战3_06】第三章:JUnit 的体系结构(下)

《JUnit in Action》全新第3版封面截图
写在前面
本章的 上一篇 笔记主要梳理了JUnit 4的种种困境,这一篇就来看看JUnit 5如何破局。
文章目录
第三章 JUnit 的体系结构(下)
(接上篇)……市场亟盼更轻量的基于模块化设计的全新测试框架,于是 JUnit 5 应运而生。
3.5 JUnit 5 的架构特点
全新的 JUnit 5 采用了模块化的解决方案,在践行 关注点的逻辑分离 原则上,主要聚焦三个方面:
- 为开发者提供编写测试的核心
API; - 重构测试的发现和运行机制;
- 提供能与主流
IDE和热门构建工具轻松交互的新API,以简化测试的运行。
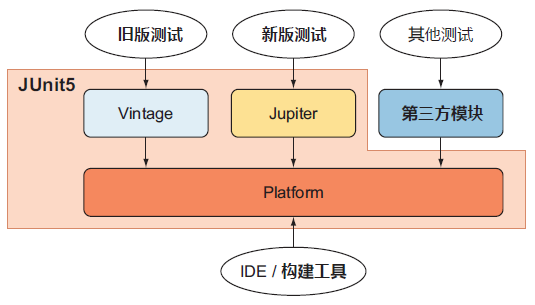
这样就有了目前的三个固定模块:
JUnit Platform平台模块:不仅提供了基于JVM启动测试的专属平台,全新的API还可以让测试代码很方便地在控制台、IDE及构建工具上启动;JUnit Jupiter模型模块:提出了全新的单元测试编程模型与扩展模型。其命名Jupiter源自太阳系第五大行星木星——同时也是体积最大的行星;JUnit Vintage测试引擎:用于在平台上运行基于JUnit 3、JUnit 4等历史版本的测试代码,实现向后兼容。
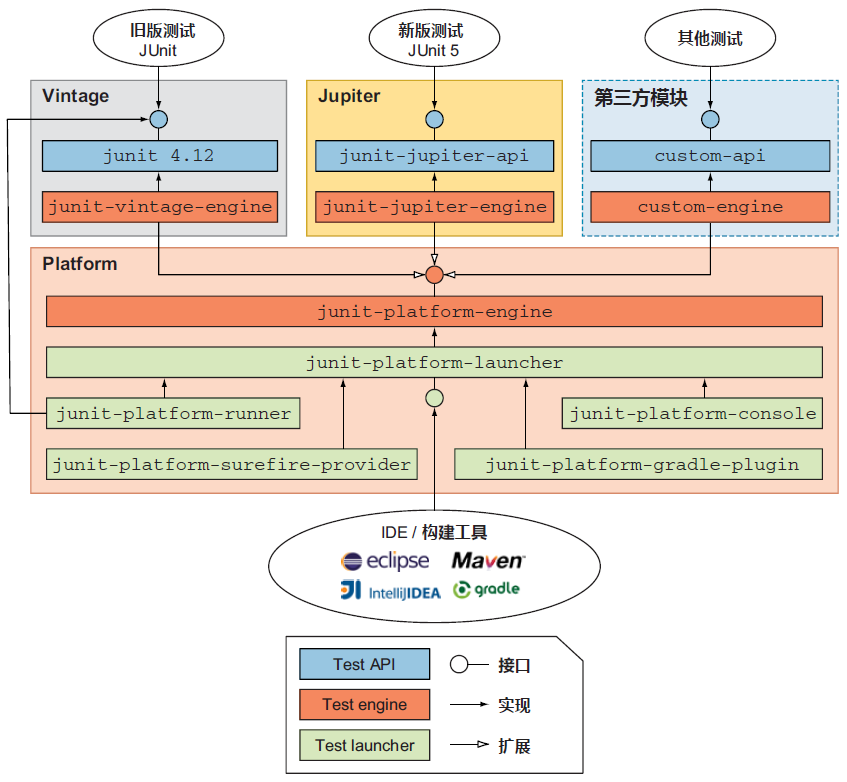
各模块的主要构件及用途梳理如下:
JUnit Platform:
| 构件名称 | 作用 |
|---|---|
junit-platform-commons | JUnit 的内部通用库,仅限 JUnit 框架内部使用。 |
junit-platform-console | 提供从控制台发现和执行 JUnit 平台测试的相关支持。 |
junit-platform-console-standalone | 包含所有依赖项的可执行 jar 包,是一个基于 Java 的命令行应用,可从控制台启动 JUnit 平台。 |
junit-platform-engine | 测试引擎的公共 API。 |
junit-platform-launcher | 用于配置和启动测试计划的公共 API,通常被 IDE 和构建工具使用。 |
junit-platform-runner | 用于在 JUnit 4 环境下执行 JUnit 平台测试及测试套件的运行工具。 |
junit-platform-suite-api | 包含在 JUnit 平台配置测试套件的相关注解。 |
junit-platform-surefire-provider | 基于 Maven 在 JUnit 平台发现和执行测试。 |
junit-platform-gradle-plugin | 基于 Gradle 在 JUnit 平台发现和执行测试。 |
JUnit Jupiter:
| 构建名称 | 作用 |
|---|---|
junit-jupiter-api | 用于编写测试和扩展的专属 API |
junit-jupiter-engine | JUnit Jupiter 专属测试引擎,仅用于运行时 |
junit-jupiter-params | 为 JUnit Jupiter 的参数化测试提供相关支持 |
junit-jupiter-migrationsupport | 提供从 JUnit 4 迁移到 JUnit Jupiter 的支持 |
而 JUnit Vintage 只包含一个 junit-vintage-engine 构件,专门用于运行 JUnit 3 或 JUnit 4 的实测用例,毕竟在 2017 年正式推出 JUnit 5 以前,市面上还有相当多的代码库是基于旧版的 JUnit 4 编写的测试用例。这可能也是为什么作者会在下一章中单独讨论新旧 JUnit 的迁移过渡的主要原因吧。
3.6 JUnit 5 架构图
原图详见书中图 3.8、3.9(第 36 页)。
以下两张示意图就是本章要介绍的核心内容 —— JUnit 5 的框架结构。从大包大揽的单独的 jar 文件发展成多模块协同发展的新格局 ——
简要版:
细致版:
3.7 旧版 JUnit 功能扩展示例
为了加深印象,本章还基于 JUnit 4 演示了自定义 runner 运行器和自定义 rules 规则的写法,同时附带了两个 JUnit 4 内置的 rules —— ExpectedException 和 TemporaryFolder 的用法(主要是为下一章的版本升级做铺垫)。
必需的依赖项:
<dependency>
<groupId>org.junit.vintage</groupId>
<artifactId>junit-vintage-engine</artifactId>
<version>5.6.0</version>
<scope>provided</scope>
</dependency>
3.7.1 示例1:自定义 rules 规则
先来看自定义 rules 的例子,实现在测试方法前后输出一行文字内容:
public class CustomRule implements TestRule {
private Statement base;
private Description description;
@Override
public Statement apply(Statement base, Description description) {
this.base = base;
this.description = description;
return new CustomStatement(base, description);
}
private static class CustomStatement extends Statement {
private final Statement base;
private final Description description;
public CustomStatement(Statement base, Description description) {
this.base = base;
this.description = description;
}
@Override
public void evaluate() throws Throwable {
System.out.println(this.getClass().getSimpleName() + " " + description.getMethodName() + " has started");
try {
base.evaluate();
} finally {
System.out.println(this.getClass().getSimpleName() + " " + description.getMethodName() + " has finished");
}
}
}
}
// test class
public class CustomRuleTester {
@Rule
public CustomRule myRule = new CustomRule();
@Test
public void myCustomRuleTest() {
System.out.println("Call of a test method");
}
}
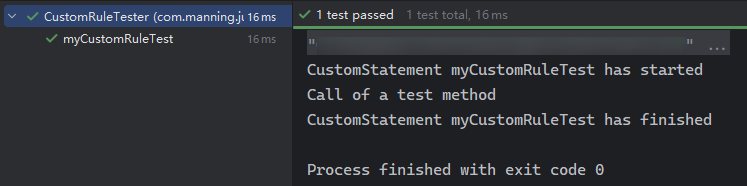
运行结果:
注意
@Rule注解除了像L3那样加到成员变量上,还可以加到注入字段的getter方法上(比成员变量先执行,也是官方文档的推荐做法):public class CustomRuleTester2 { private CustomRule myRule = new CustomRule(); @Rule public CustomRule getMyRule() { return myRule; } @Test public void myCustomRuleTest() { System.out.println("Call of a test method"); } }最终实测效果也是一样的。
3.7.2 示例2:自定义 runner 运行器
自定义 runner 稍显复杂,需要通过 RunNotifier 对象手动指定测试用例的开头和结尾:
public class CustomTestRunner extends Runner {
private final Class<?> testedClass;
  public CustomTestRunner(Class<?> testedClass) {
    this.testedClass = testedClass;
    }
    @Override
    public Description getDescription() {
    return Description
    .createTestDescription(testedClass, this.getClass().getSimpleName() + " description");
    }
    @Override
    public void run(RunNotifier notifier) {
    System.out.println("Running tests with " + this.getClass().getSimpleName() + ": " + testedClass);
    try {
    Object testObject = testedClass.newInstance();
    for (Method method : testedClass.getMethods()) {
    if (method.isAnnotationPresent(Test.class)) {
    notifier.fireTestStarted(Description
    .createTestDescription(testedClass, method.getName()));
    method.invoke(testObject);
    notifier.fireTestFinished(Description
    .createTestDescription(testedClass, method.getName()));
    }
    }
    } catch (InstantiationException | IllegalAccessException | InvocationTargetException e) {
    throw new RuntimeException(e);
    }
    }
    }
    // test class
    @RunWith(CustomTestRunner.class)
    public class CalculatorTest {
    @Test
    public void testAdd() {
    Calculator calculator = new Calculator();
    double result = calculator.add(10, 50);
    //      assertEquals(61, result, 0);
    MatcherAssert.assertThat("10 add 50 should be 60", result, Matchers.closeTo(61, 0.01));
    }
    }
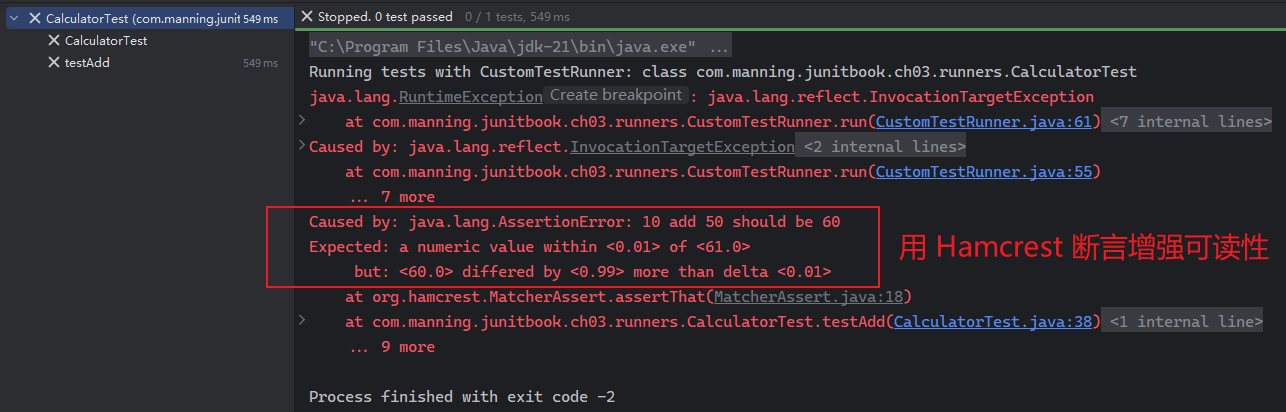
实测结果(故意改为报错的情况,用到了 Hamcrest 提供的断言方法):
3.7.3 示例3:内置 rules 演示抛异常下的测试
需要用到内置 rules 类 ExpectedException,对抛出的异常和异常信息的设置必须先于测试代码的执行:
public class RuleExceptionTester {
@Rule
public ExpectedException expectedException = ExpectedException.none();
private Calculator calculator = new Calculator();
@Test
public void expectIllegalArgumentException() {
expectedException.expect(IllegalArgumentException.class);
expectedException.expectMessage("Cannot extract the square root of a negative value");
calculator.sqrt(-1);
}
@Test
public void expectArithmeticException() {
expectedException.expect(ArithmeticException.class);
expectedException.expectMessage("Cannot divide by zero");
calculator.divide(1, 0);
}
}
3.7.4 示例4:内置 rules 演示临时文件与文件夹的测试
对于需要临时创建文件夹或临时文件的测试场景,JUnit 4 也提供了内置的工具类 TemporaryFolder,可实现测试前的自动创建,并在测试完成后自动清理。
和 ExpectedException 类似,相关文件操作必须写在断言语句前面(L9、L10):
public class RuleTester {
@Rule
public TemporaryFolder folder = new TemporaryFolder();
private static File createdFolder;
private static File createdFile;
@Test
public void testTemporaryFolder() throws IOException {
createdFolder = folder.newFolder("createdFolder");
createdFile = folder.newFile("createdFile.txt");
assertTrue(createdFolder.exists());
assertTrue(createdFile.exists());
}
@AfterClass
public static void cleanUpAfterAllTestsRan() {
assertFalse(createdFolder.exists());
assertFalse(createdFile.exists());
}
}
注意:给出这四个示例的根本目的,是为了突出 JUnit 4 自定义扩展的难写和反射机制的种种弊端,为下一章 JUnit 5 的优化做铺垫。
后话
自此,关于JUnit架构演进的大致过程就梳理完了。不知道认真看到这里的朋友们是否也会和当初的我一样,对JUnit 4没有提前考虑可扩展性和模块化设计感到不解?对主流IDE的研发团队长期以来饱受JUnit 4反射机制折磨而无动于衷的态度感到不可思议?难道世界真就是一个巨大的草台班子吗?直到再次梳理并发表这篇笔记,我才终于恍然大悟。
借用当下流行的一句话:一代人有一代人的上甘岭。JUnit 4诞生于“中世纪”的 2006 年,那时EJB才初露锋芒,互联网的春天还远未到来。当时JUnit 4的历史使命是纠正了JUnit 3的一些方向性错误(方法名必须以test开头、不支持功能扩展、解绑对junit.framework.TestCase的严格继承等)。若时光倒退到 2005 年末,相信JUnit 4依然会这样选,依然会只留下一个jar包文件,依然不会高瞻远瞩地预见到十年后移动互联网的到来。好在日拱一卒,功不唐捐——正是有了JUnit 4十余年来培植出的单元测试生态,才有了JUnit 5的厚积薄发,更加灵活多样的设计范式才能被业内普遍认可,并在当前的 AI 浪潮下催生出更具潜力的全新方法论和工具链生态。
而我们要做的,不过是永葆好奇心和批判思维,既不盲从“草台班子”的论调夜郎自大,也不为荒诞可笑的“末世论”、“劝退论”畏首畏尾。虽然全新的JUnit 6.0已于上月底在GitHub社区正式发布,不用再苦心酝酿十多年,我们也大可不必提前焦虑或者盲目喜新厌旧,只要持续深耕下去并拥抱未来,自己扎实走过的每一步,都会算数。

 浙公网安备 33010602011771号