Springboot基础教程(5)--员工管理系统 - 详解
在前面章节对Springboot,自动装配原理,配置文件,静态资源和模板引擎有了基本了解之后,接下来通过实现一个不带数据库的员工管理系统来进行一些简单的CRUD练习。
1、准备工作
创建一个由Maven管理的Springboot项目,并导入资源文件。
资源文件参考:https://gitee.com/zty-f/springboot/tree/main/springboot-03-web-system/src/main/resources
在
pom.xml中导入lombok和Thymeleaf依赖<dependency> <groupId>org.projectlombok</groupId> <artifactId>lombok</artifactId> <version>1.18.36</version> </dependency> <dependency> <groupId>org.springframework.boot</groupId> <artifactId>spring-boot-starter-thymeleaf</artifactId> </dependency>创建实体类
Department部门类和Employee员工类//部门表 @Data @AllArgsConstructor @NoArgsConstructor public class Department { private Integer id; private String departmentName; }//员工表 @Data @NoArgsConstructor public class Employee { private Integer id; private String name; private String email; private Integer gender; //0: 女;1: 男 private Department department; private Date birth; public Employee(Integer id, String name, String email, Integer gender, Department department) { this.id = id; this.name = name; this.email = email; this.gender = gender; this.department = department; //默认创建日期 this.birth = new Date(); } }创建对应的Dao层,模拟数据库数据
//部门dao
@Repository
public class DepartmentDao {
//模拟数据库中的数据
private static Map<Integer, Department> departments = null;
  static {
  departments = new HashMap<Integer, Department>();// 创建一个部门表
    departments.put(101,new Department(101,"教学部"));
    departments.put(102,new Department(102,"市场部"));
    departments.put(103,new Department(103,"教研部"));
    departments.put(104,new Department(104,"运营部"));
    departments.put(105,new Department(105,"后勤部"));
    }
    //获得所有部门信息
    public Collection<Department> getDepartments() {
      return departments.values();
      }
      //通过id获取部门信息
      public Department getDepartmentById(int id) {
      return departments.get(id);
      }
      }
//部门dao @Repository public class EmployeeDao { //模拟数据库中的数据 private static Map<Integer, Employee> employees = null; //员工所属的部门 @Autowired private DepartmentDao departmentDao; static { employees = new HashMap<Integer, Employee>();// 创建一个部门表 employees.put(1001,new Employee(1001,"AAY","828965@qq.com",0,new Department(101,"教学部"))); employees.put(1002,new Employee(1002,"ABY","852525@qq.com",1,new Department(102,"市场部"))); employees.put(1003,new Employee(1003,"ACY","8528965@qq.com",0,new Department(103,"教研部"))); employees.put(1004,new Employee(1004,"ADY","8558965@qq.com",1,new Department(104,"运营部"))); employees.put(1005,new Employee(1005,"AEY","8552965@qq.com",0,new Department(105,"后勤部"))); } //主键自增 private static Integer initId = 1006; //增加一个员工 public void add(Employee employee) { if (employee.getId()==null){ employee.setId(initId++); } employee.setDepartment(departmentDao.getDepartmentById(employee.getDepartment().getId())); employees.put(employee.getId(), employee); } //查询全部员工信息 public Collection<Employee> getAll() { return employees.values(); } //根据Id查询员工信息 public Employee getEmployeeById(Integer id) { return employees.get(id); } //根据Id删除员工 public void deleteById(Integer id) { employees.remove(id); } }
2、国际化
2.1、配置文件编写
1、我们在resources资源文件下新建一个i18n目录,存放国际化配置文件
2、建立一个login.properties文件,还有login_zh_CN.properties和login_en_US.properties;
3、为了能更方便的整合国际化资源包,我们首先在插件市场下载Resource Bundle Editor插件。
下载完后即可在资源包处编辑资源文件。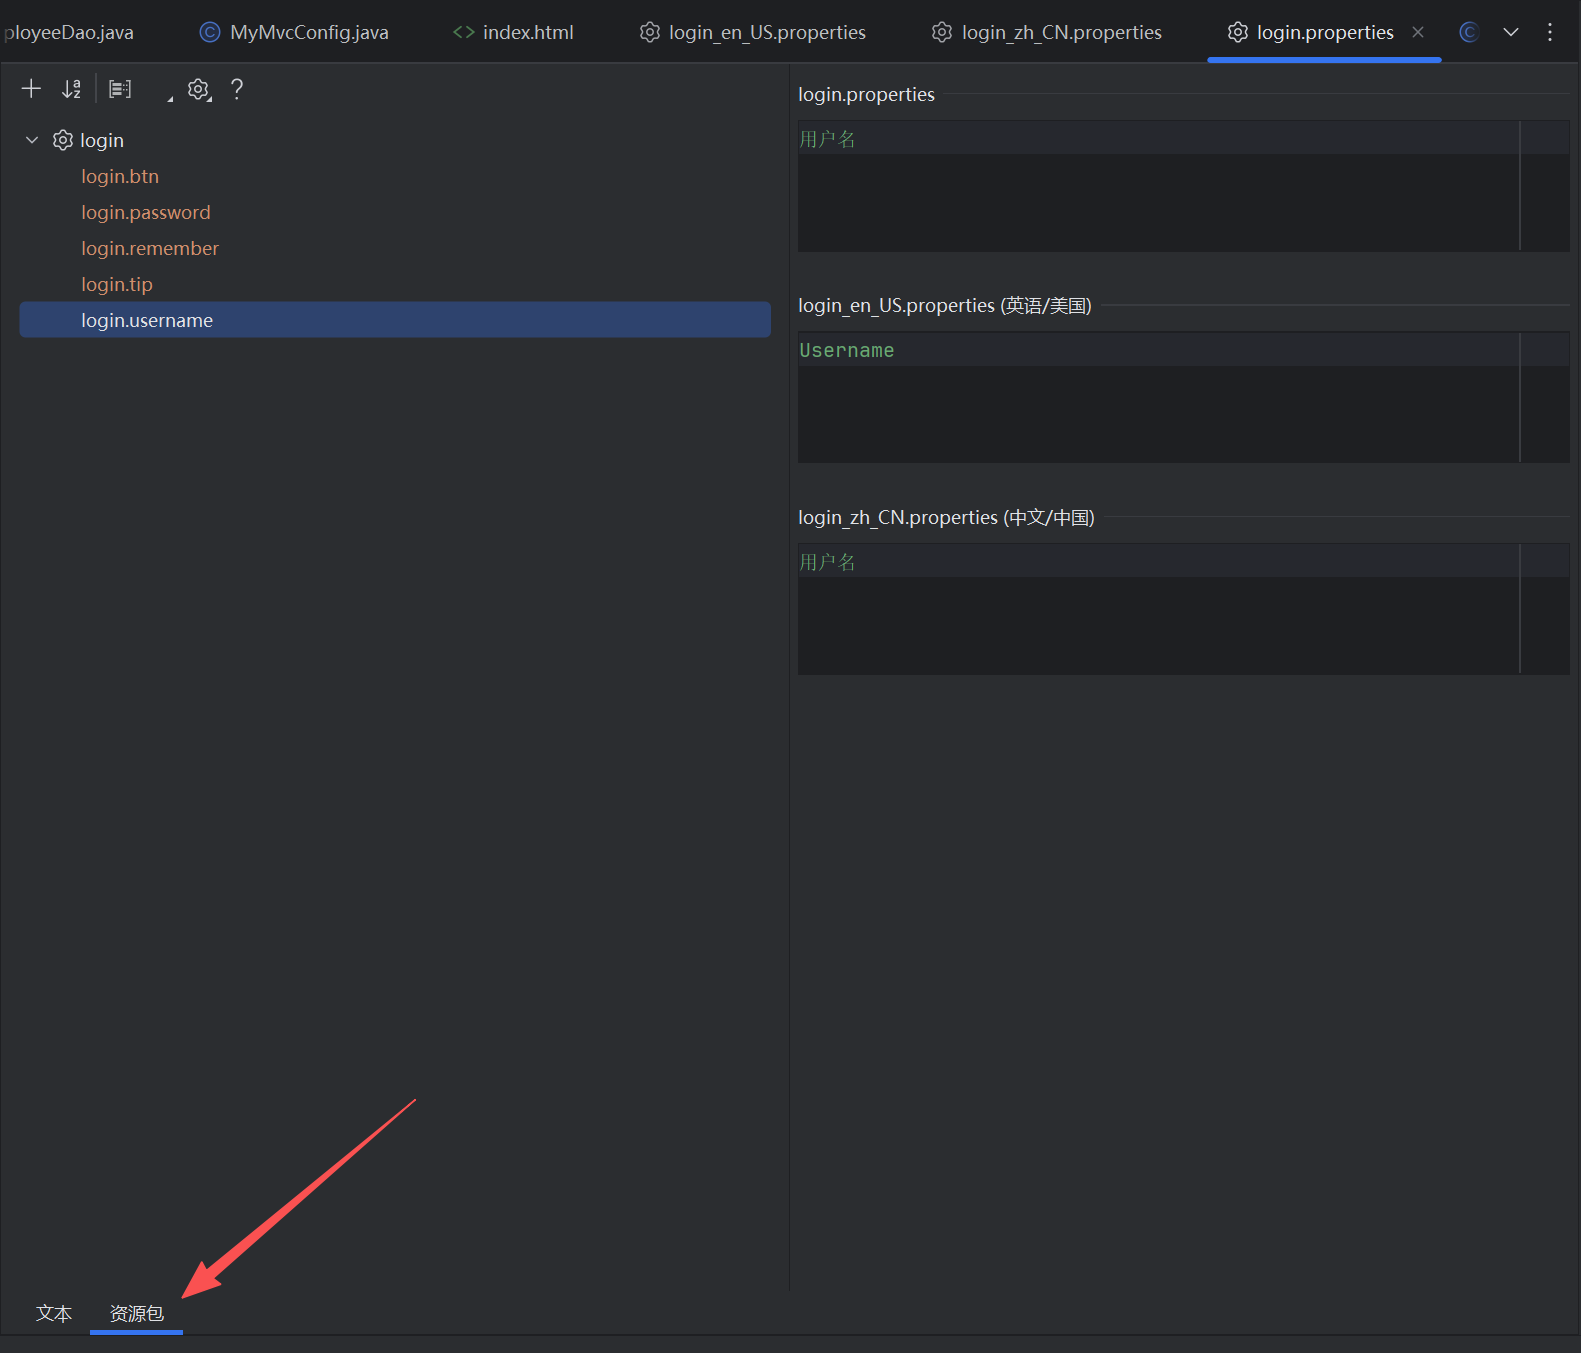
分别给配置文件配置不同属性。
login.properties
login.btn=登录
login.password=密码
login.remember=记住我
login.tip=请登录
login.username=用户名
login_zh_CN.properties
login.btn=登录
login.password=密码
login.remember=记住我
login.tip=请登录
login.username=用户名
login_en_US.properties
login.btn=Sign in
login.password=Password
login.remember=Remember me
login.tip=Please sign in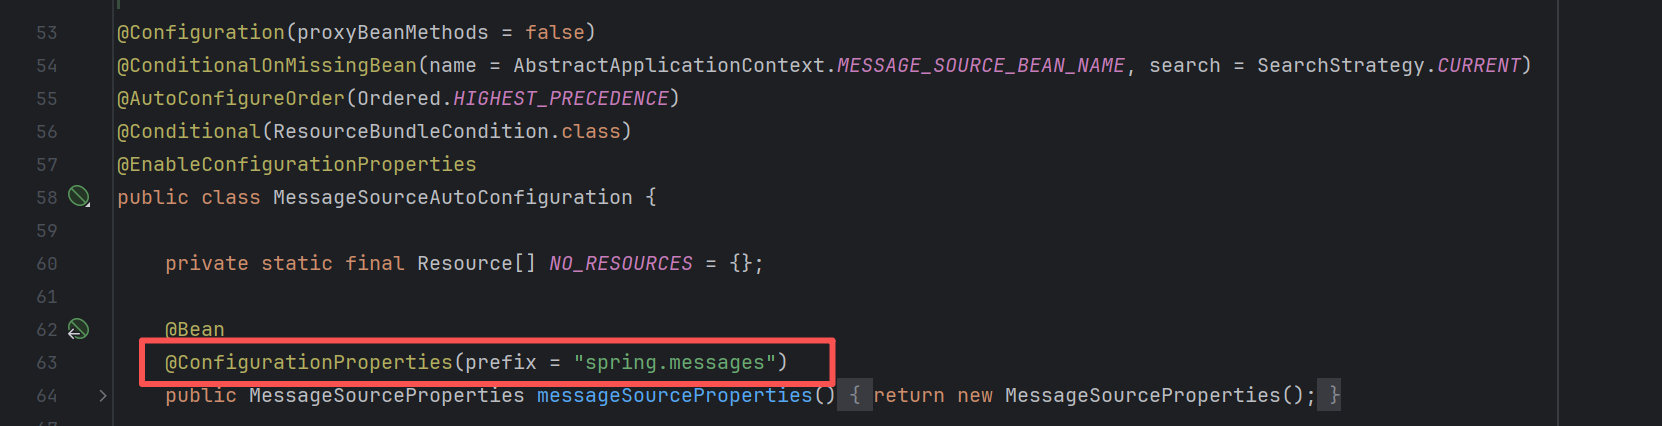
login.username=Username查找自动配置国际化消息类的文件:MessageSourceAutoConfiguration,找到要在配置文件中使用spring.messages前缀进行配置。
在application.properties中配置:
# 国际化配置文件存放的真实位置
spring.messages.basename=i18n.login
2.2、配置LocaleResolver
在WebMvcAutoConfiguration中,可以看到这样一段代码
@Bean
@ConditionalOnMissingBean
@ConditionalOnProperty(prefix = "spring.mvc", name = "locale")
public LocaleResolver localeResolver() {
// FIXED指的是Always use the configured locale. 即用户自己配置LocaleResolver
if (this.mvcProperties.getLocaleResolver() == WebMvcProperties.LocaleResolver.FIXED) {
return new FixedLocaleResolver(this.mvcProperties.getLocale());
}
// AcceptHeaderLocaleResolver为WebMvc默认自动装配的Resolver
AcceptHeaderLocaleResolver localeResolver = new AcceptHeaderLocaleResolver();
localeResolver.setDefaultLocale(this.mvcProperties.getLocale());
return localeResolver;
}进入AcceptHeaderLocaleResolver中查看默认的区域解析方法
@Override
public Locale resolveLocale(HttpServletRequest request) {
Locale defaultLocale = getDefaultLocale();
if (defaultLocale != null && request.getHeader("Accept-Language") == null) {
return defaultLocale;
}
Locale requestLocale = request.getLocale();
List<Locale> supportedLocales = getSupportedLocales();
  if (supportedLocales.isEmpty() || supportedLocales.contains(requestLocale)) {
  return requestLocale;
  }
  Locale supportedLocale = findSupportedLocale(request, supportedLocales);
  if (supportedLocale != null) {
  return supportedLocale;
  }
  return (defaultLocale != null ? defaultLocale : requestLocale);
}仿照AcceptHeaderLocaleResolver的写法,我们编写一个自己的LocaleResolver。
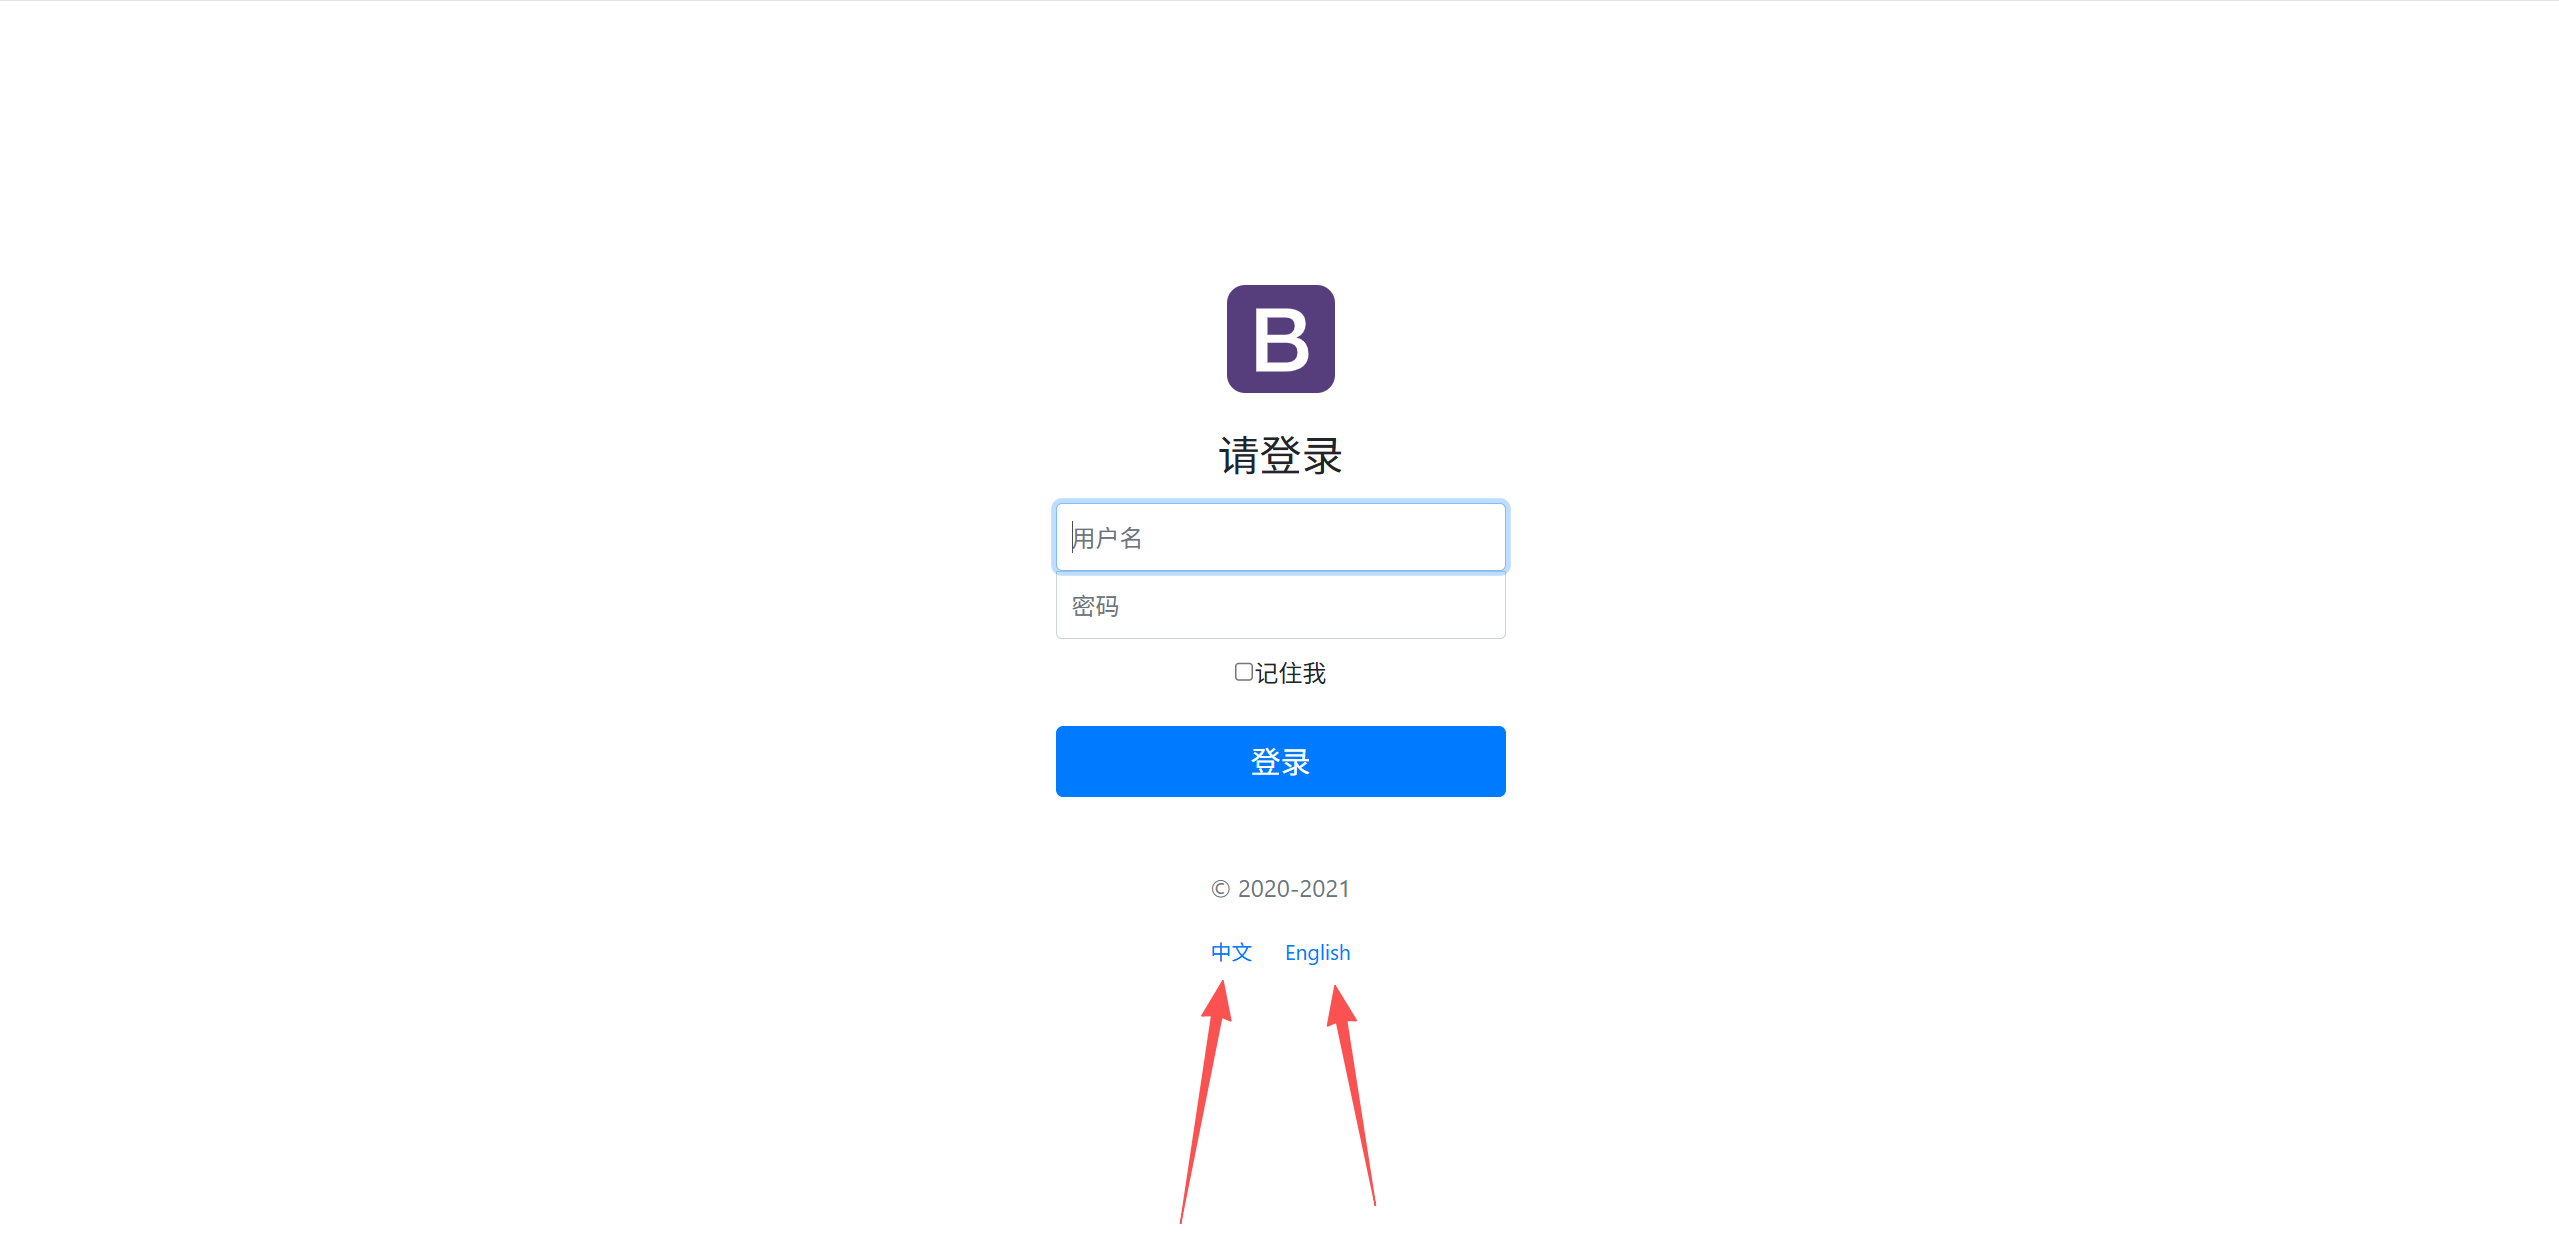
我们在前端链接中,说明会在链接传入参数l='xx_XX'
<!-- 这里传入参数不需要使用 ?使用 (key=value)-->
<a class="btn btn-sm" th:href="@{/index.html(l='zh_CN')}">中文</a>
<a class="btn btn-sm" th:href="@{/index.html(l='en_US')}">English</a>
所以在我们自己编写的LocaleResolver中,对前端发来的request参数进行解析,然后分配到不同的区域。
public class MyLocaleResolver implements LocaleResolver {
//解析请求
@Override
public Locale resolveLocale(HttpServletRequest request) {
//获取请求中的语言参数
String language = request.getParameter("l");
//如果前端没有传参就用默认的
Locale locale = Locale.getDefault();
//如果请求的链接携带了国际化的参数
if (!StringUtils.isEmpty(language)) {
//zh_CN
String[] s = language.split("_");
//语言,国家
locale = new Locale(s[0], s[1]);
}
return locale;
}
@Override
public void setLocale(HttpServletRequest request, HttpServletResponse response, Locale locale) {
}
}最后我们在配置类MyMvcConfig中装配我们自己的LocaleResolver
//自定义的国际化组件装配进容器
@Bean
public LocaleResolver localeResolver() {
return new MyLocaleResolver();
}
最后,点击链接即可完成中英文切换。
3、登录功能
3.1、基本登录功能实现
编写一个LoginController
@Controller
public class LoginController {
@RequestMapping("/user/login")
public String login(@RequestParam("username") String username,//@RequestParam与前端表单中的name对应
@RequestParam("password") String password,
Model model) {
//若用户名非空,密码为123456则成功登陆
if (!StringUtils.isEmpty(username) && "123456".equals(password)) {
//重定向回dashboard主页
return "redirect:/main.html";
} else {
//告诉用户登录失败了!
model.addAttribute("msg","用户名或密码错误!");
return "index";
}
}
}
在视图解析器中增加一个ViewController
@Override
public void addViewControllers(ViewControllerRegistry registry) {
//把/main.html请求与dashboard绑定
registry.addViewController("/main.html").setViewName("dashboard");
}
3.2、登录拦截器
编写一个LoginHandlerInterceptor
public class LoginHandlerInterceptor implements HandlerInterceptor {
@Override
public boolean preHandle(HttpServletRequest request, HttpServletResponse response, Object handler) throws Exception {
// 登陆成功之后,应该有用户的Session
Object loginUser = request.getSession().getAttribute("loginUser");
if (loginUser == null) {
request.setAttribute("msg","没有权限,请先登录!");
// 转发回首页
request.getRequestDispatcher("/index.html").forward(request, response);
return false;
}else {
// Session存在,则放行!
return true;
}
}
}在MyMvcConfig中添加拦截器,写法类似添加视图控制器。
@Override
public void addInterceptors(InterceptorRegistry registry) {
registry.addInterceptor(new LoginHandlerInterceptor()).
addPathPatterns("/**").excludePathPatterns("/index.html","/","/user/login",
"/css/**","/js/**","/img/**");//静态资源过滤
}
4、编写用户增删改查接口
4.1、展示员工列表
@Controller
public class EmployeeController {
@Autowired
EmployeeDao employeeDao;
@RequestMapping("/emps")
public String list(Model model){
Collection<Employee> employees = employeeDao.getAll();
  model.addAttribute("emps", employees);
  return "emp/list";
  }
  }
4.2、增加员工信息
@Controller
public class EmployeeController {
@Autowired
EmployeeDao employeeDao;
@Autowired
DepartmentDao departmentDao;
@GetMapping("/emp")
public String toAddPage(Model model){
//查出所有部门的信息
Collection<Department> departments = departmentDao.getDepartments();
  model.addAttribute("departments", departments);
  return "emp/add";
  }
  @PostMapping("/emp")
  public String addEmp(Employee employee){
  System.out.println("add=>"+employee);
  employeeDao.add(employee);//调用底层业务方法,添加员工信息
  return "redirect:/emps";
  }
  }
4.3、修改员工信息
//去员工的修改页面
@GetMapping("/emp/{id}")
public String toUpdateEmp(@PathVariable("id") Integer id, Model model) {
//查出原来的数据
Employee employee = employeeDao.getEmployeeById(id);
model.addAttribute("emp", employee);
//查出所有部门的信息
Collection<Department> departments = departmentDao.getDepartments();
  model.addAttribute("departments", departments);
  return "emp/update";
  }
  @RequestMapping("/updateEmp")
  public String updateEmp(Employee employee) {
  employeeDao.add(employee);
  return "redirect:/emps";
  }
4.4、删除员工信息
//删除员工
@GetMapping("/delEmp/{id}")
public String deleteEmp(@PathVariable("id") Integer id) {
employeeDao.deleteById(id);
return "redirect:/emps";
}
4.5、登出接口
@Controller
public class LoginController {
@RequestMapping("/user/logout")
public String logout(HttpSession session) {
session.invalidate();
return "redirect:/index.html";
}
}
 浙公网安备 33010602011771号