
深入解析:Vue3 模板引用——ref
Vue3 模板引用——ref
1. 访问模板引用
1.1 在 onMounted 生命周期中使用(建议)
一个特殊的attribute—— ref ,允许我们在一个特定的 DOM 元素或子组件实例被挂载后,获得对它的直接引用:
<input ref="input">让我们来看一个实例:
<template>
  <div>
    <input id="my-input" ref="input">
      </div>
        </template>
          <script setup>
            import { useTemplateRef, onMounted } from 'vue'
            // 第一个参数必须与模板中的 ref 值匹配
            const input = useTemplateRef('input')
            onMounted(() => {
            console.log('input:', input)
            console.log('input.value:', input.value)
            input.value.focus()
            })
            </script>
              <style lang="scss" scoped></style>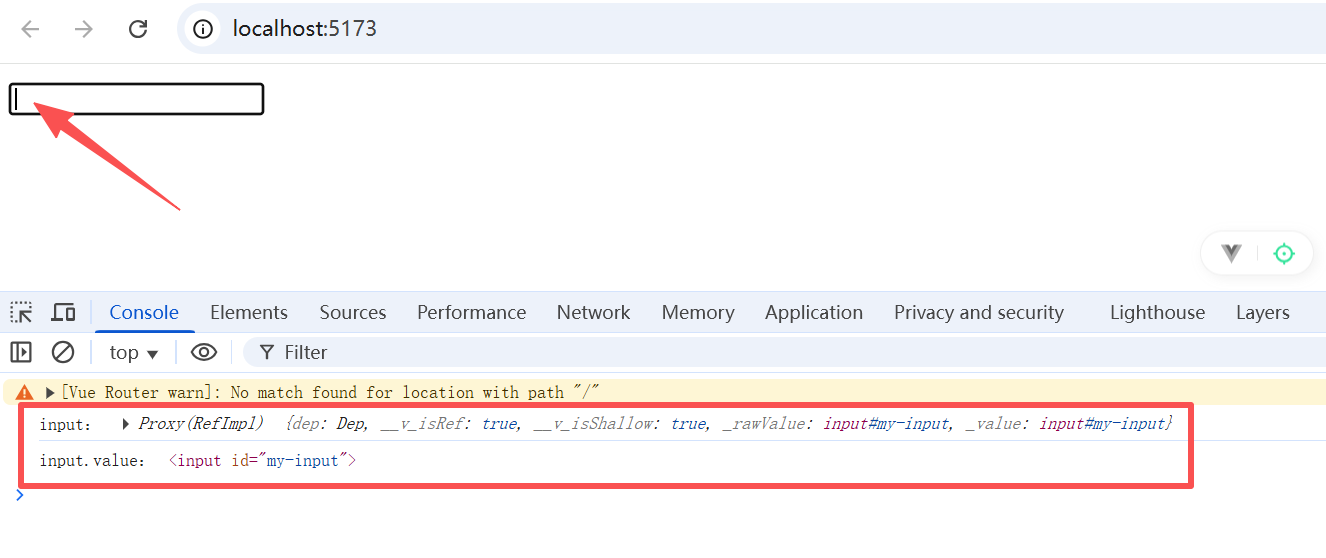
可以看到模板引用,获取到的实际上是一个 DOM 元素 的 proxy 对象,其 .value 才是对应真正的 DOM 元素。
1.2 在 onMounted 生命周期前使用(不建议)
我们都知道,只有在组件挂载后才能访问模板引用。因此,如果在之前就进行引用访问,就会报错。比如:
<template>
  <div>
    <input id="my-input" ref="input">
      </div>
        </template>
          <script setup>
            import { useTemplateRef, onMounted, watchEffect } from 'vue'
            // 第一个参数必须与模板中的 ref 值匹配
            const input = useTemplateRef('input')
            watchEffect(() => {
            console.log('input:', input)
            console.log('input.value:', input.value)
            input.value.focus()
            })
            </script>
              <style lang="scss" scoped></style>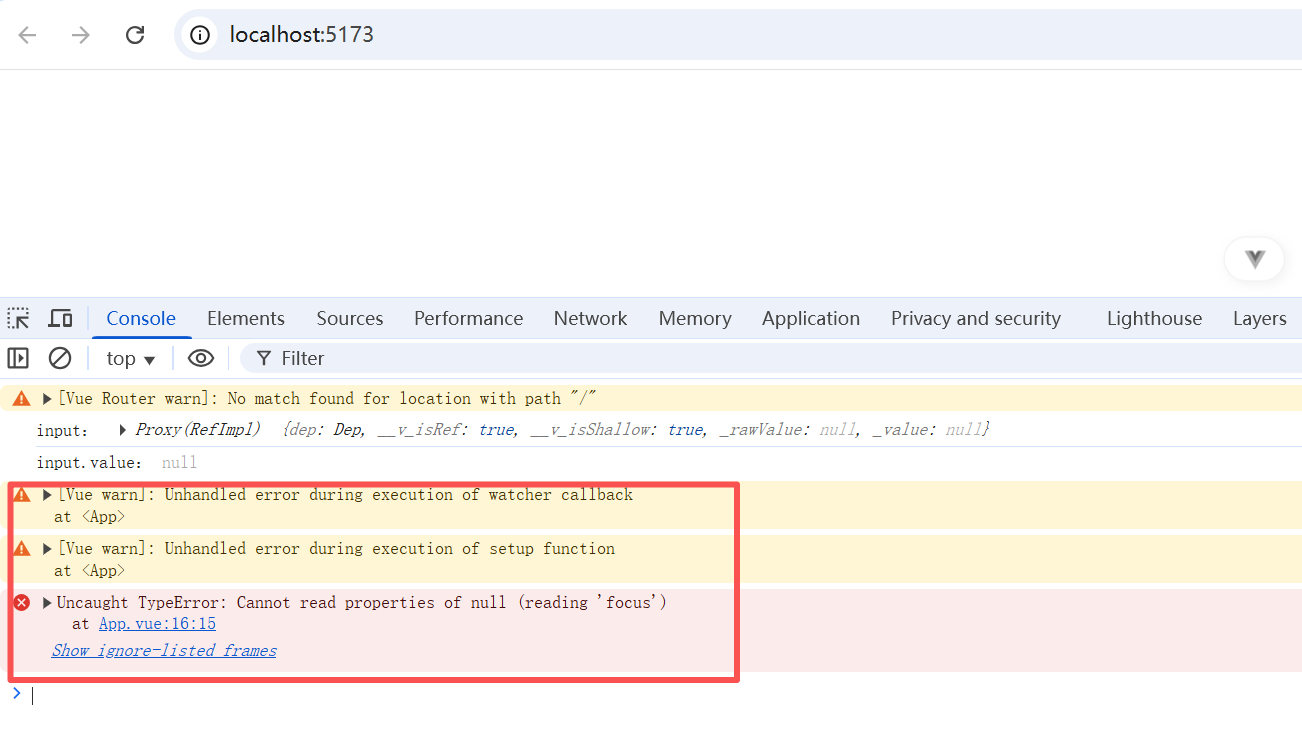
可以在进行无值处理,或者将其放进 onMounted 生命周期中。比如:
<template>
  <div>
    <input id="my-input" ref="input">
      </div>
        </template>
          <script setup>
            import { useTemplateRef, onMounted, watchEffect } from 'vue'
            // 第一个参数必须与模板中的 ref 值匹配
            const input = useTemplateRef('input')
            watchEffect(() => {
            if(input.value) {
            console.log('input:', input)
            console.log('input.value:', input.value)
            input.value.focus()
            } else {
            // 此时还未挂载,或此元素已经被卸载(例如通过 v-if 控制),可以做一些提示类输出或操作
            }
            })
            </script>
              <style lang="scss" scoped></style>
2. 组件上的 ref
2.1 父组件调用子组件方法和属性(子组件通过defineExpose暴露方法和属性)
在 Vue2 中 ,我们可以通过 ref 直接获取到子组件定义的变量和方法。
但是在 Vue3 的组合式API中,因为我们使用了 <script setup>,导致子组件的任何东西都无法被访问,除非子组件在其中通过 defineExpose 宏显式暴露。下面是一个实例。
子组件Child.vue:
<template>
  <div>{{ number }}</div>
    </template>
      <script setup>
        import { ref } from 'vue'
        const number = ref(1)
        function add() {
        number.value++
        }
        // 暴露给父组件使用
        defineExpose({
        number,
        add
        })
        </script>
          <style lang="scss" scoped></style>
父组件App.vue:
<template>
  <Child ref="child" />
    <button @click="addChild">+1</button>
      </template>
        <script setup>
          import { useTemplateRef, onMounted } from 'vue'
          import Child from '@/components/Child.vue'
          const childRef = useTemplateRef('child')
          onMounted(() => {
          // childRef.value 将持有 <Child /> 的实例
          console.log(childRef)
          console.log(childRef.value)
          })
          function addChild() {
          childRef.value.add()
          }
          </script>
            <style lang="scss" scoped></style>
2.2 子组件调用父组件的属性和方法(拓展,和 ref 没什么关系)
2.2.1 使用 props 和 emit(比较常用,父子通信)
子组件 Child.vue:
<template>
  <div>{{ parentNumber }}</div>
    <div>{{ hello }}</div>
      <button @click="sayHello">调用父组件的方法</button>
        </template>
          <script setup>
            import { ref, defineProps } from 'vue'
            const hello = ref('Hello world!')
            // 使用父组件变量
            const props = defineProps({
            parentNumber: Number
            })
            // 定义事件传递函数
            const emit = defineEmits(["sayHello"])
            const sayHello = () => {
            // 向父组件传递事件和数据
            emit('sayHello', hello.value)
            }
            </script>
              <style lang="scss" scoped></style>
父组件App.vue:
<template>
  <Child ref="child" :parentNumber="number" @sayHello="handleSayHello" />
    </template>
      <script setup>
        import { ref, useTemplateRef, onMounted } from 'vue'
        import Child from '@/components/Child.vue'
        const number = ref(0)
        const childRef = useTemplateRef('child')
        onMounted(() => {
        // childRef.value 将持有 <Child /> 的实例
        console.log(childRef)
        console.log(childRef.value)
        })
        // 子组件触发的事件,在这里进行二次处理
        function handleSayHello(hello) {
        console.log(hello)
        }
        </script>
          <style lang="scss" scoped></style>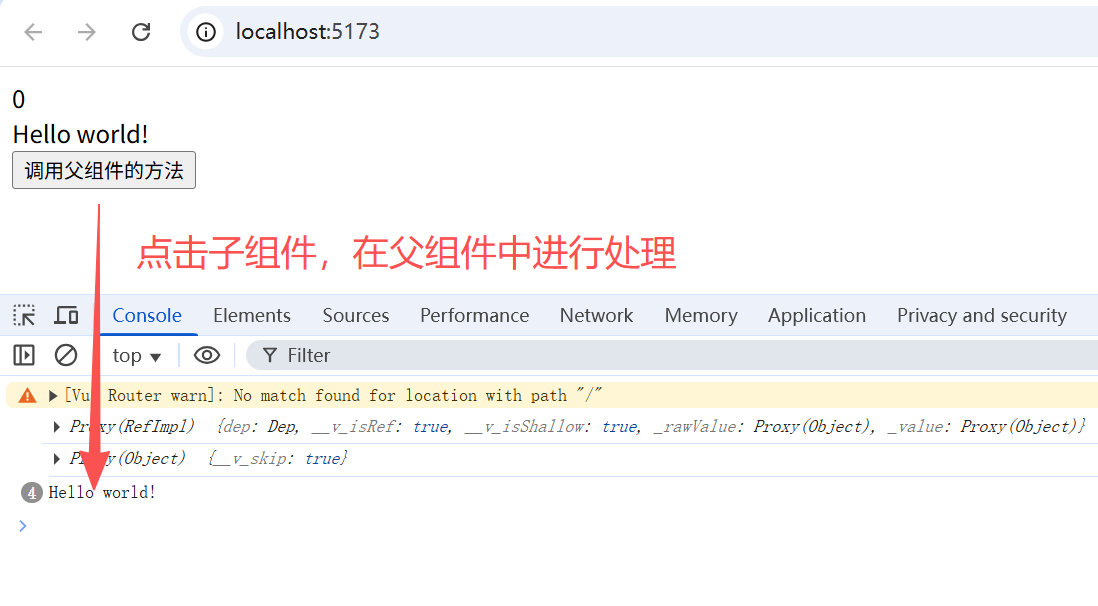
2.2.2 使用 provide 和 inject(比较少用,跨级别父子通信)
任意级别的父组件通过 provide 向子组件提供变量和方法;
任意级别的子组件通过 inject 拿到父组件提供的变量和方法。
2.2.2.1 使用方式
父组件 App.vue:
<template>
  <div class="parent">
    <div>这是父组件</div>
      <div>{{ number }}</div>
        <Child />
          </div>
            </template>
              <script setup>
                import { ref, provide } from 'vue'
                import Child from '@/components/Child.vue'
                const number = ref(10)
                const parentMethod = () => {
                console.log('调用了父组件方法');
                number.value++
                }
                // 定义可向任意层级子组件传递的变量和方法
                provide('number', number)
                provide('parentMethod', parentMethod)
                </script>
                  <style lang="scss" scoped>
                    .parent {
                    color: red;
                    border: 1px solid red;
                    padding: 10px;
                    }
                    </style>
子组件Child.vue:
<template>
  <div class="child">
    <div>这是子组件</div>
      <GrandChild />
        </div>
          </template>
            <script setup>
              import GrandChild from './GrandChild.vue';
              </script>
                <style lang="scss" scoped>
                  .child {
                  color: green;
                  border: 1px solid green;
                  padding: 10px;
                  }
                  </style>
第二级子组件(这里简称 “孙子组件”) grandChild.vue:
<template>
  <div class="grandcCild">
    <div>这是孙子组件</div>
      <div>{{ parentNumber }}</div>
        <button @click="callParentMethod">调用祖先中最近的parentMethod方法</button>
          </div>
            </template>
              <script setup>
                import { inject } from 'vue';
                // 获取任意级别父组件的变量和方法
                const parentNumber = inject('number')
                const parentMethod = inject('parentMethod')
                const callParentMethod = () => {
                if(parentMethod) {
                parentMethod();
                } else {
                console.log('父组件中没有该方法');
                }
                }
                </script>
                  <style lang="scss" scoped>
                    .grandcCild {
                    color: blue;
                    border: 1px solid blue;
                    padding: 10px;
                    }
                    </style>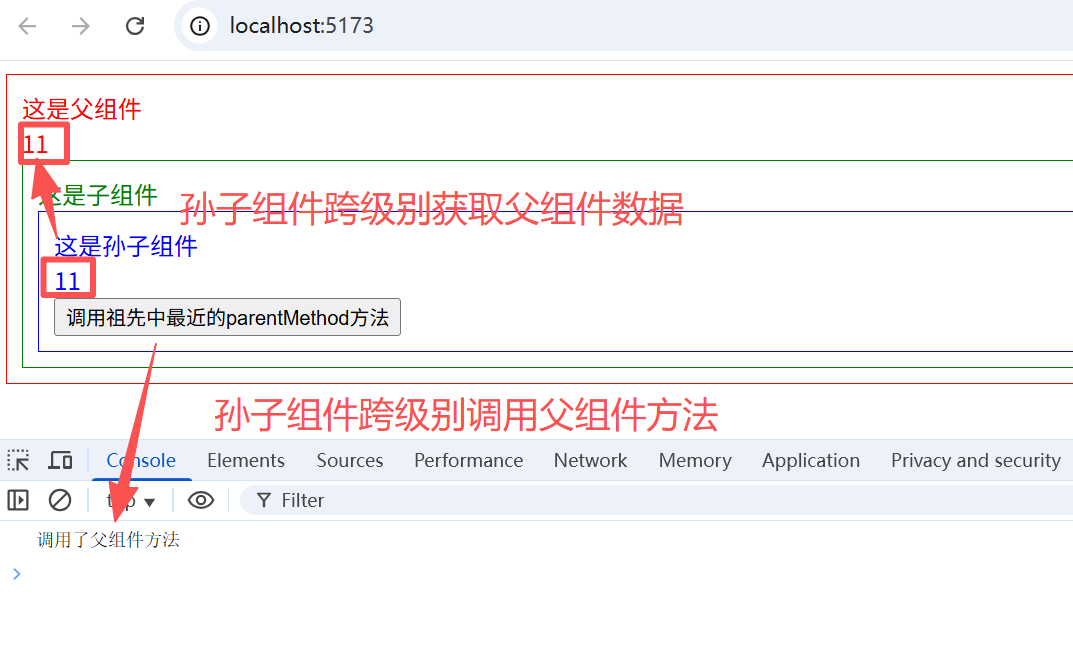
2.2.2.2 使用细节(调用最近父组件的变量和方法)
值得注意的是,如果多个级别的父组件都使用provide提供了相同名称的变量或方法,子组件在调用 inject 获取时只会获取到最近的组件的变量或属性。
比如,将 2.2.2.1 中的子组件 Child.vue 进行修改,也添加 number 和 parentMethod:
<template>
  <div class="child">
    <div>这是子组件</div>
      <div>{{ number }}</div>
        <GrandChild />
          </div>
            </template>
              <script setup>
                import { ref, provide } from 'vue';
                import GrandChild from './GrandChild.vue';
                const number = ref(20);
                const parentMethod = () => {
                console.log('调用了子组件方法');
                number.value++
                }
                // 定义可向任意层级子组件传递的变量和方法
                provide('number', number)
                provide('parentMethod', parentMethod)
                </script>
                  <style lang="scss" scoped>
                    .child {
                    color: green;
                    border: 1px solid green;
                    padding: 10px;
                    }
                    </style>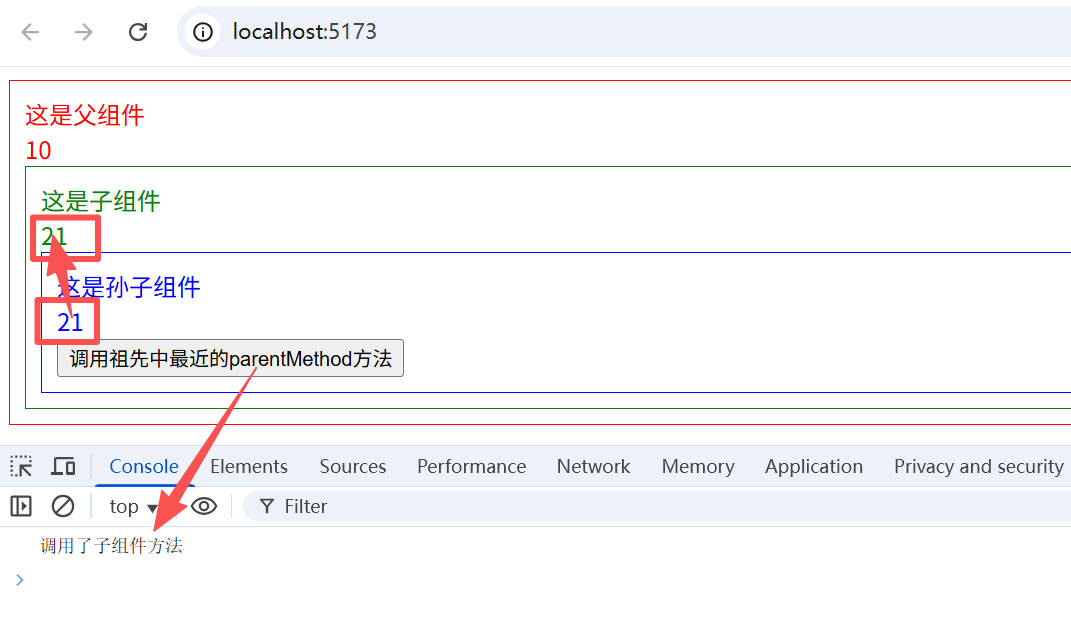
3. v-for 中的 ref
<template>
  <ul>
    <li v-for="item in list" ref="items">
      {{ item }}
      </li>
        </ul>
          </template>
            <script setup>
              import { ref, useTemplateRef, onMounted } from 'vue'
              const list = ref([1, 2, 3])
              const itemRefs = useTemplateRef('items')
              onMounted(() => {
              console.log(itemRefs.value)
              console.log(itemRefs.value.map(i => i.textContent))
              })
              </script>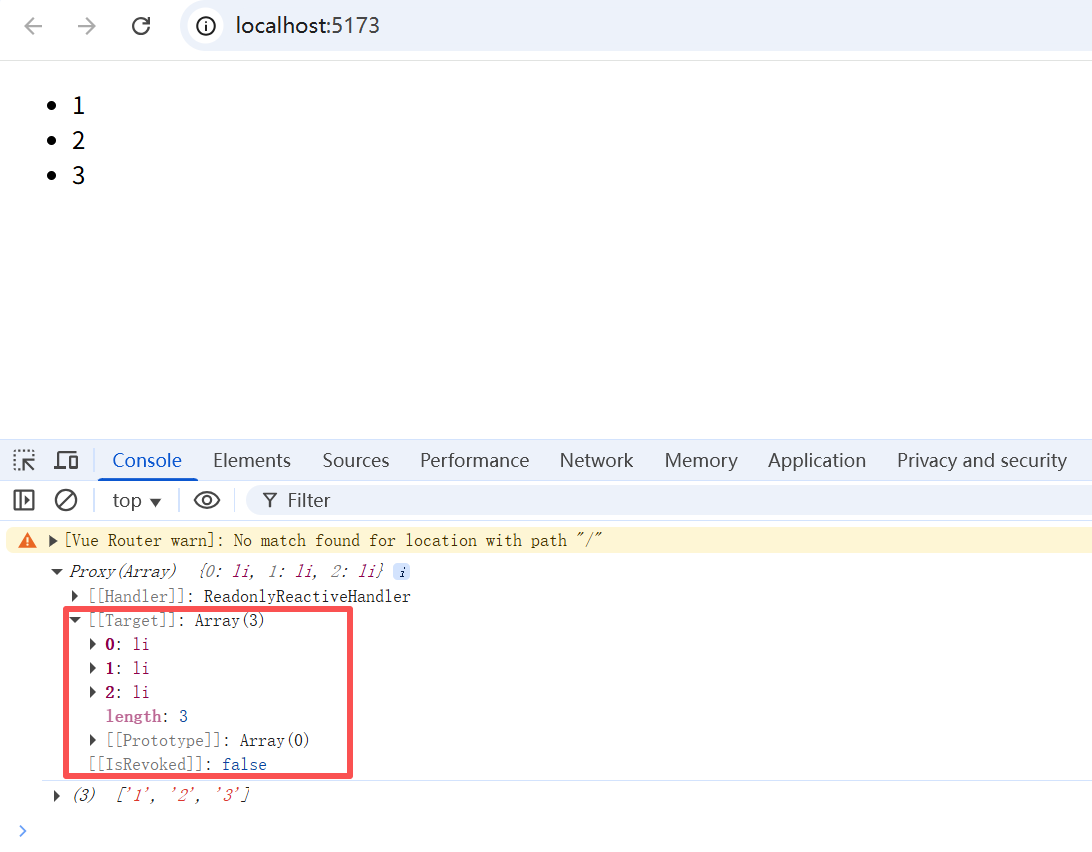
可以看到,v-for 中的 ref 的 .value 获取到的是所有 DOM 元素组成的数组。
4. 函数模板引用
在 3 的例子中,虽然能够取得整体的ref,但是无法针对某个具体的ref进行操作。Vue3 提供了函数模板引用,允许我们动态地使用函数设置el。
<input :ref="(el) => { /* 将 el 赋值给一个数据属性或 ref 变量 */ }">让我们来看下面一个例子。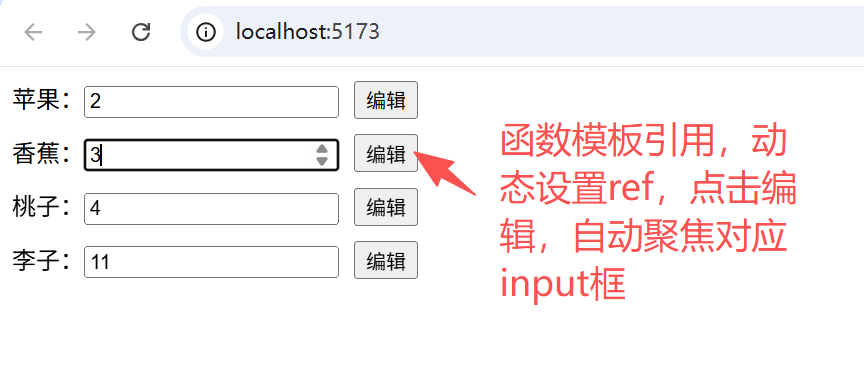
假设我们有一大批水果,可以动态修改价格,用户希望在每个价格右侧添加一个编辑按钮,点击时可以聚焦到对应的价格输入框中。此时就可以使用函数动态设置ref,将 ref 存储在一个map或者set中,方便进行操作。
具体示例代码如下:
<template>
  <div>
    <div v-for="(fruit, index) in fruits" :key="index">
      <span>{{ fruit.name }}:</span>
        <input type="number" v-model="fruit.price" placeholder="请输入水果价格" :ref="(el) => setInputRef(el, index)"/>
          <button @click="handleEdit(index)">编辑</button>
            </div>
              </div>
                </template>
                  <script setup>
                    import { ref, onMounted } from 'vue'
                    const fruits = ref([
                    { id: 1, name: '苹果', price: 6 },
                    { id: 2, name: '香蕉', price: 3 },
                    { id: 3, name: '桃子', price: 4 },
                    { id: 4, name: '李子', price: 8 },
                    ])
                    const inputRefMap = ref({})
                    // 动态设置ref,并存储到map中
                    const setInputRef = (el, index) => {
                    if(el) {
                    inputRefMap.value[`input_ref_${index}`] = el
                    }
                    }
                    // 取得对应的input元素并聚焦
                    const handleEdit = (index) => {
                    inputRefMap.value[`input_ref_${index}`].focus()
                    }
                    onMounted(() => {
                    })
                    </script>
                      <style lang="scss" scoped>
                        input{
                        margin-right: 10px;
                        }
                        </style>
上一章 《Vue3 基础实战练习》
下一章 《Vue3 生命周期》

 浙公网安备 33010602011771号