构建 Confirm 和 Alert 插件:在 Vue 中实现自定义弹窗
前端开发工程师、技术日更博主、已过CET6
阿珊和她的猫_CSDN博客专家、23年度博客之星前端领域TOP1
牛客高级专题作者、打造专栏《前端面试必备》 、《2024面试高频手撕题》、《前端求职突破计划》
蓝桥云课签约作者、上架课程《Vue.js 和 Egg.js 开发企业级健康管理项目》、《带你从入门到实战全面掌握 uni-app》
在Vue中开发 Confirm 和 Alert 插件可以通过创建自定义的弹窗组件来实现。以下是一个简单的 Confirm 和 Alert 插件的实现示例。
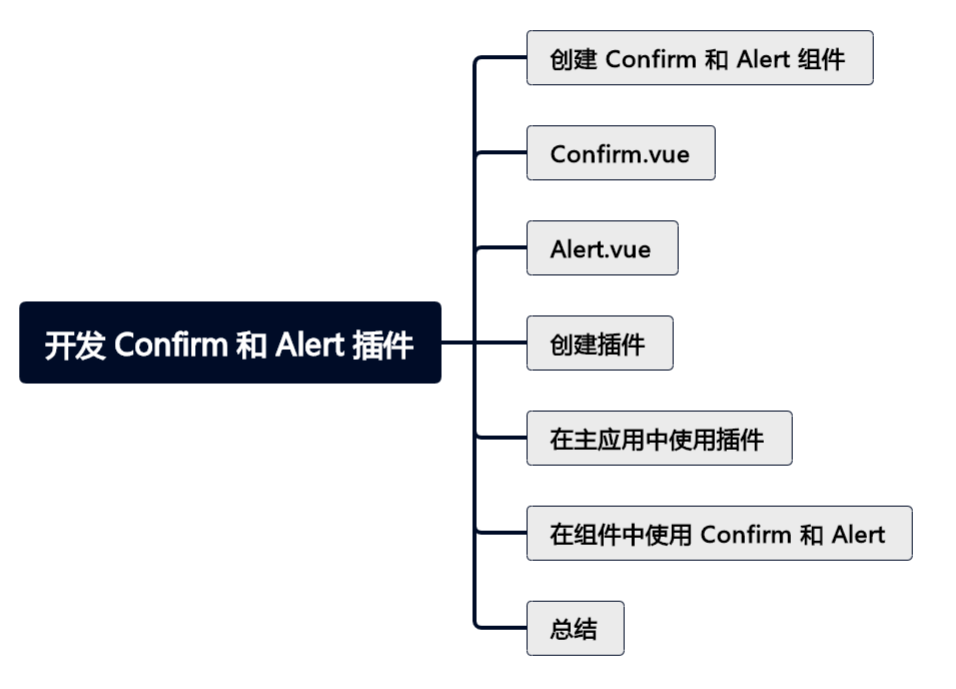
创建 Confirm 和 Alert 组件
首先,创建两个组件 Confirm.vue 和 Alert.vue。
Confirm.vue
<template>
    <div v-if="visible" class="confirm-modal">
      <div class="modal-content">
    <p>{{ message }}</p>
    <button @click="confirm">确认</button>
    <button @click="cancel">取消</button>
    </div>
  </div>
</template>
<script>
  import { ref, defineComponent } from 'vue';
  export default defineComponent({
  props: {
  message: String
  },
  setup(props, { emit }) {
  const visible = ref(true);
  const confirm = () => {
  visible.value = false;
  emit('confirm');
  };
  const cancel = () => {
  visible.value = false;
  emit('cancel');
  };
  return {
  visible,
  confirm,
  cancel
  };
  }
  });
</script>
<style>
  /* 添加一些基本的样式 */
  .confirm-modal {
  position: fixed;
  top: 0;
  left: 0;
  width: 100%;
  height: 100%;
  background-color: rgba(0, 0, 0, 0.5);
  display: flex;
  justify-content: center;
  align-items: center;
  }
  .modal-content {
  background-color: white;
  padding: 20px;
  border-radius: 5px;
  text-align: center;
  }
</style>
Alert.vue
Alert 组件与 Confirm 类似,但没有取消按钮。
<template>
    <div v-if="visible" class="alert-modal">
      <div class="modal-content">
    <p>{{ message }}</p>
    <button @click="ok">确定</button>
    </div>
  </div>
</template>
<script>
  // 类似 Confirm.vue 的 script 部分
  // ...
</script>
<style>
  /* 类似 Confirm.vue 的样式 */
  // ...
</style>
创建插件
创建一个插件文件 dialogPlugin.js 来注册和使用这些组件。
import { createApp } from 'vue';
import Confirm from './Confirm.vue';
import Alert from './Alert.vue';
const DialogPlugin = {
install(app) {
app.component('Confirm', Confirm);
app.component('Alert', Alert);
}
};
export default DialogPlugin;
在主应用中使用插件
在 main.js 中引入并使用这个插件。
import { createApp } from 'vue';
import App from './App.vue';
import DialogPlugin from './dialogPlugin';
const app = createApp(App);
app.use(DialogPlugin);
app.mount('#app');
在组件中使用 Confirm 和 Alert
在任何组件中,你可以直接使用 <Confirm> 和 <Alert> 组件。
<template>
<button @click="showConfirm">Show Confirm</button>
<button @click="showAlert">Show Alert</button>
</template>
<script>
  import { ref } from 'vue';
  export default {
  setup() {
  const showConfirm = () => {
  const confirmInstance = createApp({
  render: () => h('Confirm', {
  message: 'Are you sure?',
  onConfirm: () => {
  console.log('Confirmed!');
  },
  onCancel: () => {
  console.log('Canceled!');
  }
  });
  confirmInstance.mount(document.createElement('div'));
  };
  const showAlert = () => {
  const alertInstance = createApp({
  render: () => h('Alert', {
  message: 'This is an alert!',
  onOk: () => {
  console.log('Alert acknowledged!');
  }
  });
  alertInstance.mount(document.createElement('div'));
  };
  return {
  showConfirm,
  showAlert
  };
  }
  };
</script>
总结
以上代码展示了如何在Vue3中创建和使用 Confirm 和 Alert 插件。通过这种方式,你可以轻松地在任何组件中显示确认和警告对话框,并且可以自定义它们的样式和行为。

 浙公网安备 33010602011771号