CentOS 7 mongodb_3.4 sharding
环境准备
系统版本:CentOS Linux release 7.4.1708
服务器IP地址
172.16.8.24 Node1
172.16.8.25 Node2
172.16.8.26 Node3
服务器的规划如下图
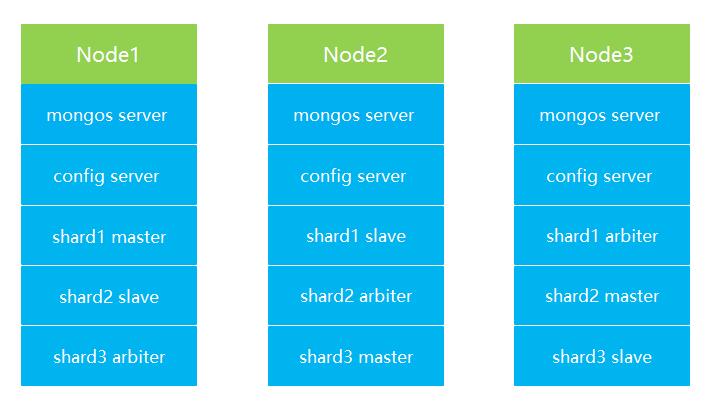
MongoDB的下载安装
mongodb的版本地址:https://www.mongodb.org/dl/linux/x86_64
本次使用下载的版本
# wget http://downloads.mongodb.org/linux/mongodb-linux-x86_64-v3.4-latest.tgz
# tar xf mongodb-linux-x86_64-v3.4-latest.tgz
# mkdir /usr/local/mongodb
# mv mongodb-linux-x86_64-3.4.17-13-g5099801229/* /usr/local/mongodb
配置环境变量
# vim /etc/profile
追加内容
export MONGODB_HOME=/usr/local/mongodb
export PATH=$MONGODB_HOME/bin:$PATH
使立即生效
# source /etc/profile

三台服务器使用使用hostname访问
# vim  /etc/hosts
追加内容
172.16.8.24       node1
172.16.8.25       node2
172.16.8.26       node3
创建mongodb的相关目录(conf configsvr mongos db shard1 shard2 shard3 log)
mkdir -p /data/mongodb/log
mkdir -p /data/mongodb/conf
mkdir -p /data/mongodb/mongos
mkdir -p /data/mongodb/db/{shard1,shard2,shard3}
集群配置
1.config server配置服务器
# vim /data/mongodb/conf/configsvr.conf
配置内容
## content
systemLog:
  destination: file
  logAppend: true
  path: /data/mongodb/log/configsvr.log

# Where and how to store data.
storage:
  dbPath: /data/mongodb/configsvr
  journal:
    enabled: true
# how the process runs
processManagement:
  fork: true
  pidFilePath: /data/mongodb/configsvr/configsrv.pid

# network interfaces
net:
  port: 27002
  bindIp: 0.0.0.0

#operationProfiling:
replication:
    replSetName: config

sharding:
    clusterRole: configsvr
启动三台服务器的config server
mongod -f /data/mongodb/conf/configsvr.conf
登录任意一台配置服务器,初始化配置副本集
# mongo node1:27002
# > use admin;
config变量
# > config = {_id : "config",members : [{_id : 0, host : "node1:27002" },{_id : 1, host : "node2:27002" },{_id : 2, host : "node3:27002" }]}
初始化副本集
# > rs.initiate(config)
查看集群状态
# >rs.status();
2.配置分片副本集(三台机器)
设置第一个分片副本集
# vim /data/mongodb/conf/shard1.conf
配置内容
# where to write logging data.
systemLog:
  destination: file
  logAppend: true
  path: /data/mongodb/log/shard1.log

# Where and how to store data.
storage:
  dbPath: /data/mongodb/db/shard1
  journal:
    enabled: true
  directoryPerDB: true
  engine: wiredTiger
  wiredTiger:
    engineConfig:
      cacheSizeGB: 3               #设置使用内存大小
      statisticsLogDelaySecs: 0
      journalCompressor: snappy
      directoryForIndexes: true
    collectionConfig:
      blockCompressor: snappy
    indexConfig:
      prefixCompression: true

# how the process runs
processManagement:
  fork: true
  pidFilePath: /data/mongodb/db/shard1/shard1.pid

# network interfaces
net:
  port: 27010
  bindIp: node1                #根据实际情况进行调整

#operationProfiling:
operationProfiling:
  slowOpThresholdMs: 100
  mode: slowOp

replication:
  oplogSizeMB: 2048
  replSetName: shard1
  secondaryIndexPrefetch: all

sharding:
    clusterRole: shardsvr
启动shard1分片
# mongod -f /data/mongodb/conf/shard1.conf
初始化shard1分片的集合
# mongo  node1:27010
# > use admin;
config变量
# >config = {_id : "shard1",members : [{_id : 0, host : "node1:27010",priority:5 },{_id : 1, host : "node2:27010",priority:3 },{_id : 2, host : "node3:27010",arbiterOnly: true }]}
初始化副本集
# > rs.initiate(config)
查看集群状态
# >rs.status();
设置第二个分片副本集
# vim /data/mongodb/conf/shard2.conf
配置内容
# where to write logging data.
systemLog:
  destination: file
  logAppend: true
  path: /data/mongodb/log/shard2.log

# Where and how to store data.
storage:
  dbPath: /data/mongodb/db/shard2
  journal:
    enabled: true
  directoryPerDB: true
  engine: wiredTiger
  wiredTiger:
    engineConfig:
      cacheSizeGB: 3                   #根据实际情况设置内存大小
      statisticsLogDelaySecs: 0
      journalCompressor: snappy
      directoryForIndexes: true
    collectionConfig:
      blockCompressor: snappy
    indexConfig:
      prefixCompression: true

# how the process runs
processManagement:
  fork: true
  pidFilePath: /data/mongodb/db/shard2/shard2.pid

# network interfaces
net:
  port: 27020
  bindIp: node1                    #根据实际情况绑定IP

#operationProfiling:
operationProfiling:
  slowOpThresholdMs: 100
  mode: slowOp

replication:
  oplogSizeMB: 2048
  replSetName: shard2
  secondaryIndexPrefetch: all

sharding:
    clusterRole: shardsvr
启动shard2分片
# mongod -f /data/mongodb/conf/shard2.conf
初始化shard2分片
# mongo  node3:27020
# > use admin;
config变量
# >config = {_id : "shard2",members : [{_id : 0, host : "node1:27020",priority:3 },{_id : 1, host : "node2:27020",arbiterOnly: true },{_id : 2, host : "node3:27020",priority:5 }]}
初始化副本集
# > rs.initiate(config)
查看集群状态
# >rs.status();
设置第三个分片副本集
# vim /data/mongodb/conf/shard3.conf
配置内容
# where to write logging data.
systemLog:
  destination: file
  logAppend: true
  path: /data/mongodb/log/shard3.log

# Where and how to store data.
storage:
  dbPath: /data/mongodb/db/shard3
  journal:
    enabled: true
  directoryPerDB: true
  engine: wiredTiger
  wiredTiger:
    engineConfig:
      cacheSizeGB: 3                  #根据实际情况设置内存大小
      statisticsLogDelaySecs: 0
      journalCompressor: snappy
      directoryForIndexes: true
    collectionConfig:
      blockCompressor: snappy
    indexConfig:
      prefixCompression: true

# how the process runs
processManagement:
  fork: true
  pidFilePath: /data/mongodb/db/shard3/shard3.pid

# network interfaces
net:
  port: 27030
  bindIp: node1                        #根据实际情况绑定IP

#operationProfiling:
operationProfiling:
  slowOpThresholdMs: 100
  mode: slowOp

replication:
  oplogSizeMB: 2048
  replSetName: shard3
  secondaryIndexPrefetch: all

sharding:
    clusterRole: shardsvr
启动shard3分片
# mongod -f /data/mongodb/conf/shard3.conf
初始化shard3分片
# mongo  node2:27030
# > use admin;
config变量
# >config = {_id : "shard3",members : [{_id : 0, host : "node1:27030",arbiterOnly: true },{_id : 1, host : "node2:27030",priority:5 },{_id : 2, host : "node3:27030",priority:3 }]}
初始化副本集
# > rs.initiate(config)
查看集群状态
# >rs.status();
3.配置路由服务器 mongos
# vim /data/mongodb/conf/mongos.conf
配置内容
# content
systemLog:
  destination: file
  logAppend: true
  path: /data/mongodb/log/mongos.log

processManagement:
  fork: true
  pidFilePath: /data/mongodb/mongos/mongos.pid

# network interfaces
net:
  port: 27001
  bindIp: node1                   #根据实际情况绑定IP

sharding:
   configDB: config/node1:27002,node2:27002,node3:27002
启动三台服务器的mongos server
# mongos -f /data/mongodb/conf/mongos.conf
连接路由服务器和shard分片副本集
# mongo  node1:27001
# > use admin
#串联路由服务器与分片副本集
> sh.addShard("shard1/node1:27010,node2:27010,node3:27010")
> sh.addShard("shard2/node1:27020,node2:27020,node3:27020")
> sh.addShard("shard3/node1:27030,node2:27030,node3:27030")
#查看集群状态
> sh.status()
测试验证
插入数据后,数据能够自动分片,指定需要激活分片的数据库和集合

数据库testdb激活分片
db.runCommand( { enablesharding :"testdb"});

指定数据库里需要分片的集合和片键,哈希id 分片
db.runCommand( { shardcollection : "testdb.table1",key : {"id": "hashed"} } );
测试分片配置是否正确
# mongo  node1:27001
切换数据库到testdb
>use  testdb
插入50万数据
>for(i=1;i<=500000;i++){db.table1.insert({"id":i,"name":"linux"})};
查看分片信息
> db.table1.stats();
模拟三台服务器其中一台故障
将服务器node3 关机
# shutdown -h now
检查集群状态
#sh.status()
继续写入50万数据到testdb数据库
> use  testdb
插入50万数据
>for(i=1;i<=500000;i++){db.table1.insert({"id":i,"name":"mongodb"})};
查询表数据条数应该有100万
> db.table1.count()
mongodb数据库添加安全权限访问控制
进入mongodb的mongos
# mongo node3:27001
> use admin
创建超级管理员
> db.createUser({user:"root",pwd:"centosmongodb",roles:[{role:"root",db:"admin"}]})
验证
> db.auth("root","centosmongodb")

在testdb创建一个读写权限的账号
> use testdb;
> db.createUser({user:"test",pwd:"testdb",roles:[{role:"readWrite",db:"testdb"}]})
> db.auth("test","testdb")
生成keyfile.key,用于集群的通信验证,拷贝文件到其他几台服务器
# cd /data/mongodb/conf
# openssl rand -base64 756 >keyfile.key
# chmod 400 keyfile.key
在所有服务器上面停止mongodb的进程
# killall mongos
# killall mongod
括号里面的配置文件追加认证的的配置(configsvr.conf shard1.conf shard2.conf shard3.conf)
security:
  keyFile: /data/mongodb/conf/keyfile.key
  clusterAuthMode: keyFile
  authorization: enabled
mongos 配置文件有些特殊,只需要添加下面的配置(mongos.conf)
security:
  keyFile: /data/mongodb/conf/keyfile.key
  clusterAuthMode: keyFile
启动mongodb的进程,先启动配置服务器,然后启动分片,最后启动mongos
# mongod -f /data/mongodb/conf/configsvr.conf
# mongod -f /data/mongodb/conf/shard1.conf
# mongod -f /data/mongodb/conf/shard2.conf
# mongod -f /data/mongodb/conf/shard3.conf
# mongos -f /data/mongodb/conf/mongos.conf

 浙公网安备 33010602011771号