磁盘管理之格式化/分区/挂载
Linux磁盘分区fdisk命令
1、什么是磁盘分区?
磁盘分区就是将一个硬盘驱动器分成若干个逻辑驱动器,是把硬盘连续的区块当做一个独立的磁盘来使用。分区表是一个硬盘分区的索引,分区的信息都会写进分区表。
2、为什么要进行磁盘分区?
- 防止数据丢失:如果系统只有一个分区,那么这个分区损坏,用户将会丢失所的有数据。
- 增加磁盘空间使用效率:可以用不同的区块大小来格式化分区,如果有很多1K的文件,而硬盘分区区块大小为4K,那么每存储一个文件将会浪费3K空间。这时我们需要取这些文件大小的平均值进行区块大小的划分。
- 数据激增到极限不会引起系统挂起:将用户数据和系统数据分开,可以避免用户数据填满整个硬盘,引起的系挂起。
3、分区工具fdisk用法参数介绍
语法
fdisk [选项] <磁盘>           更改分区表
fdisk [选项] -l [<磁盘>...]   列出分区表
选项
 -b, --sectors-size <大小>     显示扇区计数和大小
 -B, --protect-boot            创建新标签时不要擦除 bootbits
 -c, --compatibility[=<模式>]  模式,为“dos”或“nondos”(默认)
 -L, --color[=<时机>]          彩色输出(auto, always 或 never)默认启用颜色
 -l, --list                    显示分区并退出
 -x, --list-details            类似 --list 但提供更多细节
 -n, --noauto-pt               不要在空设备上创建默认分区表
 -o, --output <列表>           输出列
 -t, --type <类型>             只识别指定的分区表类型
 -u, --units[=<单位>]          显示单位,“cylinders”柱面或“sectors”扇区(默认)
 -s, --getsz                   以 512-字节扇区显示设备大小[已废弃]
      -b, --bytes                   以字节为单位而非易读的格式来打印 SIZE
      --lock[=<模式>]           使用独占设备锁(yes、no 或 nonblock)
 -w, --wipe <模式>             擦除签名(auto, always 或 never)
 -W, --wipe-partitions <模式>  擦除新分区的签名(auto, always 或 never)

 -C, --cylinders <数字>        指定柱面数
 -H, --heads <数字>            指定磁头数
 -S, --sectors <数字>          指定每条磁道的扇区数

 -h, --help                    显示此帮助
 -V, --version                 显示版本
二、磁盘分区
在Linux下,磁盘格式化、分区和挂载的详细步骤如下所示:
1、确认分区的磁盘
2、给 /dev/vdb 创建一个主分区,大小为10G
3、将硬盘的分区写进内核
[root@Desktop-c82e ~]# partprobe /dev/vdb
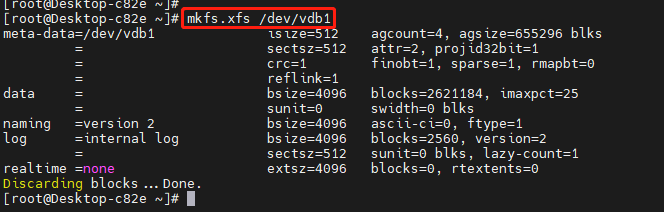
4、创建文件系统
文件系统类型比较多,我这里使用的是xfs文件系统,不同的文件系统有不同的特点。
注:mkfs
mkfs用来对某个磁盘分区建立文件系统。
如mkfs -t ext3 /dev/sda1 表示对sda1分区建立ext3文件系统。其他文件系统类型可以用man mkfs查看。
也可以用mkfs来对一个文件建立文件系统,如下命令。
$ dd if=/dev/zero of=tmp.disk bs=1024k count=10 # 建立一个10M的文件tmp.disk
$ mkfs -t ext3 tmp.disk # 将该文件格式化为ext3文件系统
$ sudo mount -o loop tmp.disk /mnt/ # 将该文件系统挂载到mnt目录下。
挂载后,就可以把这个10M的文件当作一个磁盘来用了。不过只有10M,可以建立更大的。/dev/zero是linux下特有的一个0生成器。
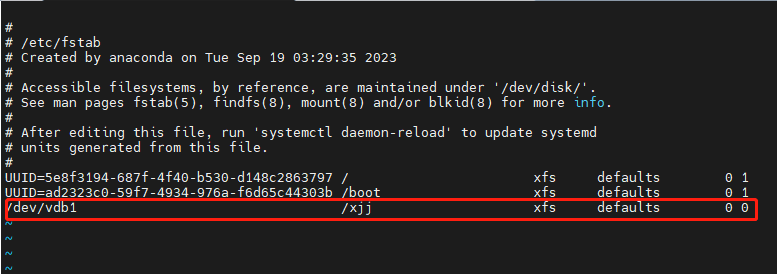
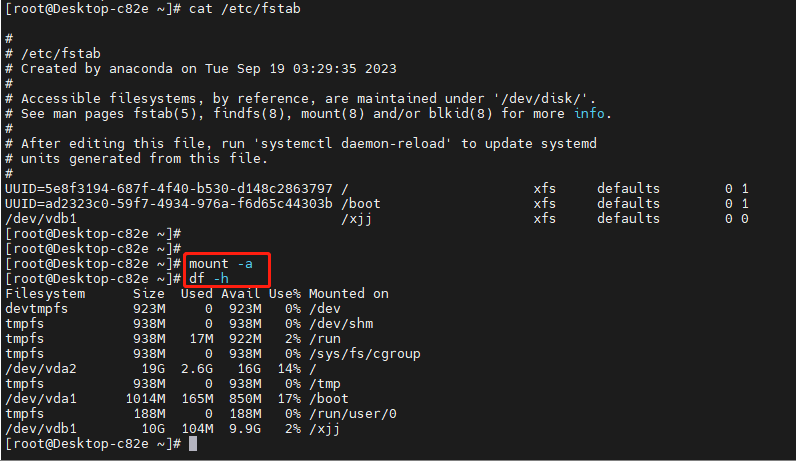
5、挂载
所谓挂载,其实就是把这个分区和一个目录做关联,往这个目录里面写数据,就是往这个分区中写数据
硬盘的挂载,最好是永久挂载,所以设置/etc/fstab
6、检查
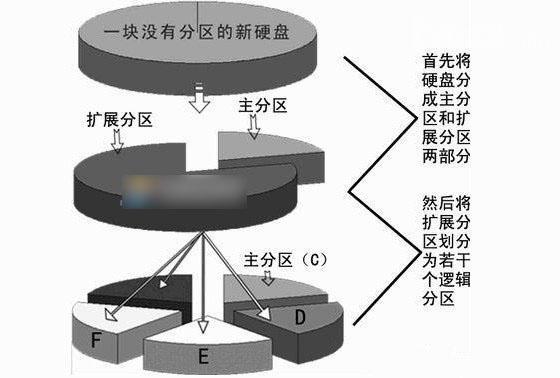
三、主分区,逻辑分区,扩展分区的区别
1.地位不同
逻辑分区属于扩展分区,扩展分区属于主分区。
给新硬盘上建立分区时都要遵循以下的顺序:建立主分区→建立扩展分区→建立逻辑分区→激活主分区→格式化所有分区。
2.位置不同
主分区又叫做引导分区,最多只能创建四个。
扩展分区是主分区之外的部分。
逻辑分区在扩展分区之内可以创建无数个。
3.作用不同
主分区是独立的,对应磁盘上的第一个分区,“一般”就是C盘。
扩展分区是一个概念,实际上是看不到的。
逻辑分区相当于一块存储截止,和操作系统还有别的逻辑分区、主分区没有什么关系,是“独立的”。
4.格式化情况不同
格式化是针对主分区和逻辑分区的。要格式化是因为这和操作系统管理文件系统有关系。没有格式化的分区就像一张白纸,要写入数据,必须对白纸打上“格子”,每个格子里面写一块。而操作系统只认这些格子。
5.大小不同
我们假定扩展分区为字母X,用一个公式来总结它们之间的关系:
硬盘的容量=主分区的容量+扩展分区的容量(硬盘=C盘+X)
扩展分区的容量=各个逻辑分区的容量之和(X=D盘+E盘+F盘)
四、实例示范
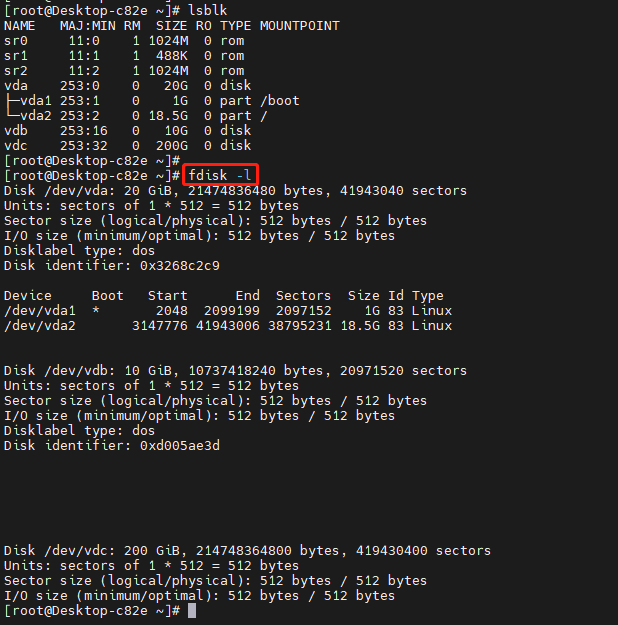
1、确定磁盘设备
[root@Desktop-c82e ~]# fdisk -l  //查看可用磁盘设备
Disk /dev/vda: 20 GiB, 21474836480 bytes, 41943040 sectors
Units: sectors of 1 * 512 = 512 bytes
Sector size (logical/physical): 512 bytes / 512 bytes
I/O size (minimum/optimal): 512 bytes / 512 bytes
Disklabel type: dos
Disk identifier: 0x3268c2c9

Device     Boot   Start      End  Sectors  Size Id Type
/dev/vda1  *       2048  2099199  2097152    1G 83 Linux
/dev/vda2       3147776 41943006 38795231 18.5G 83 Linux


Disk /dev/vdb: 10 GiB, 10737418240 bytes, 20971520 sectors
Units: sectors of 1 * 512 = 512 bytes
Sector size (logical/physical): 512 bytes / 512 bytes
I/O size (minimum/optimal): 512 bytes / 512 bytes
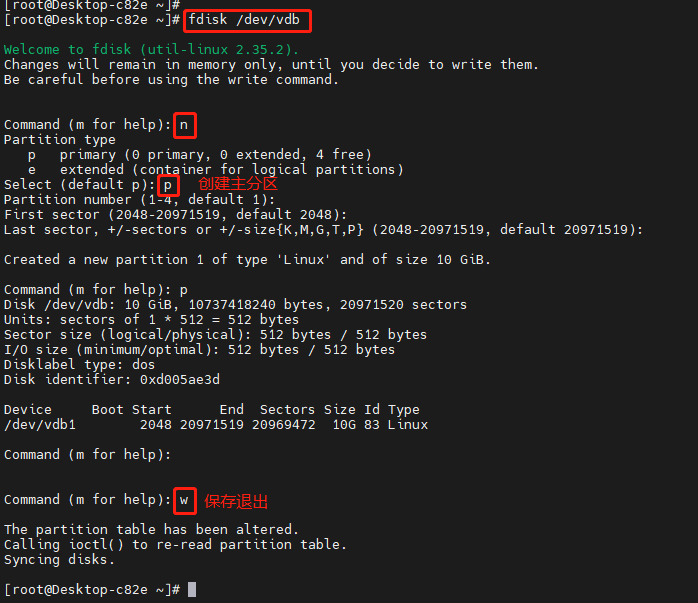
2、使用fdisk对磁盘进行分区
[root@Desktop-c82e ~]# fdisk /dev/vdb

Welcome to fdisk (util-linux 2.35.2).
Changes will remain in memory only, until you decide to write them.
Be careful before using the write command.

Device does not contain a recognized partition table.
Created a new DOS disklabel with disk identifier 0xd005ae3d.

Command (m for help):
输入 m 列出可以执行的命令:
Command (m for help): m

Help:

  DOS (MBR)
   a   toggle a bootable flag
   b   edit nested BSD disklabel
   c   toggle the dos compatibility flag

  Generic
   d   delete a partition
   F   list free unpartitioned space
   l   list known partition types
   n   add a new partition
   p   print the partition table
   t   change a partition type
   v   verify the partition table
   i   print information about a partition

  Misc
   m   print this menu
   u   change display/entry units
   x   extra functionality (experts only)

  Script
   I   load disk layout from sfdisk script file
   O   dump disk layout to sfdisk script file

  Save & Exit
   w   write table to disk and exit
   q   quit without saving changes

  Create a new label
   g   create a new empty GPT partition table
   G   create a new empty SGI (IRIX) partition table
   o   create a new empty DOS partition table
   s   create a new empty Sun partition table

各指令含义如下:
a: 切换引导标志(toggle a bootable flag)
b: 编辑BSD磁盘标签(edit bsd disklabel)
c: 切换DOS兼容性标志(toggle the dos compatibility flag)
d: 删除分区(delete a partition)
l: 列出已知的分区类型(list known partition types)
n: 添加新分区(add a new partition)
o: 创建一个新的空DOS分区表(create a new empty DOS partition table)
p: 打印分区表(print the partition table)
q: 退出而不保存更改(quit without saving changes)
s: 创建一个新的空Sun磁盘标签(create a new empty Sun disklabel)
t: 更改分区的系统ID(change a partition's system id)
u: 更改显示/输入单位(change display/entry units)
v: 验证分区表(verify the partition table)
w: 将表写入磁盘并退出(write table to disk and exit)
x: 额外功能(仅供专家使用)(extra functionality (experts only))
输入 p 列出磁盘目前的分区情况:
Command (m for help): p
Disk /dev/vdb: 10 GiB, 10737418240 bytes, 20971520 sectors
Units: sectors of 1 * 512 = 512 bytes
Sector size (logical/physical): 512 bytes / 512 bytes
I/O size (minimum/optimal): 512 bytes / 512 bytes
Disklabel type: dos
Disk identifier: 0xd005ae3d
输入 n 建立新的磁盘分区,首先建立两个主磁盘分区:
ommand (m for help): n
Command action
   e   extended
   p   primary partition (1-4)
p    //建立主分区
Partition number (1-4): 1  //分区号
First cylinder (1-391, default 1):  //分区起始位置
Using default value 1
last cylinder or +size or +sizeM or +sizeK (1-391, default 391): 100  //分区结束位置,单位为扇区

Command (m for help): n  //再建立一个分区
Command action
   e   extended
   p   primary partition (1-4)
p
Partition number (1-4): 2  //分区号为2
First cylinder (101-391, default 101):
Using default value 101
Last cylinder or +size or +sizeM or +sizeK (101-391, default 391): +200M  //分区结束位置,单位
确认分区建立成功:
Command (m for help): p

Disk /dev/sdb: 3221 MB, 3221225472 bytes
255 heads, 63 sectors/track, 391 cylinders
Units = cylinders of 16065 * 512 = 8225280 bytes

   Device Boot      Start         End      Blocks   Id  System
/dev/sdb1               1         100      803218+  83  Linux
/dev/sdb2             101         125      200812+  83  Linux
再建立一个逻辑分区:
Command (m for help): n
Command action
   e   extended
   p   primary partition (1-4)
e  //选择扩展分区
Partition number (1-4): 3
First cylinder (126-391, default 126):
Using default value 126
Last cylinder or +size or +sizeM or +sizeK (126-391, default 391):
Using default value 391
确认扩展分区建立成功:
Command (m for help): p

Disk /dev/sdb: 3221 MB, 3221225472 bytes
255 heads, 63 sectors/track, 391 cylinders
Units = cylinders of 16065 * 512 = 8225280 bytes

   Device Boot      Start         End      Blocks   Id  System
/dev/sdb1               1         100      803218+  83  Linux
/dev/sdb2             101         125      200812+  83  Linux
/dev/sdb3             126         391     2136645    5  Extended
在扩展分区上建立两个逻辑分区:
Command (m for help): n
Command action
   l   logical (5 or over)
   p   primary partition (1-4)
l //选择逻辑分区
First cylinder (126-391, default 126):
Using default value 126
Last cylinder or +size or +sizeM or +sizeK (126-391, default 391): +400M

Command (m for help): n
Command action
   l   logical (5 or over)
   p   primary partition (1-4)
l
First cylinder (176-391, default 176):
Using default value 176
Last cylinder or +size or +sizeM or +sizeK (176-391, default 391):
Using default value 391
确认逻辑分区建立成功:
Command (m for help): p

Disk /dev/sdb: 3221 MB, 3221225472 bytes
255 heads, 63 sectors/track, 391 cylinders
Units = cylinders of 16065 * 512 = 8225280 bytes

   Device Boot      Start         End      Blocks   Id  System
/dev/sdb1               1         100      803218+  83  Linux
/dev/sdb2             101         125      200812+  83  Linux
/dev/sdb3             126         391     2136645    5  Extended
/dev/sdb5             126         175      401593+  83  Linux
/dev/sdb6             176         391     1734988+  83  Linux

Command (m for help):
从上面的结果我们可以看到,在硬盘sdb我们建立了2个主分区(sdb1,sdb2),1个扩展分区(sdb3),2个逻辑分区(sdb5,sdb6)
注意:主分区和扩展分区的磁盘号位1-4,也就是说最多有4个主分区或者扩展分区,逻辑分区开始的磁盘号为5,因此在这个实验中试没有sdb4的。
最后对分区操作进行保存:
Command (m for help): w
The partition table has been altered!

Calling ioctl() to re-read partition table.
Syncing disks.
建立好分区之后我们还需要对分区进行格式化才能在系统中使用磁盘。
在sdb1上建立ext2分区:
[root@localhost ~]# mkfs.ext2 /dev/sdb1
mke2fs 1.39 (29-May-2006)
Filesystem label=
OS type: Linux
Block size=4096 (log=2)
Fragment size=4096 (log=2)
100576 inodes, 200804 blocks
10040 blocks (5.00%) reserved for the super user
First data block=0
Maximum filesystem blocks=209715200
7 block groups
32768 blocks per group, 32768 fragments per group
14368 inodes per group
Superblock backups stored on blocks:
        32768, 98304, 163840

Writing inode tables: done
Writing superblocks and filesystem accounting information: done

This filesystem will be automatically checked every 32 mounts or
180 days, whichever comes first.  Use tune2fs -c or -i to override.
在sdb6上建立ext3分区:
[root@localhost ~]# mkfs.ext3 /dev/sdb6
mke2fs 1.39 (29-May-2006)
Filesystem label=
OS type: Linux
Block size=4096 (log=2)
Fragment size=4096 (log=2)
217280 inodes, 433747 blocks
21687 blocks (5.00%) reserved for the super user
First data block=0
Maximum filesystem blocks=444596224
14 block groups
32768 blocks per group, 32768 fragments per group
15520 inodes per group
Superblock backups stored on blocks:
        32768, 98304, 163840, 229376, 294912

Writing inode tables: done
Creating journal (8192 blocks): done
Writing superblocks and filesystem accounting information: done

This filesystem will be automatically checked every 32 mounts or
180 days, whichever comes first.  Use tune2fs -c or -i to override.
[root@localhost ~]#
建立两个目录/oracle和/web,将新建好的两个分区挂载到系统:
[root@localhost ~]# mkdir /oracle
[root@localhost ~]# mkdir /web
[root@localhost ~]# mount /dev/sdb1 /oracle
[root@localhost ~]# mount /dev/sdb6 /web
查看分区挂载情况:
[root@localhost ~]# df -h
文件系统              容量  已用 可用 已用% 挂载点
/dev/mapper/VolGroup00-LogVol00
                      6.7G  2.8G  3.6G  44% /
/dev/sda1              99M   12M   82M  13% /boot
tmpfs                 125M     0  125M   0% /dev/shm
/dev/sdb1             773M  808K  733M   1% /oracle
/dev/sdb6             1.7G   35M  1.6G   3% /web
如果需要每次开机自动挂载则需要修改/etc/fstab文件,加入两行配置:
[root@localhost ~]# vim /etc/fstab

/dev/VolGroup00/LogVol00 /                       ext3    defaults        1 1
LABEL=/boot             /boot                   ext3    defaults        1 2
tmpfs                   /dev/shm                tmpfs   defaults        0 0
devpts                  /dev/pts                devpts  gid=5,mode=620  0 0
sysfs                   /sys                    sysfs   defaults        0 0
proc                    /proc                   proc    defaults        0 0
/dev/VolGroup00/LogVol01 swap                    swap    defaults        0 0
/dev/sdb1               /oracle                 ext2    defaults        0 0
/dev/sdb6               /web                    ext3    defaults        0 0

 浙公网安备 33010602011771号