C#中缓存的使用 ajax请求基于restFul的WebApi(post、get、delete、put) 让 .NET 更方便的导入导出 Excel .net core api +swagger(一个简单的入门demo 使用codefirst+mysql) C# 位运算详解 c# 交错数组 c# 数组协变 C# 添加Excel表单控件(Form Controls) C#串口通信程序
C#中缓存的使用
缓存的概念及优缺点在这里就不多做介绍,主要介绍一下使用的方法。
1.在ASP.NET中页面缓存的使用方法简单,只需要在aspx页的顶部加上一句声明即可:
<%@ OutputCache Duration="100" VaryByParam="none" %>
Duration:缓存时间(秒为单位),必填属性
2.使用微软自带的类库System.Web.Caching
新手接触的话不建议直接使用微软提供的类库,因为这样对理解不够深刻。所以在这里我带大家自己写一套缓存操作方法,这样理解得更加清晰。
话不多说,代码开敲。
一、首先,先模拟数据来源。新建一个类,写一个数据操作方法(该方法耗时、耗资源)
|
1
2
3
4
5
6
7
8
9
10
11
12
13
14
15
16
17
18
19
20
21
22
23
24
25
26
27
28
29
|
using System;using System.Collections.Generic;using System.Linq;using System.Text;using System.Threading;using System.Threading.Tasks;namespace Cache{ public class DataSource { /// <summary> /// 模拟从数据库读取数据 /// 耗时、耗CPU /// </summary> /// <param name="count"></param> public static int GetDataByDB(int count) { Console.WriteLine("-------GetDataByDB-------"); int result = 0; for (int i = count; i < 99999999; i++) { result += i; } Thread.Sleep(2000); return result; } }} |
二、编写一个缓存操作类
2.1 构造一个字典型容器,用于存放缓存数据,权限设为private ,防止随意访问造成数据不安全性
        //缓存容器
        private static Dictionary<string, object> CacheDictionary = new Dictionary<string, object>();
2.2 构造三个方法(添加数据至缓存容器、从缓存容器获取数据、判断缓存是否存在)

        /// <summary>
        /// 添加缓存
        /// </summary>
        public static void Add(string key, object value)
        {
            CacheDictionary.Add(key, value);
        }

        /// <summary>
        /// 获取缓存
        /// </summary>
        public static T Get<T>(string key)
        {
            return (T)CacheDictionary[key];
        }

        /// <summary>
        /// 判断缓存是否存在
        /// </summary>
        /// <param name="key"></param>
        /// <returns></returns>
        public static bool Exsits(string key)
        {
            return CacheDictionary.ContainsKey(key);
        }
三、程序入口编写测试方法
3.1 先看一下普通情况不适用缓存,它的执行效率有多慢
using System;
using System.Collections.Generic;
using System.Linq;
using System.Text;
using System.Threading.Tasks;

namespace Cache
{
    class Program
    {
        static void Main(string[] args)
        {
            for (int i = 1; i < 6; i++)
            {
                Console.WriteLine($"------第{i}次请求------");
                int result = DataSource.GetDataByDB(666);
                Console.WriteLine($"第{i}次请求获得的数据为:{result}");
            }
        }
    }
}

3.2 接下来,我们编写缓存试用方法。概念无非就是根据key前往字典容器里查找是否有相对应缓存数据,有则直接调用,没有则生成并存入字典容器里。
using System;
using System.Collections.Generic;
using System.Linq;
using System.Text;
using System.Threading.Tasks;

namespace Cache
{
    class Program
    {
        static void Main(string[] args)
        {
            for (int i = 1; i < 6; i++)
            {
                Console.WriteLine($"------第{i}次请求------");
                //int result = DataSource.GetDataByDB(666);
                int result = 0;
                //key的名字一定要确保请求的准确性 DataSource GetDataByDB 666缺一不可
                string key = "DataSource_GetDataByDB_666";
                if (CacheHelper.Exsits(key))
                {
                    //缓存存在,直接获取原数据
                    result = CacheHelper.Get<int>(key);
                }
                else
                {
                    //缓存不存在,去生成缓存,并加入容器
                    result = DataSource.GetDataByDB(666);
                    CacheHelper.Add(key, result);
                }
                Console.WriteLine($"第{i}次请求获得的数据为:{result}");
            }
        }
    }
}
3.3 我们看看加入缓存之后的效率如何

四、可以看到,瞬间完成。事已至此,缓存的使用基本是完成了。但是回过头来我们想想看。一个系统成百上千个地方使用缓存的话,那岂不是要写成百上千个if else判断缓存是否存在,然后获取?
答案显而易见,肯定不合理的。所以我们要对代码进行优化。
4.1 缓存操作类(CacheHelper)编写一个通用的获取方法
        /// <summary>
        /// 缓存获取方法
        /// </summary>
        /// <typeparam name="T"></typeparam>
        /// <param name="key">缓存字典容器对应key</param>
        /// <param name="func">委托方法 传入操作对象</param>
        /// <returns></returns>
        public static T GetCache<T>(string key, Func<T> func)
        {
            T t = default(T);
            if (CacheHelper.Exsits(key))
            {
                //缓存存在,直接获取原数据
                t = CacheHelper.Get<T>(key);
            }
            else
            {
                //缓存不存在,去生成缓存,并加入容器
                t = func.Invoke();
                CacheHelper.Add(key, t);
            }
            return t;
        }
4.2 程序入口进行调用,传入的委托参数为lamad表达式优化后的代码
using System;
using System.Collections.Generic;
using System.Linq;
using System.Text;
using System.Threading.Tasks;

namespace Cache
{
    class Program
    {
        static void Main(string[] args)
        {
            for (int i = 1; i < 6; i++)
            {
                Console.WriteLine($"------第{i}次请求------");
                int result = 0;
                //key的名字一定要确保请求的准确性 DataSource GetDataByDB 666缺一不可
                string key = "DataSource_GetDataByDB_666";

                //将需要执行的获取数据操作编写成委托传入方法(重点)
                //Func<int> func = new Func<int>(() => { return DataSource.GetDataByDB(666); });

                result = CacheHelper.GetCache(key, () => DataSource.GetDataByDB(666));
                Console.WriteLine($"第{i}次请求获得的数据为:{result}");
            }
        }
    }
}
到这里,缓存的使用基本结束了。最好值得一提的是,缓存尽量在数据量小、重复查询量大的情况下使用。因为缓存也是要耗内存的,服务器内存是有限的!
ajax请求基于restFul的WebApi(post、get、delete、put)
近日逛招聘软件,看到部分企业都要求会编写、请求restFul的webapi。正巧这段时间较为清闲,于是乎打开vs准备开撸。
1.何为restFul?
restFul是符合rest架构风格的网络API接口。
rest是一种软件架构的编码风格,是根据网络应用而去设计和开发的一种可以降低开发复杂度的编码方式,并且可以提高程序的可伸缩性(增减问题)。
几种较为常见的操作类型:get(查询)、post(新增)、put(修改)、delete(删除)
2.restFul标准的WebApi搭建以及部署在iis上
在这里为了方便,使用的ef框架,在创建读/写控制器时直接引用了模型类


控制器直接帮我帮crud的方法都写好了,按照注释的请求规则,可直接使用。代码如下:
using System;
using System.Collections.Generic;
using System.Data;
using System.Data.Entity;
using System.Data.Entity.Infrastructure;
using System.Linq;
using System.Net;
using System.Net.Http;
using System.Web.Http;
using System.Web.Http.Description;
using webapi;

namespace webapi.Controllers
{
    public class ProductsController : ApiController
    {
        private DtoolsEntities db = new DtoolsEntities();

        // GET: api/Products
        [HttpGet]
        public IQueryable<Product> GetProduct()
        {
            return db.Product.OrderByDescending(p => p.AddDate).Take(10);
        }

        // GET: api/Products/5
        [HttpGet]
        [ResponseType(typeof(Product))]
        public IHttpActionResult GetProduct(int id)
        {
            Product product = db.Product.Find(id);
            if (product == null)
            {
                return NotFound();
            }

            return Ok(product);
        }

        // PUT: api/Products/5  update
        [HttpPut]
        [ResponseType(typeof(void))]
        public IHttpActionResult PutProduct(int id, Product product)
        {
            if (!ModelState.IsValid)
            {
                return BadRequest(ModelState);
            }

            if (id != product.Id)
            {
                return BadRequest();
            }
            product.AddDate = DateTime.Now;
            db.Entry(product).State = EntityState.Modified;

            try
            {
                db.SaveChanges();
            }
            catch (DbUpdateConcurrencyException)
            {
                if (!ProductExists(id))
                {
                    return NotFound();
                }
                else
                {
                    throw;
                }
            }

            return StatusCode(HttpStatusCode.NoContent);
        }


        // POST: api/Products
        [HttpPost]
        [ResponseType(typeof(Product))]
        public IHttpActionResult PostProduct(Product product)
        {
            if (!ModelState.IsValid)
            {
                return BadRequest(ModelState);
            }
            product.AddDate = DateTime.Now;
            db.Product.Add(product);
            db.SaveChanges();

            return CreatedAtRoute("DefaultApi", new { id = product.Id }, product);
        }

        // DELETE: api/Products/5
        [HttpDelete]
        [ResponseType(typeof(Product))]
        public IHttpActionResult DeleteProduct(int id)
        {
            Product product = db.Product.Find(id);
            if (product == null)
            {
                return NotFound();
            }

            db.Product.Remove(product);
            db.SaveChanges();

            return Ok(product);
        }

        protected override void Dispose(bool disposing)
        {
            if (disposing)
            {
                db.Dispose();
            }
            base.Dispose(disposing);
        }

        private bool ProductExists(int id)
        {
            return db.Product.Count(e => e.Id == id) > 0;
        }
    }
}
每个控制器前根据类型最好指定[HttpGet] [HttpPost] [HttpPut] [HttpDelete],因为服务器是根据请求类型自动映射匹配控制器名称,加上特性,避免出错。
weiapi设置中指定json格式,避免数据类型异常

webapi的搭建基本没有问题了。接下来就是部署在iis上,这里不多做描述,不懂如何部署iis可点击这里 (会被揍吗?)
3.前台ajax请求页面的编写
<!DOCTYPE html>

<html xmlns="http://www.w3.org/1999/xhtml">
<head runat="server">
    <meta http-equiv="Content-Type" content="text/html; charset=utf-8" />
    <title></title>
    <script src="js/jquery-3.3.1.js"></script>
    <script type="text/javascript">

        //部署在iis上的webapi接口具体请求路径
        var httpUrl = "http://192.168.0.142:8018/api/Products";

        $(function () {
            $.ajax({
                url: httpUrl,
                type: "GET",
                dataType: "json",
                success: function (data) {
                    $.each(data, function (index, item) {
                        var tr = $("<tr/>");
                        $("<td/>").html(item["ProductName"]).appendTo(tr);
                        $("<td/>").html(item["Brand"]).appendTo(tr);
                        $("<td/>").html(item["ASIN"]).appendTo(tr);
                        $("<td/>").html(item["SKU"]).appendTo(tr);
                        $("<button id ='d' onclick='del(" + item["Id"] + ")'>").html("删除").appendTo(tr);
                        $("<button id ='u' onclick='update(" + item["Id"] + ")'>").html("更新").appendTo(tr);
                        tr.appendTo("#tab");
                    });
                },
                error: function (XMLHttpRequest, textStatus, errorThrown) {
                    alert(XMLHttpRequest + "," + textStatus + "," + errorThrown);
                }
            });

        });

        //修改
        function update(id) {
            $.ajax({
                url: httpUrl + "?id=" + id,
                type: "Put",
                data: { "id": id, "ProductName": '男士领带', "Brand": '海澜之家', "ASIN": 'SAD498AE1', "SKU": '98DA7E9QE-SDAE', "StoreName": '海澜之家京东自营店' },
                dataType: "json",
                success: function (data) {
                    location.reload();
                }
            })
        }

        //新增
        function add() {
            $.ajax({
                url: httpUrl,
                type: "Post",
                data: { "ProductGuid": newGuid(), "ProductName": '男士衬衫', "Brand": '海澜之家', "ASIN": 'SAD498AE1', "SKU": '98DA7E9QE-SDAE', "StoreName": '海澜之家天猫旗舰店' },
                dataType: "json",
                success: function (data) {
                    location.reload();
                }
            })
        }

        //删除
        function del(id) {
            $.ajax({
                url: httpUrl+"/" + id,
                type: "Delete",
                dataType: "json",
                success: function (data) {
                    location.reload();
                }
            });
        }

        //生成guid
        function newGuid() {
            var guid = "";
            for (var i = 1; i <= 32; i++) {
                var n = Math.floor(Math.random() * 16.0).toString(16);
                guid += n;
                if ((i == 8) || (i == 12) || (i == 16) || (i == 20))
                    guid += "-";
            }
            return guid;
        }
    </script>
</head>
<body>
    <div>
        <table id="tab">
            <tr>
                <th>产品名称</th>
                <th>产品品牌</th>
                <th>ASIN</th>
                <th>SKU</th>
            </tr>
        </table>
        <button id="add" onclick="add()">add</button>
    </div>

</body>
</html>
前端,后端代码都写完了。只剩测试了。想都不用想肯定会出问题的,因为涉及到了跨域请求等,接下来就为大家解决问题。
问题一:ajax请求,涉及到cors跨域,请求失败

问题介绍及原因分析:
CORS是一个W3C标准,全称是”跨域资源共享”。它允许浏览器向跨源服务器,发出XMLHttpRequest请求,基本上目前所有的浏览器都实现了CORS标准,其实目前几乎所有的浏览器ajax请求都是基于CORS机制的。
跨域问题一般发生在Javascript发起AJAX调用,因为浏览器对于这种请求,所给予的权限是较低的,通常只允许调用本域中的资源,除非目标服务器明确地告知它允许跨域调用。所以,跨域的问题虽然是由浏览器的行为产生出来的,但解决的方法却 是在服务端。因为不可能要求所有客户端降低安全性。
解决方案:
web.config修改配置文件,使服务端支持跨域请求
<system.webServer>
    <httpProtocol>
      <customHeaders>
        <!--服务器端返回Response header  后接URL或*  表示允许-->
        <add name="Access-Control-Allow-Origin" value="*" />
        <add name="Access-Control-Allow-Headers" value="Content-Type" />
     <!--支持请求的类型-->
        <add name="Access-Control-Allow-Methods" value="GET, POST, PUT, DELETE, OPTIONS" />
      </customHeaders>
    </httpProtocol>
    <handlers>
      <remove name="ExtensionlessUrlHandler-Integrated-4.0" />
      <add name="ExtensionlessUrlHandler-Integrated-4.0" path="*." verb="*" type="System.Web.Handlers.TransferRequestHandler" preCondition="integratedMode,runtimeVersionv4.0" />
    </handlers>
  </system.webServer>
问题二:get、post 可正常请求,put、delete 出现405(Method Not Allowed) 注意:我提交Put的请求,浏览器响应的是Request Method:PUT

问题介绍及原因分析:
有些人会问:我刚刚在服务端设置了允许put delete请求了,浏览器上服务端的响应也看到了支持put delete,为啥服务端还是拒绝呢?
一切都是iis的WebDAV(Web Distribution Authorization Versioning) Publish惹的祸,WebDAV是基于HTTP协议的拓展,添加了很多Method用于管理服务器上的文件。若安装了WebDAV,那么iis所有的site都会默认使用WebDAV Module与WebDAV Handler。
WebDAV Handler的默认配置是处理如下 Method:PROPFIND,PROPPATCH,MKCOL,PUT,COPY,DELETE,MOVE,LOCK,UNLOCK。所以浏览器发送的put delete请求都会被拦截并交给WebDAV Handler来处理,并且WebDAV Handler会默认拒绝请求
解决方案:
既然我们找到了问题所在点,那么解决方案应然而生,那就是在配置文件里移除ebDAVModule和WebDAVHandler或者在系统中直接移除WebDAV
 <system.webServer>
    <!--以下配置为了让IIS 7+支持Put/Delete方法-->
    <httpProtocol>
      <customHeaders>
        <!--服务器端返回Response header  后接URL或*  表示允许-->
        <add name="Access-Control-Allow-Origin" value="*" />
        <add name="Access-Control-Allow-Headers" value="Content-Type" />
        <add name="Access-Control-Allow-Methods" value="GET, POST, PUT, DELETE, OPTIONS" />
      </customHeaders>
    </httpProtocol>
    <validation validateIntegratedModeConfiguration="false"/>
    <handlers>
      <!--移除WebDAV协议-->
      <remove name="WebDAV"/>
      <remove name="ExtensionlessUrlHandler-Integrated-4.0" />
      <!--支持所有方式的请求-->
      <add name="ExtensionlessUrlHandler-Integrated-4.0" path="*." verb="*" type="System.Web.Handlers.TransferRequestHandler" preCondition="integratedMode,runtimeVersionv4.0" />
    </handlers>
    <!--IIS7/7.5上必须加这个配置,否则访问报错-->
    <modules  runAllManagedModulesForAllRequests="true">
      <!--移除WebDAV协议-->
      <remove name="WebDAVModule"/>
      <remove name="TelemetryCorrelationHttpModule" />
      <add name="TelemetryCorrelationHttpModule" type="Microsoft.AspNet.TelemetryCorrelation.TelemetryCorrelationHttpModule, Microsoft.AspNet.TelemetryCorrelation" preCondition="integratedMode,managedHandler" />
    </modules>
  </system.webServer>
问题三:put delete请求,又出现了405(Method Not Allowed)


问题介绍及原因分析:
大家发现没有,问题二put提交,Request Method就是put,Delete提交,Request Method就是Delete。然而在这里统统都是OPTIONS。那么这个OPTIONS到底是个啥呢?
Preflighted Requests(预检请求)
Preflighted Requests是CORS中一种透明服务器验证机制。预检请求首先需要向另外一个域名的资源发送一个 HTTP OPTIONS 请求头,其目的就是为了判断实际发送的请求是否是安全的。
下面的2种情况需要进行预检:
1、简单请求,比如使用Content-Type 为 application/xml 或 text/xml 的 POST 请求;
2、请求中设置自定义头,比如 X-JSON、X-MENGXIANHUI 等。
原来put、delete请求如果头部设置了XMLHttpRequest.setRequestHeader("Content-Type", "application/json")之前还发送了一次预检请求。
解决方案:
既然是多的一次请求,那我们就在服务端过滤掉就好了。
Global.asac添加以下方法就行了
using System;
using System.Collections.Generic;
using System.Linq;
using System.Web;
using System.Web.Http;
using System.Web.Mvc;
using System.Web.Optimization;
using System.Web.Routing;

namespace webapi
{
    public class WebApiApplication : System.Web.HttpApplication
    {
        protected void Application_Start()
        {
            AreaRegistration.RegisterAllAreas();
            GlobalConfiguration.Configure(WebApiConfig.Register);
            FilterConfig.RegisterGlobalFilters(GlobalFilters.Filters);
            RouteConfig.RegisterRoutes(RouteTable.Routes);
            BundleConfig.RegisterBundles(BundleTable.Bundles);
        }

        protected void Application_BeginRequest()
        {
            if (Request.Headers.AllKeys.Contains("Origin") && Request.HttpMethod == "OPTIONS")
            {
                Response.End();
            }
        }
    }
}
到这里,ajax跨域实现RestFul请求,已经是能正常运行了。剩下的只是安全校验、身份认证、异常记录等,就能放到生产环境了。这里就不多做描述了,毕竟博主还是上班族...
如有错误,欢迎大家指正~
让 .Net 更方便的导入导出Excel
Intro#
因为前一段时间需要处理一些 excel 数据,主要是导入/导出操作,将 Excel 数据转化为对象再用程序进行处理和分析,没有找到比较满意的库,于是就自己造了一个轮子,屏蔽掉了 xlsx 与 xls 的差别,屏蔽了 Npoi 操作 Excel 的细节,提供简单容易上手的 api。
导入/导出#
直接添加 nuget 包引用 WeihanLi.Npoi
根据 excel 文件获取一个 IWorkbook 对象,支持 *.xls/*.xlsx
IWorkbook workbook = ExcelHelper.LoadExcel("excelFilePath");将 Excel 文件的第一个 sheet 里的内容转成 list 对象
List<TEntity> entityList = ExcelHelper.ToEntityList<TEntity>("excelFilePath");将 Excel 文件的第一个 sheet 里的内容转成 DataTable 对象
DataTable dataTable = ExcelHelper.ToDataTable("excelFilePath");将 list 对象导出到 Excel 字节数组
List<TEntity> entityList = ExcelHelper.ToEntityList<TEntity>("excelFilePath");

entityList.ToExcelBytes();
将 list 对象导出到 Excel 文件
List<TEntity> entityList = ExcelHelper.ToEntityList<TEntity>("excelFilePath");

entityList.ToExcelFile("excelFilePath");More#
.net core api +swagger(一个简单的入门demo 使用codefirst+mysql)
前言:
自从.net core问世之后,就一直想了解。但是由于比较懒惰只是断断续续了解一点。近段时间工作不是太忙碌,所以偷闲写下自己学习过程。慢慢了解.net core 等这些基础方面学会之后再用.net core写一个项目,前期文章都是为之后的项目做准备。同时也希望这些基础文章能帮助更多的想入手 .net core的小白。(文中如有不正确地方欢迎各位指正)
开发工具vs2017
数据库 mysql8.0
.net core环境 .net core2.1
1】model层建立
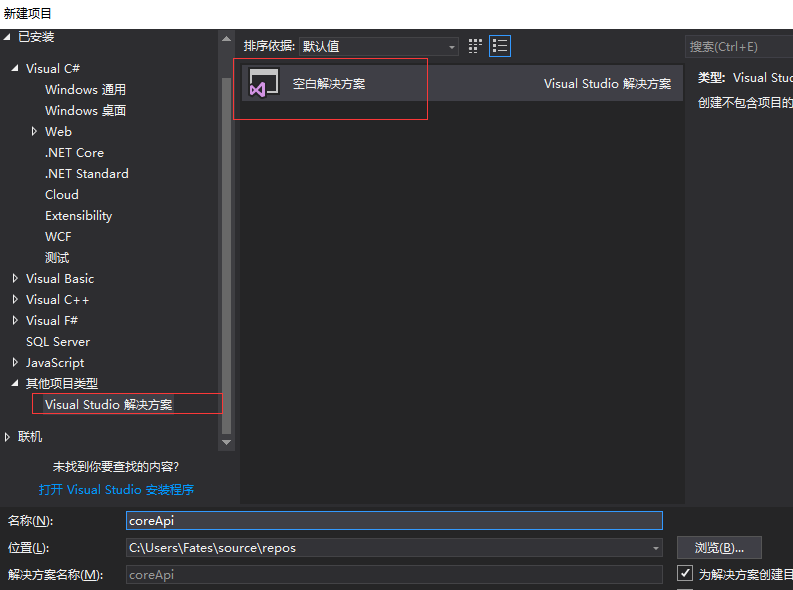
先新建一个项目:左侧目录选择其他项目类型=》vs解决方案=》空白方案=》自己随意去个名字
添加一个core 内库作为model层,

由于本次数据库使用的是mysql,所以在model层中通过nuget分别引用Microsoft.EntityFrameworkCore.Tools和Pomelo.EntityFrameworkCore.MySql(注意两个版本必须一致 这里选自2.1.4版本,之前博主引用版本不对,直接导致连接输出出错)

然后分别添加一个model类和数据库上下文类,本demo创建一张user表
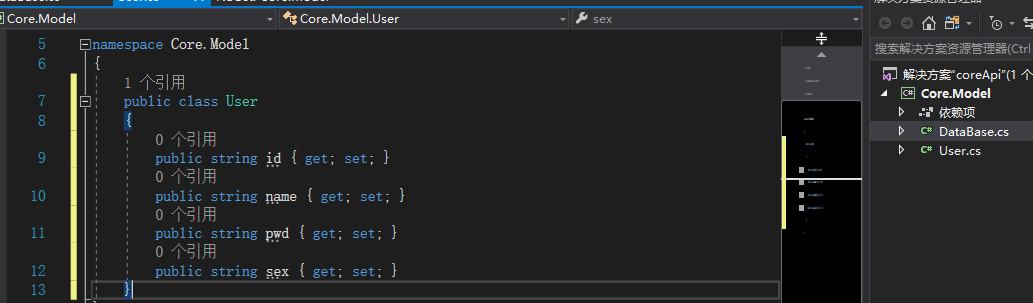
数据库上下文类DataBase

using Microsoft.EntityFrameworkCore;

namespace Core.Model
{
    public class DataBase : DbContext
    {
        //构造方法
        public DataBase(DbContextOptions<DataBase> options)
            : base(options)
        { }

        #region 数据区域
        public DbSet<User> User { get; set; }
        #endregion

    }
}
至此,model创建完毕,后期各位可以根据自己的需要自己拓展
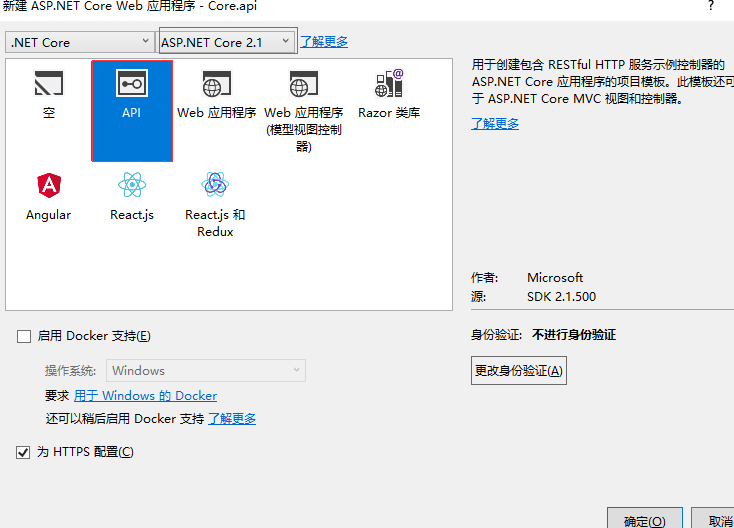
2】创建api层
首先在解决方案中创建api层,流程如下图

建议新手选择api这一项,创建完毕之后,项目结构如右图
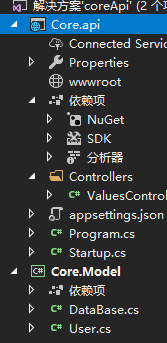
别忘记在api层添加对model层的引用

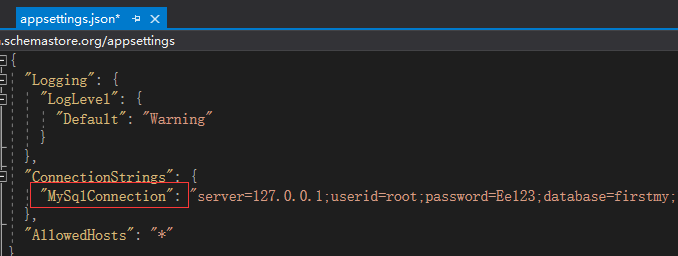
首先来appsettings.json配置数据库,127.0.0.1代表本地计算机
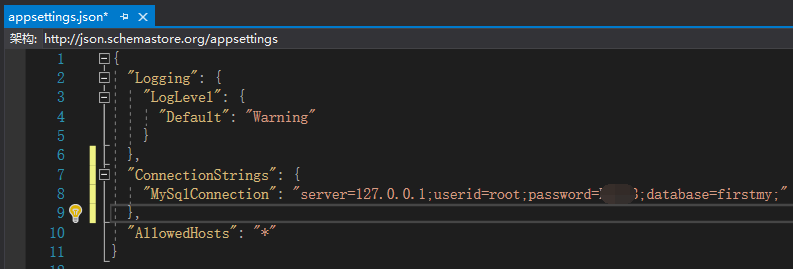
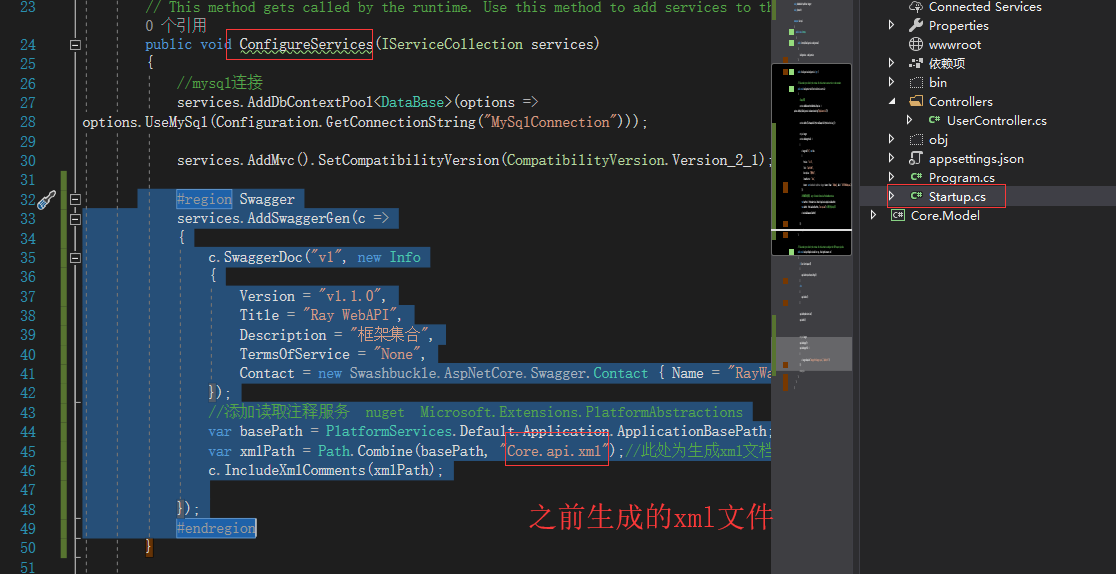
配置完毕之后来到 Startup.cs的ConfigureServices方法将数据库连接配置好,如果此段代码有飘红部分,只需要将其缺失的地方引用(需要引用
using Microsoft.EntityFrameworkCore;和using Core.Model;)

   //mysql连接
            services.AddDbContextPool<DataBase>(options =>
options.UseMySql(Configuration.GetConnectionString("MySqlConnection")));
注意括号中的MySqlConnection就是appsettings.json中写连接数据库字符串的前缀
接下来将原有的控制器删除,自己添加一个UserController.cs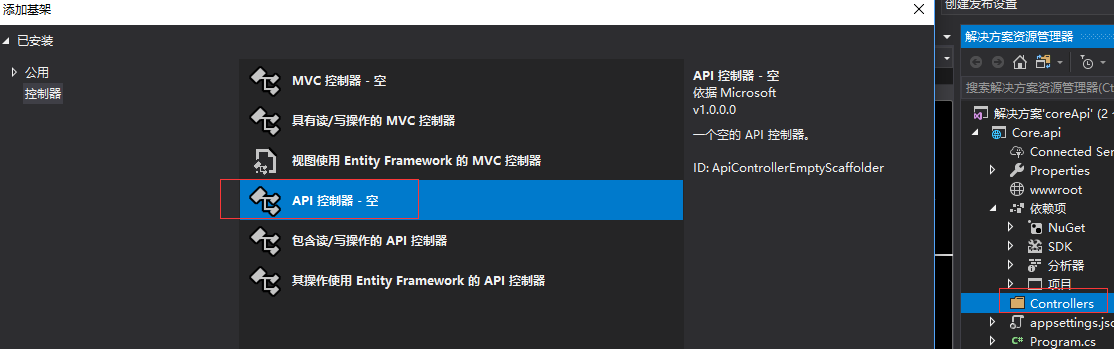
控制器中代码(包含增删查改CRUD)
using System;
using System.Collections.Generic;
using System.Linq;
using System.Threading.Tasks;
using Core.Model;
using Microsoft.AspNetCore.Http;
using Microsoft.AspNetCore.Mvc;

namespace Core.api.Controllers
{
    [Produces("application/json")]
    [Route("api/admin/[controller]")]
    [ApiController]
    public class UserController : Controller
    {

        private readonly DataBase _context;
        public UserController(DataBase context)
        {
            _context = context;
        }
        #region base

        /// <summary>
        /// 获取单个
        /// </summary>
        /// <param name="id">Id</param>
        /// <returns></returns>
        [HttpGet("{id}")]
        public JsonResult GetById(string id)
        {
            var tt = _context.Set<User>().Where(c => c.id == id).ToList();
            //_context.Set<User>().Add(us);
            //_context.SaveChanges();
            return Json(tt);
        }
        /// <summary>
        /// 添加
        /// </summary>
        /// <param name="entity"></param>
        /// <returns></returns>
        [HttpPost]
        public JsonResult Add(User entity = null)
        {
            _context.Set<User>().Add(entity);
            int num = _context.SaveChanges();

            if (entity == null)
                return Json("参数为空");
            if (num > 0) { return Json("成功"); }
            else { return Json("失敗"); }
        }
        /// <summary>
        /// 编辑
        /// </summary>
        /// <param name="entity"></param>
        /// <returns></returns>
        [HttpPut]
        [Route("User")]
        public JsonResult Update(User entity = null)
        {

            _context.Set<User>().Update(entity);
            int num = _context.SaveChanges();
            if (entity == null)
                return Json("参数为空");
            if (num > 0) { return Json("成功"); }
            else { return Json("失敗"); }
        }

        /// <summary>
        /// 删除
        /// </summary>
        /// <param name="ids"></param>
        /// <returns></returns>
        [HttpDelete]
        public JsonResult Dels(string ids = null)
        {
            if (ids.Length == 0)
                return Json("参数为空");
            var tt = _context.Set<User>().Where(c => c.id == ids).First();
            _context.Set<User>().Remove(tt);
            int num = _context.SaveChanges();
            if (num > 0) { return Json("成功"); }
            else { return Json("失敗"); }
        }
        #endregion
    }
}
自此一个简单的api基本完成,需要运行检验还需要一个步骤。
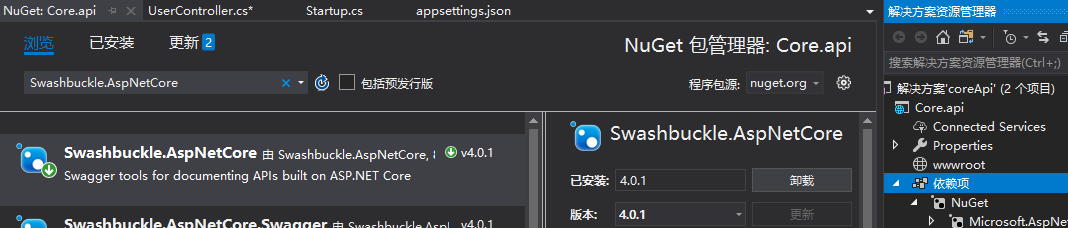
3】swagger
为了检测接口运行,这里选择swagger
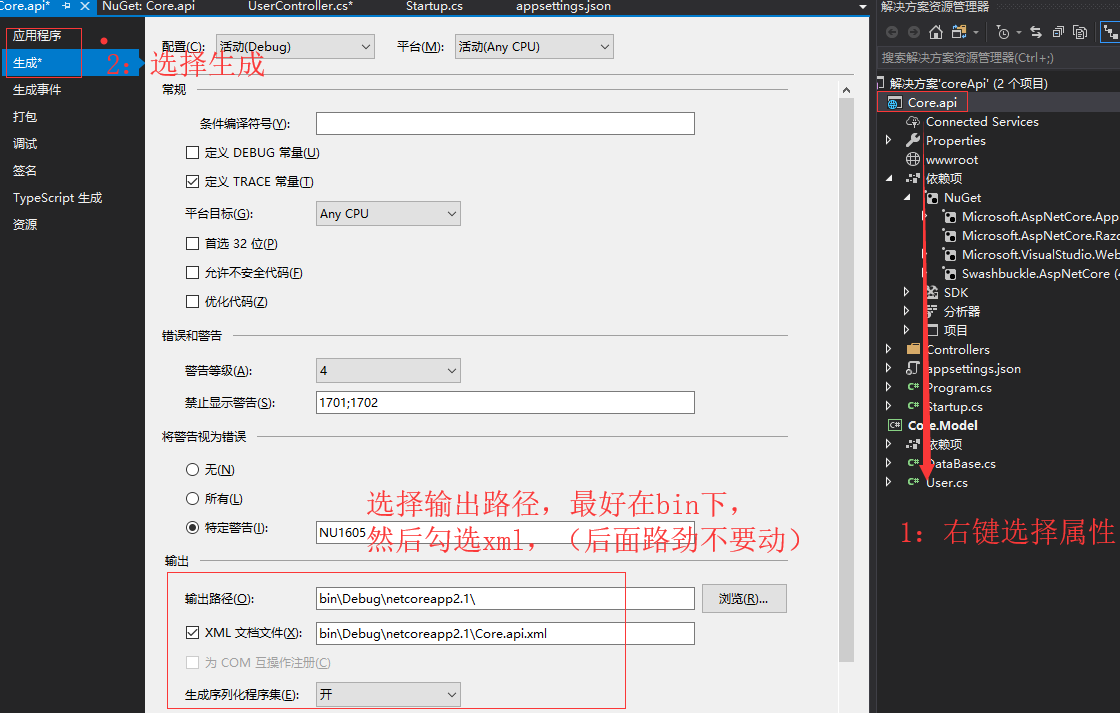
首先在api层通过nuget引用Swashbuckle.AspNetCore
然后右键单击core.api项目选择属性,打开一个新面板之后选择左侧的生成菜单=》扎到输出提示。选择输出路径bin\Debug\netcoreapp2.1\=》勾选xml文档文件
然后回到 Startup.cs ,分别加入以下代码
此处需要先在nuget中引用 Microsoft.Extensions.PlatformAbstractions
注意 上文中生成的core.api.xml写入到下列方法中 ,名字要保持一致,否者报错
#region Swagger
services.AddSwaggerGen(c =>
{
c.SwaggerDoc("v1", new Info
{
Version = "v1.1.0",
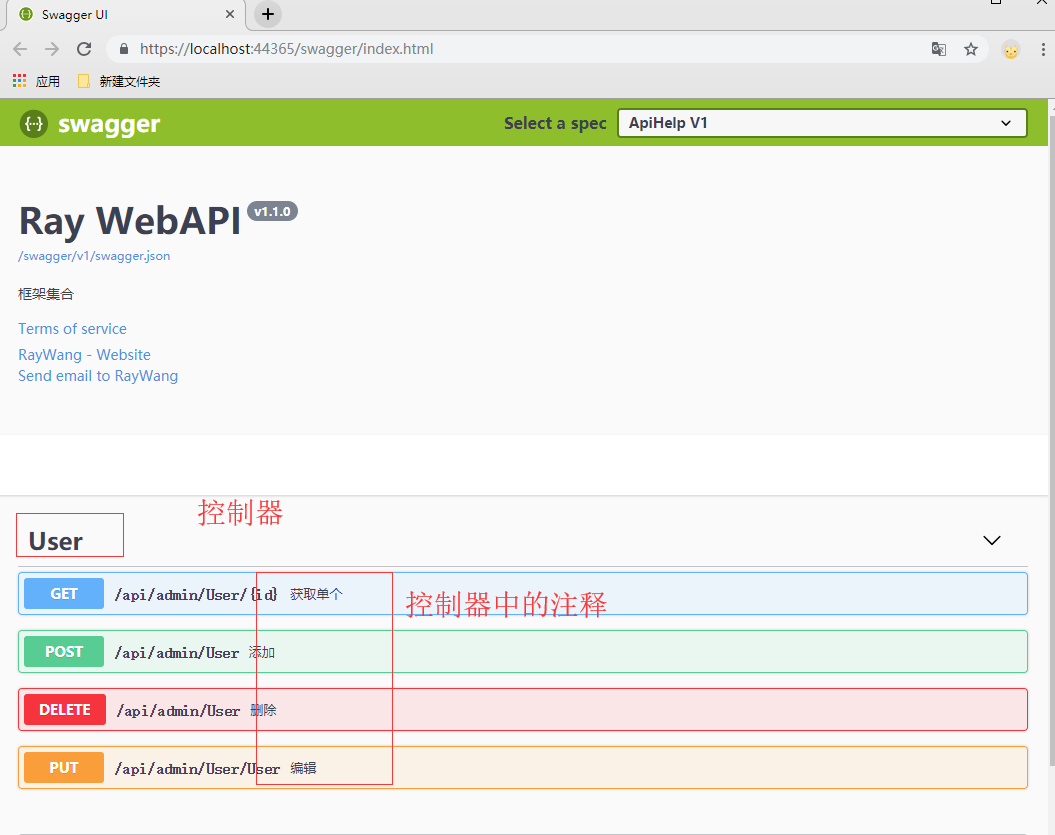
Title = "Ray WebAPI",
Description = "框架集合",
TermsOfService = "None",
Contact = new Swashbuckle.AspNetCore.Swagger.Contact { Name = "RayWang", Email = "2271272653@qq.com", Url = "http://www.cnblogs.com/RayWang" }
});
//添加读取注释服务 nuget Microsoft.Extensions.PlatformAbstractions
var basePath = PlatformServices.Default.Application.ApplicationBasePath;
var xmlPath = Path.Combine(basePath, "Core.api.xml");//此处为生成xml文档
c.IncludeXmlComments(xmlPath);
});
#endregion
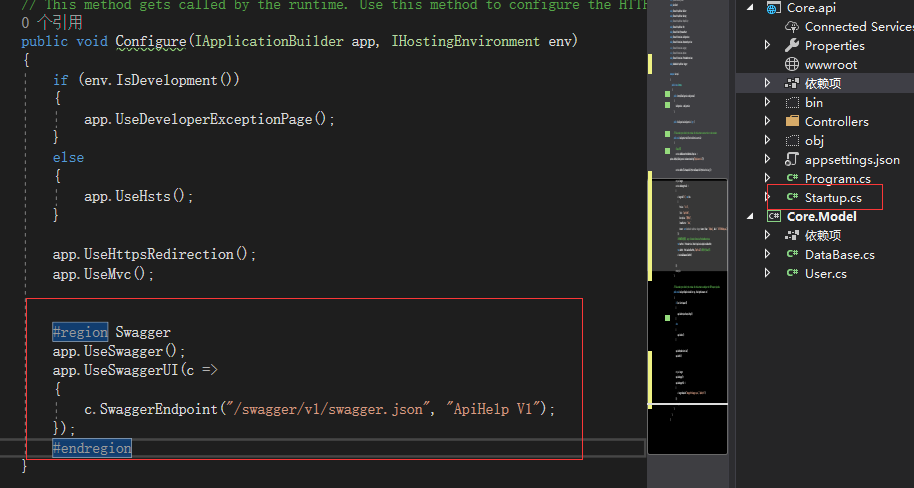
  #region Swagger
            app.UseSwagger();
            app.UseSwaggerUI(c =>
            {
                c.SwaggerEndpoint("/swagger/v1/swagger.json", "ApiHelp V1");
            });
            #endregion
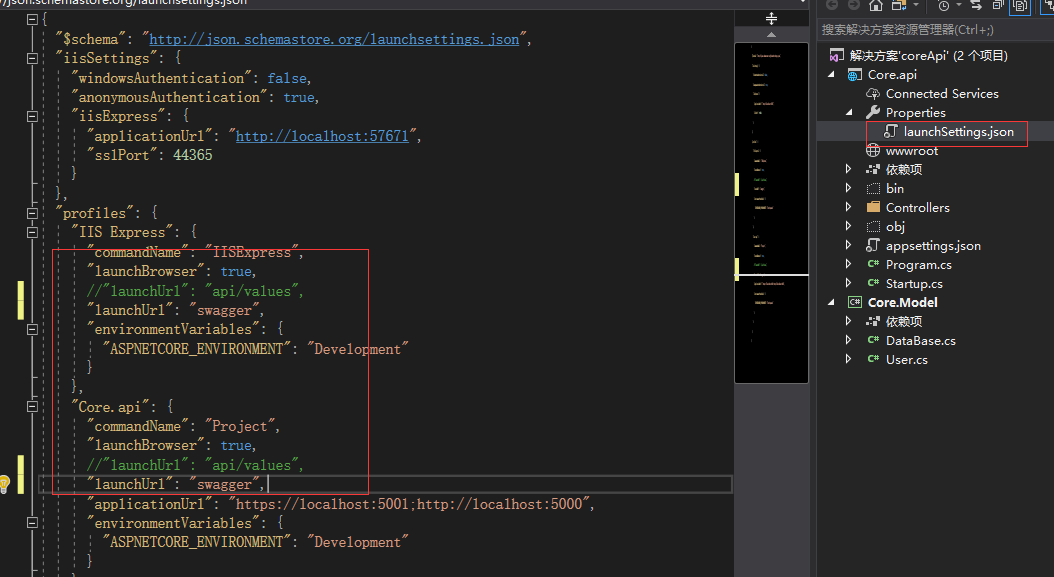
,最后来到launchSettings.json修改以下代码,将api/value修改为swagger,表示项目已启动就显示Swagger的主页面,而不用通过输入路劲
因为本项目是codefirst,所以最后在项目启动之前别忘记在nuget控制台运行以下两行代码
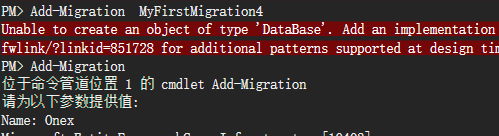
先输入:Add-Migration  MyFirstMigration(名字。这里随意取未MyFirstMigration)
 在输入:Update-Database

补充一个小问题,博主首次在nuget控制台输入
Add-Migration MyFirstMigration的时候不知道为什么报错,后来先输入Add-Migration 然后随意取一个名字才成功。之前未遇见过。如果遇到此类错误的读者可以先试试我这个办法。
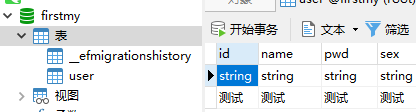
最后】最后运行代码,就会看到页面如下
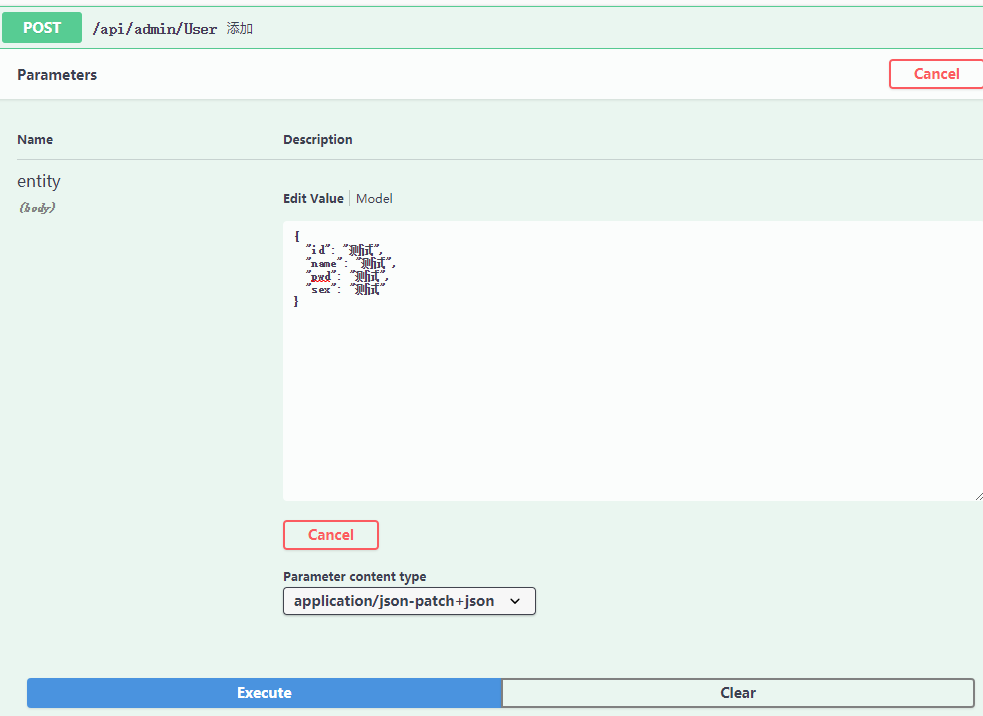
添加一条数据进行尝试,单击绿色post=》单击try it out =》输入数据(这里我全部输入“测试”)=》单击execute
然后鼠标下滑,就可以看到返回的结果
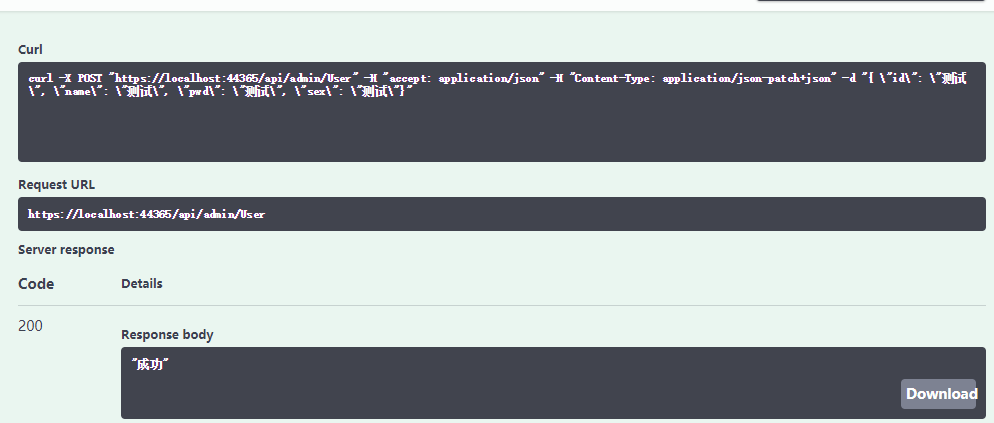
然后进入数据库验证,发现数据插入成功
C# 位运算详解
| 运算符 | 描述 |
|---|---|
| &(位与) | 当两个二进制操作位都为1时,结果就为1 |
| |(位或) | 当两个二进制操作位有1个为1时,结果就为1 |
| ^(位异或) | 当两个二进制操作位只有1个为1时,结果为1 |
| ~(位非) | 操作位的每个位都取反(就是0变成1,1变成0) |
| <<(左移) | 二进制左移运算符。左操作数的值向左移动右操作数指定的位数。 |
| >>(右移) | 二进制右移运算符。左操作数的值向右移动右操作数指定的位数。 |
pq实例图
| p | q | p & q | p | q | p ^ q |
|---|---|---|---|---|
| 0 | 0 | 0 | 0 | 0 |
| 0 | 1 | 0 | 1 | 1 |
| 1 | 1 | 1 | 1 | 0 |
| 1 | 0 | 0 | 1 | 1 |
如下 :
int x=12,y=10;
int a;
a=x&y; //a=8
下面是计算试子的和加减法一样
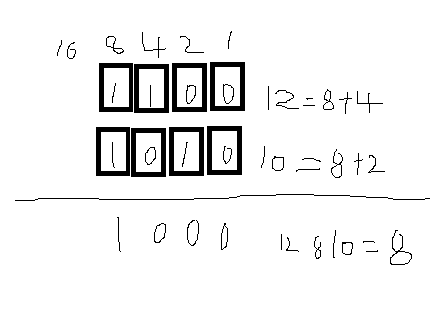
二进制的个位,十位,百位,千位,分别对应的是1,2,4,8 二进制每多一位只需要乘2 那个个位置有1 就加上该位置的十进制数 。
上面说&运算时,当两个二进制操作位都为1时,结果就为1
看个位 0&0 =0 十位 0&1=0 百位 1&0=0 千位1&1=1
换下来就是 1000(二进制) =8(十进制) 12&10=8
12|10,12^10 可以试着就算这个值
位非怎么运算呢?
~12 直接位数取反 0变1,1变0 二进制左端1是位负数 在取反上-1
~12=-13;
要获取他12的相反数 二进制表示 也是 取反 但是在结果上加1
左/右移 左移对移玩的位置补0 14<<3 二进制就是 1110>>1110 000
就是 14X2X2X2=112 14<<3=112
右移 切记负数右移是错误的 因为一个负数无论如何除2都不会乘位一个正数 14>>3=1
c# 交错数组
申明数组
int [3][ ] arr;
arr[0][ ]=new int [ , ] { { 1,2},{3,3} }
arr[2][ ]=new int [ , ] { { 1,2},{3,3} }
arr[3][ ]=new int [ , ] { { 1,2},{3,3} }
输出方式
cw(arr[0][1,1])=3
c# 数组协变
class a{}
class b:a{}
a[] arr=new a[3];
a[] arr2=new a[3];
给arr 数组赋值
arr[0]=new a();
arr2[0]=new b();
此时 arr2 数组也可以接受b类 因为继承关系协变
值类型数组没有协变
C# 添加Excel表单控件(Form Controls)
在Excel中,添加的控件可以和单元格关联,我们可以操作控件来修改单元格的内容,在下面的文章中,将介绍在Excel中添加几种不同的表单控件的方法,包括:
- 添加文本框(Textbox)
- 单选按钮(Radio button)
- 复选框(Checkbox)
- 组合框(combo Box)
使用工具
PS:下载安装该组件后,注意在项目程序中添加引用Spire.Xls.dll(dll文件可在安装路径下的Bin文件夹中获取),如下图所示

代码示例
【示例1】插入Excel表单控件
步骤1:创建工作表
//实例化一个Workbook类实例,并获取第1个工作表
Workbook workbook = new Workbook();
Worksheet sheet = workbook.Worksheets[0];

//设置表格行高、列宽
sheet.Range["A1:F1"].ColumnWidth = 15F;
sheet.Range["A1:B12"].RowHeight = 20F;
步骤 2:插入文本框
//插入文本框控件,指定文本框位置、大小以及文本对齐方式
sheet.Range["A1"].Text = "姓名:";
ITextBoxShape textBox = sheet.TextBoxes.AddTextBox(1, 2, 25, 110);
textBox.Text = "John";
textBox.HAlignment = CommentHAlignType.Center;
textBox.VAlignment = CommentVAlignType.Center;
步骤 3:插入单选按钮
//插入单选按钮,指定单元格位置
sheet.Range["A3"].Text = "性别:";
IRadioButton radioButton = sheet.RadioButtons.Add(3, 2, 20, 80);
radioButton.CheckState = CheckState.Checked;
radioButton.Text = "女";
radioButton = sheet.RadioButtons.Add(3, 3, 20, 80);
radioButton.Text = "男";
步骤 4:插入复选框
//插入复选框并指定单元格位置
sheet.Range["A5"].Text = "所在行业:";
ICheckBox checkBox = sheet.CheckBoxes.AddCheckBox(5, 2, 18, 65);
checkBox.CheckState = CheckState.Checked;
checkBox.Text = "教育";
checkBox = sheet.CheckBoxes.AddCheckBox(5, 3, 18, 65);
checkBox.Text = "医疗";
checkBox = sheet.CheckBoxes.AddCheckBox(5, 4, 18, 65);
checkBox.Text = "IT";
checkBox = sheet.CheckBoxes.AddCheckBox(5, 5, 18, 65);
checkBox.Text = "零售";
checkBox = sheet.CheckBoxes.AddCheckBox(5, 6, 18, 65);
checkBox.Text = "其他";
步骤 5:插入组合框
//插入组合框,并指定单元格位置、大小
sheet["A7"].Text = "年龄(段):";
sheet["A8"].Text = "<18";
sheet["A9"].Text = "18<Y<30";
sheet["A10"].Text = "30<Y<50";
IComboBoxShape comboBox = sheet.ComboBoxes.AddComboBox(7, 2, 23, 100);
comboBox.ListFillRange = sheet["A8:A10"];
步骤 6:指定Combox的关联单元格
sheet["A12"].Text = "代表人群类别:";
comboBox.LinkedCell = sheet.Range["B12"];
comboBox.SelectedIndex = 1;
步骤 7:保存文档
workbook.SaveToFile("AddFormControls.xlsx", ExcelVersion.Version2010);
运行该项目程序,生成文件(可在项目文件夹bin>Debug下查看文档)

全部代码:
using Spire.Xls;
using Spire.Xls.Core;
using System.Drawing;

namespace FormControls_XLS
{
    class Program
    {
        static void Main(string[] args)
        {
            //实例化一个Workbook类实例,并获取第1个工作表
            Workbook workbook = new Workbook();
            Worksheet sheet = workbook.Worksheets[0];

            //设置表格行高、列宽
            sheet.Range["A1:F1"].ColumnWidth = 15F;
            sheet.Range["A1:B12"].RowHeight = 20F;

            //插入文本框控件,指定文本框位置、大小以及文本对齐方式
            sheet.Range["A1"].Text = "姓名:";
            ITextBoxShape textBox = sheet.TextBoxes.AddTextBox(1, 2, 25, 110);
            textBox.Text = "John";
            textBox.HAlignment = CommentHAlignType.Center;
            textBox.VAlignment = CommentVAlignType.Center;

            //插入单选按钮,指定单元格位置
            sheet.Range["A3"].Text = "性别:";
            IRadioButton radioButton = sheet.RadioButtons.Add(3, 2, 20, 80);
            radioButton.CheckState = CheckState.Checked;
            radioButton.Text = "女";
            radioButton = sheet.RadioButtons.Add(3, 3, 20, 80);
            radioButton.Text = "男";

            //插入复选框并指定单元格位置
            sheet.Range["A5"].Text = "所在行业:";
            ICheckBox checkBox = sheet.CheckBoxes.AddCheckBox(5, 2, 18, 65);
            checkBox.CheckState = CheckState.Checked;
            checkBox.Text = "教育";
            checkBox = sheet.CheckBoxes.AddCheckBox(5, 3, 18, 65);
            checkBox.Text = "医疗";
            checkBox = sheet.CheckBoxes.AddCheckBox(5, 4, 18, 65);
            checkBox.Text = "IT";
            checkBox = sheet.CheckBoxes.AddCheckBox(5, 5, 18, 65);
            checkBox.Text = "零售";
            checkBox = sheet.CheckBoxes.AddCheckBox(5, 6, 18, 65);
            checkBox.Text = "其他";

            //插入组合框,并指定单元格位置、大小
            sheet["A7"].Text = "年龄(段):";
            sheet["A8"].Text = "<18";
            sheet["A9"].Text = "18<Y<30";
            sheet["A10"].Text = "30<Y<50";
            IComboBoxShape comboBox = sheet.ComboBoxes.AddComboBox(7, 2, 23, 100);
            comboBox.ListFillRange = sheet["A8:A10"];

            //指定组合框的关联单元格
            sheet["A12"].Text = "代表人群类别:";
            comboBox.LinkedCell = sheet.Range["B12"];
            comboBox.SelectedIndex = 1;

            //保存文档
            workbook.SaveToFile("AddFormControls.xlsx", ExcelVersion.Version2010);
            System.Diagnostics.Process.Start("AddFormControls.xlsx");
        }
    }
}
【示例 2】 删除Excel表单控件
步骤 1:加载文档,并获取指定单元格
Workbook workbook = new Workbook();
workbook.LoadFromFile("test.xlsx");
Worksheet sheet = workbook.Worksheets[0];
步骤 2:删除组合框
for (int i = 0; i < sheet.ComboBoxes.Count; i++)
{
    sheet.ComboBoxes[i].Remove();
}
步骤 3:保存文档
workbook.SaveToFile("RemoveComboBoxes.xlsx", ExcelVersion.Version2010);
全部代码:
using Spire.Xls;


namespace RemoveFormControl_XLS
{
    class Program
    {
        static void Main(string[] args)
        {
            //创建Workbook实例,加载Excel文档
            Workbook workbook = new Workbook();
            workbook.LoadFromFile("test.xlsx");

            //获取第一个工作表
            Worksheet sheet = workbook.Worksheets[0];

            //删除工作表中所有的组合框
            for (int i = 0; i < sheet.ComboBoxes.Count; i++)
            {
                sheet.ComboBoxes[i].Remove();
            }

            //保存并打开文档
            workbook.SaveToFile("RemoveComboBoxes.xlsx", ExcelVersion.Version2010);
            System.Diagnostics.Process.Start("RemoveComboBoxes.xlsx");
        }
    }
}
运行程序后,表格中相应的控件将被删除。
C#串口通信程序实现无感知签到与答题
最近公司项目上线,之前利用串口通讯实现校牌的无感知签到程序, 项目上线以后刚刚好有时间把之前的出现的问题做下记录,废话不多,直接到主题
串口介绍:
串行接口简称串口,也称串行通信接口或串行通讯接口(通常指COM接口),是采用串行通信方式的扩展接口。(至于再详细,自己百度)
正文:
最近在公司让用C#写一个串口通讯程序,下面我将这次遇到的问题和解决方法奉献出来,希望对工作中需要的朋友有所帮助!
我们来看具体的实现步骤。
公司要求实现以下几个功能:
1.)启动程序打开串口通信,接受嵌入式校牌发送过来的16进制形式的数据指令执行业务操作,业务操作完做出回应。
2.)根据需要设置串口通信的必要参数。
3.)通过校牌指令执行相关业务,拉取数据通过访问java的http接口获取数据,并将数据进行处理转换为16进制形式下发给校牌
4.)配置相关接口地址
5.)校牌答题与教室端互动通过本地UPD传递给教室端,
看着好像挺复杂,其实都是纸老虎,一戳就破,前提是你敢去戳。我尽量讲的详细一些,争取说到每个知识点。
C#代码实现:采用SerialPort
实例化一个SerialPort
1. private SerialPort ComDevice = new SerialPort();
我自己写了个串口的类就直接上代码
  1 using System;
  2 using System.Collections.Generic;
  3 using System.Configuration;
  4 using System.IO.Ports;
  5 using System.Linq;
  6 using System.Text;
  7 using System.Threading;
  8 using System.Threading.Tasks;
  9
 10 namespace ZPZSerialPort.ComSerialPort
 11 {
 12     public sealed class ComDeviceManager
 13     {
 14         private NLog.Logger logger = NLog.LogManager.GetCurrentClassLogger();//NLog日志记录串口信息
 15         private static ComDeviceManager _comManager;
 16         private static readonly object _instAsync = new object();
 17         public SerialPort ComDeviceComputerChip { get; private set; }
 18
 19         public Action<Byte[]> ActionComputerChip { get; set; }
 20
 21         /// <summary>
 22         /// 此处配置根据实际串口进行配置,也可以配置为可变的参数
 23         /// </summary>
 24         private ComDeviceManager()
 25         {
 26             ComDeviceComputerChip = new SerialPort();//实例化一个SerialPort
 27             ComDeviceComputerChip.PortName = ConfigurationManager.AppSettings["protnamexyt"];//端口号此处端口号不固定此处配置为可变参数
 28             ComDeviceComputerChip.BaudRate = 115200;// 串行波特率指定为115200
 29             ComDeviceComputerChip.Parity = (Parity)Convert.ToInt32("0");//
 30             ComDeviceComputerChip.DataBits = Convert.ToInt32("8");
 31             ComDeviceComputerChip.StopBits = (StopBits)Convert.ToInt32("1");
 32             ComDeviceComputerChip.DataReceived += ComDevice1_DataReceived;
 33
 34         }
 35         /// <summary>
 36         /// 接受端口数据事件
 37         /// </summary>
 38         /// <param name="sender"></param>
 39         /// <param name="e"></param>
 40         private void ComDevice1_DataReceived(object sender, SerialDataReceivedEventArgs e)
 41         {
 42             byte[] buffers = new byte[ComDeviceComputerChip.BytesToRead];
 43             ComDeviceComputerChip.Read(buffers, 0, buffers.Length);
 44             ActionComputerChip?.Invoke(buffers);
 45         }
 46         /// <summary>
 47         /// 当前设备
 48         /// </summary>
 49         public static ComDeviceManager CurrentDevice
 50         {
 51             get
 52             {
 53                 if (_comManager == null)
 54                 {
 55                     lock (_instAsync)
 56                     {
 57                         if (_comManager == null)
 58                         {
 59                             return _comManager = new ComDeviceManager();
 60                         }
 61                     }
 62                 }
 63
 64                 return _comManager;
 65             }
 66         }
 67         /// <summary>
 68         /// 打开端口
 69         /// </summary>
 70         /// <returns></returns>
 71         public bool OpenDevice()
 72         {
 73             try
 74             {
 75                 if (!ComDeviceComputerChip.IsOpen)
 76                 {
 77                     ComDeviceComputerChip.Open();
 78                 }
 79                 return true;
 80             }
 81             catch (Exception ex)
 82             {
 83                 logger.Error("打开设备错误:"+ex);
 84             }
 85
 86             return false;
 87         }
 88         /// <summary>
 89         /// 发送数据
 90         /// </summary>
 91         /// <param name="data"></param>
 92         /// <returns></returns>
 93         public bool SendDzxp(byte[] data)
 94         {
 95             try
 96             {
 97                 if (ComDeviceComputerChip.IsOpen)
 98                 {
 99                     Thread.Sleep(10);// 延迟发送必须做延迟发送不然发送给校牌接受不到,这个问题浪费了一上午事件才发送在发送得时候需要做延迟
100                     ComDeviceComputerChip.Write(data, 0, data.Length);//发送数据给串口端口
101                     Thread.Sleep(10);// 延迟发送
102                     return true;
103                 }
104             }
105             catch (Exception ex)
106             {
107                 logger.Error(ex);
108             }
109
110             return false;
111         }
112
113
114     }
115 }
设备操作类已经编写完毕,接着就是我们收到指令主动执行操作:操作的步骤如下几点
1.)同步时间
收到同步时间指令获取当前系统时间转换为16进制字节,进行CRC校验之后带上,发送给基站,发送的格式为
引导码+发送码+卡号+响应成功码+长度+内容(当前时间)+校验码
2.)同步课程
收到同步课程指令先通过接口拉取数据,把拉取到json数据解析,上课的开始时间,频点,日期,星期 数据进行解析为16进制字节数组
引导码+发送码+卡号+响应成功码+长度+内容(一天课程上课时间)+校验码
拉取到的课程与校牌成功以后 把卡号,频点,同步成功最后课程的时间 提交给接口保存
3.)签到
收到签到指令 进行回复
引导码+发送码+卡号+响应成功码+长度+内容(校牌发送的签到指令)+校验码
把校牌卡号与课程ID 提交给接口保存
一 通讯层格式:
请求/控制数据帧
|
引导码 |
数据传输方向 |
设备IC卡号 |
命令码 |
数据包长度 |
数据内容 |
校验码 (CRC16) |
|
|
FA FA |
D0/D1 |
4 bytes |
0x00~0xFF |
0x00~0x3F |
0~N |
CRC_L |
CRC_H |
-
引导码:2 bytes,0xFA 0xFA;
-
数据传输方向:1 byte,0xD0为电子校牌上传数据给服务器,0xD1为服务器下发数据到电子校牌;
-
设备IC卡号:4 byte,对应内嵌电子校牌的IC卡号;
-
命令码:1 byte,取值范围为0x00 – 0xFF;
-
数据包长度:1 byte,0x00 – 0x3F;
-
数据内容:传输的数据信息,长度大小与数据包长度一致;
-
校验码:2 bytes,低字节在前,高字节在后,采用CRC16校验方式,校验数据包括从数据传输方向到数据内容;
响应数据帧
|
引导码 |
数据传输方向 |
设备IC卡号 |
命令码 |
响应标志码 |
数据包长度 |
数据内容 |
校验码 (CRC16) |
|
|
FA FA |
D0/D1 |
4 bytes |
0x00~0xFF |
0x80/0x81 |
0x00~0x3F |
0~N |
CRC_L |
CRC_H |
-
引导码:2 bytes,0xFA 0xFA;
-
数据传输方向:1 byte,0xD0为终端设备上传数据给服务器,0xD1为服务器下发数据到终端设备;
-
设备IC卡号:4 byte,对应内嵌电子校牌的IC卡号;
-
命令码:1 byte,取值范围为0x00 – 0xFF;
-
响应标志码:1 byte,0x80-----接收正确;0x81----接收有误;
数据有误码:0x01-----数据格式有误
0x02-----校验码错误
0x03-----题型有误
-
数据包长度:1 byte,0x00 – 0x3F;
-
数据内容:传输的数据信息,长度大小与数据包长度一致;
-
校验码:2 bytes,低字节在前,高字节在后,采用CRC16校验方式,校验数据包括从数据传输方向到数据内容;
二 详细命令解析:
(以设备IC卡号为0xA0 0xA1 0xA2 0xA3为例)
-
电子校牌连接基站服务器 0x00
命令码: 0x00
数据内容:年/月/日/星期/时/分/秒 7 bytes
举例:
Send: FA FA D0 A0 A1 A2 A3 00 00 CRC16
Recv: FA FA D1 A0 A1 A2 A3 00 80 07 YY MM DD WW hh mm ss CRC16 // 连接成功
-
电子校牌请求服务器同步课程表 0x01
命令码: 0x01
数据内容:ID号:A0 A1 A2 A3
FF FF FF FF 表示对所有电子校牌统一下发
N=2n+1:课程表(时间、频点) 星期几+(时间(小时/分钟)+频点)* n(课节数,最大10)
Weekday:星期一 ~ 星期六(1~6), 星期日: 0
时间(H/M):((H-6)<< 4) | (M/5) 分钟为5的倍数
举例:
Send: FA FA D0 A0 A1 A2 A3 01 00 CRC16 // 校牌请求下发课程表
Recv: FA FA D1 A0 A1 A2 A3 01 80 N weekday 1...2n CRC16 // 服务器下发课程表
Send: FA FA D0 A0 A1 A2 A3 01 80 01 weekday CRC16 //校牌回复设置课程表成功
-
电子校牌完成签到功能 0x02
命令码: 0x02
数据内容: 年/月/日/时/分/秒 6 bytes
举例:
Send: FA FA D0 A0 A1 A2 A3 02 06 YY MM DD hh mm ss CRC16
Recv: FA FA D1 A0 A1 A2 A3 02 80 06 YY MM DD hh mm ss CRC16 // 签到成功
处理相关业务逻辑使用工厂模式
![复制代码]()
1 using System; 2 using System.Collections.Generic; 3 using System.Linq; 4 using System.Text; 5 using System.Threading.Tasks; 6 7 namespace ZPZSerialPort.Factory 8 { 9 public interface ICommunication 10 { 11 bool Send(object data); 12 } 13 /// <summary> 14 /// 同步时间 15 /// </summary> 16 public class SyncTime : ICommunication// 17 { 18 public bool Send(object data) 19 { 20 Console.WriteLine("同步时间接受的数据"); 21 return true; 22 } 23 } 24 /// <summary> 25 /// 同步课程 26 /// </summary> 27 public class SyncCourse : ICommunication 28 { 29 public bool Send(object data) 30 { 31 Console.WriteLine("同步课程接受的数据"); 32 return true; 33 } 34 } 35 /// <summary> 36 /// 签到 37 /// </summary> 38 public class Sign : ICommunication 39 { 40 public bool Send(object data) 41 { 42 Console.WriteLine("同步课程接受的数据"); 43 return true; 44 } 45 46 } 47 /// <summary> 48 /// 答题 49 /// </summary> 50 public class Answer : ICommunication 51 { 52 public bool Send(object data) 53 { 54 Console.WriteLine("答题接受的数据"); 55 return true; 56 } 57 } 58 59 60 }![复制代码]()
![复制代码]()
1 using System; 2 using System.Collections.Generic; 3 using System.Linq; 4 using System.Text; 5 using System.Threading.Tasks; 6 7 namespace ZPZSerialPort.Factory 8 { 9 /// <summary> 10 /// 通讯工厂 11 /// </summary> 12 public class CommunicationFactory 13 { 14 public ICommunication CreateCommunicationFactory(string style) 15 { 16 switch (style) 17 { 18 case "SyncTime"://同步时间 19 return new SyncTime(); 20 case "SyncCourse"://同步课程 21 return new SyncCourse(); 22 case "Sign"://签到 23 return new Sign(); 24 case "Answer"://答题 25 return new Answer(); 26 } 27 return null; 28 } 29 } 30 }![复制代码]()
处理接受得数据实体
  1 using System;
  2 using System.Collections.Generic;
  3 using System.Linq;
  4 using System.Text;
  5 using System.Threading.Tasks;
  6
  7 namespace ZPZSerialPort.COM_USB
  8 {
  9     /// <summary>
 10     /// 响应数据帧
 11     /// </summary>
 12     public class USBComReceiveEntity
 13     {
 14         //引导码 2 bytes,0xFA 0xFA
 15         public string header { get; set; }
 16
 17         //数据传输方向  1 byte,0xD0为电子校牌上传数据给服务器,0xD1为服务器下发数据到电子校牌
 18         public string direction { get; set; }
 19
 20         //设备IC卡号 4 byte,对应内嵌电子校牌的IC卡号
 21         public string icCard { get; set; }
 22
 23         //命令码 1 byte,取值范围为0x00 – 0xFF
 24         public string code { get; set; }
 25
 26         //响应标志码:1 byte,0x80-----接收正确;0x81----接收有误
 27         public string response { get; set; }
 28
 29         //数据包长度 1 byte,0x00 – 0x3F
 30         public string length { get; set; }
 31
 32         //数据内容 传输的数据信息,长度大小与数据包长度一致
 33         public string content { get; set; }
 34
 35         //校验码CRC16 2 bytes,低字节在前,高字节在后,采用CRC16校验方式,校验数据包括从数据传输方向到数据内容
 36         public string check { get; set; }
 37
 38         /// <summary>
 39         /// set 实体
 40         /// </summary>
 41         /// <param name="str"></param>
 42         /// <returns></returns>
 43         public static USBComReceiveEntity SetReceiveEntity(string str)
 44         {
 45             if (str == null || str.Length == 0) return null;
 46             USBComReceiveEntity entity = new USBComReceiveEntity();
 47             str = str.Replace(" ", "");
 48             if (str.Length >= 4) entity.header = str.Substring(0, 4);
 49             if (str.Length >= 6) entity.direction = str.Substring(4, 2);
 50             if (str.Length >= 14) entity.icCard = str.Substring(6, 8);
 51             if (str.Length >= 16) entity.code = str.Substring(14, 2);
 52             if (str.Length >= 18) entity.response = str.Substring(16, 2);
 53             if (str.Length >= 20) entity.length = str.Substring(18, 2);
 54             int count = 0;
 55             if (entity.length != null && entity.length.Length > 0) count = int.Parse(entity.length) * 2;
 56             if (count > 0 && str.Length >= 20 + count) entity.content = str.Substring(20, count);
 57             if (str.Length >= count + 20 + 4) entity.check = str.Substring(20 + count, 4);
 58             return entity;
 59         }
 60
 61         /// <summary>
 62         /// 校验码CRC16
 63         /// </summary>
 64         /// <param name="sendEntity"></param>
 65         /// <returns></returns>
 66         public static string getCheckString(USBComReceiveEntity sendEntity)
 67         {
 68             string str = "";
 69             if (sendEntity.direction == null || sendEntity.direction.Length == 0) str = str + USBComUtil.Com_Send;
 70             else str = str + sendEntity.direction;
 71             if (sendEntity.icCard == null || sendEntity.icCard.Length == 0) str = str + "";
 72             else str = str + sendEntity.icCard;
 73             if (sendEntity.code == null || sendEntity.code.Length == 0) str = str + "";
 74             else str = str + sendEntity.code;
 75             if (sendEntity.response == null || sendEntity.response.Length == 0) str = str + "";
 76             else str = str + sendEntity.response;
 77             if (sendEntity.length == null || sendEntity.length.Length == 0) str = str + "";
 78             else str = str + sendEntity.length;
 79             if (sendEntity.content == null || sendEntity.content.Length == 0) str = str + "";
 80             else str = str + sendEntity.content;
 81             return CRCUtil.ToModbusCRC16(str);
 82         }
 83
 84         /// <summary>
 85         /// 返回实体字符串
 86         /// </summary>
 87         /// <param name="sendEntity"></param>
 88         /// <returns></returns>
 89         public static string getEntityToString(USBComReceiveEntity sendEntity)
 90         {
 91             string str = "";
 92             if (sendEntity.header == null || sendEntity.header.Length == 0) str = USBComUtil.Com_Header;
 93             else str = sendEntity.header;
 94             if (sendEntity.direction == null || sendEntity.direction.Length == 0) str = str + USBComUtil.Com_Send;
 95             else str = str + sendEntity.direction;
 96             if (sendEntity.icCard == null || sendEntity.icCard.Length == 0) str = str + "";
 97             else str = str + sendEntity.icCard;
 98             if (sendEntity.code == null || sendEntity.code.Length == 0) str = str + "";
 99             else str = str + sendEntity.code;
100             if (sendEntity.response == null || sendEntity.response.Length == 0) str = str + "";
101             else str = str + sendEntity.response;
102             if (sendEntity.length == null || sendEntity.length.Length == 0) str = str + "";
103             else str = str + sendEntity.length;
104             if (sendEntity.content == null || sendEntity.content.Length == 0) str = str + "";
105             else str = str + sendEntity.content;
106             if (sendEntity.check == null || sendEntity.check.Length == 0) str = str + "";
107             else str = str + sendEntity.check;
108             return str;
109         }
110     }
111 }
CRC16校验 算法类
  1 using System;
  2 using System.Collections.Generic;
  3 using System.Linq;
  4 using System.Text;
  5 using System.Threading.Tasks;
  6
  7 namespace ZPZSerialPort.COM_USB
  8 {
  9     public class CRCUtil
 10     {
 11         #region  CRC16
 12         public static byte[] CRC16(byte[] data)
 13         {
 14             int len = data.Length;
 15             if (len > 0)
 16             {
 17                 ushort crc = 0xFFFF;
 18
 19                 for (int i = 0; i < len; i++)
 20                 {
 21                     crc = (ushort)(crc ^ (data[i]));
 22                     for (int j = 0; j < 8; j++)
 23                     {
 24                         crc = (crc & 1) != 0 ? (ushort)((crc >> 1) ^ 0xA001) : (ushort)(crc >> 1);
 25                     }
 26                 }
 27                 byte hi = (byte)((crc & 0xFF00) >> 8);  //高位置
 28                 byte lo = (byte)(crc & 0x00FF);         //低位置
 29
 30                 return new byte[] { lo, hi };
 31             }
 32             return new byte[] { 0, 0 };
 33         }
 34         #endregion
 35
 36         #region  ToCRC16
 37         public static string ToCRC16(string content)
 38         {
 39             return ToCRC16(content, Encoding.UTF8);
 40         }
 41
 42         public static string ToCRC16(string content, bool isReverse)
 43         {
 44             return ToCRC16(content, Encoding.UTF8, isReverse);
 45         }
 46
 47         public static string ToCRC16(string content, Encoding encoding)
 48         {
 49             return ByteToString(CRC16(encoding.GetBytes(content)), true);
 50         }
 51
 52         public static string ToCRC16(string content, Encoding encoding, bool isReverse)
 53         {
 54             return ByteToString(CRC16(encoding.GetBytes(content)), isReverse);
 55         }
 56
 57         public static string ToCRC16(byte[] data)
 58         {
 59             return ByteToString(CRC16(data), true);
 60         }
 61
 62         public static string ToCRC16(byte[] data, bool isReverse)
 63         {
 64             return ByteToString(CRC16(data), isReverse);
 65         }
 66         #endregion
 67
 68         #region  ToModbusCRC16
 69         public static string ToModbusCRC16(string s)
 70         {
 71             return ToModbusCRC16(s, true);
 72         }
 73
 74         public static string ToModbusCRC16(string s, bool isReverse)
 75         {
 76             return ByteToString(CRC16(StringToHexByte(s)), isReverse);
 77         }
 78
 79         public static string ToModbusCRC16(byte[] data)
 80         {
 81             return ToModbusCRC16(data, true);
 82         }
 83
 84         public static string ToModbusCRC16(byte[] data, bool isReverse)
 85         {
 86             return ByteToString(CRC16(data), isReverse);
 87         }
 88         #endregion
 89
 90         #region  ByteToString
 91         public static string ByteToString(byte[] arr, bool isReverse)
 92         {
 93             try
 94             {
 95                 byte hi = arr[0], lo = arr[1];
 96                 return Convert.ToString(isReverse ? hi + lo * 0x100 : hi * 0x100 + lo, 16).ToUpper().PadLeft(4, '0');
 97             }
 98             catch (Exception ex) { throw (ex); }
 99         }
100
101         public static string ByteToString(byte[] arr)
102         {
103             try
104             {
105                 return ByteToString(arr, true);
106             }
107             catch (Exception ex) { throw (ex); }
108         }
109         #endregion
110
111         #region  StringToHexString
112         public static string StringToHexString(string str)
113         {
114             StringBuilder s = new StringBuilder();
115             foreach (short c in str.ToCharArray())
116             {
117                 s.Append(c.ToString("X4"));
118             }
119             return s.ToString();
120         }
121         #endregion
122
123         #region  StringToHexByte
124         private static string ConvertChinese(string str)
125         {
126             StringBuilder s = new StringBuilder();
127             foreach (short c in str.ToCharArray())
128             {
129                 if (c <= 0 || c >= 127)
130                 {
131                     s.Append(c.ToString("X4"));
132                 }
133                 else
134                 {
135                     s.Append((char)c);
136                 }
137             }
138             return s.ToString();
139         }
140
141         private static string FilterChinese(string str)
142         {
143             StringBuilder s = new StringBuilder();
144             foreach (short c in str.ToCharArray())
145             {
146                 if (c > 0 && c < 127)
147                 {
148                     s.Append((char)c);
149                 }
150             }
151             return s.ToString();
152         }
153
154         /// <summary>
155         /// 字符串转16进制字符数组
156         /// </summary>
157         /// <param name="hex"></param>
158         /// <returns></returns>
159         public static byte[] StringToHexByte(string str)
160         {
161             return StringToHexByte(str, false);
162         }
163
164         /// <summary>
165         /// 字符串转16进制字符数组
166         /// </summary>
167         /// <param name="str"></param>
168         /// <param name="isFilterChinese">是否过滤掉中文字符</param>
169         /// <returns></returns>
170         public static byte[] StringToHexByte(string str, bool isFilterChinese)
171         {
172             string hex = isFilterChinese ? FilterChinese(str) : ConvertChinese(str);
173
174             //清除所有空格
175             hex = hex.Replace(" ", "");
176             //若字符个数为奇数,补一个0
177             hex += hex.Length % 2 != 0 ? "0" : "";
178
179             byte[] result = new byte[hex.Length / 2];
180             for (int i = 0, c = result.Length; i < c; i++)
181             {
182                 result[i] = Convert.ToByte(hex.Substring(i * 2, 2), 16);
183             }
184             return result;
185         }
186         #endregion
187     }
188 }
具体得业务代码就不贴出来了,由于是公司产品项目,大家都明白我也不多说。
代码下载:ZPZSerialPort.rar

 浙公网安备 33010602011771号