
实验6:开源控制器实践——RYU
一、实验目的
能够独立部署RYU控制器;
能够理解RYU控制器实现软件定义的集线器原理;
能够理解RYU控制器实现软件定义的交换机原理。
二、实验环境
下载虚拟机软件Oracle VisualBox或VMware;
在虚拟机中安装Ubuntu 20.04 Desktop amd64,并完整安装Mininet;
三、实验要求
(一)基本要求
1、完成Ryu控制器的安装。
在Ryu安装目录下执行ryu --version查看版本

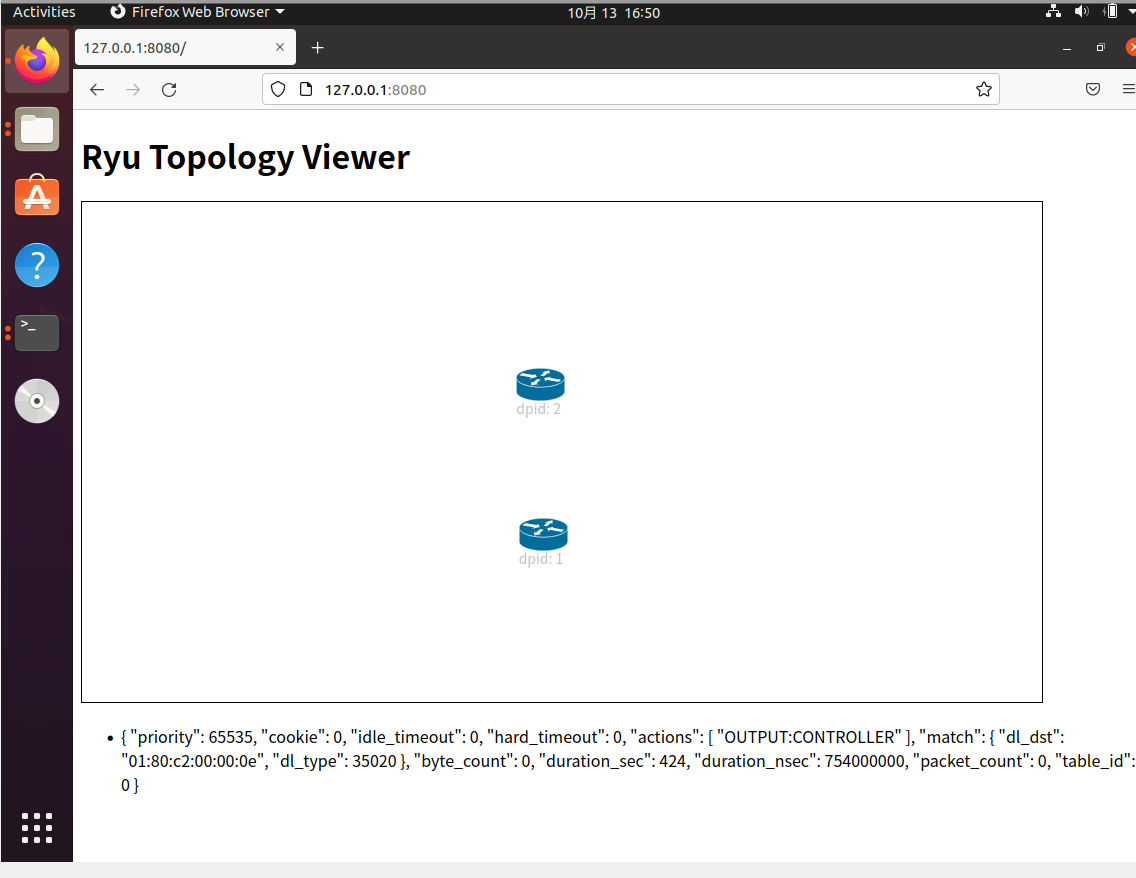
2、搭建下图所示SDN拓扑,协议使用Open Flow 1.0,并连接Ryu控制器。

-
搭建拓扑:
sudo mn --topo=single,3 --mac --controller=remote,ip=127.0.0.1,port=6633 --switch ovsk,protocols=OpenFlow10 -
启动并连接ryu控制器:
ryu-manager ryu/ryu/app/gui_topology/gui_topology.py --observe-links3、通过Ryu的图形界面查看网络拓扑(访问 http://127.0.0.1:8080 )
![]()
4、阅读Ryu文档的The First Application一节,运行并使用 tcpdump 验证L2Switch,分析和POX的Hub模块有何不同。
-
新建一个文件,编辑保存为 L2Switch.py 文件
from ryu.base import app_manager
from ryu.controller import ofp_event
from ryu.controller.handler import MAIN_DISPATCHER
from ryu.controller.handler import set_ev_cls
from ryu.ofproto import ofproto_v1_0

class L2Switch(app_manager.RyuApp):
    OFP_VERSIONS = [ofproto_v1_0.OFP_VERSION]

    def __init__(self, *args, **kwargs):
        super(L2Switch, self).__init__(*args, **kwargs)

    @set_ev_cls(ofp_event.EventOFPPacketIn, MAIN_DISPATCHER)
    def packet_in_handler(self, ev):
        msg = ev.msg
        dp = msg.datapath
        ofp = dp.ofproto
        ofp_parser = dp.ofproto_parser

        actions = [ofp_parser.OFPActionOutput(ofp.OFPP_FLOOD)]

        data = None
        if msg.buffer_id == ofp.OFP_NO_BUFFER:
             data = msg.data

        out = ofp_parser.OFPPacketOut(
            datapath=dp, buffer_id=msg.buffer_id, in_port=msg.in_port,
            actions=actions, data = data)
        dp.send_msg(out)
-
使用命令
ryu-manager L2Switch.py运行并验证(运行后再搭拓扑): -
h1 ping h2
![]()
-
h1 ping h3
![]()


由上述结果可知,与POX的Hub模块相比,L2Switch的相同之处在于:
Hub和L2Switch实现的都是洪泛发送ICMP报文,所以在h2和h3可以看到都有抓到数据包。
不同之处在于:L2Switch下发的流表无法查看,而Hub可以查看。

(二)进阶要求
阅读Ryu关于simple_switch.py和simple_switch_1x.py的实现,以simple_switch_13.py为例,完成其代码的注释工作,并回答下列问题:
- simple_switch_13.py注释
# Copyright (C) 2011 Nippon Telegraph and Telephone Corporation.
#
# Licensed under the Apache License, Version 2.0 (the "License");
# you may not use this file except in compliance with the License.
# You may obtain a copy of the License at
#
#    http://www.apache.org/licenses/LICENSE-2.0
#
# Unless required by applicable law or agreed to in writing, software
# distributed under the License is distributed on an "AS IS" BASIS,
# WITHOUT WARRANTIES OR CONDITIONS OF ANY KIND, either express or
# implied.
# See the License for the specific language governing permissions and
# limitations under the License.

# 引入包
from ryu.base import app_manager
from ryu.controller import ofp_event
from ryu.controller.handler import CONFIG_DISPATCHER, MAIN_DISPATCHER
from ryu.controller.handler import set_ev_cls
from ryu.ofproto import ofproto_v1_3
from ryu.lib.packet import packet
from ryu.lib.packet import ethernet
from ryu.lib.packet import ether_types


class SimpleSwitch13(app_manager.RyuApp):
    # 定义openflow版本
    OFP_VERSIONS = [ofproto_v1_3.OFP_VERSION]

    def __init__(self, *args, **kwargs):
        super(SimpleSwitch13, self).__init__(*args, **kwargs)
        # 定义保存mac地址到端口的一个映射
        self.mac_to_port = {}

    # 处理EventOFPSwitchFeatures事件
    @set_ev_cls(ofp_event.EventOFPSwitchFeatures, CONFIG_DISPATCHER)
    def switch_features_handler(self, ev):
        datapath = ev.msg.datapath
        ofproto = datapath.ofproto
        parser = datapath.ofproto_parser

        # install table-miss flow entry
        #
        # We specify NO BUFFER to max_len of the output action due to
        # OVS bug. At this moment, if we specify a lesser number, e.g.,
        # 128, OVS will send Packet-In with invalid buffer_id and
        # truncated packet data. In that case, we cannot output packets
        # correctly.  The bug has been fixed in OVS v2.1.0.
        match = parser.OFPMatch()#match:流表项匹配,OFPMatch():不匹配任何信息
        actions = [parser.OFPActionOutput(ofproto.OFPP_CONTROLLER,
                                          ofproto.OFPCML_NO_BUFFER)]
        self.add_flow(datapath, 0, match, actions)#添加流表项

    # 添加流表函数
    def add_flow(self, datapath, priority, match, actions, buffer_id=None):
        # 获取交换机信息
        ofproto = datapath.ofproto
        parser = datapath.ofproto_parser

        # 对action进行包装
        inst = [parser.OFPInstructionActions(ofproto.OFPIT_APPLY_ACTIONS,
                                             actions)]
        # 判断是否有buffer_id,生成mod对象
        if buffer_id:
            mod = parser.OFPFlowMod(datapath=datapath, buffer_id=buffer_id,
                                    priority=priority, match=match,
                                    instructions=inst)
        else:
            mod = parser.OFPFlowMod(datapath=datapath, priority=priority,
                                    match=match, instructions=inst)
        # 发送mod
        datapath.send_msg(mod)

    # 触发packet in事件时,调用_packet_in_handler函数
    @set_ev_cls(ofp_event.EventOFPPacketIn, MAIN_DISPATCHER)
    def _packet_in_handler(self, ev):
        # If you hit this you might want to increase
        # the "miss_send_length" of your switch
        if ev.msg.msg_len < ev.msg.total_len:
            self.logger.debug("packet truncated: only %s of %s bytes",
                              ev.msg.msg_len, ev.msg.total_len)
        # 获取包信息,交换机信息,协议等等
        msg = ev.msg
        datapath = msg.datapath
        ofproto = datapath.ofproto
        parser = datapath.ofproto_parser
        in_port = msg.match['in_port']

        pkt = packet.Packet(msg.data)
        eth = pkt.get_protocols(ethernet.ethernet)[0]

        # 忽略LLDP类型
        if eth.ethertype == ether_types.ETH_TYPE_LLDP:
            # ignore lldp packet
            return

        # 获取源端口,目的端口
        dst = eth.dst
        src = eth.src

        dpid = format(datapath.id, "d").zfill(16)
        self.mac_to_port.setdefault(dpid, {})

        self.logger.info("packet in %s %s %s %s", dpid, src, dst, in_port)

        # 学习包的源地址,和交换机上的入端口绑定
        # learn a mac address to avoid FLOOD next time.
        self.mac_to_port[dpid][src] = in_port

        # 查看是否已经学习过该目的mac地址
        if dst in self.mac_to_port[dpid]:
            out_port = self.mac_to_port[dpid][dst]
        # 否则进行洪泛
        else:
            out_port = ofproto.OFPP_FLOOD

        actions = [parser.OFPActionOutput(out_port)]

        # 下发流表处理后续包,不再触发 packet in 事件
        # install a flow to avoid packet_in next time
        if out_port != ofproto.OFPP_FLOOD:
            match = parser.OFPMatch(in_port=in_port, eth_dst=dst, eth_src=src)
            # verify if we have a valid buffer_id, if yes avoid to send both
            # flow_mod & packet_out
            if msg.buffer_id != ofproto.OFP_NO_BUFFER:
                self.add_flow(datapath, 1, match, actions, msg.buffer_id)
                return
            else:
                self.add_flow(datapath, 1, match, actions)
        data = None
        if msg.buffer_id == ofproto.OFP_NO_BUFFER:
            data = msg.data
		# 发送Packet_out数据包
        out = parser.OFPPacketOut(datapath=datapath, buffer_id=msg.buffer_id,
                                  in_port=in_port, actions=actions, data=data)
        # 发送流表
        datapath.send_msg(out)
a) 代码当中的mac_to_port的作用是什么?
保存mac地址到交换机端口的映射,为交换机自学习功能提供数据结构进行mac端口的存储。
b) simple_switch和simple_switch_13在dpid的输出上有何不同?
dpid = datapath.id # simple_switch的dpid赋值
dpid = format(datapath.id, "d").zfill(16) # simple_switch_13的dpid赋值
由上可见在simple_switch_13中,会在前端加上0以填充至16位,simple_switch直接输出dpid
c) 相比simple_switch,simple_switch_13增加的switch_feature_handler实现了什么功能?
实现了交换机以特性应答消息响应特性请求
d) simple_switch_13是如何实现流规则下发的?
在接收到packetin事件后,首先获取包学习,交换机信息,以太网信息,协议信息等。如果以太网类型是LLDP类型,则不予处理。如果不是,则获取源端口目的端口,以及交换机id,先学习源地址对应的交换机的入端口,再查看是否已经学习目的mac地址,如果没有则进行洪泛转发。如果学习过该mac地址,则查看是否有buffer_id,如果有的话,则在添加流动作时加上buffer_id,向交换机发送流表
e) switch_features_handler和_packet_in_handler两个事件在发送流规则的优先级上有何不同?
switch_features_handler下发流表的优先级更高
四、个人总结
- 实验难度:基础要求较简单,进阶要求较难
- 实验过程遇到的困难及解决办法:基本要求是连接ryu并通过Ryu的图形界面查看网络拓扑,一开始用图形界面时出现了问题,询问老师后知道是python的版本发生了改变,之后按照文件中的方法删除旧的软链接,然后添加新的软链接以后就把python版本改回3.0了,不是很清楚为什么回自己变掉。改完以后还是出现一样的问题,然后发现自己终端打开的位置出现错误了,应该在学号文件夹里面打开,还是得细心一点。
在使用 tcpdump 验证L2Switch时,由于是和上次实验一样的方法,所以会比较顺利。就是因为自己是一开始就建立了拓扑,后面在验证的时候,发现抓包时ping不出来,询问同学以后,重新构建了拓扑,成功解决。
最后一个问题是用ryu图形界面,出现了两个图形,后面想了一下,应该是自己在不小心既在ryu文件夹里面建了一个拓扑的原因 - 个人感想:基本要求都会了,了解了hub模块与L2Switch模块的异同,知道了怎么连接ryu,怎么开ryu的图形界面,此外也进一步熟悉了tcpdump的用法,也通过进阶要求对simple_switch_13有了一点了解。并且了解了怎么修改python版本,还是第一次修改,另外就是要细心一点,比如通过ryu开启图形界面的代码就知道了应该是在学号文件夹下打开终端,但是自己却开错了,实在不应该。

 浙公网安备 33010602011771号