
Table 分页处理
介绍两种table分页处理:PHP分页 和 js(jquery.table)分页。
一:jquery.table:
1:下载两个文件:table_jui.css 和 jquery.dataTables.min.js(当然前面的加载 jquery.js文件);将其拉入html 前面。
table_jui.css 和 jquery.dataTables.min.js
2:建表:


 1  <table style="width: 100%; margin-bottom:8px; " class="dataTables_wrapper table" id="tablemsg">
 2                 <thead style="font-size: 15px; font-weight: 800; background-color: #E7E5DA;">
 3                     <tr>
 4                         <td>用户ID</td>
 5                         <td>反馈问题</td>
 6                         <td>设备类型</td>
 7                         <td>应用版本</td>
 8                         <td>系统版本</td>
 9                         <td>反馈时间</td>
10                         <td>最后回复</td>
11                     </tr>
12                 </thead>
13                 <tbody id="tablelise" style="table-layout: fixed; word-wrap: break-word;">
14                     <tr>
15                         <td></td>
16                         <td></td>
17                         <td></td>
18                         <td></td>
19                         <td></td>
20                         <td></td>
21                         <td></td>
22                     </tr>
23                 </tbody>
24             </table>
3:js插入数据:
 1 function showGcmList() {
 2
 3             var datable = $('#tablemsg').dataTable({ "bDestroy": true});
 4             datable.fnClearTable();
 5
 6             for (var i = 0; i < data.length; i++) {
 7
 8
 9                 $tr = $('<tr>' +
10                        '<td>' + data[i].userid + '</td>' +
11                        '<td>' + msg + '</td>' +
12                         '<td >' + data[i].devicetype + '</td>' +
13                         '<td >' + data[i].appver + '</td>' +
14                         '<td >' + data[i].osver + '</td>' +
15                         '<td >' + data[i].msgtime + '</td>' +
16                         '<td>'+ data[i].id + '</td>' +
17              '</tr>')
18
19                 $('#tablelise').append($tr);
20             }
21             $("#tablelise tr:odd").addClass("tabEven");
22             tableui();
23         }
注: var datable = $('#tablemsg').dataTable({ "bDestroy": true}); datable.fnClearTable(); 是对table中的数据清空(同$('#tablelise').empty();).
4:tableui() 函数就是对table表的渲染(每个属性,下面会有详细介绍):
 1 function tableui() {
 2
 3     $(function () {
 4     $("#tablemsg").dataTable({ //表的ID
 5     "bDestroy": true,
 6
 7     "bPaginate": true, //开关,是否显示分页器
 8     "bJQueryUI": false, //开关,是否启用JQueryUI风格
 9     "bAutoWidth": false, //自适应宽度
10     "bFilter": true,         //是否显示模糊查询
11     "bProcessing": false,
12     "bStateSave": true,     //是否开启cookie,当需要对table的数据处理后,依然停留在该页数据。
13     "bSort": true,              //是否排序
14     "bLengthChange": true, //开关,是否显示每页大小的下拉框
15     "aLengthMenu": [30, 50, 60],//下拉框的值
16     "iDisplayLength": 30,  //下拉框的初始值
17
18     "aaSorting": [[5, "desc"]],      //当bSort为true是起作用,即table的第6行按降序排。
19     "sPaginationType": "full_numbers", //table脚标显示
20     "aoColumns": [                           //每列的宽度(可省略)
21       { sWidth: '80px' },
22       { sWidth: '23%' },
23       { sWidth: '80px' },
24       { sWidth: '80px' },
25       { sWidth: '80px' },
26       { sWidth: '100px' },
27       { sWidth: '23%' },
28     ],
29
30     "oLanguage": {
31     "sProcessing": "正在加载中......",
32     "sLengthMenu": "每页显示 _MENU_ 条记录",
33     "sZeroRecords": "对不起,查询不到相关数据!",
34     "sEmptyTable": "表中无数据存在!",
35     "sInfo": "当前显示 _START_ 到 _END_ 条,共 _TOTAL_ 条记录",
36     "sInfoFiltered": "数据表中共为 _MAX_ 条记录",
37     "sSearch": "模糊搜索",
38     "oPaginate": {
39     "sFirst": "首页",
40     "sPrevious": "上一页",
41     "sNext": "下一页",
42     "sLast": "末页"
43     }
44     }
45   });
46   });
47 }
5:效果:
"bFilter" : true 属性是否显示搜索: 
"bLengthChange": true 属性是否显示每页的显示值: 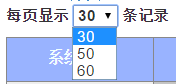 其中 aLengthMenu 的值为下拉框的各个值,iDisplayLength 为初始值。
"sPaginationType": "full_numbers" 属性设置分页脚的显示样式 
最终显示效果:

二:PHP分页(ThinkPHP):
1:准备分页类文件 Page.class.php (类位于 /ThinkPHP/Library/Org/Util/ 文件夹下,如果没有,可在网上下载)。
2:后台PHP代码 function showTable():
 1     function showTable(){
 2         $table = M ( 'msg', '', 'DB_CONFIG' );
 3         if(isset($_GET['p'])){
 4             $p=$_GET['p'];
 5
 6         }else{
 7             $p=1;
 8         }
 9
10         import("Org.Util.Page");//加载分页类
11
12         $countaql='select count(1) as count from fb_msg_android where userfeedback <> 0';
13         $count = $table->query($countaql);   //查询数据
14
15         $page=new \Page(intval($count[0]['count']),8);    //第一个参数是 数据总数,第二个参数是  每页显示的数据个数
16
17
18         $sqlstrmsg="select * from fb_msg_android where userfeedback <> 0 limit $page->firstRow,$page->listRows";
19         $data = $table->query($sqlstrmsg);      //查询数据,从第一条到第8条
20
21         $page->setConfig('header','条记录');    //分页脚标设置
22         $page->setConfig('prev',"上一页");
23         $page->setConfig('next','下一页');
24             $page->setConfig('first','首页');
25         $page->setConfig('last','末页');
26
27         $show=$page->show();        //显示分页(必写)
28
29         $this->assign('select',$data);    //查询数据渲染模板
30
31         $this->assign('page',$show);       //渲染分页table
32
33         $this->display();         //显示面板
34     }
3:添加模板(html表):
 1 <table class="table" border="1" style="width:100%;border-collapse:collapse;border:2px solid #000;text-align:center;">
 2         <tr>
 3             <th>系统ID</th>
 4             <th>用户ID</th>
 5             <th>信息</th>
 6             <th>信息发布时间</th>
 7             <th>操作数</th>
 8         </tr>
 9
10         <foreach name='select' item='b'>   <-- 后台的 $this->assign('select',$data); 的查询数据-->
11             <tr>
12                 <td>{$b.id}</td>
13                 <td>{$b.uid}</td>
14                 <td>{$b.msg}</td>
15                 <td>{$b.msgtime}</td>
16                 <td>{$b.userfeedback}</td>
17             </tr>
18         </foreach>
19         <tfoot>                                <-- 必须有 tfoot 用于显示分页脚标 -->
20             <tr style="background-color:#000;color:#ffffff;">
21                 <td colspan='5' align='right'>
22                     {$page}
23                 </td>
24             </tr>
25         </tfoot>
26     </table>
4:效果:

参考链接:http://blog.163.com/john_pei/blog/static/2046000172014270125286/
http://www.thinkphp.cn/info/192.html
http://blog.csdn.net/xiaojun1288/article/details/6861501

 浙公网安备 33010602011771号