第十周-云计算运维作业
- 完成nginx编译安装脚本
#!/bin/bash
NGINX_VERSION=1.20.2
INSTALL_DIR=/usr/local/src
NEW_PATH="/usr/local/src/nginx/sbin"
sudo su -c "getent passwd nginx" -s /bin/bash root && useradd -s /sbin/nologin nginx
wget http://nginx.org/download/nginx-${NGINX_VERSION}.tar.gz || { echo "下载失败!";exit 20;  }
tar xf nginx-${NGINX_VERSION}.tar.gz -C /usr/local/src
yum -y install gcc openssl-devel pcre-devel
cd /usr/local/src/nginx-${NGINX_VERSION}
./configure --prefix=${INSTALL_DIR} --with-http_ssl_module
make -j `grep -c processor /proc/cpuinfo`&& make install
if [ $? -ne 0 ];then
	echo Install nginx is failed!
	exit 10
else
	echo "Install nginx is finished!"
	sed -i "s|^\(PATH=.*\)|\1:$NEW_PATH|" ~/.bash_profil
fi

echo "<h1> hello world </h1>" > ${INSTALL_DIR}/html/index.html
- 完成nginx平滑升级,总结步骤
wget http://nginx.org/download/nginx-1.20.1.tar.gz
tar xvf nginx-1.20.1.tar.gz
cd nginx-1.20.1

/apps/nginx/sbin/nginx -v #查看编译参数
[root@centos8 nginx-1.20.1]#make
[root@centos8 nginx-1.20.1]#objs/nginx -v
ll objs/nginx /apps/nginx/sbin/nginx #查看版本

cp /apps/nginx/sbin/nginx /opt/nginx.old  #备份
cp -f ./objs/nginx /apps/nginx/sbin/ #新版覆盖旧版


#发送信号USR2 平滑升级可执行程序,将存储有旧版本主进程PID的文件重命名为nginx.pid.oldbin,并启动新的nginx
#此时两个master的进程都在运行,只是旧的master不在监听,由新的master监听80
#此时Nginx开启一个新的master进程,且这个新master进程会生成新的worker进程,即升级后的Nginx进程,此时老的进程不会自动退出,新的请求仍由旧进程处理。

kill -USR2 `cat /apps/nginx/logs/nginx.pid
注意:这里需要确保nginx的启动方式是以绝对路径方式启动,否则会出现execve() failed while executing new binary process "nginx" (2: No such file or directory)的报错。
#如果有新请求,仍由旧版本提供服务
[root@ubuntu2204 ~]#curl -I 127.0.0.1

#先关闭旧nginx的worker进程,而不关闭旧nginx主进程方便回滚
#向原老的Nginx主进程发送WINCH信号,它会平滑关闭老的工作进程(主进程不退出),这时所有新请求都会由新版Nginx处理

kill -WINCH `cat /apps/nginx/logs/nginx.pid.oldbin`

#经过一段时间测试,新版本服务没问题,最后发送QUIT信号,退出老的master,完成全部升级过程
[root@centos8 nginx-1.20.1]#kill -QUIT `cat /apps/nginx/logs/nginx.pid.oldbin`

在高版本,可以直接在将新文件copy过去后,使用:
make upgrade
- 总结nginx核心配置,并实现nginx多虚拟主机
user nginx; #user: 指定 Nginx 运行的用户和组
worker_processes auto;#定义工作进程的数量。通常设置为 CPU 核心数
error_log /var/log/nginx/error.log warn;#指定错误日志文件的位置和日志级别
pid /var/run/nginx.pid; #指定存储 Nginx 进程 ID 的文件位置

events {
	worker_connections 1024;#每个工作进程的最大连接数
	use epoll;#指定事件驱动模型,如 epoll(Linux)或 kqueue(FreeBSD)
}

http {
	include /etc/nginx/mime.types;
	default_type application/octet-stream;

	log_format main '$remote_addr - $remote_user [$time_local] "$request" '#定义访问日志格式
					  '$status $body_bytes_sent "$http_referer" '
					  '"$http_user_agent" "$http_x_forwarded_for"';

	access_log /var/log/nginx/access.log main;#指定访问日志文件的位置和使用的日志格式

	sendfile on;#启用高效文件传输
	keepalive_timeout 65;#客户端连接保持活动的超时时间
	gzip on;#启用响应数据的 gzip 压缩

	server {
		listen 80;#监听端口
		server_name example.com;#服务器域名
		root /var/www/html;#根目录
		index index.html index.htm;#默认索引

		location / {
			try_files $uri $uri/ =404;
		}

		location /re/ {
			rewrite /1.html /2.html permanent; #重定向
		}#redirect 临时302 #permanent 永久301

		location /api/ {
			proxy_pass http://10.0.0.18:8080;#代理到其他服务器
		}
	}
}
nginx多虚拟主机
user nginx;

http {
	include /etc/nginx/mime.types;

	# 虚拟主机1: test1.com
	server {
		listen 80;
		server_name test1.com www.test1.com;
		root /var/www/example.com;
		index index.html index.htm;

}

	# 虚拟主机2: test.com
	server {
		listen 80;
		server_name test.com www.test.com;

		root /var/www/test.com;
		index index.html index.htm;

	}
}
- 总结nginx日志格式定制
变量
$remote_addr # 记录客户端IP地址
$remote_user # 记录客户端用户名
$time_local # 记录通用的本地时间
$time_iso8601 # 记录ISO8601标准格式下的本地时间
$request # 记录请求的方法以及请求的http协议
$status # 记录请求状态码(用于定位错误信息)
$body_bytes_sent # 发送给客户端的资源字节数,不包括响应头的大小
$$bytes_sent # 发送给客户端的总字节数($msec:) # 日志写入时间。单位为秒,精度是毫秒。
$http_referer # 记录从哪个页面链接访问过来的
$http_user_agent # 记录客户端浏览器相关信息
$http_x_forwarded_for #记录客户端IP地址
$request_length # 请求的长度(包括请求行,请求头和请求正文)。
$request_time # 请求花费的时间,单位为秒,精度毫秒
自定义默认格式日志
 log_format access_log_format  '$remote_addr - $remote_user [$time_local]
"$request" '
					  '$status $body_bytes_sent "$http_referer" '
					  '"$http_user_agent" "$http_x_forwarded_for"'
					  '$server_name:$server_port'-$http_x_forwarded_fo;

access_log logs/access.log   access_log_format;
自定义 json 格式日志
log_format access_json '{"@timestamp":"$time_iso8601",'
		'"host":"$server_addr",'
		'"clientip":"$remote_addr",'
		'"size":$body_bytes_sent,'
		'"responsetime":$request_time,' #总的处理时间
		'"upstreamtime":"$upstream_response_time",' #后端应用服务器处理时间
		'"upstreamhost":"$upstream_addr",'
		'"http_host":"$host",'
		'"uri":"$uri",'
		'"xff":"$http_x_forwarded_for",'
		'"referer":"$http_referer",'
		'"tcp_xff":"$proxy_protocol_addr",'
		'"http_user_agent":"$http_user_agent",'
		'"status":"$status"}';
	 access_log /apps/nginx/logs/access_json.log access_json;
- 总结 nginx反向代理及https安全加密
反向代理、反向代理缓存
server {
	listen 80;
	listen 443 ssl http2;
	server_name test.com;
	ssl_certificate /etc/nginx/certs/www.test.org.pem;
 	ssl_certificate_key /etc/nginx/certs/www.test.org.key;
	ssl_session_cache shared:sslcache:20m;
	ssl_session_timeout 10m;
location / {
    proxy_pass http://192。168.1.133; #代理
    proxy_set_header Host $host; #设置转发请求头,以便目标服务器能够获取客户端的真实信息
    proxy_set_header X-Real-IP $remote_addr;
    proxy_cache proxycache; #缓存
    proxy_cache_key $request_uri; #对指定的数据进行MD5的运算做为缓存的key
    proxy_cache_valid 200 302 10m; #指定响应码的缓存时间
    proxy_cache_valid any 1m;   #除指定的状态码返回的数据以外的缓存多长时间,必须设置,否则不会缓存

	}
}
https加密
cd /etc/nginx/
mkdir certs
cd certs/
openssl req -newkey rsa:4096 -nodes -sha256 -keyout ca.key -x509 -days 3650 -out ca.crt #生成CA私钥和自签名证书
openssl req -newkey rsa:4096 -nodes -sha256 -keyout www.test.org.key     -out www.test.org.csr #生成私钥和自签名证书
openssl x509 -req -days 3650 -in www.test.org.csr -CA ca.crt -CAkey ca.key -CAcreateserial -out www.test.org.crt #签发证书
cat www.wang.org.crt ca.crt > www.wang.org.pem #合并CA和服务器证书成一个文件,注意服务器证书必须在前,ca证书在后,否则会出错
- 实验完成基于LNMP和Redis的phpmyadmin的会话保持,记录完整步骤
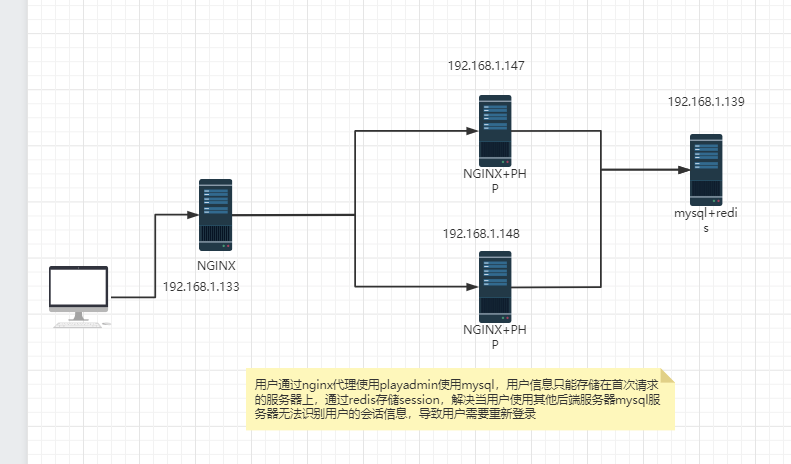
系统:ubuntu 192.168.1.139 mysql|redis
**mysql**

	apt update && apt -y install mysql-server

	vim /etc/mysql/mysql.conf.d/mysqld.cnf
	#bind-address           = 127.0.0.1 #修改
	#mysqlx-bind-address   = 127.0.0.1

	systemctl restart mysql.service
	#MySQL8.0要求指定认证插件
	mysql> create user admin@'192.168.1.%' identified with mysql_native_password by
	'123456';
	grant all on *.* to admin@'192.168.1.%'; #授权

**redis**

	apt -y install redis

	vim /etc/redis/redis.conf
	 - listen 0.0.0.0 #修改

	systemctl restart redis
系统:ubuntu 192.168.1.148|192.168.1.147 nignx+php
**安装和配置 PHP-FPM服务使用Redis保存会话信息**
apt-get update && -y install php-fpm php-mysql php-redis php-json php-mbstring #安装php扩展包
groupadd -g 666 -r www
useradd -u 666 -g www -s /sbin/nologin -r www #创建用户和组
mkdir /etc/nginx/conf.d/
mkdir /data/www/
chown -R www.www /etc/nginx
vim /etc/php/8.1/fpm/pool.d/www.conf #配置php-fpm
listen = 127.0.0.1:9000 #必要
;listen = /run/php/php8.1-fpm.sock
pm.status_path = /pm_status#不必要
ping.path = /ping #不必要
php_value[session.save_handler] = redis
php_value[session.save_path] = "tcp://192.168.1.139:6379"
systemctl restart php8.1-fpm.service
** 配置nginx支持php**
vim /apps/nginx/conf/nginx.conf #ubnutu建议直接写入nginx.conf
user www;
server {
listen 80;
server_name www.wang.org;
root /data/www/;
index index.php;
client_max_body_size 20m;
location ~ \.php$|/ping|/php-status {
fastcgi_pass 127.0.0.1:9000 ;
fastcgi_param SCRIPT_FILENAME $document_root$fastcgi_script_name;
#fastcgi_param SCRIPT_FILENAME /data/www$fastcgi_script_name;
include fastcgi_params;
}
}
**部署PhpMyAdmin**
wget https://files.phpmyadmin.net/phpMyAdmin/5.2.0/phpMyAdmin-5.2.0-all-languages.zip
unzip phpMyAdmin-5.2.0-all-languages.zip -d /opt/
mv /opt/phpMyAdmin-5.2.0-all-languages/* /data/www/
cp /data/www/config.sample.inc.php config.inc.php
vim /data/www/config.inc.php
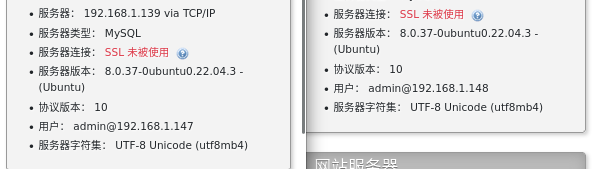
$cfg['Servers'][$i]['host'] = '192.168.1.139';
chown -R www.www /data/www/
192.168.1.133 nginx #配置Nginx反向代理实现负载均衡
vim /etc/nginx/conf.d/test.conf
upstream web {
	server 192.168.1.148:80;
	server 192.168.1.147:80;
}
server{
	listen 80;
	server_name www.test;
	index index.php;
	location / {
	   proxy_pass http://web;
	}
}
systemctl restart nginx

 浙公网安备 33010602011771号