Java -- IO
java.io
Java.nio
Java.io中最为核心的一个概念:流(stream),面向流的编程,Java中一个流要么是输入流,要么是输出流,不可能同时既是输入流,又是输出流
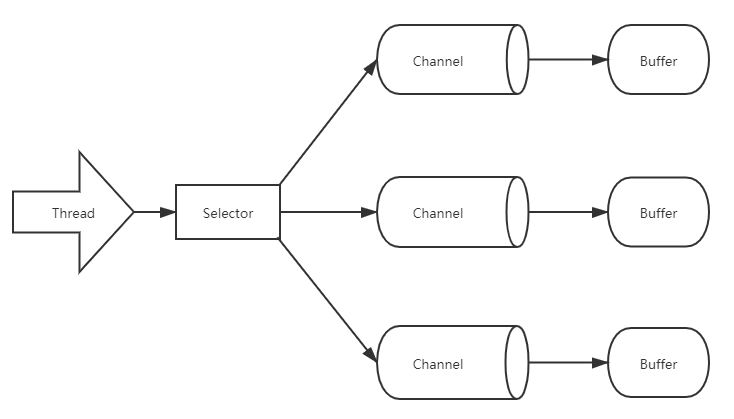
Java .nio中拥有三个核心概念:Selector(选择器)、Channel(通道)、Buffer (缓冲区),在Java.nio中,是面向 块(block)
或是 缓冲区(Buffer)编程的。Buffer 本质上是一块内存,底层实现上实现上是一个数组,数据的读、写都是由 Buffer 来实现的,
在Nio 中,数据的读、写 是可以在同一个 Buffer 缓冲区中进行的,除了数组之外,Buffer 还提供了对数据的结构化访问方式,并且可以追踪到
系统的读写过程
Java 中的 八大基本数据类型 出了 Boolean 类型都有各自对应的 Buffer 类型,IntBuffer、LongBuffer、ByteBuffer、CharBuffer等
Channel 指的是可以向其写入数据、读取数据的对象,类似 Java.io 中的Stream 且一定是通过 Buffer来读写数据的,所有数据的读、写都是通过 Buffer
来进行的,永远不会直接向 Channel 写入数据或是 读取数据
与 Stream 不同的是,Stream 是单向的,Channel 是双向的;

public static void main(String[] args) {
    IntBuffer buffer = IntBuffer.allocate(10);

    for (int i = 0; i < buffer.capacity(); i++) {
        int nextInt = new SecureRandom().nextInt(20);
        buffer.put(nextInt);
    }

    // 将读写状态翻转(必须调用)
    buffer.flip();
    while (buffer.hasRemaining()) {
        System.out.println(buffer.get());
    }
}

public static void main(String[] args) throws IOException {
    // 输入流
    FileInputStream fileInputStream = new FileInputStream("C:\\xxx\\xxx.txt");
    // 输入流转Channel
    FileChannel channel = fileInputStream.getChannel();
    // 通过Buffer读取数据
    ByteBuffer byteBuffer = ByteBuffer.allocate(512);
    // 写入数据进入 Buffer
    channel.read(byteBuffer);

    // 必须进行读写翻转才能转换读写
    byteBuffer.flip();

    while (byteBuffer.remaining() > 0) {
        byte b = byteBuffer.get();
        System.out.println("char:" + (char) b);
    }

    fileInputStream.close();
}
示例3:
public static void main(String[] args) throws IOException {
    // 写入数据到文件
    FileOutputStream fileOutputStream = new FileOutputStream("E:\\xxx\\xxx.txt");
    // 流转换为通道
    FileChannel channel = fileOutputStream.getChannel();
    // 读写数据的Buffer
    ByteBuffer buffer = ByteBuffer.allocate(512);

    byte[] bytes = "Hello World".getBytes();

    for (int i = 0; i < bytes.length; i++) {
        buffer.put(bytes[i]);
    }

    // 必须翻转读写
    buffer.flip();

    channel.write(buffer);

    fileOutputStream.close();
}
NIO
关于 NIO Buffer 中有三个重要的属性(本质的属性): position(游标位置)、limit(限位)、capacity(容量)
capacity:Buffer的 capacity 是它能包含的元素的个数,永远不会是负数,且永远不会变化
limit:是Buffer 指第一个不能进行读写的元素的索引,它永远不会为负数,也永远不会大于 capacity,初始化Buffer时,limit 在 capacity 的位置
当调用 flip(),limit的位置会移动到存储的最后一个元素的后一位进行拦截限制,而position 则移到 0 的位置,
一个一个的读写着来,当来到 limit 时,表示本次读写完成
position:指的是 Buffer 下一个将要被读 / 写的元素的索引,永远不会为负数,且永远不会超过 limit ,position 类似一个游标
Mark(标记):是已经读 / 写的那个位置,永远不会超过 position
0 <= Mark <= position <= limit <= capacity
相对方法:limit 值与 position 值会在操作的时候考虑到
绝对方法:完全忽略 position 和 limit 的值,而是直接根据索引(数组实现的)位置去读取数据 ,
Nio 读写文件示例:
public static void main(String[] args) throws Exception {

    FileInputStream inputStream = new FileInputStream("/input.txt");
    FileOutputStream outputStream = new FileOutputStream("output.txt");

    FileChannel inChannel = inputStream.getChannel();
    FileChannel outChannel = outputStream.getChannel();

    ByteBuffer buffer = ByteBuffer.allocate(512);

    while (true) {
    //buffer文件可能需要循环使用多次才能完成读写操作,当完成一次buffer后,需要clear
        buffer.clear();

        // 将数据读到Buffer 中
        int read = inChannel.read(buffer);

        // 数据读完就退出,读不完就写
        if (-1 == read) {
            break;
        }
        // 每次读的数据进行写,需要翻转,将 position 置零,limit 到最后一个元素的后一位
        buffer.flip();
        outChannel.write(buffer);
    }
    inChannel.close();
    outChannel.close();
}
Buffer.putXxx();
public static void main(String[] args) throws Exception {
    ByteBuffer buffer = ByteBuffer.allocate(512);

    buffer.putInt(123);
    buffer.putLong(222119292992912L);
    buffer.putDouble(3.14D);
    buffer.putFloat(1.11F);
    buffer.putChar('N');
    buffer.putShort((short) 2);

    buffer.flip();

    // 数据放入的顺序和去除的顺序一定是一样的,否则长度不一致抛异常
    buffer.getInt();
    buffer.getLong();
    buffer.getDouble();
    buffer.getFloat();
    buffer.getChar();
    buffer.getShort();
}
Slice(): 和原有的buff是共享的相同的底层数组
public static void main(String[] args) throws Exception {
    ByteBuffer buffer = ByteBuffer.allocate(10);
    for (int i = 0; i < buffer.capacity(); i++) {
        buffer.put((byte) i);
    }

    /**通过 slice,可以指定起始位置,结束位置,进行切片得到一个新的Buff,新的buff 并不是一个独立的数据,
     * 而是引用 原来老的 buffer 中指定索引期间的数据,原buffer 数据的修改,新的都会随之改变
     * 新的buffer 的limit ,position 则是一个独立的。并不影响原 buffer 中的 limit 和 position
     */
    buffer.position(2);
    buffer.limit(8);
    ByteBuffer newBuffer = buffer.slice();
}
HeapByteBufferR:
当不希望调用端对提供的 buffer 进行修改写操作,可以使用 只读 Buffer,他和原有的 Buffer 数据是共享底层数组的,原数据的修改,在新的
readOnlyBuffer:是可见的,但二者的 limit ,position,capacity 、mark 等是独立的(出了数据区,其他都是不共享的)
可以随时将一个普通的 Buffer 转为 只读 Buffer 调用 asReadOnlyBuffer();反之则不行
public static void main(String[] args) throws Exception {
    ByteBuffer buffer = ByteBuffer.allocate(10);
    for (int i = 0; i < buffer.capacity(); i++) {
        buffer.put((byte) i);
    }

    // 返回一个新的 Buffer 对象,只读的 Buffer --> HeapByteBufferR
    ByteBuffer readOnlyBuffer = buffer.asReadOnlyBuffer();
}
DirectByteBuffer:
public static void main(String[] args) throws Exception {
    FileInputStream inputStream = new FileInputStream("/input.txt");
    FileOutputStream outputStream = new FileOutputStream("output.txt");

    FileChannel inChannel = inputStream.getChannel();
    FileChannel outChannel = outputStream.getChannel();

    ByteBuffer buffer = ByteBuffer.allocateDirect(512);

    while (true) {
        //buffer文件可能需要循环使用多次才能完成读写操作,当完成一次buffer后,需要clear
        buffer.clear();

        // 将数据读到Buffer 中
        int read = inChannel.read(buffer);

        // 数据读完就退出,读完就写
        if (-1 == read) {
            break;
        }
        // 每次读的数据进行写,需要翻转,将 position 置零,limit 到最后一个元素的后一位
        buffer.flip();
        outChannel.write(buffer);
    }
    inChannel.close();
    outChannel.close();
}
内存映射文件修改,直接修改内存中的文件
public static void main(String[] args) throws Exception {
    // 修改的文件,rw 表示 可读,可写
    RandomAccessFile accessFile = new RandomAccessFile("test.txt", "rw");
    FileChannel channel = accessFile.getChannel();

    // 可读可写,读写 0--5 索引的buffer
    MappedByteBuffer map = channel.map(FileChannel.MapMode.READ_WRITE, 0, 5);
    map.put(0, (byte) 'a');
    map.put(1, (byte) 'b');
    map.put(2, (byte) 'c');
    map.put(3, (byte) 'd');
    map.put(4, (byte) 'e');
}
fileLock
public static void main(String[] args) throws Exception {
    // 修改的文件,rw 表示 可读,可写
    RandomAccessFile accessFile = new RandomAccessFile("test.txt", "rw");
    FileChannel channel = accessFile.getChannel();

    // 从哪个位置开始锁(3),锁住长度是(10),锁类型:true 共享锁(共享读),false:排他锁(只能有一个程序写)
    FileLock lock = channel.lock(3, 10, true);

    // 锁是否有效
    boolean valid = lock.isValid();
    // 是否是共享锁
    boolean shared = lock.isShared();
}
Buffer 的 Scattering 和 Gethering
Scattering:分散,在进行读的时候 ,不仅可以传一个 Buffer,可以传多个,如Buffer数组,它会顺序的从Channel 中读取数到 Buffer,
从第一个Buffer 读,读满了然后读取到第二个 Buffer 中,依次顺序读到 Buffer 中,便于自定义协议中,规定制定长度 数据,
使用不同长度的 Buffer 进行读取,然后,直接读取响应的 Buffer 即可得到设计的数据,无需对一个Buffer 进行长度截取解析
Gethering :汇集和 Scattering 类似,只不过 Gethering 是将数据写到 Channel 中,从多个 Buffer 中从第一个一次写入 Channel,写完第一个
然后写第二个,依次顺序进行写,知道所有数据 都写到 Channel
public static void main(String[] args) throws Exception {
    ServerSocketChannel socketChannel = ServerSocketChannel.open();

    InetSocketAddress address = new InetSocketAddress(10086);
    socketChannel.socket().bind(address);

    // 自定义 每个Buffer 长度,存放自定义的规定长度的数据
    int msgLength = 2 + 5 + 64;
    ByteBuffer head = ByteBuffer.allocate(2);// 存放请求头
    ByteBuffer param = ByteBuffer.allocate(5);// 存放请求参数
    ByteBuffer body = ByteBuffer.allocate(64);// 存放请求体数据

    ByteBuffer[] buffers = new ByteBuffer[]{head, param, body};

    SocketChannel accept = socketChannel.accept();

    // 死循环监听接收消息
    while (true) {
        int bytesRead = 0;
        while (bytesRead < msgLength) {
            System.out.println("bytesRead" + bytesRead);

            Arrays.asList(buffers).stream()
                    .map(buffer -> "position:" + buffer.position() + ",limit:" + buffer.limit())
                    .forEach(System.out::print);
        }

        Arrays.asList(buffers).forEach(buffer -> buffer.flip());

        long writLength = 0;
        while (writLength < msgLength) {
            long write = accept.write(buffers);
            writLength += write;
        }

        Arrays.asList(buffers).forEach(buffer -> buffer.clear());
    }
}
Selector :
public static void main(String[] args) throws Exception {
    int[] ports = new int[5];
    ports[0] = 11000;
    ports[1] = 12000;
    ports[2] = 13000;
    ports[3] = 14000;
    ports[4] = 15000;

    Selector selector = Selector.open();

    for (int i = 0; i < ports.length; i++) {
        ServerSocketChannel socketChannel = ServerSocketChannel.open();
        // 配置阻塞属性,false 非阻塞
        socketChannel.configureBlocking(false);

        // 获得一个服务端连接
        ServerSocket serverSocket = socketChannel.socket();

        InetSocketAddress address = new InetSocketAddress((ports[i]));
        serverSocket.bind(address);

        // 注册通道与选择器之间的关联关系 必须是:SelectionKey.OP_ACCEPT,当客户端与服务端发起连接的时候才能获取到连接
        socketChannel.register(selector, SelectionKey.OP_ACCEPT);

        System.out.println("监听端口:" + ports[i]);
    }

    // 监听
    while (true) {
        // 返回 Selects 的 Key 的数量
        int keysNum = selector.select();
        System.out.println("keyNumbers:" + keysNum);

        Set<SelectionKey> selectionKeys = selector.selectedKeys();
        Iterator<SelectionKey> iterator = selectionKeys.iterator();
        while (iterator.hasNext()) {
            SelectionKey selectionKey = iterator.next();

            if (selectionKey.isAcceptable()) {
                // 连接客户端
                ServerSocketChannel serverSocketChannel = (ServerSocketChannel) selectionKey.channel();

                // 接收客户端的连接通道
                SocketChannel socketChannel = serverSocketChannel.accept();
                socketChannel.configureBlocking(false);

                socketChannel.register(selector, SelectionKey.OP_READ);

                // 接收到了当前客户端之后移除,否则重复的接收
                iterator.remove();

                System.out.println("获得客户端连接:" + socketChannel);
            } else if (selectionKey.isReadable()) {
                // 读取数据
                SocketChannel socketChannel = (SocketChannel) selectionKey.channel();

                int bytesRead = 0;

                while (true) {
                    ByteBuffer buffer = ByteBuffer.allocate(512);
                    buffer.clear();
                    int read = socketChannel.read(buffer);
                    if (read == -1) {
                        // 数据读取完毕
                        break;
                    }

                    // 数据读完,写数据回客户端(这里吧读取的数据写回去)
                    buffer.flip();
                    socketChannel.write(buffer);
                    bytesRead += read;
                }
                System.out.println("读取:" + bytesRead + ",来自于:" + socketChannel);

                // 读取完数据之后移除,避免重复读取
                iterator.remove();
            }
        }
    }
}
本文来自博客园,作者:Vermeer,转载请注明原文链接:https://www.cnblogs.com/chxlay/p/15056827.html

 浙公网安备 33010602011771号