携程的apollo是一套配置中心框架,我们自己的项目中,无需把配置文件写在yml中,而是写在apollo的配置中心里。
好处是,如果需要修改配置,直接在apollo上修改,无需重启程序,就能让程序马上使用新配置
1.部署apolllo项目
在apollo的github项目https://github.com/ctripcorp/apollo中找到本地快速部署请参见Quick Start
来到apollo快速开始页面https://ctripcorp.github.io/apollo/#/zh/deployment/quick-start
下载Quick Start安装包,得到 apollo-build-scripts-master.zip包,解压并把项目放到独立的地方
参照https://ctripcorp.github.io/apollo/#/zh/deployment/quick-start进行下面步骤
1.先打开sql文件夹,将两个sql文件在数据库中执行
2.编辑demo.sh,修改以下配置
#apollo config db info
apollo_config_db_url="jdbc:mysql://localhost:3306/ApolloConfigDB?characterEncoding=utf8&serverTimezone=Asia/Shanghai"
apollo_config_db_username=用户名
apollo_config_db_password=密码(如果没有密码,留空即可)

# apollo portal db info
apollo_portal_db_url="jdbc:mysql://localhost:3306/ApolloPortalDB?characterEncoding=utf8&serverTimezone=Asia/Shanghai"
apollo_portal_db_username=用户名
apollo_portal_db_password=密码(如果没有密码,留空即可)
3.在有demo.sh的文件夹下,按住shift并右键,选择在此处打开PowerShell窗口,输入 ./demo.sh start 启动项目
4.访问 http://localhost:8080/ ,该路径是apollo的eureka面板,可以看到运行着两个实例,APOLLO-ADMINSERVICE和APOLLO-CONFIGSERVICE
一个是管理页面,一个是配置
5.打开 http://localhost:8070 页面,用户名apollo,密码admin,可以来到apollo的配置管理页面
apollo安装完成
2.apollo整合springboot
1.pom
<?xml version="1.0" encoding="UTF-8"?>
<project xmlns="http://maven.apache.org/POM/4.0.0"
         xmlns:xsi="http://www.w3.org/2001/XMLSchema-instance"
         xsi:schemaLocation="http://maven.apache.org/POM/4.0.0 http://maven.apache.org/xsd/maven-4.0.0.xsd">
    <modelVersion>4.0.0</modelVersion>

    <groupId>org.example</groupId>
    <artifactId>test-apollo</artifactId>
    <version>1.0-SNAPSHOT</version>
    <properties>
        <spring-boot.version>2.3.4.RELEASE</spring-boot.version>
        <apollo-client.version>1.7.0</apollo-client.version>
    </properties>
    <dependencyManagement>
        <dependencies>
            <dependency>
                <groupId>org.springframework.boot</groupId>
                <artifactId>spring-boot-dependencies</artifactId>
                <version>${spring-boot.version}</version>
                <type>pom</type>
                <scope>import</scope>
            </dependency>
        </dependencies>
    </dependencyManagement>
    <dependencies>
        <dependency>
            <groupId>org.projectlombok</groupId>
            <artifactId>lombok</artifactId>
            <scope>provided</scope>
        </dependency>
        <dependency>
            <groupId>org.springframework.boot</groupId>
            <artifactId>spring-boot-configuration-processor</artifactId>
            <optional>true</optional>
        </dependency>
        <dependency>
            <groupId>org.springframework.boot</groupId>
            <artifactId>spring-boot-starter-web</artifactId>
        </dependency>
        <dependency>
            <!-- apollo的客户端 -->
            <groupId>com.ctrip.framework.apollo</groupId>
            <artifactId>apollo-client</artifactId>
            <version>${apollo-client.version}</version>
        </dependency>
    </dependencies>
</project>
2.启动类增加注解开启apollo配置
import com.ctrip.framework.apollo.spring.annotation.EnableApolloConfig;
import org.springframework.boot.SpringApplication;
import org.springframework.boot.autoconfigure.SpringBootApplication;

@SpringBootApplication
@EnableApolloConfig
public class App {
    public static void main(String[] args) {
        SpringApplication.run(App.class, args);
    }
}
3.application.properties配置
不使用yml,直接用application.properties,并且application.properties只配置端口和apollo服务端的信息
server.port=9991

app.id=myAppId
apollo.bootstrap.enabled=true
#从1.2.0版本开始,如果希望把日志相关的配置(如logging.level.root=info或logback-spring.xml中的参数)也放在Apollo管理,
# 那么可以额外配置apollo.bootstrap.eagerLoad.enabled=true来使Apollo的加载顺序放到日志系统加载之前,
# 不过这会导致Apollo的启动过程无法通过日志的方式输出(因为执行Apollo加载的时候,日志系统压根没有准备好呢!所以在Apollo代码中使用Slf4j的日志输出便没有任何内容)
apollo.bootstrap.eagerLoad.enabled=true
# 多久向配置中心同步配置信息,单位分钟。apollo客户端会定时向配置中心获取最新信息。注意,在配置中心的修改会立即同步到程序的,
# 但可能网络或者其他问题导致配置中心做了修改但程序没有得到最新配置,所以需要定时向配置中心获取最新配置。
apollo.refreshInterval=1
# apollo配置中心的地址,就是那个eureka界面地址
apollo.meta=http://localhost:8080/
# 本服务使用的apollo中的namespace
apollo.bootstrap.namespaces=test1,application
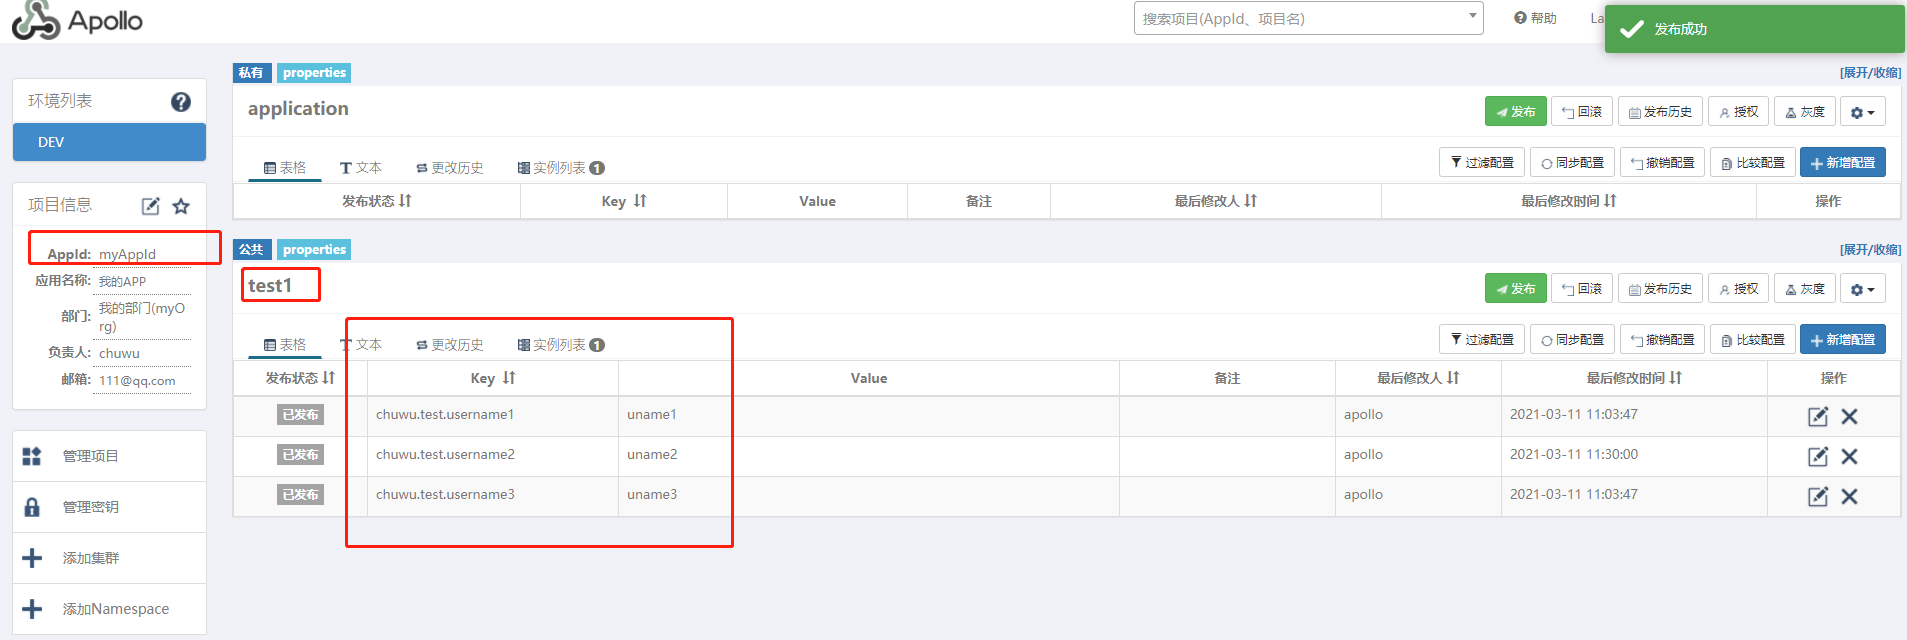
4.在apollo新增配置
1.在apollo配置管理页面, http://localhost:8070/ ,先创建项目,appid写上myAppId
2.进入项目,会发现已经有一个application的namespace,这是默认的主配置,每个项目都有,并且是每个项目都私有的
3.添加namespace,创建namespace,名字为test1,注意这个test1是上面application.properties中的apollo.bootstrap.namespaces中的一项
4.将test1这个namespace加入到项目myAppId中
5.编辑test1这个namespace,新增如下内容
chuwu.test.username1 = uname1
chuwu.test.username2 = uname2
chuwu.test.username3 = uname3
5.在程序中增加配置类
@Configuration
@Data
public class TestConfig {
    @Value("${chuwu.test.username1}")
    private String userName1;
    @Value("${chuwu.test.username2}")
    private String userName2;
    @Value("${chuwu.test.username3}")
    private String userName3;
}
6.测试获取配置
1.定义控制器,注入TestConfig
import com.chuwu.test.config.TestConfig;
import org.springframework.beans.factory.annotation.Autowired;
import org.springframework.web.bind.annotation.GetMapping;
import org.springframework.web.bind.annotation.RequestMapping;
import org.springframework.web.bind.annotation.RestController;
@RestController
@RequestMapping("/test")
public class Test {
    @Autowired
    TestConfig testConfig;
    @GetMapping("/t2")
    public String test2() {
        System.out.println(testConfig.getUserName1());
        System.out.println(testConfig.getUserName2());
        System.out.println(testConfig.getUserName3());
        return "hello world!";
    }

}
2.浏览器访问 http://localhost:9991/test/t2
3.得到的输出结果
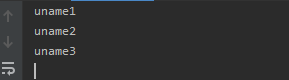
可以看到,在apollo中设置的配置,是可以在程序中读取到的
3.测试动态修改配置
继续使用上面整合的例子
在apollo配置页面修改myAppId项目的配置,修改namespace为test1的配置如下
chuwu.test.username1 = uname1
chuwu.test.username2 = uname222
chuwu.test.username3 = uname3
访问 http://localhost:9991/test/t2 ,程序的输出结果如下
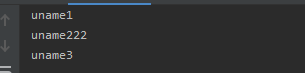
可以看到,在Apollo中修改配置,是可以直接同步修改到程序中,无需重启程序。
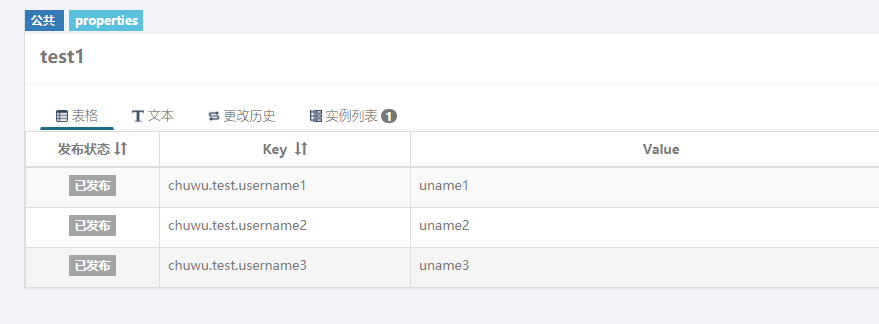
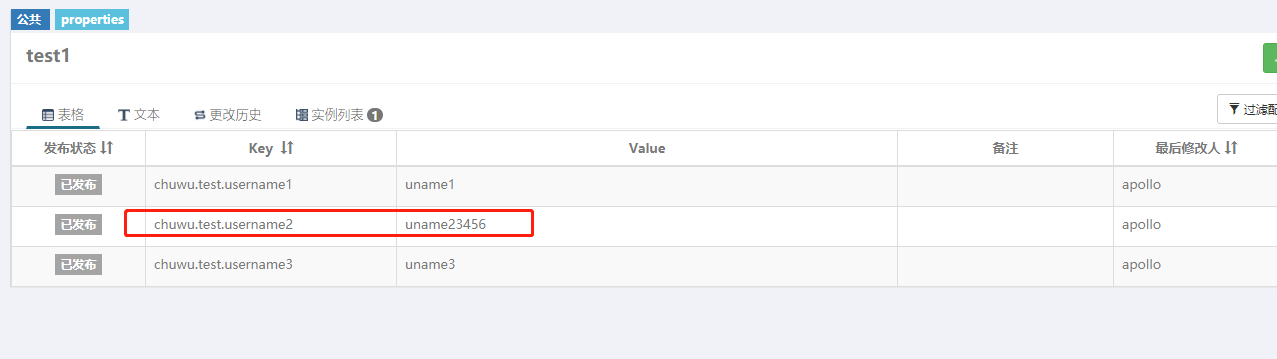
4.坑
1.如果配置类使用@ConfigurationProperties的方式,则只会在启动后加载配置,后续在apollo的配置修改,不能立即更新到程序中
例子如下:
apollo配置
配置类
import lombok.Data;
import org.springframework.boot.context.properties.ConfigurationProperties;
import org.springframework.stereotype.Component;
@Component
@Data
@ConfigurationProperties(prefix = "chuwu.test")
public class TestConfig {
    private String userName1;
    private String userName2;
    private String userName3;
}
程序启动后,访问 http://localhost:9991/test/t2 ,程序的输出结果如下

当修改apollo的配置
不重启程序,访问 http://localhost:9991/test/t2 ,程序的输出结果如下
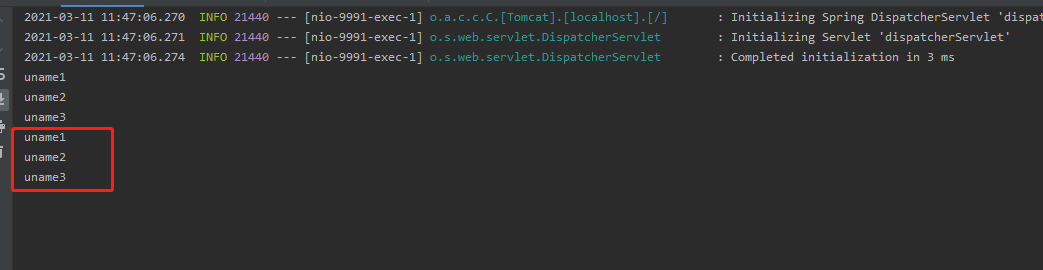
可以看出,修改了Apollo的配置,并没有同步修改到程序中,而使用@Value的方式是正确的,能立即同步配置
5.坑,配置是否生效的情况如下
- API方式获取的配置,实时更新
@Value方式注入的配置,实时更新@ConfigurationProperties方式注入的配置,启动时注入,后续需要重新注入的话,需要自己处理一下,可以使用RefreshScope,也可以使用EnvironmentChangeEvent- 数据源、zookeeper这类有状态的组件,需要自己监听配置变化,在配置变化时重连远端的数据库或zk,可以参考dynamic-datasource
- 日志级别也是类似的,可以参考spring-cloud-logger

 浙公网安备 33010602011771号