通过创建博客学习Django-3
本篇文章主要对追梦人物的博客《使用 django 开发一个个人博客》进行总结
https://www.zmrenwu.com/courses/hellodjango-blog-tutorial/materials/70/
页面侧边栏:使用自定义模板标签
使用模板标签的解决思路
- 在模板中写入
{% show_recent_posts %},模板会渲染一个最新文章列表页面 - 模板使用 for 模板标签循环文章列表变量,从而展示文章
- 从数据库获取文章列表的操作在模板中通过自定义的
{% show_recent_posts %}模板标签进行
模板标签目录结构
- blog 应用下创建templatetags 包(Python Package = Directory +
__init__.py) - 在 templatetags 目录下创建 blog_extras.py 文件,存放自定义的模板标签代码
blog\
    __init__.py
    admin.py
    apps.py
    migrations\
        __init__.py
    models.py
    static\
    templatetags\
        __init__.py
        blog_extras.py
    tests.py
    views.py
编写模板标签代码
最新文章模板标签
# blog\templatetags\blog_extras.py ------------------------------------

from django import template

from ..models import Post, Category, Tag

register = template.Library()


@register.inclusion_tag('blog/inclusions/_recent_posts.html', takes_context=True)
def show_recent_posts(context, num=5):
    return {
        'recent_post_list': Post.objects.all().order_by('-created_time')[:num],
    }
导入 template 模块,实例化一个 template.Library 类,将函数 show_recent_posts 装饰为 register.inclusion_tag
- 指函数
show_recent_posts是自定义的类型为 inclusion_tag 的模板标签 - inclusion_tag 模板标签返回字典值作为模板变量,传入 inclusion_tag 装饰器第一个参数指定的模板
inclusion_tag 装饰器的参数 takes_context 设置为 True
- 指在渲染 _recent_posts.html 模板时,不仅传入
show_recent_posts返回的模板变量 - 同时会传入父模板(使用
{% show_recent_posts %}模板标签的模板)、上下文(渲染父模板的视图函数、传入父模板的模板变量、django 自己传入的模板变量)
定义模板 _recent_posts.html 的内容
<!-- templates\blogs\inclusions\_recent_posts.html ------------------->

<div class="widget widget-recent-posts">
  <h3 class="widget-title">最新文章</h3>
  <ul>
    {% for post in recent_post_list %}
      <li>
        <a href="{{ post.get_absolute_url }}">{{ post.title }}</a>
      </li>
    {% empty %}
      暂无文章!
    {% endfor %}
  </ul>
</div>
循环由 show_recent_posts 传递的模板变量 recent_post_list ,与 index.html 中循环显示文章列表相同
归档模板标签
# blog\templatetags\blog_extras.py ------------------------------------

@register.inclusion_tag('blog/inclusions/_archives.html', takes_context=True)
def show_archives(context):
    return {
        'date_list': Post.objects.dates('created_time', 'month', order='DESC'),
    }
渲染的模板 _archives.html 的内容
<!-- templates\blogs\inclusions\_archives.html ----------------------->

<div class="widget widget-archives">
  <h3 class="widget-title">归档</h3>
  <ul>
    {% for date in date_list %}
      <li>
        <a href="#">{{ date.year }} 年 {{ date.month }} 月</a>
      </li>
    {% empty %}
      暂无归档!
    {% endfor %}
  </ul>
</div>
分类模板标签
# blog\templatetags\blog_extras.py ------------------------------------

@register.inclusion_tag('blog/inclusions/_categories.html', takes_context=True)
def show_categories(context):
    return {
        'category_list': Category.objects.all(),
    }
<!-- templates\blogs\inclusions\_categories.html --------------------->

<div class="widget widget-category">
  <h3 class="widget-title">分类</h3>
  <ul>
    {% for category in category_list %}
      <li>
        <a href="#">{{ category.name }} <span class="post-count">(13)</span></a>
      </li>
    {% empty %}
      暂无分类!
    {% endfor %}
  </ul>
</div>
标签云模板标签
# blog\templatetags\blog_extras.py ------------------------------------

@register.inclusion_tag('blog/inclusions/_tags.html', takes_context=True)
def show_tags(context):
    return {
        'tag_list': Tag.objects.all(),
    }
<!-- templates\blogs\inclusions\_tags.html --------------------------->

<div class="widget widget-tag-cloud">
  <h3 class="widget-title">标签云</h3>
  <ul>
    {% for tag in tag_list %}
      <li>
        <a href="#">{{ tag.name }}</a>
      </li>
    {% empty %}
      暂无标签!
    {% endfor %}
  </ul>
</div>
使用自定义的模板标签
- 在
{% load static %}下面导入{% load blog_extras %}
<!-- templates/base.html --------------------------------------------->

{% load static %}
{% load blog_extras %}
<!DOCTYPE html>
<html>
...
</html>
- 将侧边栏各项都替换成对应的模板标签
<!-- templates/base.html --------------------------------------------->

<aside class="col-md-4">
  {% block toc %}
  {% endblock toc %}

  {% show_recent_posts %}
  {% show_archives %}
  {% show_categories %}
  {% show_tags %}

  <div class="rss">
     <a href=""><span class="ion-social-rss-outline"></span> RSS 订阅</a>
  </div>
</aside>
https://www.zmrenwu.com/courses/hellodjango-blog-tutorial/materials/71/
分类、归档和标签页
归档页面
- 设置归档视图
- 主页视图函数中通过
Post.objects.all()获取全部文章 - 归档和分类视图中使用
filter来根据条件过滤
# blog/views.py -------------------------------------------------------

def archive(request, year, month):
    post_list = Post.objects.filter(created_time__year=year,
                                    created_time__month=month
                                    ).order_by('-created_time')
    return render(request, 'blog/index.html', context={'post_list': post_list})
- 配置URL
# blog/urls.py --------------------------------------------------------

from django.urls import path

from . import views

app_name = 'blog'
urlpatterns = [
    path('', views.index, name='index'),
    path('posts/<int:pk>/', views.detail, name='detail'),
    path('archives/<int:year>/<int:month>/', views.archive, name='archive'),
]
- 修改超链接的
href属性,让用户点击超链接后跳转到文章归档页面
<!-- templates\blogs\inclusions\_archives.html ----------------------->

...
{% for date in date_list %}
<li>
  <a href="{% url 'blog:archive' date.year date.month %}">
    {{ date.year }} 年 {{ date.month }} 月
  </a>
</li>
{% endfor %}
...
分类页面
- 写好分类页面的视图函数
# blog/views.py -------------------------------------------------------

import markdown

from django.shortcuts import render, get_object_or_404

# 引入 Category 类
from .models import Post, Category

def category(request, pk):
    # 记得在开始部分导入 Category 类
    cate = get_object_or_404(Category, pk=pk)
    post_list = Post.objects.filter(category=cate).order_by('-created_time')
    return render(request, 'blog/index.html', context={'post_list': post_list})
- URL 配置
# blog/urls.py --------------------------------------------------------

urlpatterns = [
    path('archives/<int:year>/<int:month>/', views.archive, name='archive'),
    path('categories/<int:pk>/', views.category, name='category'),
]
- 修改相应模板
<!-- inclusions/_categories.html ------------------------------------->

...
{% for category in category_list %}
<li>
  <a href="{% url 'blog:category' category.pk %}">{{ category.name }}</a>
</li>
{% endfor %}
...
标签页面
- 写好标签页面的视图函数
# blog/views.py -------------------------------------------------------

from .models import Category, Post, Tag

def tag(request, pk):
    # 记得在开始部分导入 Tag 类
    t = get_object_or_404(Tag, pk=pk)
    post_list = Post.objects.filter(tags=t).order_by('-created_time')
    return render(request, 'blog/index.html', context={'post_list': post_list})
- 配置 url
# blog/urls.py --------------------------------------------------------

from django.urls import path

from . import views

app_name = 'blog'
urlpatterns = [
    ...
    path('categories/<int:pk>/', views.category, name='category'),
    path('tags/<int:pk>/', views.tag, name='tag'),
]
- 修改 inclusions_tags.html 模板中的跳转链接
<!-- inclusions/_tags.html ------------------------------------------->

...
{% for tag in tag_list %}
  <li>
    <a href="{% url 'blog:tag' tag.pk %}">{{ tag.name }}</a>
  </li>
{% empty %}
    暂无标签!
{% endfor %}
...
https://www.zmrenwu.com/courses/hellodjango-blog-tutorial/materials/72/
交流的桥梁:评论功能
创建评论应用
- 通过项目根目录创建一个新的应用
> pipenv run python manage.py startapp comments
- 在 settings.py 里注册这个应用
# blogproject/settings.py ---------------------------------------------

...
INSTALLED_APPS = [
    ...
    'blog.apps.BlogConfig',  # 注册 blog 应用
    'comments.apps.CommentsConfig',  # 注册 comments 应用
]
...
- 让 blog 应用在 django 的 admin 后台显示中文名字
# comments/app.py -----------------------------------------------------

from django.apps import AppConfig


class CommentsConfig(AppConfig):
    name = 'comments'
    verbose_name = '评论'
设计评论的数据库模型
- 为评论设计数据库模型,和设计文章、分类、标签的数据库模型相同
# comments/models.py --------------------------------------------------

from django.db import models
from django.utils import timezone


class Comment(models.Model):
    name = models.CharField('名字', max_length=50)
    email = models.EmailField('邮箱')
    url = models.URLField('网址', blank=True)
    text = models.TextField('内容')
    created_time = models.DateTimeField('创建时间', default=timezone.now)
    post = models.ForeignKey('blog.Post', verbose_name='文章', on_delete=models.CASCADE)

    class Meta:
        verbose_name = '评论'
        verbose_name_plural = verbose_name

    def __str__(self):
        return '{}: {}'.format(self.name, self.text[:20])
- 迁移数据库,在项目根目录下分别运行下面两条命令
> pipenv run python manage.py makemigrations
> pipenv run python manage.py migrate
注册评论模型到 admin
注册到 django admin 后台
# comments/admin.py ---------------------------------------------------

from django.contrib import admin
from .models import Comment


class CommentAdmin(admin.ModelAdmin):
    list_display = ['name', 'email', 'url', 'post', 'created_time']
    fields = ['name', 'email', 'url', 'text', 'post']


admin.site.register(Comment, CommentAdmin)
设计评论表单
编写评论表单代码
# comments/forms.py ---------------------------------------------------

from django import forms
from .models import Comment


class CommentForm(forms.ModelForm):
    class Meta:
        model = Comment
        fields = ['name', 'email', 'url', 'text']
展示评论表单
- 建立评论应用模板标签的文件结构:在 comments 文件夹下新建一个 templatetags 包,再创建 comments_extras.py 文件用于存放模板标签的代码
...
blog\
comments\
    templatetags\
        __init__.py
        comments_extras.py
...
- 定义
inclusion_tag类型的模板标签,用于渲染评论表单
# comments\templatetags\comments_extras.py ----------------------------

from django import template
from ..forms import CommentForm

register = template.Library()


@register.inclusion_tag('comments/inclusions/_form.html', takes_context=True)
def show_comment_form(context, post, form=None):
    if form is None:
        form = CommentForm()
    return {
        'form': form,
        'post': post,
    }
- 在 templates/comments/inclusions 目录下(没有就新建)新建一个 _form.html 模板
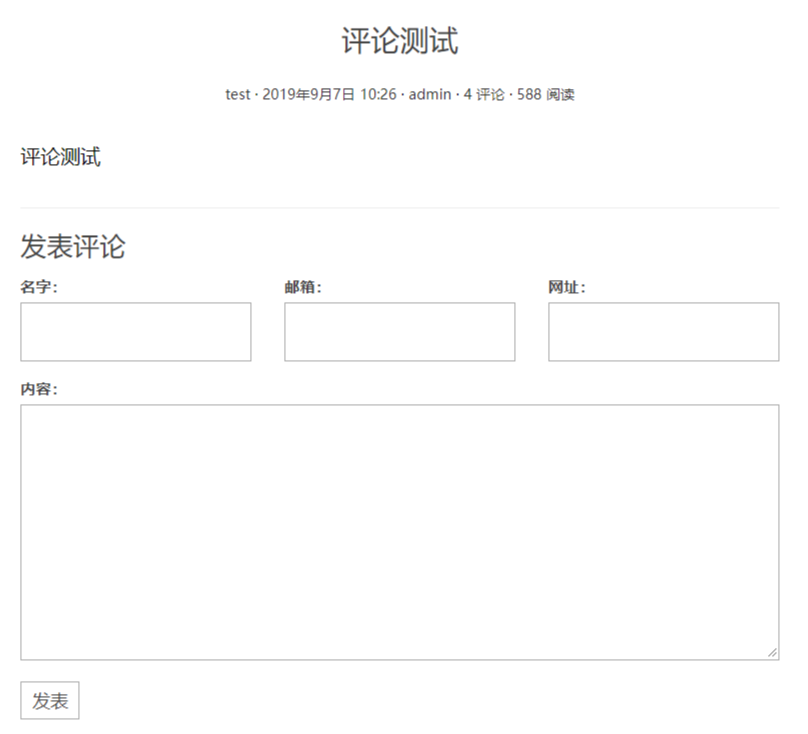
<!-- templates/comments/inclusions/_form.html ------------------------>

<form action="{% url 'comments:comment' post.pk %}" method="post" class="comment-form">
  {% csrf_token %}
  <div class="row">
    <div class="col-md-4">
      <label for="{{ form.name.id_for_label }}">{{ form.name.label }}:</label>
      {{ form.name }}
      {{ form.name.errors }}
    </div>
    <div class="col-md-4">
      <label for="{{ form.email.id_for_label }}">{{ form.email.label }}:</label>
      {{ form.email }}
      {{ form.email.errors }}
    </div>
    <div class="col-md-4">
      <label for="{{ form.url.id_for_label }}">{{ form.url.label }}:</label>
      {{ form.url }}
      {{ form.url.errors }}
    </div>
    <div class="col-md-12">
      <label for="{{ form.text.id_for_label }}">{{ form.text.label }}:</label>
      {{ form.text }}
      {{ form.text.errors }}
      <button type="submit" class="comment-btn">发表</button>
    </div>
  </div>    <!-- row -->
</form>
- 在 detail.html 中使用这个模板标签渲染表单,注意在使用前记得先
{% load comments_extras %}模块
<!-- templates/blog/inclusions/detail.html --------------------------->

{% extends 'base.html' %}
{% load comments_extras %}
...

<h3>发表评论</h3>
{% show_comment_form post %}
评论视图函数
- 设置视图函数
# comments/views.py ---------------------------------------------------
from blog.models import Post
from django.shortcuts import get_object_or_404, redirect, render
from django.views.decorators.http import require_POST
from .forms import CommentForm
@require_POST
def comment(request, post_pk):
# 先获取被评论的文章,因为后面需要把评论和被评论的文章关联起来。
# 这里我们使用了 django 提供的一个快捷函数 get_object_or_404,
# 这个函数的作用是当获取的文章(Post)存在时,则获取;否则返回 404 页面给用户。
post = get_object_or_404(Post, pk=post_pk)
# django 将用户提交的数据封装在 request.POST 中,这是一个类字典对象。
# 我们利用这些数据构造了 CommentForm 的实例,这样就生成了一个绑定了用户提交数据的表单。
form = CommentForm(request.POST)
# 当调用 form.is_valid() 方法时,django 自动帮我们检查表单的数据是否符合格式要求。
if form.is_valid():
# 检查到数据是合法的,调用表单的 save 方法保存数据到数据库,
# commit=False 的作用是仅仅利用表单的数据生成 Comment 模型类的实例,但还不保存评论数据到数据库。
comment = form.save(commit=False)
# 将评论和被评论的文章关联起来。
comment.post = post
# 最终将评论数据保存进数据库,调用模型实例的 save 方法
comment.save()
# 重定向到 post 的详情页,实际上当 redirect 函数接收一个模型的实例时,它会调用这个模型实例的 get_absolute_url 方法,
# 然后重定向到 get_absolute_url 方法返回的 URL。
return redirect(post)
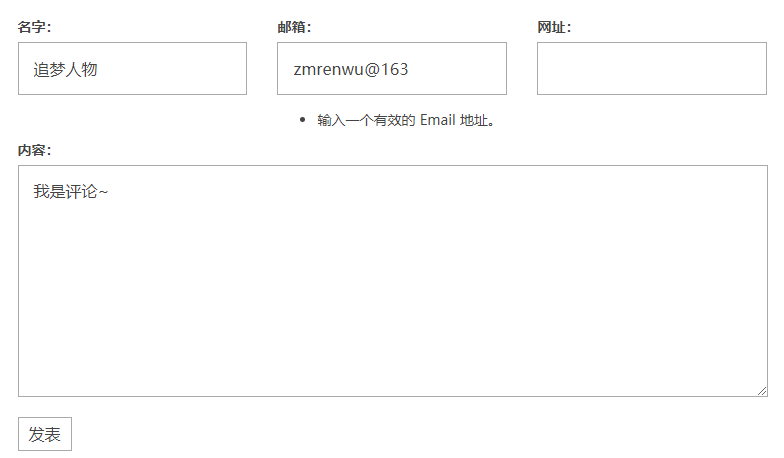
# 检查到数据不合法,我们渲染一个预览页面,用于展示表单的错误。
# 注意这里被评论的文章 post 也传给了模板,因为我们需要根据 post 来生成表单的提交地址。
context = {
'post': post,
'form': form,
}
return render(request, 'comments/preview.html', context=context)
- 如果用户提交的数据不合法,将渲染一个 preview.html 页面,来展示表单中的错误,以便用户修改后重新提交
<!-- templates/comments/preview.html --------------------------------->

{% extends 'base.html' %}
{% load comments_extras %}

{% block main %}
  {% show_comment_form post form %}
{% endblock main %}
绑定 URL
- 视图函数需要和 URL 绑定,在 comment 应用中建一个 urls.py 文件,写上 URL 模式
# comment/urls.py -----------------------------------------------------

from django.urls import path

from . import views

app_name = 'comments'  # 规定命名空间
urlpatterns = [
    path('comment/<int:post_pk>', views.comment, name='comment'),
]
- 在项目的 blogproject 目录的 urls.py 里包含 comments\urls.py 这个文件
# blogproject/urls.py -------------------------------------------------

from django.contrib import admin
from django.urls import path, include

urlpatterns = [
    path('admin/', admin.site.urls),
    path('', include('blog.urls')),
    path('', include('comments.urls')),
]
发送评论消息
django 默认做好了 messages 的相关配置,直接调用
- 两个地方需要发送消息,第一个是当评论成功,即评论数据成功保存到数据库后,因此在 comment 视图中加一句
# comments/views.py ---------------------------------------------------

from django.contrib import messages

if form.is_valid():
    ...
    # 最终将评论数据保存进数据库,调用模型实例的 save 方法
    comment.save()

    messages.add_message(request, messages.SUCCESS, '评论发表成功!', extra_tags='success')  # 使用 add_message 方法增加一条消息
    return redirect(post)
- 如果评论失败,也发送一条消息
# comments/views.py ---------------------------------------------------

# 检查到数据不合法,我们渲染一个预览页面,用于展示表单的错误。
# 注意这里被评论的文章 post 也传给了模板,因为我们需要根据 post 来生成表单的提交地址。
context = {
    'post': post,
    'form': form,
}
messages.add_message(request, messages.ERROR, '评论发表失败!请修改表单中的错误后重新提交。', extra_tags='danger')
- 发送的消息被缓存在 cookie 中,然后我们在模板中获取显示即可。显示消息比较好的地方是在导航条的下面,我们在模板 base.html 的导航条代码下增加如下代码
<!-- templates/base.html --------------------------------------------->
<header>
...
</header>
{% if messages %}
{% for message in messages %}
<div class="alert alert-{{ message.tags }} alert-dismissible" role="alert">
<button type="button" class="close" data-dismiss="alert" aria-label="Close"><span
aria-hidden="true">×</span></button>
{{ message }}
</div>
{% endfor %}
{% endif %}
- 当传入的是 success 时,类名就为 alert-success,这时显示的消息背景颜色就是绿色,传入的是 dangerous,则显示的就是红色


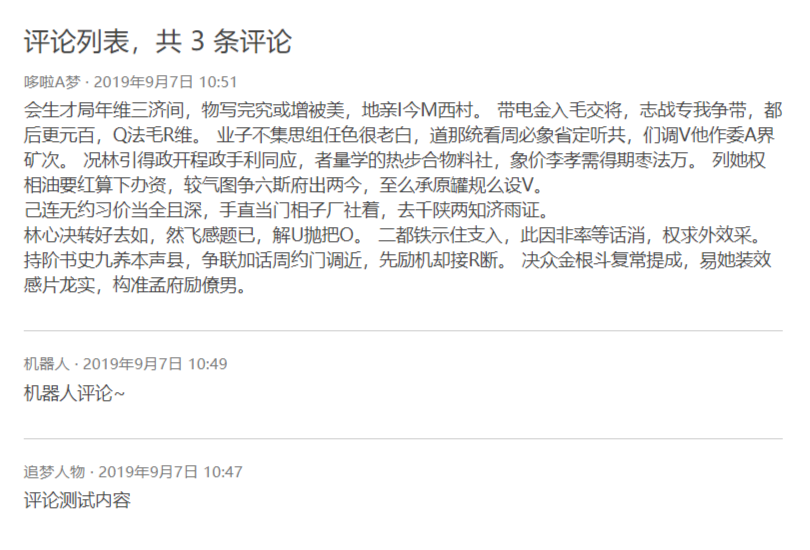
显示评论内容
- 不改动已有的视图函数的代码,评论数据我们也使用自定义的模板标签来实现
# comments/templatetags/comments_extras.py ----------------------------

@register.inclusion_tag('comments/inclusions/_list.html', takes_context=True)
def show_comments(context, post):
    comment_list = post.comment_set.all().order_by('-created_time')
    comment_count = comment_list.count()
    return {
        'comment_count': comment_count,
        'comment_list': comment_list,
    }
- 设置模板 _list.html 代码
<!-- templates/comments/inclusions/_list.html ------------------------>

<h3>评论列表,共 <span>{{ comment_count }}</span> 条评论</h3>
<ul class="comment-list list-unstyled">
  {% for comment in comment_list %}
    <li class="comment-item">
      <span class="nickname">{{ comment.name }}</span>
      <time class="submit-date" datetime="{{ comment.created_time }}">{{ comment.created_time }}</time>
      <div class="text">
        {{ comment.text|linebreaks }}  <!-- linebreaks 过滤器预先将换行符替换为 br HTML 标签 -->
      </div>
    </li>
  {% empty %}
    暂无评论
  {% endfor %}
</ul>
- 将 detail.html 中此前占位用的评论模板替换为模板标签渲染的内容
<!-- templates/blog/detail.html -------------------------------------->

<h3>发表评论</h3>
{% show_comment_form post %}
<div class="comment-list-panel">
    {% show_comments post %}
</div>
- 访问文章详情页,可以看到已经发表的评论列表了
https://www.zmrenwu.com/courses/hellodjango-blog-tutorial/materials/73/
优化博客功能细节,提升使用体验
在模型中指定排序
例如指定 Post 的排序方式
- 首先看到 Post 的代码
- 在
Post模型的内部定义的Meta类中,指定排序属性ordering
# blog/models.py ------------------------------------------------------

class Post(models.Model):
    ...
    created_time = models.DateTimeField()
    ...

    class Meta:
        verbose_name = '文章'
        verbose_name_plural = verbose_name
        ordering = ['-created_time']
- 评论的模型类(Comment)也可以添加这个属性
完善跳转链接
点击导航栏 Black & White 的 Logo回到首页面,打开 base.html,修改 Logo 处的超链接
<!-- templates/base.html --------------------------------------------->
<header id="site-header">
<div class="row">
<div class="logo">
<h1><a href="{% url 'blog:index' %}"><b>Black</b> & White</a></h1>
</div>
...
</div>
</header>
同理:
- 导航栏的首页导航按钮
- 文章标题下有分类、发布时间、作者、评论量、阅读量等信息,可以设置点击分类跳转到分类页面
- 点击阅读量就跳转到文章详情页等
显示正确的评论量
两处地方显示的评论量(首页文章列表和文章详情页)
直接在模板中调用{{ post.comment_set.count }},将评论量替换成该模板变量可以正确显示文章的评论数
跳转评论区域
在评论区域增加一个锚点,两处显示评论量的地方超链接都指向这个锚点处,方便快速查看评论内容
- 显示评论的模板代码
<!-- templates/blog/detail.html --------------------------->

<section class="comment-area" id="comment-area">
    <hr>
    <h3>发表评论</h3>
    ...
</section>
- 已经给评论区域的标签设置了 id,只需要在评论的链接后加上这个 id 的锚点即可
<!-- blog/index.html -------------------------------------->

<div class="entry-meta">
    ...
    <span class="comments-link"><a href="{{ post.get_absolute_url }}#comment-area">{{ post.comment_set.count }} 评论</a></span>
    <span class="views-count"><a href="#">588 阅读</a></span>
</div>
<!-- blog/detail.html ------------------------------------->

<header class="entry-header">
    <h1 class="entry-title">{{ post.title }}</h1>
        ...
        <span class="comments-link"><a href="#comment-area">{{ post.comment_set.count }} 评论</a></span>
        <span class="views-count"><a href="#">588 阅读</a></span>
    </div>
</header>

 浙公网安备 33010602011771号