UITableView 入门简单使用 [xcode 4.4.1]
本篇学习目标:
1. 使用Storyboard 编辑View
2. 用UITableView显示一个简单的数组
3. 增加UITableView 事件
4. 给UITableView绑定数据源
5. 点击每行,弹出信息窗口
接下跟我如下操作:
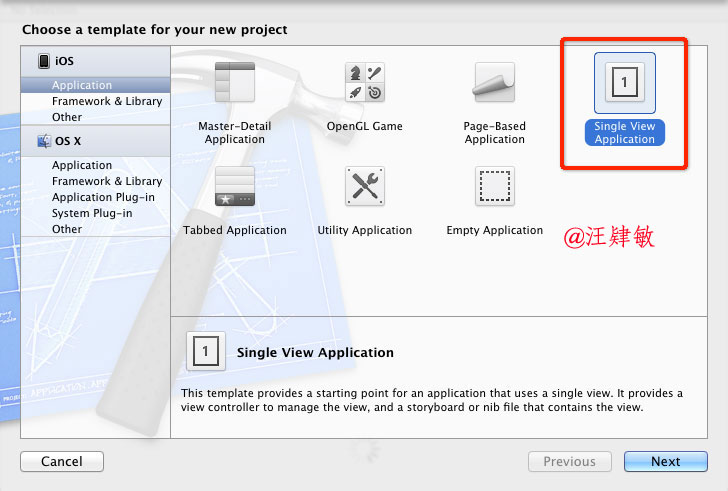
1. 首先启动Xcode,新建一个工程 创建项目,选择如下:
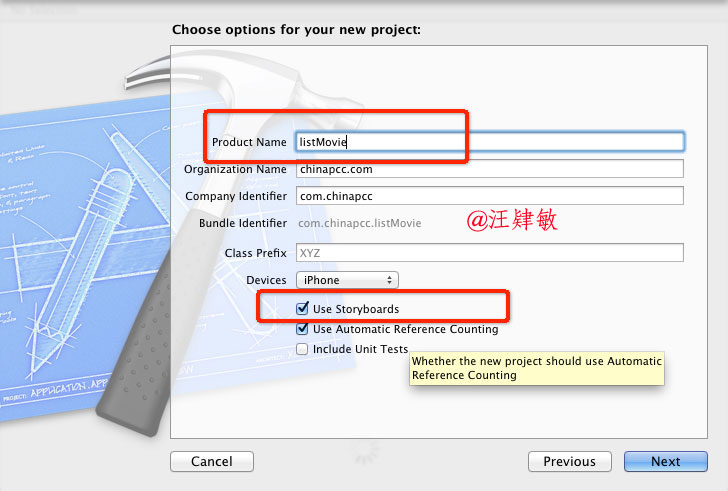
下一步,输入产品名,两个红框要注意:
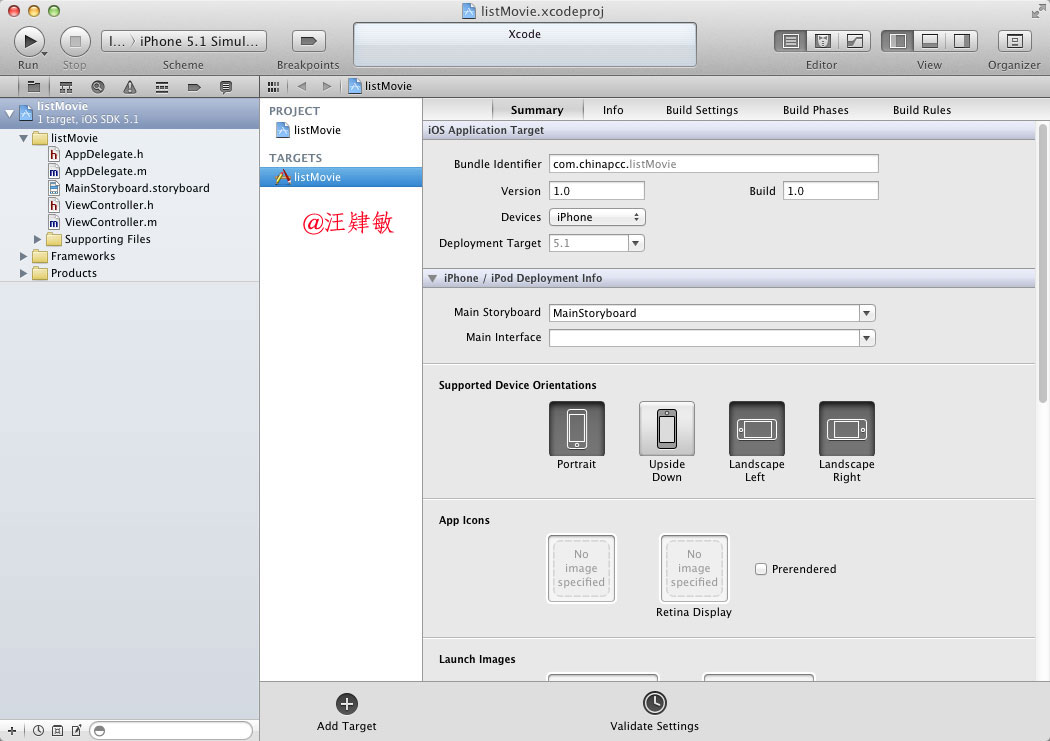
完成创建项目之后,界面如下:
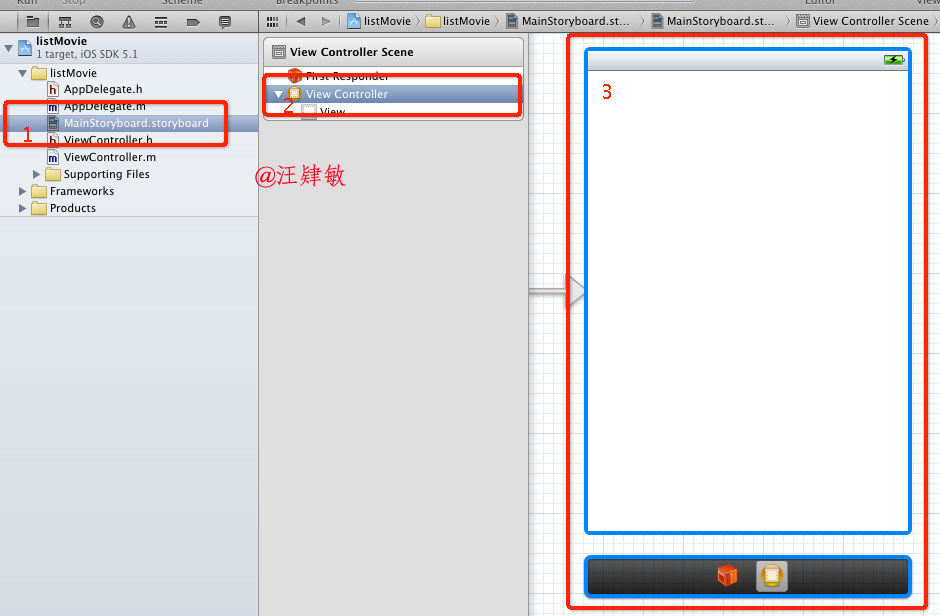
2. 选中MainStoryboard.storyboard 打开View编辑窗口,按下1,2,3步删除操作,把默认的ViewController删除
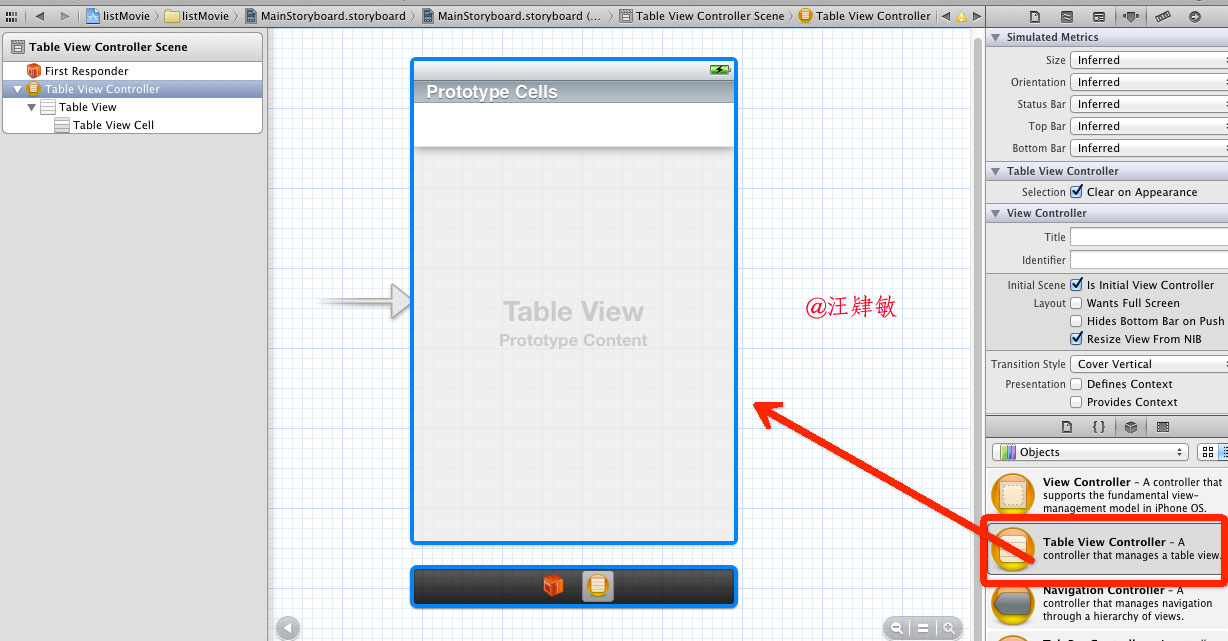
3. 打开控件库拖一下Table View Controller 到MainStoryboard.storyboard 中,如下图所示:
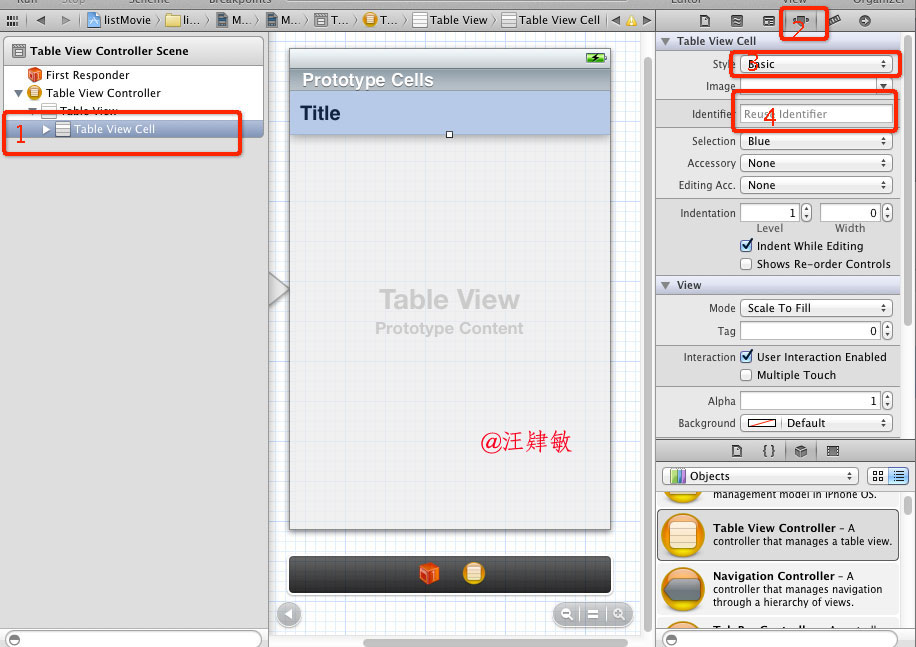
4. 打开Table View Cell 设置属性,注意:Identifier 这个必须设置参数,这里我们设置成:MovieCell
5. 删除默认的控制器(Controller) 文件,如图所示:

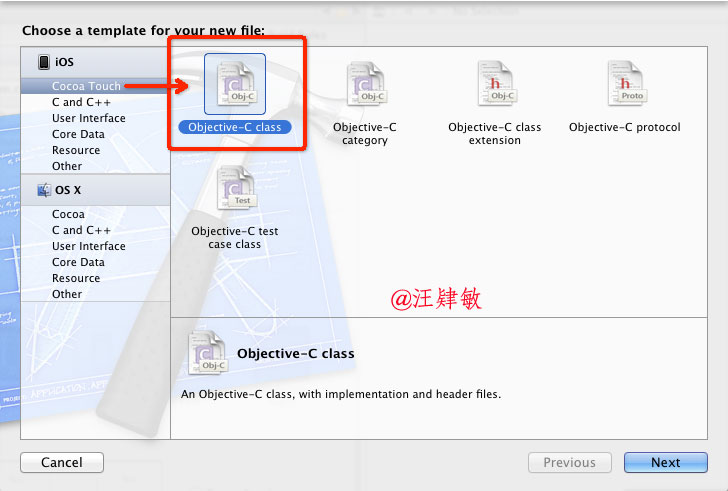
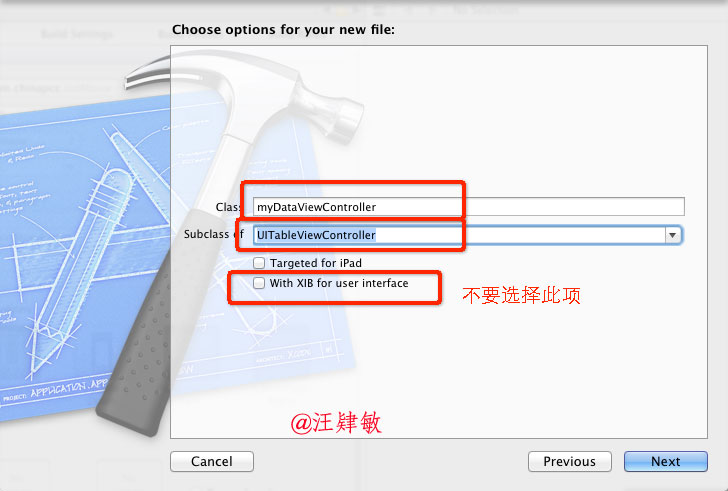
6. 添加需要的Controller文件,如图所示:
7. 打开 myDataViewController.h 文件如下所示:
// myDataViewController.h
// listMovie
//
// Created by tony on 12-8-29.
// Copyright (c) 2012 年 chinapcc.com. All rights reserved.
//
#import <UIKit/UIKit.h>
@interface myDataViewController : UITableViewController
// 添加数据源
@property (strong,nonatomic) NSMutableArray *listOfMovies;
@end
注意:以前有些教程需要这行代码:<UITableViewDataSource,UITableViewDelegate>,现在的不需要了
// 注意:这是错误的代码
@interface myDataViewController : UITableViewController<UITableViewDataSource,UITableViewDelegate>
@end
8. 打开myDataViewController.m 文件
// 在上面的代码下,添加如此一行:
@synthesize listOfMovies;
9. 视图初始化加载的代码
{
listOfMovies = [[NSMutableArray alloc] init];
[listOfMovies addObject:@"I Love Tony"];
[listOfMovies addObject:@"美丽心灵"];
[listOfMovies addObject:@"雨人"];
[listOfMovies addObject:@"波拉克"];
[listOfMovies addObject:@"暗物质"];
[listOfMovies addObject:@"天才瑞普利"];
[listOfMovies addObject:@"猫鼠游戏"];
[listOfMovies addObject:@"香水"];
[listOfMovies addObject:@"一级恐惧"];
[listOfMovies addObject:@"心灵捕手"];
[listOfMovies addObject:@"莫扎特传"];
[listOfMovies addObject:@"证据"];
[listOfMovies addObject:@"海上钢琴师"];
[listOfMovies addObject:@"电锯惊魂"];
[listOfMovies addObject:@"沉默的羔羊"];
[listOfMovies addObject:@"非常嫌疑犯"];
[listOfMovies addObject:@"寻找弗罗斯特"];
[super viewDidLoad];
// Uncomment the following line to preserve selection between presentations.
// self.clearsSelectionOnViewWillAppear = NO;
// Uncomment the following line to display an Edit button in the navigation bar for this view controller.
// self.navigationItem.rightBarButtonItem = self.editButtonItem;
}
10. 释放内存,手持设备内存是不够的,不要忘记以下这些代码:
{
// 释放内存
self.listOfMovies = nil;
[super viewDidUnload];
// Release any retained subviews of the main view.
// e.g. self.myOutlet = nil;
}
11. 修改数据绑定代码,详细如下:
- (NSInteger)numberOfSectionsInTableView:(UITableView *)tableView
{
// 默认有些行,请删除或注 释 #warning Potentially incomplete method implementation.
// 这里是返回的节点数,如果是简单的一组数据,此处返回1,如果有多个节点,就返回节点 数
return 1;
}
- (NSInteger)tableView:(UITableView *)tableView numberOfRowsInSection:(NSInteger)section
{
// 默认有此行,请删除或注 释 #warning Incomplete method implementation.
// 这里是返回节点的行数
return [self.listOfMovies count];
}
- (UITableViewCell *)tableView:(UITableView *)tableView cellForRowAtIndexPath:(NSIndexPath *)indexPath
{
// 大家还记得,之前让你们设置的Cell Identifier 的 值,一定要与前面设置的值一样,不然数据会显示不出来
static NSString *CellIdentifier = @"MovieCell";
UITableViewCell *cell = [tableView dequeueReusableCellWithIdentifier:CellIdentifier];
// 根据行获取数组中值
NSString *value = [listOfMovies objectAtIndex:indexPath.row];
// 把取得值,设置到Table中去
cell.textLabel.text = value;
return cell;
}
-(NSString*)tableView:(UITableView *)tableView titleForHeaderInSection:(NSInteger)section
{
// 返回顶部标题
return @"电影列表";
}
-(NSString*)tableView:(UITableView *)tableView titleForFooterInSection:(NSInteger)section
{
// 返回底部文字
return @"作者:汪肄敏";
}
12. 不要忘记View 与Controller 做一个联系
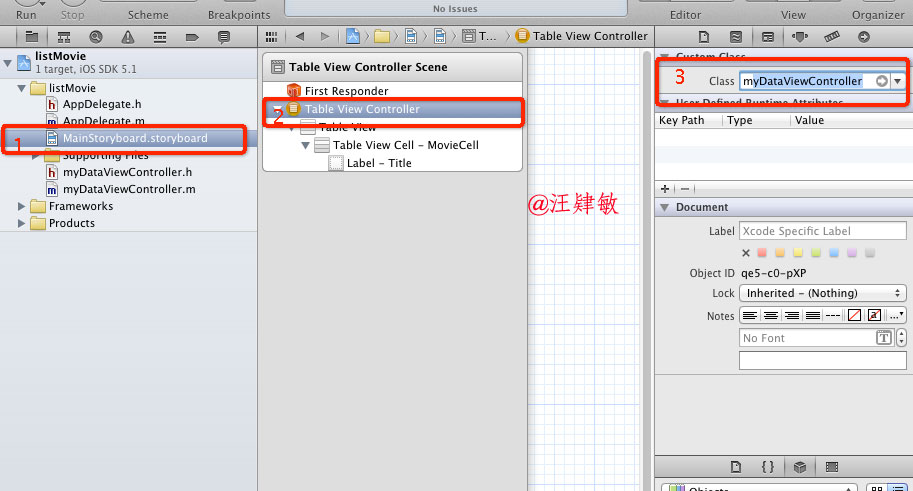
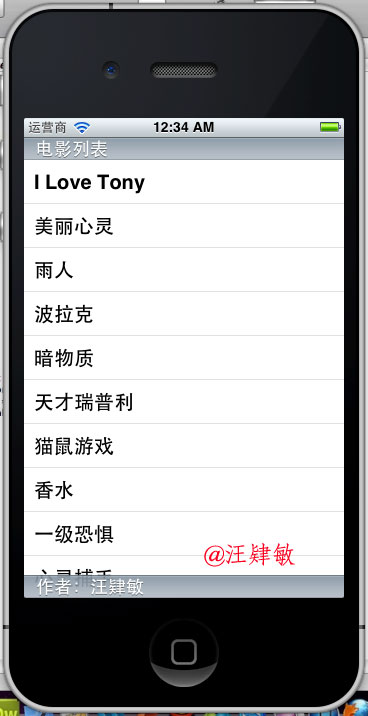
13. 到此时,程序已可以运行了,看一看成果吧
14. 不满意,是不是前面添加一个图片,更好看点,那就来吧
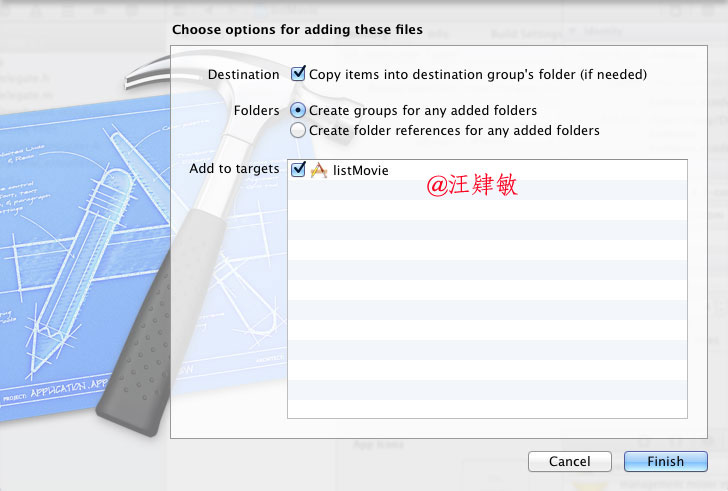
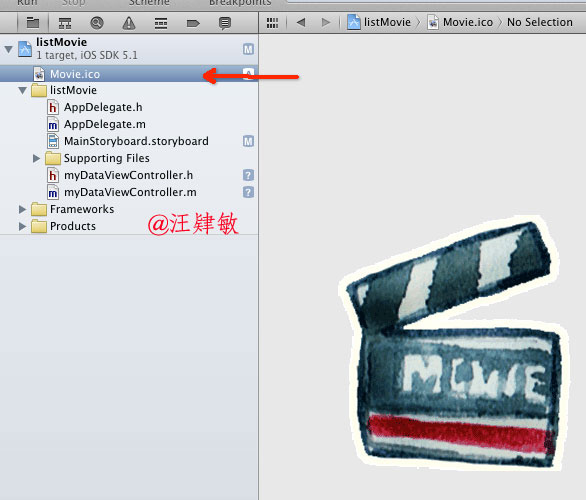
先拖一张图片进项目中,如图所示:
我的图片如下:
修改数据绑定的代码
{
// 大家还记得,之前让你们设置的Cell Identifier 的 值,一定要与前面设置的值一样,不然数据会显示不出来
static NSString *CellIdentifier = @"MovieCell";
UITableViewCell *cell = [tableView dequeueReusableCellWithIdentifier:CellIdentifier];
// 根据行获取数组中值
NSString *value = [listOfMovies objectAtIndex:indexPath.row];
// 把取得值,设置到Table中去
cell.textLabel.text = value;
// 添加列表前部图片(这两行是新增的)
UIImage *image = [UIImage imageNamed:@"Movie.ico"];
cell.imageView.image = image;
return cell;
}
搞定,收工,效果如下:

背景声音:那个脱脱呀,点击事件。。。
呵呵,还有一个事件,接着来吧
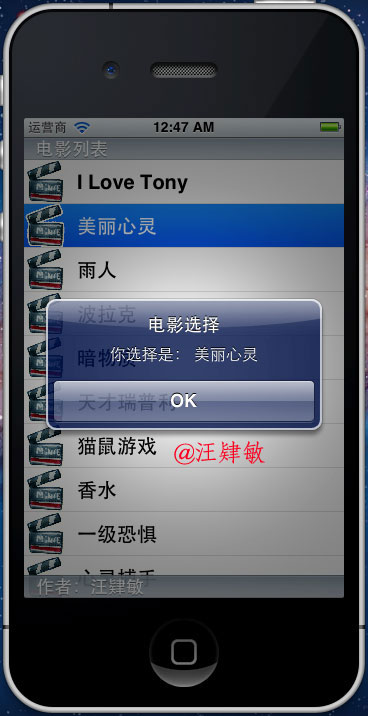
15.修改事件代码,默认是为用户生成代码,只是没有内容,我们来修改一下:
{
// 大家都懂的,不需要我解释吧
NSString *slect = [listOfMovies objectAtIndex:indexPath.row];
NSString *msg = [[NSString alloc] initWithFormat:@" 你选择是: %@ ",slect];
UIAlertView *alert = [[UIAlertView alloc] initWithTitle:@"电影选择"
message:msg
delegate:self
cancelButtonTitle:@"OK"
otherButtonTitles:nil, nil];
[alert show];
}
最终效果来了:
16. 按国际惯例,要附上代码:源代码下
载

 浙公网安备 33010602011771号