abp(net core)+easyui+efcore实现仓储管理系统——展现层实现增删改查之列表视图(七)
abp(net core)+easyui+efcore实现仓储管理系统目录
abp(net core)+easyui+efcore实现仓储管理系统——ABP总体介绍(一)
abp(net core)+easyui+efcore实现仓储管理系统——解决方案介绍(二)
abp(net core)+easyui+efcore实现仓储管理系统——领域层创建实体(三)
abp(net core)+easyui+efcore实现仓储管理系统——定义仓储并实现 (四)
abp(net core)+easyui+efcore实现仓储管理系统——创建应用服务(五)
abp(net core)+easyui+efcore实现仓储管理系统——展现层实现增删改查之控制器(六)
上接上一篇文章(abp(net core)+easyui+efcore实现仓储管理系统——展现层实现增删改查之控制器(六))。
二、创建Index视图
在首页中,我们一般会用列表来展示信息。为了使用ASP.NET MVC Core强视图带给我们的好处(模型绑定、输入校验等等),我们需要创建一个ViewModel来进行模型绑定。因为ABP提倡为每个不同的应用服务提供不同的Dto进行数据交互,展示对应Dto。那我们创建的ViewModel就需要包含这几个模型,方可在一个视图中完成多个模型的绑定。
1,创建视图模型
1) 在Visual Studio 2017的“解决方案资源管理器”中,右键单击在领域层“ABP.TPLMS.Web.Mvc”项目中的Models目录。 选择“添加” > “新建文件夹”。并将文件夹命名为“Module”。
2) 鼠标右键单击“Module”文件夹,然后选择“添加” > “类”。 将类命名为 EditModuleModalViewModel,代码如下。
using System.Collections.Generic;
using System.Linq;
using ABP.TPLMS.Modules.Dto;

namespace ABP.TPLMS.Web.Models.Module
{
    public class EditModuleModalViewModel
    {
        public CreateUpdateModuleDto Module { get; set; }

        public IReadOnlyList<ModuleDto> Modules { get; set; }

    }
}
2,创建列表视图
1) 在Visual Studio 2017的“解决方案资源管理器”中,右键单击在展现层“ABP.TPLMS.Web.Mvc”项目中的Views目录。 选择“添加” > “新建文件夹”。并将文件夹命名为“Module”。
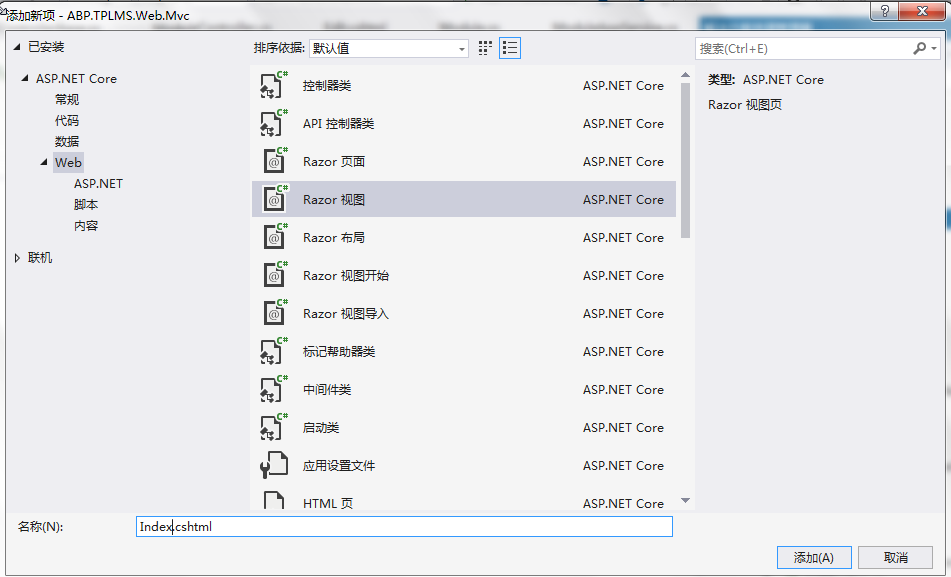
2) 鼠标右键单击“Module”文件夹,然后选择“添加” > “新建项…”。 在“添加新项-ABP.TPLMS.Web.Mvc”对话框中,选择“Razor视图”,并将名称命名为Index.cshmtl,如下图。
3) 在Index视图中,我们通过循环遍历,输出模块信息。代码如下。
@using ABP.TPLMS.Web.Startup
@model ABP.TPLMS.Web.Models.Module.EditModuleModalViewModel

@{
    ViewData["Title"] = PageNames.Module;
}
@section scripts
    {
        <script src="~/view-resources/Views/Module/Index.js" asp-append-version="true"></script>
   }


<div class="row clearfix">
    <div class="col-lg-12 col-md-12 col-sm-12 col-xs-12">
        <div class="card">
            <div class="header">
                <h2>
                    @L("Module")
                </h2>
                <ul class="header-dropdown m-r--5">
                    <li class="dropdown">
                        <a href="javascript:void(0);" class="dropdown-toggle" data-toggle="dropdown"
 role="button" aria-haspopup="true" aria-expanded="false"><i class="material-icons">more_vert</i>
                        </a>
                        <ul class="dropdown-menu pull-right">

                            <li><a id="RefreshButton" href="javascript:void(0);"
class="waves-effect waves-block"><i class="material-icons">refresh</i>@L("Refresh")</a></li>
                        </ul>
                    </li>
                </ul>
            </div>
            <div class="body table-responsive">

                <table class="table">
                    <thead>
                        <tr>
                            <th>
                                @Html.DisplayNameFor(model => model.Module.Name)

                            </th>

                            <th>

                                @Html.DisplayNameFor(model => model.Module.DisplayName)
                            </th>
                            <th>
                                @Html.DisplayNameFor(model => model.Module.HotKey)
                            </th>
                            <th>
                                @Html.DisplayNameFor(model => model.Module.IconName)
                            </th>
                            <th>
                                @Html.DisplayNameFor(model => model.Module.RequiredPermissionName)
                            </th>
                            <th>
                                @Html.DisplayNameFor(model => model.Module.Status)
                            </th>
                            <th></th>
                        </tr>
                    </thead>
                    <tbody>
                        @foreach (var item in Model.Modules)
                        {
                            <tr>
                                <td>
                                    @Html.DisplayFor(modelItem => item.Name)

                                </td>
                                <td>
                                    @Html.DisplayFor(modelItem => item.DisplayName)
                                </td>
                                <td>
                                    @Html.DisplayFor(modelItem => item.HotKey)
                                </td>
                                <td>
                                    @Html.DisplayFor(modelItem => item.IconName)
                                </td>
                                <td>
                                    @Html.DisplayFor(modelItem => item.RequiredPermissionName)
                                </td>
                                <td>
                                    @Html.DisplayFor(modelItem => item.Status)
                                </td>
                                <td class="dropdown">

                                    <a href="#" class="dropdown-toggle" data-toggle="dropdown"
role="button" aria-haspopup="true" aria-expanded="false"><i class="material-icons">menu</i>
                                   </a>
                                    <ul class="dropdown-menu pull-right">
                                        <li>
                                            <a asp-action="Edit" class="waves-effect waves-block"
 asp-route-id="@item.Id"><i class="material-icons">edit</i>@L("Edit")</a>
                                        </li>
                                        <li>
                                            <a asp-action="Delete" class="waves-effect waves-block"
 asp-route-id="@item.Id"><i class="material-icons">delete_sweep</i>@L("Delete")</a>
                                        </li>
                                    </ul>

                                </td>
                            </tr>
                        }

                    </tbody>

                </table>

                <a asp-action="Create"
class="btn btn-primary btn-circle waves-effect waves-circle waves-float pull-right">
<i class="material-icons">add</i></a>
            </div>
        </div>
    </div>
</div>
4) 在Visual Studio 2017中按F5运行应用程序,在登录之后,我们在浏览器中输入http://localhost:5000/Module。如下图。


 浙公网安备 33010602011771号