android 登录页面的实现
 这段时间在尝试写一个有完整的登录和数据传输的app,而这样一个项目需要实现的第一步自然就是登录。其实我之前写过的校园网登录的app里get和post的过程就已经有一个登录的雏形,不过正好现在来完整的实现这样一个过程。
这段时间在尝试写一个有完整的登录和数据传输的app,而这样一个项目需要实现的第一步自然就是登录。其实我之前写过的校园网登录的app里get和post的过程就已经有一个登录的雏形,不过正好现在来完整的实现这样一个过程。
android 登陆页面的实现 - Chi4ki - 博客园 (cnblogs.com)
一、项目基础的配置
首先我们新建一个名为loginTest的项目,创建完成后在manifests里加上对互联网权限的添加:
    <uses-permission android:name="android.permission.ACCESS_NETWORK_STATE" />
    <uses-permission android:name="android.permission.INTERNET" />
并在application中加上这样一句:android:usesCleartextTraffic="true",具体的位置我前面关于校园网的文章里也写过。
接下来就是依赖库的配置,在settings.gradle中加入:maven { url "https://jitpack.io"},同时因为这里我准备使用okhttp3来方便的实现get和post的实现,所以在build.gradle中加上这么一句:
implementation 'com.squareup.okhttp3:okhttp:4.9.0'
然后sync即可。
除了上面这些必须的配置外,我们也来对页面进行简单的一个美化:将themes.xml中的parent=后面的样式中选择NoActionBar的,这样手机app上侧就不会有很大的一个状态栏了。然后再将colorPrimaryVariant的颜色修改一下,这个属性对应的就是app里面最顶部显示栏的颜色,这里我是改成了灰色(#777777)。同时注意,themes文件夹里有两个themes.xml,对应的是正常和夜间模式,两个都要对应进行修改。
二、工具类的准备
1、get/post和对返回值用正则表达式进行截取
之前我写过get和post在不引入第三方库的时候实现的方法,那么这里我们尝试使用一下okhttp来实现试试,建立一个utils的文件夹,然后在里面新建一个http的java类,将功能直接写在这里面:
public static String sendGet(String url) {
        String text="";
        try {
            OkHttpClient client = new OkHttpClient();
            Request request = new Request.Builder()
                    .url(url)
                    .build();
            Response response = null;
            response = client.newCall(request).execute();
            if (response.isSuccessful()) {
                Log.d("tag", "response.code()==" + response.code());
                Log.d("tag", "response.message()==" + response.message());
                text=response.body().string();
                Log.d("tag", "res==" + text);
            }
        } catch (Exception e) {
            e.printStackTrace();
            return "";
        }
        return text;
    }
    public static String sendPost(String url, FormBody.Builder formBody) {
        String text="";
        try {
            OkHttpClient client = new OkHttpClient();
            Request request = new Request.Builder()
                    .url(url)
                    .post(formBody.build())
                    .build();
            Response response = null;
            response=client.newCall(request).execute();
            if (response.isSuccessful()) {
                Log.d("tag", "response.code()==" + response.code());
                Log.d("tag", "response.message()==" + response.message());
                text=response.body().string();
                Log.d("tag", "res==" + text);
            }
        } catch (Exception e) {
            e.printStackTrace();
            return "";
        }
        return text;
    }
其中FormBody.Builder也是okhttp中的,使用的时候先创建一个FormBody.Builder,然后往里面添加键值对即可,例如:
                FormBody.Builder formBody = new FormBody.Builder();
                formBody.add("userName",edtName.getText().toString());
                formBody.add("password",edtPwd.getText().toString());
                String text=http.sendPost(ip1, formBody);
注意要在线程中进行访问。
然后我们还是用正则表达式来完成对返回值的截取,同样在http类中添加函数:
/**
     *pat:正则表达式
     *text:检索文本
     */
    public static String search(String pat, String text) {
        Pattern r = Pattern.compile(pat);
        Matcher m = r.matcher(text);
        if (m.find()) {
            return m.group(1);
        } else {
            return "";
        }
    }
这里我返回的是第一个截取到的对象,如果有别的需要改一下return m.group(1);就行。
那么写到这里,我们来做个简单的测试,将activity_main.xml的代码写成:
<?xml version="1.0" encoding="utf-8"?>
<androidx.constraintlayout.widget.ConstraintLayout xmlns:android="http://schemas.android.com/apk/res/android"
    xmlns:app="http://schemas.android.com/apk/res-auto"
    xmlns:tools="http://schemas.android.com/tools"
    android:layout_width="match_parent"
    android:layout_height="match_parent"
    tools:context=".MainActivity">
    <androidx.appcompat.widget.Toolbar
        android:id="@+id/toolbar"
        android:layout_width="match_parent"
        android:layout_height="?attr/actionBarSize"
        android:background="#ffd5ce"
        tools:ignore="MissingConstraints" />

    <Button
        android:id="@+id/button"
        android:layout_width="wrap_content"
        android:layout_height="wrap_content"
        android:text="get"
        android:background="#ff0000"
        android:textColor="@color/white"
        android:textSize="20sp"
        app:layout_constraintBottom_toBottomOf="parent"
        app:layout_constraintEnd_toEndOf="parent"
        app:layout_constraintStart_toStartOf="parent"
        app:layout_constraintTop_toTopOf="@+id/toolbar" />

</androidx.constraintlayout.widget.ConstraintLayout>
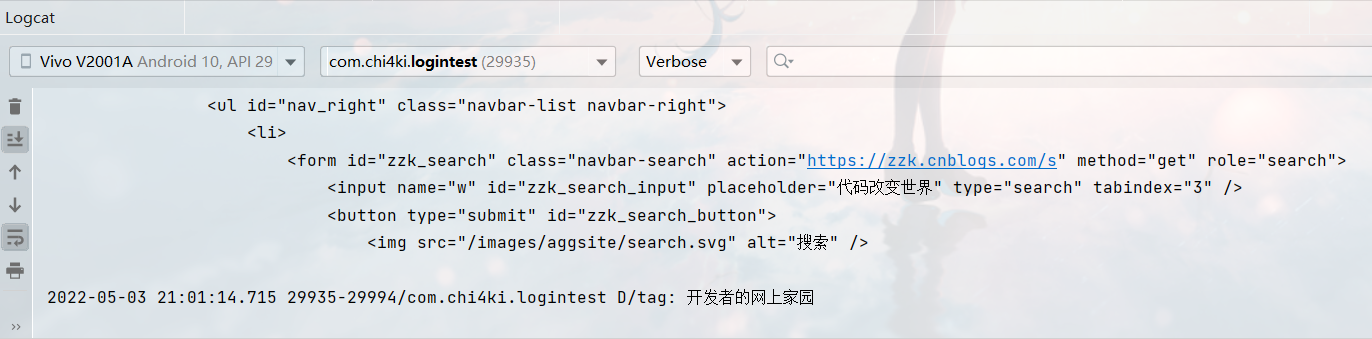
很简单,就是一个button,然后在MainActivity中做个监听,按钮点击之后会Get我的博客,并用正则表达式筛选title的值:
package com.chi4ki.logintest;

import androidx.appcompat.app.AppCompatActivity;

import android.content.Intent;
import android.os.Bundle;
import android.util.Log;
import android.view.View;
import android.widget.Button;

import com.chi4ki.logintest.utils.http;

public class MainActivity extends AppCompatActivity {
    @Override
    protected void onCreate(Bundle savedInstanceState) {
        super.onCreate(savedInstanceState);
        setContentView(R.layout.activity_main);
        Button btn = getWindow().findViewById(R.id.button);
        btn.setOnClickListener(new btnClickListener());
    }
    class btnClickListener implements View.OnClickListener{
        @Override
        public void onClick(View v) {
            Integer id=v.getId();
            if(id.equals(R.id.button)){
                new Thread(()->{
                    String ip="https://www.cnblogs.com/chi4ki";
                    String text = http.sendGet(ip);
                    String title=http.search("title=\"([^\"]*)\"", text);
                    Log.d("tag",title);
                }).start();
            }
        }
    }
}
在真机上进行测试:
ok,没有问题。
2、json解析
那么是不是http这个工具类就完成了呢,其实还是有所欠缺的。我们在get/post后获得对应接口返回的值,这里通常后端返回的是一段json文本,比如:
{
    "success": true,
    "token": "dXNlck5hbWU6YWJjLHRpbWU6MjAyMjA2MTE=",
    "type": 4
}
现在登录界面写一个对应的正则表达式来获取没有问题,但当数据量大的时候我们再根据json的每一个写对应的正则表达式,实际上很麻烦,所以这时候我们需要进行json解析,以下是我重新修改后的http类:
package com.chi4ki.logintest.utils;

import android.util.Log;

import org.json.JSONException;
import org.json.JSONObject;

import java.io.IOException;
import java.util.regex.Matcher;
import java.util.regex.Pattern;

import okhttp3.FormBody;
import okhttp3.OkHttpClient;
import okhttp3.Request;
import okhttp3.Response;

public class http {
    public static String sendGet(String url) {
        String text="";
        try {
            OkHttpClient client = new OkHttpClient();
            Request request = new Request.Builder()
                    .url(url)
                    .build();
            Response response = null;
            response = client.newCall(request).execute();
            if (response.isSuccessful()) {
                Log.d("tag", "response.code()==" + response.code());
                Log.d("tag", "response.message()==" + response.message());
                text=response.body().string();
                Log.d("tag", "res==" + text);
            }
        } catch (Exception e) {
            e.printStackTrace();
            return "";
        }
        return text;
    }
    public static String sendPost(String url, FormBody.Builder formBody) {
        String text="";
        try {
            OkHttpClient client = new OkHttpClient();
            Request request = new Request.Builder()
                    .url(url)
                    .post(formBody.build())
                    .build();
            Response response = null;
            response=client.newCall(request).execute();
            if (response.isSuccessful()) {
                Log.d("tag", "response.code()==" + response.code());
                Log.d("tag", "response.message()==" + response.message());
                text=response.body().string();
                Log.d("tag", "res==" + text);
            }
        } catch (Exception e) {
            e.printStackTrace();
            return "";
        }
        return text;
    }
    public static String sendPost(String url,FormBody.Builder formBody,String tokenName,String token) {
        String text="";
        try {
            OkHttpClient client = new OkHttpClient();
            Request request = new Request.Builder()
                    .url(url)
                    .addHeader(tokenName,token)
                    .post(formBody.build())
                    .build();
            Response response = null;
            response=client.newCall(request).execute();
            if (response.isSuccessful()) {
                Log.d("tag", "response.code()==" + response.code());
                Log.d("tag", "response.message()==" + response.message());
                Log.d("tag", "res==" + response.body().string());
                text=response.body().string();
                Log.d("tag", "res==" + text);
            }
        } catch (Exception e) {
            e.printStackTrace();
            return "";
        }
        return text;
    }
    public static String parseJsonWithJsonObject_string(String responseData, String search) throws IOException {
        String str="";
        try{
            JSONObject jsonObject=new JSONObject(responseData);
            str=jsonObject.getString(search);
        } catch (JSONException e) {
            e.printStackTrace();
            return "";
        }
        return str;
    }
    public static boolean parseJsonWithJsonObject_boolean(String responseData, String search) throws IOException {
        boolean boo=false;
        try{
            JSONObject jsonObject=new JSONObject(responseData);
            boo=jsonObject.getBoolean(search);
        } catch (JSONException e) {
            e.printStackTrace();
            return false;
        }
        return boo;
    }
    public static int parseJsonWithJsonObject_int(String responseData, String search) throws IOException {
        int num=0;
        try{
            JSONObject jsonObject=new JSONObject(responseData);
            num=jsonObject.getInt(search);
        } catch (JSONException e) {
            e.printStackTrace();
            return 0;
        }
        return num;
    }
    /**
     *pat:正则表达式
     *text:检索文本
     */
    public static String search(String pat, String text) {
        Pattern r = Pattern.compile(pat);
        Matcher m = r.matcher(text);
        if (m.find()) {
            return m.group(1);
        } else {
            return "";
        }
    }
}
我这里新增了三个函数用来获取json中对应的boolean/int/String,当然这里也需要一个个对应,如果涉及到大批量的数据那还需要对函数再进行改写用列表来进一步简化操作,当然这些就等之后具体情况再说了。使用实例:
                FormBody.Builder formBody = new FormBody.Builder();
                formBody.add("userName",edtName.getText().toString());
                formBody.add("password",edtPwd.getText().toString());
                String text=http.sendPost(ip1, formBody);
                int type=http.parseJsonWithJsonObject_int(text,"type");
                boolean success=http.parseJsonWithJsonObject_boolean(text,"success");
                String token=http.parseJsonWithJsonObject_string(text,"token");
好了,以上这些函数足够我们来完成登录的界面了,不过我们再新增一个工具类SPUtils,将SharedPreferences的存储写成几个函数来方便使用(摘自博客(26条消息) Android 更换用户头像(拍照、相册选取)_初学者-Study的博客-CSDN博客_android 用户头像 )。
package com.chi4ki.eggdemo.utils;

import android.content.Context;
import android.content.SharedPreferences;

/**
 * sharepref工具类
 */
public class SPUtils {
    private static final String NAME="config";
    public static void putBoolean(String key, boolean value, Context context) {
        SharedPreferences sp = context.getSharedPreferences(NAME,
                Context.MODE_PRIVATE);
        sp.edit().putBoolean(key, value).commit();
    }

    public static boolean getBoolean(String key, boolean defValue, Context context) {
        SharedPreferences sp = context.getSharedPreferences(NAME,
                Context.MODE_PRIVATE);
        return sp.getBoolean(key, defValue);
    }

    public static void putString(String key, String value, Context context) {
        SharedPreferences sp = context.getSharedPreferences(NAME,
                Context.MODE_PRIVATE);
        sp.edit().putString(key, value).commit();
    }

    public static String getString(String key, String defValue, Context context) {
        if(context!=null){
            SharedPreferences sp = context.getSharedPreferences(NAME,
                    Context.MODE_PRIVATE);
            return sp.getString(key, defValue);
        }
        return "";

    }

    public static void putInt(String key, int value, Context context) {
        SharedPreferences sp = context.getSharedPreferences(NAME,
                Context.MODE_PRIVATE);
        sp.edit().putInt(key, value).commit();
    }


    public static int getInt(String key, int defValue, Context context) {
        SharedPreferences sp = context.getSharedPreferences(NAME,
                Context.MODE_PRIVATE);
        return sp.getInt(key, defValue);
    }

    public static void remove(String key, Context context) {
        SharedPreferences sp = context.getSharedPreferences(NAME,
                Context.MODE_PRIVATE);
        sp.edit().remove(key).commit();
    }


}
三、注册界面的实现
1、代码逻辑
虽然登录和注册界面差不多,不过为了方便一点,我就先写一下注册界面如何来实现。首先我们对应注册界面创建一个mode0的文件夹,在里面创建registerActivity,然后在layout中创建一个activity_register.xml对应。
接下来想一下注册的过程:首先需要用户输入用户名和密码,并对密码做确认,然后由于我这里的实际需要还要做一个下拉框来选择用户的身份,最后一个按钮点击后实现注册,那么我们这里先创建一个values.xml写上对应下拉框身份的值:
<?xml version="1.0" encoding="utf-8"?>
<resources>
    <string-array name="role">
        <item>请选择你的身份</item>
        <item>1</item>
        <item>2</item>
        <item>3</item>
        <item>4</item>
    </string-array>
</resources>
这里我为方便就用数字来代表身份了,实际中肯定不能这样。然后我们来写activity_register.xml的代码:
<?xml version="1.0" encoding="utf-8"?>
<LinearLayout xmlns:android="http://schemas.android.com/apk/res/android"
    xmlns:app="http://schemas.android.com/apk/res-auto"
    android:layout_width="match_parent"
    android:layout_height="match_parent"
    xmlns:tools="http://schemas.android.com/tools"
    android:gravity="top"
    android:fitsSystemWindows="true"
    android:orientation="vertical">

    <androidx.appcompat.widget.Toolbar
        android:id="@+id/toolbar"
        android:background="#fbf4e7"
        android:layout_width="match_parent"
        android:layout_height="?attr/actionBarSize"
        app:navigationIcon="@drawable/ic_back"
        tools:ignore="MissingConstraints" />
    <View
        android:layout_width="match_parent"
        android:layout_height="30dp" />
    <TextView
        android:layout_width="wrap_content"
        android:layout_height="40dp"
        android:layout_marginStart="30dp"
        android:text="注册账户"
        android:textSize="28sp"
        android:textColor="@color/black"/>
    <EditText
        android:id="@+id/userName"
        android:layout_width="300dp"
        android:layout_height="64dp"
        android:ems="10"
        android:layout_marginStart="30dp"
        android:inputType="textPersonName"
        android:hint="请输入用户名" />

    <EditText
        android:id="@+id/passward_first"
        android:layout_marginStart="30dp"
        android:layout_width="300dp"
        android:layout_height="60dp"
        android:ems="10"
        android:inputType="textPassword"
        android:hint="请输入密码" />
    <EditText
        android:id="@+id/passward_confirm"
        android:layout_marginStart="30dp"
        android:layout_width="300dp"
        android:layout_height="60dp"
        android:ems="10"
        android:inputType="textPassword"
        android:hint="请再次输入密码" />

    <Spinner
        android:id="@+id/spinner"
        android:layout_width="300dp"
        android:layout_height="48dp"
        android:layout_marginStart="30dp"
        android:entries="@array/role" />

    <View
        android:layout_width="match_parent"
        android:layout_height="30dp" />
    <Button
        android:id="@+id/btn_register"
        android:layout_width="wrap_content"
        android:layout_height="wrap_content"
        android:text="注册"
        android:layout_marginStart="240dp" />
</LinearLayout>
这里的@drawable/ic_back对应的图标是右击drawable-new-vector asset然后检索arrow back图标并添加。
然后我们思考一下对应activity的实现,注册按钮点击后我们应获取对应几个edittext的值,如果为空则提示输入,并对密码进行确认,没问题后发送post,然后服务器返回给我们一个对应的json文本,目前我只需要其中一个数据的true/false来确认是否注册成功就行,成功结束activity返回页面,不成功目前统一提示注册失败:
package com.chi4ki.logintest.mode0;

import android.os.Bundle;
import android.util.Log;
import android.view.View;
import android.widget.AdapterView;
import android.widget.Button;
import android.widget.EditText;
import android.widget.Spinner;
import android.widget.Toast;

import androidx.appcompat.app.AppCompatActivity;

import com.chi4ki.logintest.R;
import com.chi4ki.logintest.utils.http;

import okhttp3.FormBody;

public class registerActivity extends AppCompatActivity {
    private final String ip="http://192.168.50.170:4523/mock/935584/register";
    private String type="0";
    @Override
    public void onCreate(Bundle savedInstanceState){
        super.onCreate(savedInstanceState);
        setContentView(R.layout.activity_register);
        Button btn_login = getWindow().findViewById(R.id.btn_register);
        btn_login.setOnClickListener(new registerClickListener());
        Spinner spinner=findViewById(R.id.spinner);
        spinner.setOnItemSelectedListener(new ProvOnItemSelectedListener());
    }
    //下拉框的监听
    private class  ProvOnItemSelectedListener implements AdapterView.OnItemSelectedListener {
        @Override
        public void onItemSelected(AdapterView<?> adapter,View view,int position,long id) {
            String sInfo=adapter.getItemAtPosition(position).toString();
            if(sInfo.equals("1")) type="1";
            if(sInfo.equals("2")) type="2";
            if(sInfo.equals("3")) type="3";
            if(sInfo.equals("4")) type="4";
            if(sInfo.equals("请选择你的身份")) type="0";
        }

        @Override
        public void onNothingSelected(AdapterView<?> arg0) {
            String sInfo="null";
        }
    }
    class registerClickListener implements View.OnClickListener{
        @Override
        public void onClick(View v) {
            if(v.getId()==R.id.btn_register){
                EditText userName = getWindow().findViewById(R.id.userName);
                EditText password = getWindow().findViewById(R.id.passward_first);
                EditText password2 = getWindow().findViewById(R.id.passward_confirm);
                String name=userName.getText().toString();
                String pwd=password.getText().toString();
                String pwd2=password2.getText().toString();
                boolean judge=true;
                if(name.equals("")){
                    showMsg("请输入用户名");
                    judge=false;
                }else if(pwd.equals("")){
                    showMsg("请输入密码");
                    judge=false;
                }else if(pwd2.equals("")){
                    showMsg("请确认密码");
                    judge=false;
                }else if(!pwd2.equals(pwd)){
                    showMsg("密码不一致");
                    judge=false;
                }else if(type.equals("0")){
                    showMsg("请选择您的身份");
                    judge=false;
                }
                if(judge){
                    new Thread(()->{
                        try {
                            FormBody.Builder formBody = new FormBody.Builder();
                            formBody.add("userName",name);
                            formBody.add("password",pwd);
                            formBody.add("role",type);
                            String text = http.sendPost(ip, formBody);
                            boolean status=http.parseJsonWithJsonObject_boolean(text,"success");
                            Log.d("tag",status+"\n"+text);
                            if (status) {
                                showMsg_thread("你已经成功创建账号,快去登陆吧");
                                finish();
                            } else showMsg_thread("注册失败");
                        }catch (Exception e) {
                            e.printStackTrace();
                        }
                    }).start();
                }
            }
        }
    }
    private void showMsg(String msg){
        Toast.makeText(this,msg,Toast.LENGTH_SHORT).show();
    }
    private void showMsg_thread(String msg){
        runOnUiThread(()->Toast.makeText(getApplicationContext(),msg,Toast.LENGTH_SHORT).show());
    }

}
以上,然后为了测试我们再MainActivity中加入一个对应的按钮来实现页面的跳转就行,首先是activity_main.xml:
<?xml version="1.0" encoding="utf-8"?>
<androidx.constraintlayout.widget.ConstraintLayout xmlns:android="http://schemas.android.com/apk/res/android"
    xmlns:app="http://schemas.android.com/apk/res-auto"
    xmlns:tools="http://schemas.android.com/tools"
    android:layout_width="match_parent"
    android:layout_height="match_parent"
    tools:context=".MainActivity">
    <androidx.appcompat.widget.Toolbar
        android:id="@+id/toolbar"
        android:layout_width="match_parent"
        android:layout_height="?attr/actionBarSize"
        android:background="#ffd5ce"
        tools:ignore="MissingConstraints" />

    <Button
        android:id="@+id/button"
        android:layout_width="wrap_content"
        android:layout_height="wrap_content"
        android:text="注册"
        android:background="#ff0000"
        android:textColor="@color/white"
        android:textSize="20sp"
        app:layout_constraintBottom_toBottomOf="parent"
        app:layout_constraintEnd_toEndOf="parent"
        app:layout_constraintStart_toStartOf="parent"
        app:layout_constraintTop_toTopOf="@+id/toolbar" />

</androidx.constraintlayout.widget.ConstraintLayout>
对应的MainActivity:
package com.chi4ki.logintest;

import androidx.appcompat.app.AppCompatActivity;

import android.content.Intent;
import android.os.Bundle;
import android.util.Log;
import android.view.View;
import android.widget.Button;

import com.chi4ki.logintest.mode0.registerActivity;
import com.chi4ki.logintest.utils.http;

public class MainActivity extends AppCompatActivity {
    @Override
    protected void onCreate(Bundle savedInstanceState) {
        super.onCreate(savedInstanceState);
        setContentView(R.layout.activity_main);
        Button btn = getWindow().findViewById(R.id.button);
        btn.setOnClickListener(new btnClickListener());
    }
    class btnClickListener implements View.OnClickListener{
        @Override
        public void onClick(View v) {
            Integer id=v.getId();
            if(id.equals(R.id.button)){
                startActivity(new Intent(MainActivity.this, registerActivity.class));
            }
        }
    }
}
然后注意,添加新的activity要在manifests里加上对应的注册:
<activity android:name=".mode0.registerActivity"/>
位置和里面的MainActivity并列。
2、用apifox进行接口模拟
那么,我们写好这样的程序,但像比如现在这种自行尝试的时候,又或者后端还没有给我们需要的环境,这种时候该如何测试呢?这里我是使用apifox来进行一个接口的模拟。
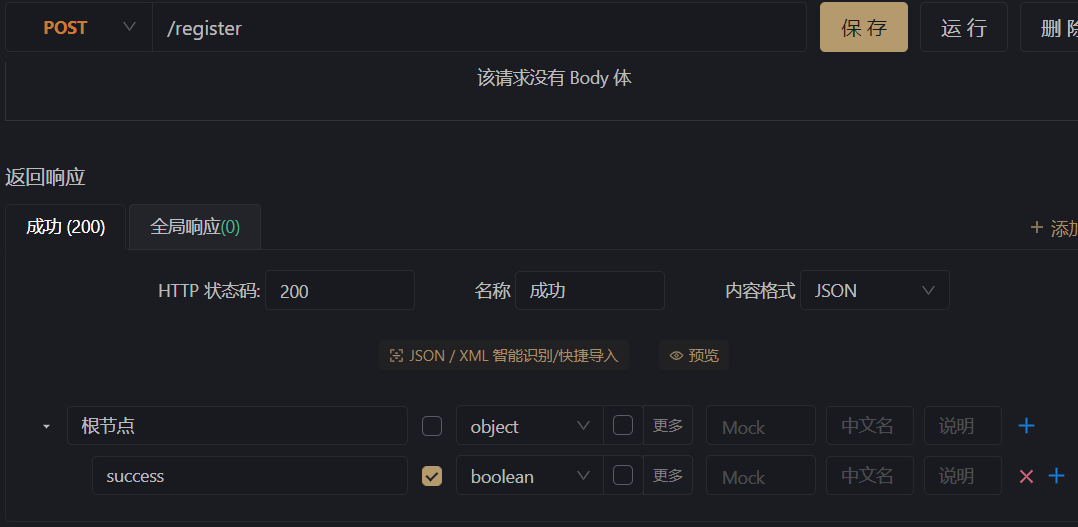
首先我们在apifox中创建一个项目,并建立我们需要的接口,将接口中的请求参数和相应参数写上我们发送的和需要的值,然后运行,此时电脑上就模拟了这样一个接口环境。这样只要我们手机和电脑连接在同一个局域网内,在电脑cmd中输入ipconfig找到wlan的ipv4地址,然后将apifox中url的127.0.0.1对应进行修改,手机上就可以进行访问了。像这里wlan连接的ipv4地址是192.168.50.170,模拟的url是http://127.0.0.1:4523/mock/935584/register,那么我们就可以对"http://192.168.50.170:4523/mock/935584/register"进行访问,来模拟返回值进行测试。
测试成功:

以上,注册部分就成功完成了。
四、登录页面的实现
首先我们先写一下登录成功后跳转的页面,因为我这里是四个身份,所以就对应四个activity,因为都还没写所以代码几乎一样,就只贴一个了,activity_mode1.xml:
<?xml version="1.0" encoding="utf-8"?>
<RelativeLayout xmlns:android="http://schemas.android.com/apk/res/android"
    xmlns:app="http://schemas.android.com/apk/res-auto"
    xmlns:tools="http://schemas.android.com/tools"
    android:layout_width="match_parent"
    android:id="@+id/drawer_layout"
    android:fitsSystemWindows="true"
    android:layout_height="match_parent"
    tools:context="com.chi4ki.">

    <androidx.viewpager.widget.ViewPager
        android:id="@+id/view_pager"
        android:layout_width="match_parent"
        android:layout_height="match_parent"
        android:layout_above="@+id/tab_layout"
        android:layout_marginBottom="1dp" />

    <com.google.android.material.tabs.TabLayout
        android:id="@+id/tab_layout"
        android:layout_width="match_parent"
        android:layout_height="wrap_content"
        android:layout_alignParentBottom="true"
        android:background="#FFF"
        android:minHeight="?attr/actionBarSize"
        app:tabIndicatorColor="#00000000"
        app:tabRippleColor="#00000000"
        app:tabSelectedTextColor="#66CCFF"
        app:tabTextColor="#929299">
        <!--app:tabSelectedTextColor="#1296DB"-->


        <com.google.android.material.tabs.TabItem
            android:id="@+id/item_home"
            android:layout_width="wrap_content"
            android:layout_height="wrap_content"
            android:text="主页" />


        <com.google.android.material.tabs.TabItem
            android:id="@+id/item_mine"
            android:layout_width="wrap_content"
            android:layout_height="wrap_content"
            android:text="我的" />

    </com.google.android.material.tabs.TabLayout>
</RelativeLayout>
就写了一个Tablayout,其它什么也没有。对应的mode1Activity代码如下,这里加了一个对前一个activity参数的获取(用于我接下来对应登录页面的token传递):
package com.chi4ki.logintest.mode1;

import android.content.Intent;
import android.os.Bundle;
import android.util.Log;

import androidx.appcompat.app.AppCompatActivity;
import androidx.viewpager.widget.ViewPager;

import com.chi4ki.logintest.R;
import com.google.android.material.tabs.TabLayout;


public class mode1Activity extends AppCompatActivity {
    private TabLayout tabLayout;
    private ViewPager viewPager;
    final String[] titleArray = new String[]{"主页", "我的"};
    @Override
    protected void onCreate(Bundle savedInstanceState){
        super.onCreate(savedInstanceState);
        setContentView(R.layout.activity_mode1);
        Intent intent = getIntent();
        Log.d("tag","mode1:"+intent.getStringExtra("token"));
    }
}
接着我们来重新写一下登录页面的布局,也就是activity_main.xml:
<?xml version="1.0" encoding="utf-8"?>
<androidx.constraintlayout.widget.ConstraintLayout xmlns:android="http://schemas.android.com/apk/res/android"
    xmlns:app="http://schemas.android.com/apk/res-auto"
    xmlns:tools="http://schemas.android.com/tools"
    android:layout_width="match_parent"
    android:layout_height="match_parent"
    tools:context=".MainActivity">
    <androidx.appcompat.widget.Toolbar
        android:id="@+id/toolbar"
        android:layout_width="match_parent"
        android:layout_height="?attr/actionBarSize"
        android:background="#ffd5ce"
        tools:ignore="MissingConstraints" />

    <EditText
        android:id="@+id/userName"
        android:layout_width="240dp"
        android:layout_height="64dp"
        android:layout_marginTop="188dp"
        android:ems="10"
        android:inputType="textPersonName"
        android:hint="请输入用户名"
        app:layout_constraintEnd_toEndOf="parent"
        app:layout_constraintHorizontal_bias="0.497"
        app:layout_constraintStart_toStartOf="parent"
        app:layout_constraintTop_toTopOf="parent" />

    <EditText
        android:id="@+id/passward"
        android:layout_width="240dp"
        android:layout_height="60dp"
        android:ems="10"
        android:hint="请输入密码"
        android:inputType="textPassword"
        app:layout_constraintBottom_toBottomOf="parent"
        app:layout_constraintEnd_toEndOf="parent"
        app:layout_constraintHorizontal_bias="0.497"
        app:layout_constraintStart_toStartOf="parent"
        app:layout_constraintTop_toBottomOf="@+id/userName"
        app:layout_constraintVertical_bias="0.0" />

    <Button
        android:id="@+id/btn_login"
        android:layout_width="163dp"
        android:layout_height="63dp"
        android:text="登录"
        app:layout_constraintBottom_toBottomOf="parent"
        app:layout_constraintEnd_toEndOf="parent"
        app:layout_constraintStart_toStartOf="parent"
        app:layout_constraintTop_toBottomOf="@+id/passward" />

    <TextView
        android:id="@+id/tv_register"
        android:layout_width="wrap_content"
        android:layout_height="wrap_content"
        android:text="没有账户?请先注册"
        android:textColor="#285bd7"
        app:layout_constraintBottom_toBottomOf="parent"
        app:layout_constraintEnd_toEndOf="parent"
        app:layout_constraintHorizontal_bias="0.498"
        app:layout_constraintStart_toStartOf="parent"
        app:layout_constraintTop_toBottomOf="@+id/btn_login"
        app:layout_constraintVertical_bias="0.203" />

</androidx.constraintlayout.widget.ConstraintLayout>
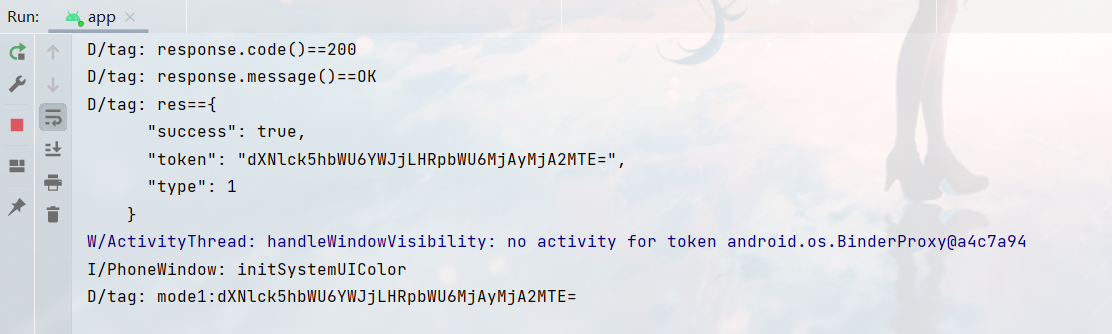
然后我们来实现对应的代码,这里相较于登录,我们只需要发送用户名和密码,但是要收到三个参数来确认,分别是登录是否正确、身份以及用于之后请求的token,token再传入给下一个activity,代码如下:
package com.chi4ki.logintest;

import androidx.appcompat.app.AppCompatActivity;

import android.content.Intent;
import android.os.Bundle;
import android.view.View;
import android.widget.Button;
import android.widget.EditText;
import android.widget.Toast;

import com.chi4ki.logintest.mode0.registerActivity;
import com.chi4ki.logintest.mode1.mode1Activity;
import com.chi4ki.logintest.mode2.mode2Activity;
import com.chi4ki.logintest.mode3.mode3Activity;
import com.chi4ki.logintest.mode4.mode4Activity;
import com.chi4ki.logintest.utils.SPUtils;
import com.chi4ki.logintest.utils.http;
import com.chi4ki.logintest.R;

import org.json.JSONArray;
import org.json.JSONException;
import org.json.JSONObject;

import java.io.IOException;

import okhttp3.FormBody;

public class MainActivity extends AppCompatActivity {
    private final String ip1="http://192.168.50.170:4523/mock/935584/login";
    EditText edtName,edtPwd;
    @Override
    protected void onCreate(Bundle savedInstanceState) {
        super.onCreate(savedInstanceState);
        setContentView(R.layout.activity_main);
        String login = SPUtils.getString("login",null,MainActivity.this);
        if(login != null) {
            if (login.equals("1")) {
                Intent intent=new Intent(MainActivity.this, mode1Activity.class);
                startActivity(intent);
                finish();
            }
            if (login.equals("2")) {
                Intent intent=new Intent(MainActivity.this, mode2Activity.class);
                startActivity(intent);
                finish();
            }
            if (login.equals("3")) {
                Intent intent=new Intent(MainActivity.this, mode3Activity.class);
                startActivity(intent);
                finish();
            }
            if (login.equals("4")) {
                Intent intent=new Intent(MainActivity.this,mode4Activity.class);
                startActivity(intent);
                finish();
            }
        }
        edtName=getWindow().findViewById(R.id.userName);
        edtPwd=getWindow().findViewById(R.id.passward);
        Button btn_login = getWindow().findViewById(R.id.btn_login);
        btn_login.setOnClickListener(new loginClickListener());
        View register = getWindow().findViewById(R.id.tv_register);
        register.setOnClickListener(new loginClickListener());
    }
    class loginClickListener implements View.OnClickListener{
        @Override
        public void onClick(View v) {
            Integer id=v.getId();
            if(id.equals(R.id.btn_login)){
                connect();
            }
            if(id.equals(R.id.tv_register)){
                startActivity(new Intent(MainActivity.this, registerActivity.class));
            }
        }
    }
    private void connect(){
        new Thread(()->{
            try{
                FormBody.Builder formBody = new FormBody.Builder();
                formBody.add("userName",edtName.getText().toString());
                formBody.add("password",edtPwd.getText().toString());
                String text=http.sendPost(ip1, formBody);
                int type=http.parseJsonWithJsonObject_int(text,"type");
                boolean success=http.parseJsonWithJsonObject_boolean(text,"success");
                String token=http.parseJsonWithJsonObject_string(text,"token");
                if (success) {
                    if (type==1) {
                        Intent intent=new Intent(MainActivity.this,mode1Activity.class);
                        intent.putExtra("token",token);
                        SPUtils.putString("login","1",MainActivity.this);
                        startActivity(intent);
                    }
                    if (type==2) {
                        Intent intent=new Intent(MainActivity.this,mode2Activity.class);
                        intent.putExtra("token",token);
                        SPUtils.putString("login","2",MainActivity.this);
                        startActivity(intent);
                    }
                    if (type==3) {
                        Intent intent=new Intent(MainActivity.this,mode3Activity.class);
                        intent.putExtra("token",token);
                        SPUtils.putString("login","3",MainActivity.this);
                        startActivity(intent);
                    }
                    if (type==4) {
                        Intent intent=new Intent(MainActivity.this,mode4Activity.class);
                        intent.putExtra("token",token);
                        SPUtils.putString("login","4",MainActivity.this);
                        startActivity(intent);
                    }
                } else {
                    showMsg_thread("fail");
                }
            }catch (Exception e) {
                e.printStackTrace();
            }
        }).start();
    }
    private void showMsg(String msg){
        Toast.makeText(this,msg,Toast.LENGTH_SHORT).show();
    }
    private void showMsg_thread(String msg){
        runOnUiThread(()->Toast.makeText(getApplicationContext(),msg,Toast.LENGTH_SHORT).show());
    }


}
这样功能就差不多实现了,不过要注意我在MainActivity中对应的登录成功同时还存储了一个参数,因为通常我们在成功登录以后启动app肯定不希望每次都还要在登录页面上,所以这里在onCreate函数里再做一个对于是否已经登录过的判断:
String login = SPUtils.getString("login",null,MainActivity.this);
        if(login != null) {
            if (login.equals("1")) {
                Intent intent=new Intent(MainActivity.this, mode1Activity.class);
                startActivity(intent);
                finish();
            }
            if (login.equals("2")) {
                Intent intent=new Intent(MainActivity.this, mode2Activity.class);
                startActivity(intent);
                finish();
            }
            if (login.equals("3")) {
                Intent intent=new Intent(MainActivity.this, mode3Activity.class);
                startActivity(intent);
                finish();
            }
            if (login.equals("4")) {
                Intent intent=new Intent(MainActivity.this,mode4Activity.class);
                startActivity(intent);
                finish();
            }
        }
对应的如果登录过就直接结束掉登录这个页面跳转到下一个页面,这样功能就完成了,至于密码更改或者token过期的情况,对应的再做一个跳转回登陆页面再修改存储的值应该就可以了。
然后再进行测试,记得不要忘了在manifests中加上activity的注册:
        <activity android:name=".mode1.mode1Activity"/>
        <activity android:name=".mode2.mode2Activity"/>
        <activity android:name=".mode3.mode3Activity"/>
        <activity android:name=".mode4.mode4Activity"/>
测试成功:
以上。不过要注意我这里get和post都是同步请求,而实际上最好应该还是都做成异步请求的,之后有时间我应该会再做个修改。
五、源代码

 浙公网安备 33010602011771号