


分库分表、读写分离
总览
什么是分表
数据角度:数据会分开存储 水平分表。结构没有变
字段角度(设计问题):字段分开。10个字段 5个字段。垂直分表
什么是分库
将一个数据库 分为多个数据库来存储
目的:解决海量数据存储问题电商系统
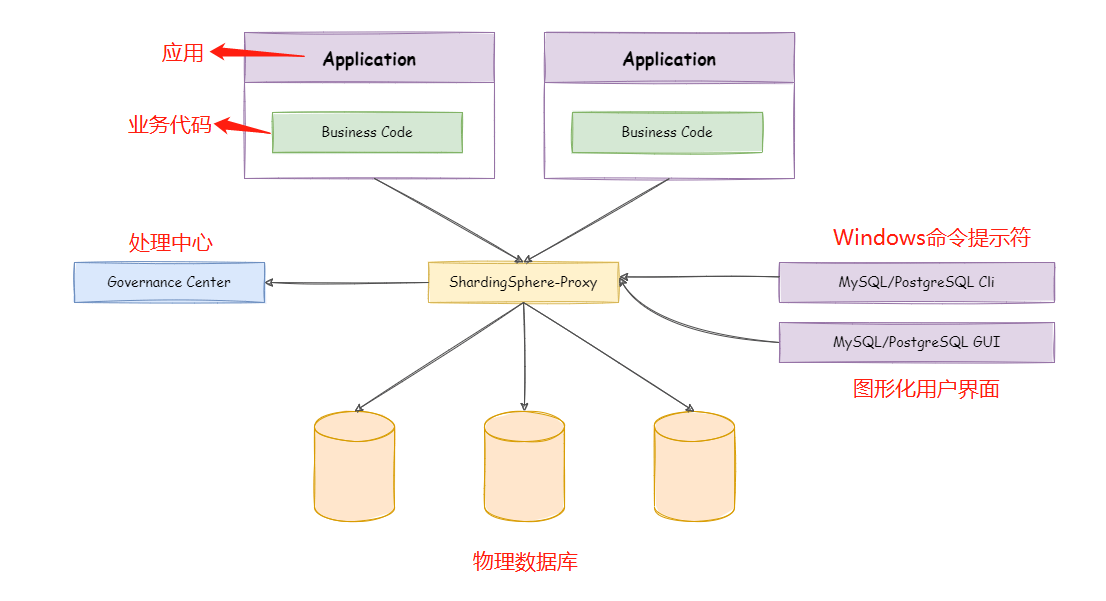
使用ShardingSphere-Proxy对Mysql数据库进行读写分离
条件:
1、seckillservices库,seckill表
2、Mysql 5.7
3、apache-shardingsphere-4.1.0-sharding-proxy
4、jdk1.8
5、mysql-connector-java-5.1.47.jar
步骤
MySql 准备
1、先安装MySql
安装软件:mysql-installer-community-5.7.32.0.msi
下载地址:https://downloads.mysql.com/archives/installer/
2、然后在Mysql中创建seckillservices 库 和seckill表


CREATE TABLE `seckills` (
    `Id` INT(11) NOT NULL AUTO_INCREMENT,
    `SeckillType` INT(11) NOT NULL,
    `SeckillName` CHAR(255) NULL,
    `SeckillUrl` CHAR(255) NULL,
    `SeckillPrice` DECIMAL(18,2) NOT NULL,
    `SeckillStock` INT(11) NOT NULL,
    `SeckillPercent` CHAR(255) NULL,
    `TimeId` INT(11) NOT NULL,
    `ProductId` INT(11) NOT NULL,
    `SeckillLimit` INT(11) NOT NULL,
    `SeckillDescription` CHAR(255) NULL,
    `SeckillIstop` INT(11) NOT NULL,
    `SeckillStatus` INT(11) NOT NULL,
    PRIMARY KEY (`Id`),
    INDEX `ProductId` (`ProductId`)
)
COLLATE='utf8mb4_general_ci'
ENGINE=InnoDB
AUTO_INCREMENT=2
;
sharding-proxy 准备
1、先下载jdk1.8
下载地址:https://www.oracle.com/cn/java/technologies/javase/javase-jdk8-downloads.html
2、然后下载mysql-connector-java-5.1.47.jar
下载地址: https://repo1.maven.org/maven2/mysql/mysql-connector-java/5.1.47/mysql-connector-java-5.1.47.jar
3、然后下载apache-shardingsphere-4.1.0-sharding-proxy
官网地址:https://shardingsphere.apache.org/
下载地址:https://archive.apache.org/dist/shardingsphere/4.1.0/
开发者文档地址:https://shardingsphere.apache.org/document/current/cn/dev-manual/
4、然后配置apache-shardingsphere-4.1.0-sharding-proxy
windows启动 进入到D:\work\net\sharding-proxy\apache-shardingsphere-4.1.0-sharding-proxy-bin\conf目录
config-sharding.yaml 准备
4.1 先配置数据源(用于连接Mysql数据库)
# 创建客户端连接库
schemaName: product

# 1、连接mysql
dataSources:
  productdatasources-0:
    url: jdbc:mysql://127.0.0.1:3306/product?serverTimezone=UTC&useSSL=false
    username: root
    password: root
    connectionTimeoutMilliseconds: 30000
    idleTimeoutMilliseconds: 60000
    maxLifetimeMilliseconds: 1800000
    maxPoolSize: 50
  productdatasources-1:
    url: jdbc:mysql://127.0.0.1:3308/product?serverTimezone=UTC&useSSL=false
    username: root
    password: root
    connectionTimeoutMilliseconds: 30000
    idleTimeoutMilliseconds: 60000
    maxLifetimeMilliseconds: 1800000
    maxPoolSize: 50

# 2、分片规则
shardingRule:
  tables: #表
    seckills: #逻辑表名
      actualDataNodes: productdatasources-${0..1}.seckills #分库分表
      #tableStrategy: #分表策越
        #inline:
         # shardingColumn: ProductId #分表字段
          #algorithmExpression: seckills-${ProductId % 2} #对ProductId取模分表

  defaultDatabaseStrategy: # 数据如何从不同数据库来进行存取
    inline:
      shardingColumn: Id #分库字段
      algorithmExpression: productdatasources-${Id % 2}  #对Id取模分库productdatasources-0
4.4 先配置访问逻辑库的权限
authentication:
  users:
    root:
      password: root
    sharding:
      password: sharding
      authorizedSchemas: products-proxy

props:
  max.connections.size.per.query: 1
  acceptor.size: 16  # The default value is available processors count * 2.
  executor.size: 16  # Infinite by default.
  proxy.frontend.flush.threshold: 128  # The default value is 128.
    # LOCAL: Proxy will run with LOCAL transaction.
    # XA: Proxy will run with XA transaction.
    # BASE: Proxy will run with B.A.S.E transaction.
  proxy.transaction.type: LOCAL
  proxy.opentracing.enabled: false
  proxy.hint.enabled: false
  query.with.cipher.column: true
  sql.show: false
  allow.range.query.with.inline.sharding: false
| 数据类型 | 说明 | 默认值 | |
|---|---|---|---|
| sql-show (?) | boolean | 是否在日志中打印 SQL。 打印 SQL 可以帮助开发者快速定位系统问题。日志内容包含:逻辑 SQL,真实 SQL 和 SQL 解析结果。 如果开启配置,日志将使用 Topic ShardingSphere-SQL,日志级别是 INFO。 |
false |
| sql-simple (?) | boolean | 是否在日志中打印简单风格的 SQL。 | false |
| executor-size (?) | int | 用于设置任务处理线程池的大小。每个 ShardingSphereDataSource 使用一个独立的线程池,同一个 JVM 的不同数据源不共享线程池。 | infinite |
| max-connections-size-per-query (?) | int | 一次查询请求在每个数据库实例中所能使用的最大连接数。 | 1 |
| check-table-metadata-enabled (?) | boolean | 是否在程序启动和更新时检查分片元数据的结构一致性。 | false |
| query-with-cipher-column (?) | boolean | 是否使用加密列进行查询。在有原文列的情况下,可以使用原文列进行查询。 | true |
| proxy-frontend-flush-threshold (?) | int | 在 ShardingSphere-Proxy 中设置传输数据条数的 IO 刷新阈值。 | 128 |
| proxy-transaction-type (?) | String | ShardingSphere-Proxy 中使用的默认事务类型。包括:LOCAL、XA 和 BASE。 | LOCAL |
| proxy-opentracing-enabled (?) | boolean | 是否允许在 ShardingSphere-Proxy 中使用 OpenTracing。 | false |
| proxy-hint-enabled (?) | boolean | 是否允许在 ShardingSphere-Proxy 中使用 Hint。使用 Hint 会将 Proxy 的线程处理模型由 IO 多路复用变更为每个请求一个独立的线程,会降低 Proxy 的吞吐量。 | false |
| xa-transaction-manager-type (?) | String | XA 事务管理器类型。列如:Atomikos,Narayana,Bitronix。 |
4、然后启动apache-shardingsphere-4.1.0-sharding-proxy
4.1 windows启动 进入到D:\work\net\sharding-proxy\apache-shardingsphere-4.1.0-sharding-proxy-bin\bin目录
通过 cmd 启动 start.bat 3307 # 3307为端口号
在逻辑库下products-proxy下创建test表,会在真实数据库下分别创建2张test-0和test-1表
MySQL读写分离
条件
1、Mysql5.7
步骤
1、主库准备  3306
     1.1 先进入到mysql目录,找到my.ini文件

     1.2 然后配置my.ini文件,增加
          server-id=1
          log-bin=mysql-bin

     1.3 然后启动master节点
        mysqld.exe --defaults-file=D:\work\net\mysql\MySQL-Server-5.7\my.ini

     1.4 然后创建slaver连接用户
           create user master
           grant replication slave on *.* to 'master'@'127.0.0.1'identified by 'mysql'
           flush privileges

2、从库准备  3309
      1.1 先进入到mysql目录,找到my.ini文件

      1.2 然后配置my.ini文件,增加
          server-id=2
         relay-log=mysql-relay-bin

      1.3 然后启动slaver节点
           mysqld.exe --defaults-file=D:\work\net\mysql\MySQL-Server-5.7-3308\my.ini

      1.4 然后从master增加同步权限
      show master status;//来查询File:mysql-bin.000001,Position:2755
           change master to master_host='127.0.0.1',
           master_port=3306,
           master_user='chenze',
           master_password='mysql',
           master_log_file='mysql-bin.000001',
           master_log_pos=1945;

      1.5 然后开启slave同步
         start slave
注意:server-uuid不能相同
1、如果相同,修改D:\work\net\mysql\MySQL Server 5.7\Data目录下的auto.conf文件就可以了
   [auto]
   server-uuid=3a15fbcf-ae39-11eb-a3de-8c1645d792a9

2、然后重启mysql
 mysqld.exe --defaults-file=D:\work\net\mysql\MySQL-Server-5.7-3308\my.ini
查看启动状态:show slave status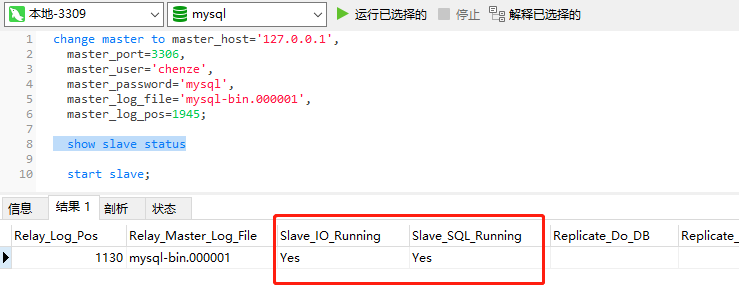
Mysql读写分离分离半同步模式
条件
1、rpl_semi_sync_master
2、rpl_semi_sync_slave
步骤
1、前提准备
  1.1 、先查询mysql是否可以安装版本
     mysq> select @@have_dynamic_loading
+------------------------+
| @@have_dynamic_loading |
+------------------------+
| YES                    |
+------------------------+
1 row in set
Time: 0.016s

2、rpl_semi_sync_master准备
    2.1 先在master节点上安装rpl_semi_sync_master
        mysql root@127.0.0.1:(none)> INSTALL PLUGIN rpl_semi_sync_master SONAME 'semisync_master.so';
Query OK, 0 rows affected
Time: 0.015s
    2.2 然后查询插件是否安装成功
mysql root@127.0.0.1:(none)> show global variables like 'rpl_semi%';
+-------------------------------------------+------------+
| Variable_name                             | Value      |
+-------------------------------------------+------------+
| rpl_semi_sync_master_enabled              | OFF        |
| rpl_semi_sync_master_timeout              | 10000      |
| rpl_semi_sync_master_trace_level          | 32         |
| rpl_semi_sync_master_wait_for_slave_count | 1          |
| rpl_semi_sync_master_wait_no_slave        | ON         |
| rpl_semi_sync_master_wait_point           | AFTER_SYNC |
+-------------------------------------------+------------+
6 rows in set
Time: 0.015s
     2.3 然后开启master复制
         set global rpl_semi_sync_master_enabled=ON;
     2.4 然后查询salver信息
         show global status like '%semi%';

3、rpl_semi_sync_slave准备
  3.1 先在master节点上安装rpl_semi_sync_slave
  mysql root@127.0.0.1:(none)> INSTALL PLUGIN rpl_semi_sync_slave SONAME 'semisync_slave.so';
Query OK, 0 rows affected
Time: 0.006s
  3.2 然后查询插件是否安装成功
mysql root@127.0.0.1:(none)> show global variables like 'rpl_semi%';
+-------------------------------------------+------------+
| Variable_name                             | Value      |
+-------------------------------------------+------------+
| rpl_semi_sync_master_enabled              | OFF        |
| rpl_semi_sync_master_timeout              | 10000      |
| rpl_semi_sync_master_trace_level          | 32         |
| rpl_semi_sync_master_wait_for_slave_count | 1          |
| rpl_semi_sync_master_wait_no_slave        | ON         |
| rpl_semi_sync_master_wait_point           | AFTER_SYNC |
| rpl_semi_sync_slave_enabled               | OFF        |
| rpl_semi_sync_slave_trace_level           | 32         |
+-------------------------------------------+------------+
8 rows in set
Time: 0.012s

 3.3 然后开启salver复制
         set global rpl_semi_sync_slave_enabled=ON;
 3.4 然后开启半同步复制模式
     stop slave io_thread;
start slave io_thread;
分片算法
环境:
1、数据库: MySQL5.7.32
2、Jdk环境: jdk1.8
3、代理程序:shardingsphere-proxy 5.0.0
4、连接MySQL的驱动:mysql-connector-java-5.1.47.jar

Shardingsphere-proxy配置
\conf\server.yaml (账号为 root 密码为 root,该账号密码为连接代理使用)
rules:
  - !AUTHORITY
    users:
      - root@%:root
      - sharding@:sharding
    provider:
      type: ALL_PRIVILEGES_PERMITTED
  - !TRANSACTION
    defaultType: XA
    providerType: Atomikos
\conf\config-sharding.yaml
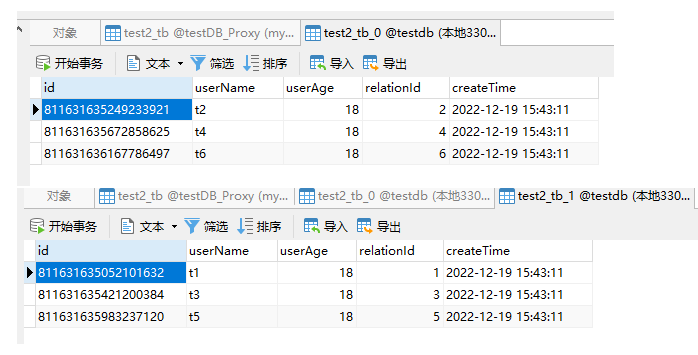
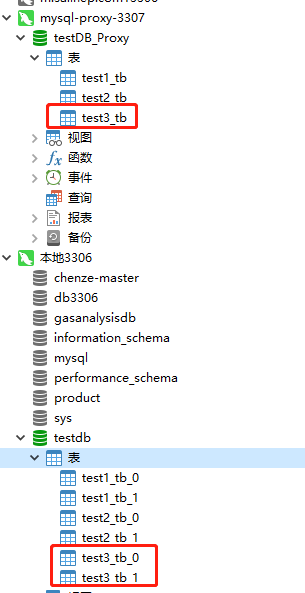
# 1. 声明proxy中的代理数据库名称
schemaName: testDB_Proxy

#2. 连接mysql
dataSources:
  ds_0:
    url: jdbc:mysql://localhost:3306/testdb?serverTimezone=UTC&useSSL=false
    username: root
    password: root
    connectionTimeoutMilliseconds: 30000
    idleTimeoutMilliseconds: 60000
    maxLifetimeMilliseconds: 1800000
    maxPoolSize: 50
    minPoolSize: 1

#3. 分片规则
rules:
- !SHARDING
  tables:
    # 表1
    test1_tb:
      actualDataNodes: ds_0.test1_tb_${0..1}
      tableStrategy:
        standard:
          shardingColumn: relationId
          shardingAlgorithmName: my_MOD
     # 表2
    test2_tb:
      actualDataNodes: ds_0.test2_tb_${0..1}
      tableStrategy:
        standard:
          shardingColumn: userName
          shardingAlgorithmName: my_HASH_MOD
      keyGenerateStrategy:
        column: id
        keyGeneratorName: snowflake
     # 表3
    test3_tb:
      actualDataNodes: ds_0.test3_tb_${0..1}
      tableStrategy:
        standard:
          shardingColumn: relationId
          shardingAlgorithmName: my_BOUNDARY_RANGE
      keyGenerateStrategy:
        column: id
        keyGeneratorName: snowflake
  #定义分片算法
  shardingAlgorithms:
    #1. int类型取模算法
    my_MOD:
      type: MOD
      props:
        sharding-count: 2   #代表数据分片到两张表,与上述的actualDataNodes中定义的表个数需要对应
    #2.字符串取模算法(hash取模)
    my_HASH_MOD:
      type: HASH_MOD
      props:
        sharding-count: '2'  #代表两张表
    # 3. 范围算法
    my_BOUNDARY_RANGE:
      type: BOUNDARY_RANGE
      props:
        # <5的分在0表中, >=5的分在1表中
        sharding-ranges: 5
  #定义key的生成规则
  keyGenerators:
    snowflake:
      type: SNOWFLAKE
      props:
        worker-id: 00000000
表1操作
CREATE TABLE `test1_tb`  (
  `id` int(11) NOT NULL AUTO_INCREMENT,
  `userName` varchar(255) CHARACTER SET utf8mb4 COLLATE utf8mb4_general_ci NULL DEFAULT NULL,
  `userAge` int(255) NULL DEFAULT NULL,
  `relationId` int(11) NULL DEFAULT NULL,
  `createTime` datetime(0) NULL DEFAULT NULL,
  PRIMARY KEY (`id`) USING BTREE
) ENGINE = InnoDB AUTO_INCREMENT = 2 CHARACTER SET = utf8mb4 COLLATE = utf8mb4_general_ci ROW_FORMAT = Dynamic;

INSERT INTO `test1_tb`(`userName`, `userAge`, `relationId`, `createTime`) VALUES ('t1', 18, 1, '2022-12-19 15:43:11');
INSERT INTO `test1_tb`(`userName`, `userAge`, `relationId`, `createTime`) VALUES ('t2', 18, 2, '2022-12-19 15:43:11');
INSERT INTO `test1_tb`(`userName`, `userAge`, `relationId`, `createTime`) VALUES ('t3', 18, 3, '2022-12-19 15:43:11');
INSERT INTO `test1_tb`(`userName`, `userAge`, `relationId`, `createTime`) VALUES ('t4', 18, 4, '2022-12-19 15:43:11');
INSERT INTO `test1_tb`(`userName`, `userAge`, `relationId`, `createTime`) VALUES ('t5', 18, 5, '2022-12-19 15:43:11');
INSERT INTO `test1_tb`(`userName`, `userAge`, `relationId`, `createTime`) VALUES ('t6', 18, 6, '2022-12-19 15:43:11');
结果:
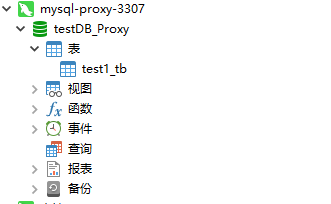
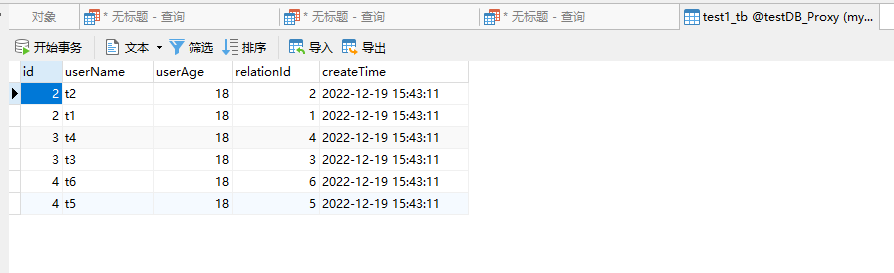

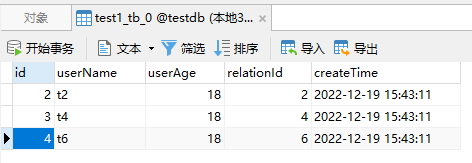
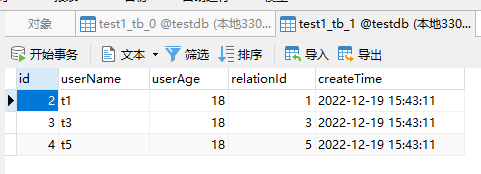
表2操作
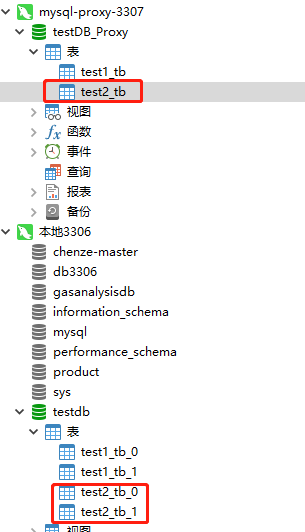
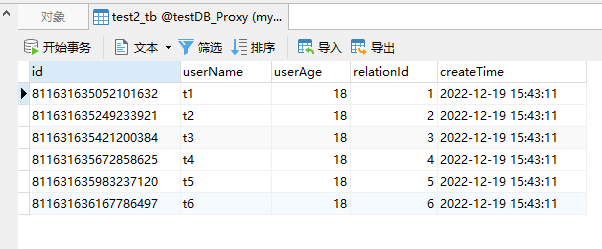
分10张表,分表字段为userName
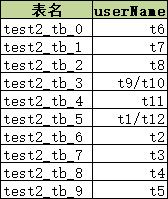
表3操作
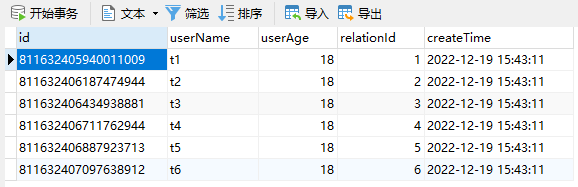
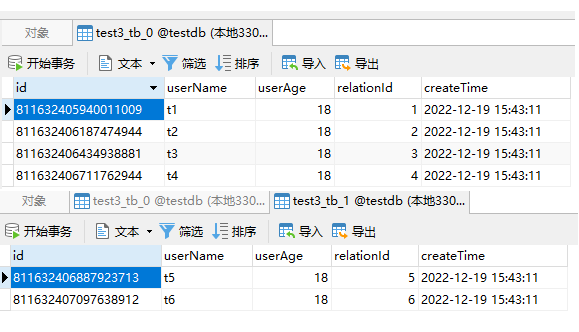
CREATE TABLE `test3_tb`  (
  `id` varchar(255) CHARACTER SET utf8mb4 COLLATE utf8mb4_general_ci NOT NULL,
  `userName` varchar(255) CHARACTER SET utf8mb4 COLLATE utf8mb4_general_ci NULL DEFAULT NULL,
  `userAge` int(255) NULL DEFAULT NULL,
  `relationId` int(11) NULL DEFAULT NULL,
  `createTime` datetime(0) NULL DEFAULT NULL,
  PRIMARY KEY (`id`) USING BTREE
) ENGINE = InnoDB CHARACTER SET = utf8mb4 COLLATE = utf8mb4_general_ci ROW_FORMAT = Dynamic;

INSERT INTO `test3_tb`(`userName`, `userAge`, `relationId`, `createTime`) VALUES ('t1', 18, 1, '2022-12-19 15:43:11');
INSERT INTO `test3_tb`(`userName`, `userAge`, `relationId`, `createTime`) VALUES ('t2', 18, 2, '2022-12-19 15:43:11');
INSERT INTO `test3_tb`(`userName`, `userAge`, `relationId`, `createTime`) VALUES ('t3', 18, 3, '2022-12-19 15:43:11');
INSERT INTO `test3_tb`(`userName`, `userAge`, `relationId`, `createTime`) VALUES ('t4', 18, 4, '2022-12-19 15:43:11');
INSERT INTO `test3_tb`(`userName`, `userAge`, `relationId`, `createTime`) VALUES ('t5', 18, 5, '2022-12-19 15:43:11');
INSERT INTO `test3_tb`(`userName`, `userAge`, `relationId`, `createTime`) VALUES ('t6', 18, 6, '2022-12-19 15:43:11');
结果:
...
|
作者:chenze 出处:https://www.cnblogs.com/chenze-Index/ 本文版权归作者和博客园共有,欢迎转载,但未经作者同意必须保留此段声明,且在文章页面明显位置给出原文连接,否则保留追究法律责任的权利。 如果文中有什么错误,欢迎指出。以免更多的人被误导。 |

 浙公网安备 33010602011771号