K8S系列第八篇(Service、EndPoints以及高可用kubeadm部署)
更多精彩内容请关注微信公众号:新猿技术生态圈
更多精彩内容请关注微信公众号:新猿技术生态圈
更多精彩内容请关注微信公众号:新猿技术生态圈
Endpoints
命名空间级资源,如果endpoints和service是同一个名字,那么就自动关联。
功能一:与service做负载均衡
[root@k8s ~]# kubectl describe svc
Name:              kubernetes
Namespace:         default
Labels:            component=apiserver
                   provider=kubernetes
Annotations:       <none>
Selector:          <none>
Type:              ClusterIP
IP Family Policy:  SingleStack
IP Families:       IPv4
IP:                10.96.0.1
IPs:               10.96.0.1
Port:              https  443/TCP
TargetPort:        6443/TCP
Endpoints:         192.168.15.201:6443
Session Affinity:  None
Events:            <none>
功能二:将外部服务引入集群
案例
# 先在本机创建一个外部的服务mysql
[root@k8s endpoints]# docker run -d -p 3306:3306 -e MYSQL_ROOT_PASSWORD=123456 mysql:5.7
c34bab6ad37f46bae59ef2ee712e8430c53142d30a53119e9912407fd540ad61
# 端口3306,密码如上
kind: Endpoints
apiVersion: v1
metadata:
  namespace: default
  name: test-endpoints
subsets:
  - addresses: # 代理ip
      - ip: 192.168.15.201
    ports:
      - port: 3306 # 服务的端口
        protocol: TCP
        name: http
---
kind: Service
apiVersion: v1
metadata:
  name: test-endpoints # 这里的名称要和上面一样才能关联
  namespace: default
spec:
  ports:
    - port: 3306
      targetPort: 3306
      protocol: TCP
      name: http
---
kind: Deployment # 提供一个mysql的客户端
apiVersion: apps/v1
metadata:
  name: mysql
  namespace: default
spec:
  selector:
    matchLabels:
      app: mysql-v1
  template:
    metadata:
      labels:
        app: mysql-v1
    spec:
      containers:
        - name: mysql
          image: mysql:5.7
          env:
            - name: MYSQL_ROOT_PASSWORD
              value: "123456"
# 部署endpoints文件
[root@k8s endpoints]# kubectl apply -f endpoints.yaml
endpoints/test-endpoints created
service/test-endpoints created
deployment.apps/mysql created
[root@k8s endpoints]# kubectl get -f endpoints.yaml
NAME                       ENDPOINTS             AGE
endpoints/test-endpoints   192.168.15.201:3306   8s

NAME                     TYPE        CLUSTER-IP      EXTERNAL-IP   PORT(S)    AGE
service/test-endpoints   ClusterIP   10.106.61.144   <none>        3306/TCP   8s

NAME                    READY   UP-TO-DATE   AVAILABLE   AGE
deployment.apps/mysql   1/1     1            1           8s
更多精彩内容请关注微信公众号:新猿技术生态圈
更多精彩内容请关注微信公众号:新猿技术生态圈
更多精彩内容请关注微信公众号:新猿技术生态圈
# 进入部署的项目
[root@k8s endpoints]# kubectl exec -it mysql-578666457d-g8856 -- bash
# 链接这个集群内部的ip
root@mysql-578666457d-g8856:/# mysql -uroot -p123456 -h10.106.61.144
mysql> create database db01;
Query OK, 1 row affected (0.01 sec)

mysql> show databases;
+--------------------+
| Database           |
+--------------------+
| information_schema |
| db01               |
| mysql              |
| performance_schema |
| sys                |
+--------------------+
5 rows in set (0.00 sec)
# 进入外面的docker的mysql
[root@k8s endpoints]# docker exec -it c34bab6ad37f bash
root@c34bab6ad37f:/# mysql -uroot -p123456
mysql> show databases;
+--------------------+
| Database           |
+--------------------+
| information_schema |
| db01               |
| mysql              |
| performance_schema |
| sys                |
+--------------------+
5 rows in set (0.00 sec)
# 发现刚才创建的db01在这里,说明Endpoints成功的代理了mysql服务
服务健康检查
配置清单
---
kind: Deployment
apiVersion: apps/v1
metadata:
  name: test-deployment
spec:
  selector:
    matchLabels:
      app: nginx-v1
  template:
    metadata:
      labels:
        app: nginx-v1
    spec:
      containers:
        - name: nginx
          image: nginx
          lifecycle: # 回调HOOK
            postStart: # 创建Pod前启动
              exec: # 第一种方式,使用较多
                command:
                  - "/bin/sh"
                  - "-c"
                  - "touch /root/1.txt"
              httpGet: # 第二种方式(使用少)
                port: 80
                path: / # httpGet的请求必须返回是200才认为是成功的
              tcpSocket: # 第三种方式(使用少)
                port: 80
            preStop: # 删除Pod前启动
              exec:
                command:
                  - "/bin/sh"
                  - "-c"
                  - "echo 123 > /root/1.txt"
          livenessProbe:
            exec:
              command:
                - "bin/bash"
                - "-c"
                - "cat /usr/share/nginx/html/index.php"
            initialDelaySeconds: 0 # 执行延迟时间
            periodSeconds: 3 # 探测频率
            timeoutSeconds: 1 # 超时时间
            successThreshold: 1 # 探测成功多少次为成功
            failureThreshold: 3 # 探测失败多少次为失败
          readinessProbe:
            tcpSocket:
              port: 80
            initialDelaySeconds: 30 # 项目比较大的时候给大一点
            periodSeconds: 1 # 就绪性的敏感度设置较大,用户体验较好
            timeoutSeconds: 1
            successThreshold: 3
            failureThreshold: 1
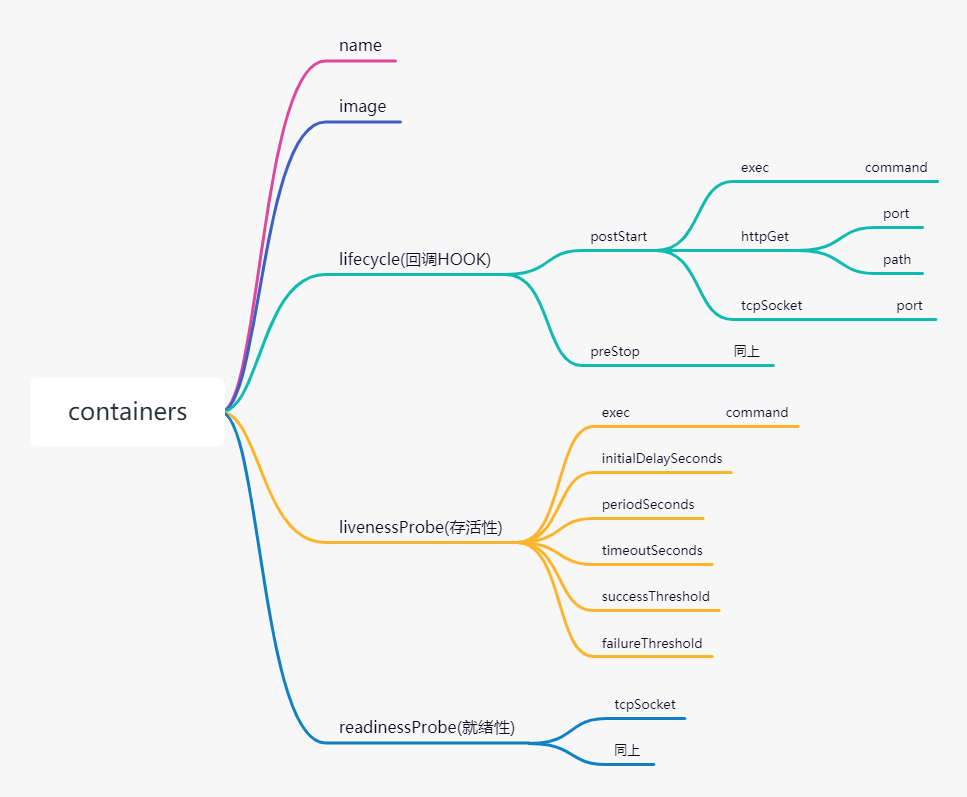
回调HOOK--lifecycle
启动时的执行函数为postStart,执行的方式有三种,分别是exec、httpGet、tcpSocket,但是httpGet需要请求到200才会返回成功,否则失败。
结束时的执行函数为preStop,执行方式与上面类似。
存活性--livenessProbe
存活性这里一般用exec的形式来检查,生产环境一般设置如下
          livenessProbe:
            exec:
              command:
                - "bin/bash"
                - "-c"
                - "cat /usr/share/nginx/html/index.php"
            initialDelaySeconds: 0 # 执行延迟时间,一般立即执行
            periodSeconds: 3 # 探测频率,三秒探测一次
            timeoutSeconds: 1 # 超时时间
            successThreshold: 1 # 探测成功多少次为成功
            failureThreshold: 3 # 探测失败多少次为失败
就绪性--readinessProbe
就绪性这里一般是通过检查端口的形式来配置
          readinessProbe:
            tcpSocket:
              port: 80
            initialDelaySeconds: 30 # 项目比较大的时候给大一点
            periodSeconds: 1 # 就绪性的敏感度设置较大,用户体验较好
            timeoutSeconds: 1 # 超时时间
            successThreshold: 3 # 三次成功为成功
            failureThreshold: 1 # 一次失败剔除
综合案例--wordpress博客项目
# 数据库服务部署
# 数据库名称空间创建
apiVersion: v1
kind: Namespace
metadata:
  name: mysql
---
# 数据库控制器创建
apiVersion: apps/v1
kind: Deployment
metadata:
  name: mysql
  namespace: mysql
spec:
  selector:
    matchLabels:
      app: mysql
  template:
    metadata:
      labels:
        app: mysql
    spec:
      containers:
        - name: mysql
          image: mysql:5.7
          env:
            - name: MYSQL_ROOT_PASSWORD
              value: "123456"
            - name: MYSQL_DATABASE
              value: wordpress
          livenessProbe: # 存活性检查
            exec:
              command:
                - "/bin/bash"
                - "-c"
                - "cat /etc/mysql/my.cnf"
            initialDelaySeconds: 0
            periodSeconds: 3
            timeoutSeconds: 1
            successThreshold: 1
            failureThreshold: 3
          readinessProbe: # 就绪性检查
            tcpSocket:
              port: 3306
            initialDelaySeconds: 20
            periodSeconds: 1
            successThreshold: 3
            failureThreshold: 1
            timeoutSeconds: 1
---
# 给数据库配置Service
apiVersion: v1
kind: Service
metadata:
  name: mysql
  namespace: mysql
spec:
  selector:
    app: mysql
  ports:
    - port: 3306
      targetPort: 3306
  type: NodePort
# 数据库部署完毕
---
# 创建项目的名称空间
apiVersion: v1
kind: Namespace
metadata:
  namespace: wordpress
  name: wordpress
---
# 创建项目的控制器
apiVersion: apps/v1
kind: Deployment
metadata:
  name: wordpress
  namespace: wordpress
spec:
  selector:
    matchLabels:
      app: wordpress
  template:
    metadata:
      labels:
        app: wordpress
    spec:
      containers:
        - name: php
          image: alvinos/php:wordpress-v2
          imagePullPolicy: Always
          livenessProbe:
            exec:
              command:
                - "/bin/bash"
                - "-c"
                - "ps -ef | grep php"
            initialDelaySeconds: 0
            periodSeconds: 3
            timeoutSeconds: 1
            successThreshold: 1
            failureThreshold: 1
          readinessProbe:
            tcpSocket:
              port: 9000
            initialDelaySeconds: 20
            periodSeconds: 1
            timeoutSeconds: 1
            successThreshold: 3
            failureThreshold: 1
        - name: nginx
          image: alvinos/nginx:wordpress-v2
          imagePullPolicy: Always
          livenessProbe:
            exec:
              command:
                - "/bin/bash"
                - "-c"
                - "cat /etc/nginx/nginx.conf"
            initialDelaySeconds: 0
            periodSeconds: 3
            timeoutSeconds: 1
            successThreshold: 1
            failureThreshold: 1
          readinessProbe:
            tcpSocket:
              port: 80
            initialDelaySeconds: 10
            periodSeconds: 1
            timeoutSeconds: 1
            successThreshold: 3
            failureThreshold: 1
# 控制器部署完毕
---
# 部署控制器Service
apiVersion: v1
kind: Service
metadata:
  name: wordpress
  namespace: wordpress
spec:
  selector:
    app: wordpress
  ports:
    - port: 80
      targetPort: 80
      name: http
      nodePort: 30080
    - port: 443
      targetPort: 443
      name: https
  type: NodePort
cluster.local想要修改可以修改这里
[root@k8s wordpress]# grep -ro "cluster.local" /etc/kubernetes/
/etc/kubernetes/manifests/kube-apiserver.yaml:cluster.local
ADM的api高可用
导出初始化文件,做修改
[root@localhost ~]# kubeadm config print init-defaults > init-config.yaml
[root@localhost ~]# cat init-config.yaml
apiVersion: kubeadm.k8s.io/v1beta2
bootstrapTokens:
- groups:
  - system:bootstrappers:kubeadm:default-node-token
  token: abcdef.0123456789abcdef
  ttl: 24h0m0s
  usages:
  - signing
  - authentication
kind: InitConfiguration
localAPIEndpoint:
  advertiseAddress: 1.2.3.4
  bindPort: 6443
nodeRegistration:
  criSocket: /var/run/dockershim.sock
  name: node
  taints: null
---
apiServer:
  timeoutForControlPlane: 4m0s
apiVersion: kubeadm.k8s.io/v1beta2
certificatesDir: /etc/kubernetes/pki
clusterName: kubernetes
controllerManager: {}
dns:
  type: CoreDNS
etcd:
  local:
    dataDir: /var/lib/etcd
imageRepository: k8s.gcr.io
kind: ClusterConfiguration
kubernetesVersion: 1.21.0
networking:
  dnsDomain: cluster.local
  serviceSubnet: 10.96.0.0/12
scheduler: {}
修改
INIT_IP=`hostname -i`
INIT_HOST=`hostname`
cat > init-config.yaml << EOF
apiVersion: kubeadm.k8s.io/v1beta2
bootstrapTokens:
- groups:
  - system:bootstrappers:kubeadm:default-node-token
  token: abcdef.0123456789abcdef
  ttl: 24h0m0s
  usages:
  - signing
  - authentication
kind: InitConfiguration
localAPIEndpoint:
  advertiseAddress: ${INIT_IP} # 当前的主机ip
  bindPort: 6443
nodeRegistration:
  criSocket: /var/run/dockershim.sock
  name: ${INIT_HOST} # 对应的主机名
  taints:
  - effect: NoSchedule
    key: node-role.kubernetes.io/master
---
apiServer:
  certSANs:
    - 192.168.15.59 # 高可用的虚拟IP
  timeoutForControlPlane: 4m0s
apiVersion: kubeadm.k8s.io/v1beta2
certificatesDir: /etc/kubernetes/pki
clusterName: kubernetes
controlPlaneEndpoint: 192.168.15.59:8443
controllerManager: {}
dns:
  type: CoreDNS
etcd:
  local:
    dataDir: /var/lib/etcd
imageRepository: registry.cn-shanghai.aliyuncs.com/baim0os # 自己的镜像仓库
kind: ClusterConfiguration
kubernetesVersion: 1.21.3
networking:
  dnsDomain: cluster.local
  podSubnet: 10.244.0.0/16
  serviceSubnet: 10.96.0.0/12
scheduler: {}
EOF
安装高可用软件
 # 三台master节点都需要安装
  # keeplived + haproxy
  [root@k8s-m-01 ~]# yum install -y keepalived haproxy
# 修改keepalived配置文件
# 根据节点的不同,修改的配置也不同
  mv /etc/keepalived/keepalived.conf /etc/keepalived/keepalived.conf_bak
  cd /etc/keepalived
  KUBE_APISERVER_IP=`hostname -i`
  cat > /etc/keepalived/keepalived.conf <<EOF
  ! Configuration File for keepalived
  global_defs {
      router_id LVS_DEVEL
  }
  vrrp_script chk_kubernetes {
      script "/etc/keepalived/check_kubernetes.sh"
      interval 2
      weight -5
      fall 3
      rise 2
  }
  vrrp_instance VI_1 {
      state MASTER
      interface eth0
      mcast_src_ip ${KUBE_APISERVER_IP}
      virtual_router_id 51
      priority 100
      advert_int 2
      authentication {
          auth_type PASS
          auth_pass K8SHA_KA_AUTH
      }
      virtual_ipaddress {
          192.168.15.59
      }
  }
EOF
  [root@k8s-m-01 /etc/keepalived]# systemctl enable --now keepalived
# 修改haproxy配置文件
# 高可用软件
  cat > /etc/haproxy/haproxy.cfg <<EOF
  global
    maxconn  2000
    ulimit-n  16384
    log  127.0.0.1 local0 err
    stats timeout 30s
  defaults
    log global
    mode  http
    option  httplog
    timeout connect 5000
    timeout client  50000
    timeout server  50000
    timeout http-request 15s
    timeout http-keep-alive 15s
  frontend monitor-in
    bind *:33305
    mode http
    option httplog
    monitor-uri /monitor
  listen stats
    bind    *:8006
    mode    http
    stats   enable
    stats   hide-version
    stats   uri       /stats
    stats   refresh   30s
    stats   realm     Haproxy\ Statistics
    stats   auth      admin:admin
  frontend k8s-master
    bind 0.0.0.0:8443
    bind 127.0.0.1:8443
    mode tcp
    option tcplog
    tcp-request inspect-delay 5s
    default_backend k8s-master
  backend k8s-master
    mode tcp
    option tcplog
    option tcp-check
    balance roundrobin
    default-server inter 10s downinter 5s rise 2 fall 2 slowstart 60s maxconn 250 maxqueue 256 weight 100
    server m01    192.168.15.51:6443  check inter 2000 fall 2 rise 2 weight 100
    server m02    192.168.15.52:6443  check inter 2000 fall 2 rise 2 weight 100
    server m03    192.168.15.53:6443  check inter 2000 fall 2 rise 2 weight 100
EOF
  [root@k8s-m-01 /etc/keepalived]# systemctl enable --now haproxy.service
  Created symlink from /etc/systemd/system/multi-user.target.wants/haproxy.service to /usr/lib/systemd/system/haproxy.service.
初始化集群
kubeadm init --config init-config.yaml --upload-certs

# 主节点命令复制下来
  kubeadm join 192.168.15.59:8443 --token abcdef.0123456789abcdef \
	--discovery-token-ca-cert-hash sha256:b22691a3783c7f1a3544006e64907418476b6942393dffa02b3b0f20cb46a083 \
	--control-plane --certificate-key 2e222d296099e3c4656dd9aa12d81b5bbbd0a3f2f13d6d3a9252334034785af1
# 从节点命令复制下来
kubeadm join 192.168.15.59:8443 --token abcdef.0123456789abcdef \
	--discovery-token-ca-cert-hash sha256:b22691a3783c7f1a3544006e64907418476b6942393dffa02b3b0f20cb46a083

# 启动
  mkdir -p $HOME/.kube
  sudo cp -i /etc/kubernetes/admin.conf $HOME/.kube/config
  sudo chown $(id -u):$(id -g) $HOME/.kube/config
安装网络插件calico
# 下载calico
curl https://docs.projectcalico.org/manifests/calico.yaml -O

# 部署calico
kubectl apply -f calico.yaml
各节点执行加入命令
# 设置集群角色
kubectl label nodes n01 node-role.kubernetes.io/node=n01
kubectl label nodes n02 node-role.kubernetes.io/node=n02

# 查看集群状态
[root@m01 ~]# kubectl get nodes
[root@m01 ~]# kubectl get nodes
NAME   STATUS   ROLES                  AGE     VERSION
m01    Ready    control-plane,master   36m     v1.21.3
m02    Ready    control-plane,master   6m47s   v1.21.3
m03    Ready    control-plane,master   5m50s   v1.21.3
n01    Ready    node                   5m      v1.21.3
n02    Ready    node                   4m42s   v1.21.3
更多精彩内容请关注微信公众号:新猿技术生态圈
更多精彩内容请关注微信公众号:新猿技术生态圈
更多精彩内容请关注微信公众号:新猿技术生态圈

 浙公网安备 33010602011771号