树莓派 Zero W+温度传感器DS18B20
作者:陈拓chentuo@ms.xab.ac.cn 2018.05.28/2018.06.01
0. 概述
用树莓派 Zero W读取DS18B20温度,上传到物联网平台。
1. 准备
1.1 硬件
- 树莓派Pi Zero W
- DS18B20温度传感器
- 杜邦线3根
- 电脑(我用Windows 7)
- 4.7KΩ电阻
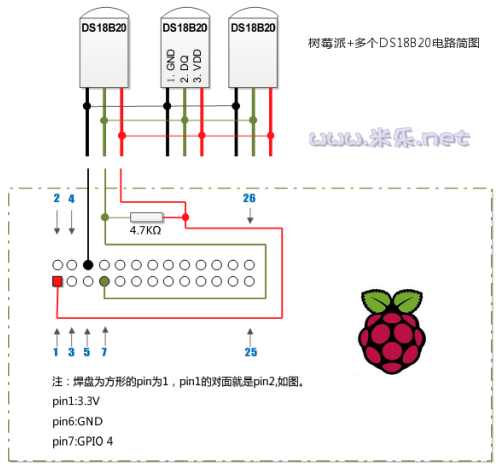
1.2 GPIO接口

1.3 接线

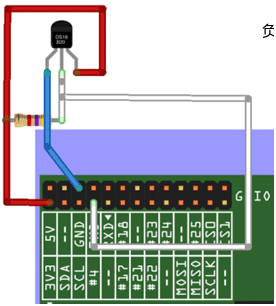

首先我们把18B20和树莓派连接。树莓派的GPIO4是W1(一线)设备的接口,所以我们需要把18B20的数据脚接到GPIO4上。GPIO4是GPIO的第7个插针。
为什么用GPIO4作为DS18B20的IO,我们在后面第5小节说明。
2. 测试
2.1 连接电脑和Pi Zero W
用putty连接电脑和Pi Zero W,看本文最后的参考文档。Host Name填raspberrypi.local,端口22,用户名pi,密码raspberry。
2.2 更新树莓派软件源
登录树莓派之后,先升级软件源,在终端下输入以下代码,等待一段时间即可。
- 更新列表
pi@raspberrypi:~ $ sudo apt-get update
这个命令,会访问源列表里的每个网址,并读取软件列表,然后保存在本地电脑。我们在新立得软件包管理器里看到的软件列表,都是通过update命令更新的。
- 更新软件
pi@raspberrypi:~ $ sudo apt-get upgrade
这个命令,会把本地已安装的软件,与刚下载的软件列表里对应软件进行对比,如果发现已安装的软件版本太低,就会提示你更新。
2.3 修改配置
pi@raspberrypi:~ $ sudo nano /boot/config.txt
在dtoverlay=dwc2之前添加一行:
dtoverlay=w1-gpio-pullup,gpiopin=4
保存並检查修改是否正确:
pi@raspberrypi:~ $ cat /boot/config.txt
重启树莓派:
pi@raspberrypi:~ $ sudo reboot
注意:reboot容易丢失ssh文件,建议如下操作:
- pi@raspberrypi:~ $ sudo shutdown -h now
- 等待电源指示灯熄灭后,关闭电源
- 重新上电连接ssh
2.4 加载模块,查看温度传感器DS18B20设备
- 加载2个模块
pi@raspberrypi:~ $ sudo modprobe w1-gpio
pi@raspberrypi:~ $ sudo modprobe w1-therm
-
- w1-gpio是单总线的IO操作模块,用于模拟单总线时序;w1_therm是DS18B20的内部操作模块(读写寄存器),和IO时序无关;
我们可以将驱动结构看成是将w1_therm挂接到w1-gpio总线上,由w1-gpio控制w1_therm工作。
-
- modprobe命令用于向内核中加载模块或者从内核中移除模块。
查看帮助:
pi@raspberrypi:~ $ modprobe -h
列出内核中所有已经或者未挂载的所有模块:
- 查看温度传感器DS18B20设备
pi@raspberrypi:~ $ cd /sys/bus/w1/devices/
pi@raspberrypi:~ $ ls
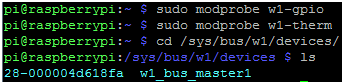
28-000004d618fa就是温度传感器DS18B20设备,这是传感器的序列号,每个传感器都不一样。
2.5 查看当前温度
依次在终端输入以下命令:
pi@raspberrypi:/sys/bus/w1/devices $ cd 28-000004d618fa
pi@raspberrypi:/sys/bus/w1/devices/28-000004d618fa $ cat w1_slave

第一行最后为CRC校验“YES”表示校验正确,为“NO”则代表校验出错,或读不到温度值。
第二行的t=25375就是当前的温度值,要換算成攝氏度,除以1000,即当前温度为23000/1000=25.375攝氏度。
3. 用python读取温度值
文件存放:/home/pi/temperature.py
操作如下:
- 回到家目录
pi@raspberrypi:/sys/bus/w1/devices/28-000004d618fa $ cat ~
pi@raspberrypi:~ $ pwd #看看回家了没有
/home/pi
- 创建temperature.py
pi@raspberrypi:~ $ sudo touch temperature.py
- 编辑temperature.py
pi@raspberrypi:~ $ sudo nano temperature.py
写进如下內容:
#/home/pi/temperature.py
# open the ds18b20 file.
tfile = open("/sys/bus/w1/devices/28-000004d618fa/w1_slave")
# Read all of the text in the file.
text = tfile.read()
# close the file
tfile.close()
# Split the text with new lines (\n) and select the second line.
secondline = text.split("\n")[1]
# Split the line into words, referring to the spaces, and select the 10th word (counting from 0).
temperaturedata = secondline.split(" ")[9]
# The first two characters are "t=", so get rid of those and convert the temperature from a string to a number.
temperature = float(temperaturedata[2:])
# Put the decimal point in the right place and display it.
temperature = temperature / 1000
print temperature
注意修改28-000004d618fa。
- 查看
pi@raspberrypi:~ $ cat temperature.py
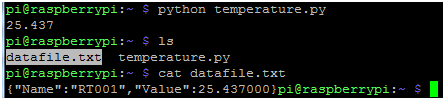
- 运行temperature.py
python temperature.py

4. 上传数据到乐联网
乐联网是国内比较知名的免费物联网数据平台,下面我们先申请乐联网账号,并添加设备和传感器。
4.1 申请乐联网账号
网址:https://www.lewei50.com/,注册一个新账号,登录。
4.2 添加新设备
先添加设备,一个设备里可以有多个不同的传感器。
选择“我的物联” > 在“菜单列表”中选择“我的设备” > 点击“添加新设备”标签,按下图添加设备:
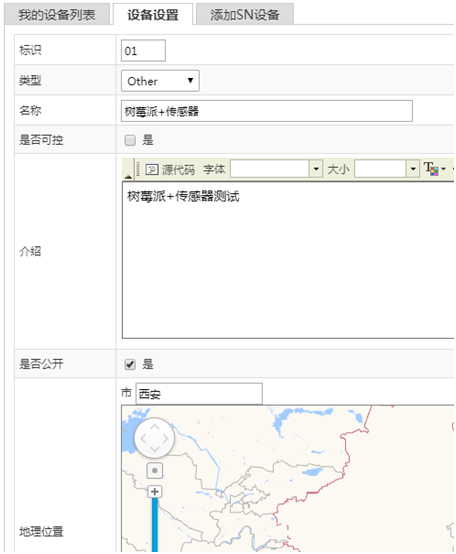
添加好的设备是这样的:

免费可以添加2个设备。
4.3 添加传感器
接下来在新设备中添加传感器。
在“菜单列表”中选择“传感器与控制器” > 在“传感器列表”标签页点击“新建”按钮。
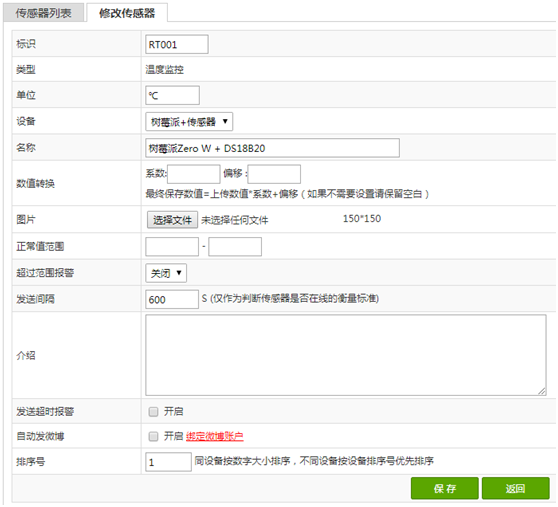
点击“保存”。注意“标识”要唯一。

传感器添加好了。免费可以添加8个传感器。
4.4 获取Userkey
选择“我的账户” > 在“菜单列表”中选择“设置个人信息” > 查看“设置个人信息”标签:

记住这个Userkey:30346d2762e64cb99336443e0ae84e02
4.5 数据上传测试
乐联网提供了一个“API在线测试工具”,网址是:
http://www.lewei50.com/dev/apitest/3
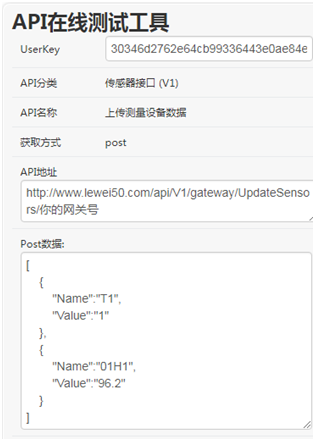
- 将你的网关号改成设备ID:01
- 将Post数据改成:
[
{
"Name":"RT001",
"Value":"15.28"
}
]
点击“调用接口”:
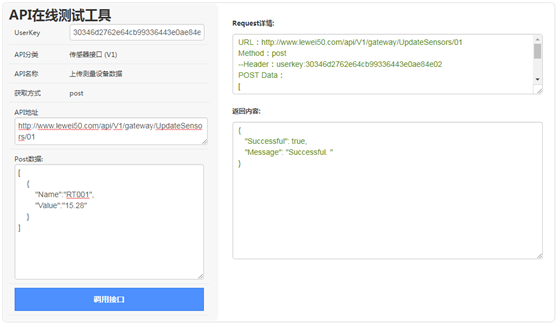
数据成功发送"Message": "Successful. "!记住Request详情:
URL:http://www.lewei50.com/api/V1/gateway/UpdateSensors/01
Method:post
--Header:userkey:30346d2762e64cb99336443e0ae84e02
POST Data:
[
{
"Name":"RT001",
"Value":"15.28"
}
]
回到乐联网,在“传感器列表”标签页查看数据。

4.6树莓派Zero W上传数据到乐联网
- 修改temperature.py,将温度值用JSON格式保存到一个文本文件:
pi@raspberrypi:~ $ sudo nano temperature.py
#/home/pi/temperature.py
tfile = open("/sys/bus/w1/devices/28-000004d618fa/w1_slave")
text = tfile.read()
tfile.close()
secondline = text.split("\n")[1]
temperaturedata = secondline.split(" ")[9]
temperature = float(temperaturedata[2:])
temperature = temperature / 1000
print temperature
res = '[{"Name":"RT001","Value":"%f"}]' %temperature
output = open('/home/pi/datafile.txt', 'w')
output.write(res)
output.close
用python将温度写入文本文件:/home/pi/datafile.txt
运行python temperature.py进行测试。
- 新增lewei50.sh脚本
文件位置:/home/pi/lewei50.sh,命令:
pi@raspberrypi:~ $ sudo nano lewei50.sh
参考Request详情写lewei50.sh脚本:
sudo python /home/pi/temperature.py
curl --request POST --data-binary @"/home/pi/datafile.txt" --header "userkey:30346d2762e64cb99336443e0ae84e02" http://www.lewei50.com/api/V1/gateway/UpdateSensors/01
- 修改lewei50.sh权限
pi@raspberrypi:~ $ sudo chmod 777 lewei50.sh

- 运行lewei50.sh测试
pi@raspberrypi:~ $ ./lewei50.sh

看看乐联网上的新数据,在“菜单列表”中选择“实时数据”查看:

- 添加到计划任务定时采集数据
将脚本加入定时任务cronjob,cronjob用于安排那些需要被周期性执行的命令。
编辑定时任务:pi@raspberrypi:~ $ sudo crontab -e
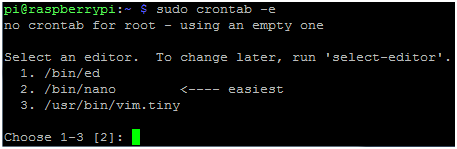
选择一个编辑器,我选默认的2。
在cornjob文件中添加下面一行,並保存(表示10分钟执行一次lewei50.sh脚本)
*/10 * * * * /home/pi/lewei50.sh
-
- Crontab语法
一个crontab文件用五个段来定义:天,日期和时间,和一个要定期执行的命令代码。
|
* * * * * command to be executed |
斜线“/”表示周期性,/10表示每10分钟;星号“*” 代表所有可能的值;逗号“,” 指定列表值,如: "1,3,4,7,8";中横线“-” 指定范围值,如 "1-6", 代表 "1,2,3,4,5,6"。
编辑完毕后,很重要的一点是一定要执行如下命令:
pi@raspberrypi:~ $ sudo /etc/init.d/cron restart
否则,定时任务不会执行。

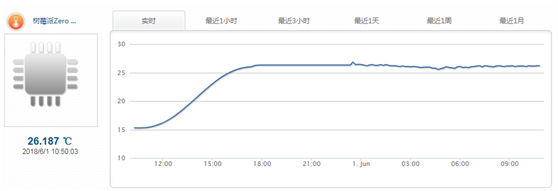
4.7 乐联网数据展示
乐联网提供了很多数据展示的方法,下面是其中的几种。
- 实时数据
请看上节相关的图。
- 查看门户
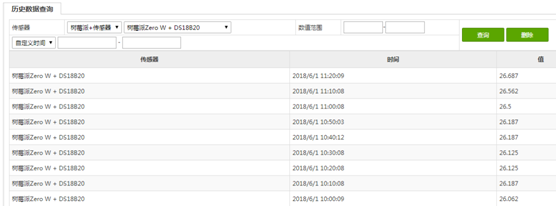
- 历史走势分析

- 历史数据查询
- 微信互动,乐为物联还支持你的设备与微信互动,关注乐为物联公众号。

5. 多个DS18B20温度传感器
5.1 硬件连接
将所有的DS18B20并联。
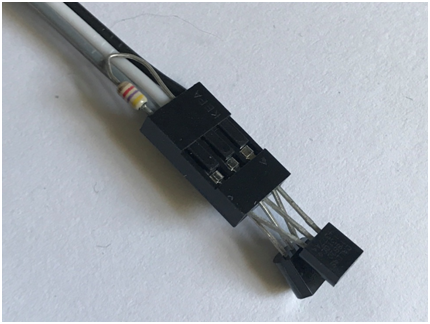
没有焊接工具的同学,可以这样连接,这是2个DS18B20:

为什么用GPIO4作为DS18B20的IO?
在2015-02-16之後的Raspbain版本,为了防止GPIO的冲突,使用了新的设备树DT(Device Tree)策略。Raspberry Pi的最新内核和固件(包括Raspbian和NOOBS版本)现在默认使用设备树DT来管理某些资源分配和模块加载。
在新内核boot分区下多了个overlays文件夹,里面有很多dtb文件,这些其实就是树莓派的设备树,打开README,就可以知道该怎么使用了。查看相关说明:
pi@raspberrypi:~ $ cat /boot/overlays/README
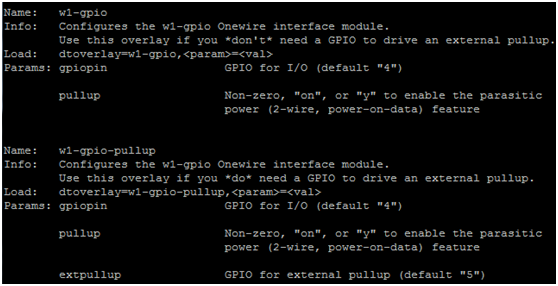
- w1-gpio
名称:w1-gpio
信息:配置w1-gpio一线接口模块。
如果不需要GPIO驱动外部上拉使用这个覆盖(overlay)。
加载:dtoverlay=w1-gpio,<param>=<val>
参数param:
gpiopin 用于IO的GPIO(默认是4)
pullup 非零,on或y以启用寄生电源(2线,电源在数据线上)
- w1-gpio-pullup
名称:w1-gpio-pullup
信息:配置w1-gpio一线接口模块。
如果需要GPIO驱动外部上拉使用这个覆盖(overlay)。
加载:dtoverlay=w1-gpio-pullup,<param>=<val>
参数Params:
gpiopin 用于IO的GPIO(默认是4)
pullup 非零,on或y以启用寄生电源(2线,电源在数据线上)
extpullup 用于外部上拉的GPIO(默认是5)
注释:寄生电源就是利用数据传输的高电平供电,用法请看DS18B20数据手册。
5.2 查看温度传感器DS18B20设备
pi@raspberrypi:~ $ ls /sys/bus/w1/devices/

28-000004d6162f和28-000004d627c6就是温度传感器DS18B20设备,这是传感器的序列号,每个DS18B20出厂时都设置了一个序列号,可以通过IO口读出。
5.3 查看当前温度
pi@raspberrypi:~ $ cat /sys/bus/w1/devices/28-000004d6162f/w1_slave
pi@raspberrypi:~ $ cat /sys/bus/w1/devices/28-000004d627c6/w1_slave

第一行最后为CRC校验“YES”表示校验正确,为“NO”则代表校验出错,或读不到温度值。
第二行的t=27375和t=27437就是当前的温度值,要換算成攝氏度就是27.375度和27,437度。放在一起的两个传感器温度值怎么不一样?看看数据手册,DS18B20的测量精度是0.5℃。
5.4 使用其他的GPIO作为DS18B20的IO引脚
下面我们将DS18B20的IO引脚从GPIO4改到GPIO17上,看第1节的图,就是引脚11上。
pi@raspberrypi:~ $ sudo nano /boot/config.txt
将gpiopin=4修改为gpiopin=17:
dtoverlay=w1-gpio-pullup,gpiopin=17
保存,重启树莓派(注意:按我前面说的方法重启):
pi@raspberrypi:~ $ sudo reboot
将DS18B20的数据线插到引脚11上,查看温度传感器DS18B20设备:
5.5 用C语言读取温度值
WiringPi
#include <stdio.h>
#include <sys/types.h>
#include <sys/stat.h>
#include <fcntl.h>
#include <unistd.h>
#include <errno.h>
#include <stdlib.h>
#include <stdio.h>
#define BUFSIZE 128
int main(void)
{
float temp;
int i, j;
int fd;
int ret;
char buf[BUFSIZE];
char tempBuf[5];
fd = open("/sys/bus/w1/devices/28-00000495db35/w1_slave", O_RDONLY); //以只读方式打开ds18b20设备文件
if(-1 == fd){ //打开设备文件出错
perror("open device file error"); //打印出错信息(原因)
return 1;
}
while(1){
ret = read(fd, buf, BUFSIZE); //将设备文件中的内容读入buf中
if(0 == ret){ //返回0表示读文件结束
break; //跳出循环体
}
if(-1 == ret){ //读文件出错
if(errno == EINTR){ //出错是由中断引起的
continue; //继续读文件
}
perror("read()"); //打印出错信息(原因)
close(fd); //关闭文件
return 1;
}
}
for(i=0;i<sizeof(buf);i++){
if(buf[i] == 't'){ //如果读到‘t’,说明后面马上出现温度值
for(j=0;j<sizeof(tempBuf);j++){
tempBuf[j] = buf[i+2+j]; //将温度值以字符串的形式写入tempBuf中
}
}
}
temp = (float)atoi(tempBuf) / 1000; //将字符串转换为浮点型温度数据
printf("%.3f C\n",temp); //打印出温度值
close(fd); //关闭文件
return 0;
}
参考文档
- 树莓派介绍
- 电脑连接树莓派PiZeroW
- 樹莓派+溫度感測器實現室內溫度監控:http://shumeipai.nxez.com/2013/10/03/raspberry-pi-temperature-sensor-monitors.html
- Raspberry Pi
Temperature Sensor
http://www.cl.cam.ac.uk/projects/raspberrypi/tutorials/temperature/


 浙公网安备 33010602011771号