
C#编程中并行与并发的简单理解
1.简述
并发通过管理多个任务的执行顺序,确保系统在高负载下仍能保持响应性;并行则利用多处理器或多核心硬件,真正同时执行任务,以加速计算。这两者在高性能计算、实时系统和用户交互应用中发挥着不可替代的作用。
在多核处理器时代,传统串行编程已无法充分利用硬件潜力。并行计算通过将任务分解到多个核心执行,显著缩短了计算时间。然而,并发与并行的实现并非没有代价,它们引入了诸如竞争条件、死锁和负载均衡等复杂问题,需要开发者具备深厚的理论基础和实践经验。
2.并发与并行
2.1 定义
-
并发(Concurrency):
- 指系统在一段时间内管理多个任务的能力。并发关注任务的协调与交错执行,通过时间分片等技术在一个或多个处理器上实现,因此并发看似同时进行,但不一定在同一时刻执行。
- 并发强调任务的逻辑组织和协调。
- 举例:一个Web服务器可以并发处理多个客户端请求,通过快速切换任务确保每个请求都能及时响应。
-
并行(Parallelism):
- 指多个任务在同一时刻真正同时执行,通常依赖于多核处理器或分布式系统。其核心目标是提升计算速度,通过将问题分解为独立的子任务并同时处理。并行适用于计算密集型任务。
- 并行关注物理执行的并行性。
- 举例:在并行矩阵乘法中,不同的核心可以同时计算矩阵的不同部分,从而显著缩短总计算时间;科学模拟或图像处理,其效果依赖于多核处理器、GPU或分布式计算系统的硬件支持。
2.2 区别
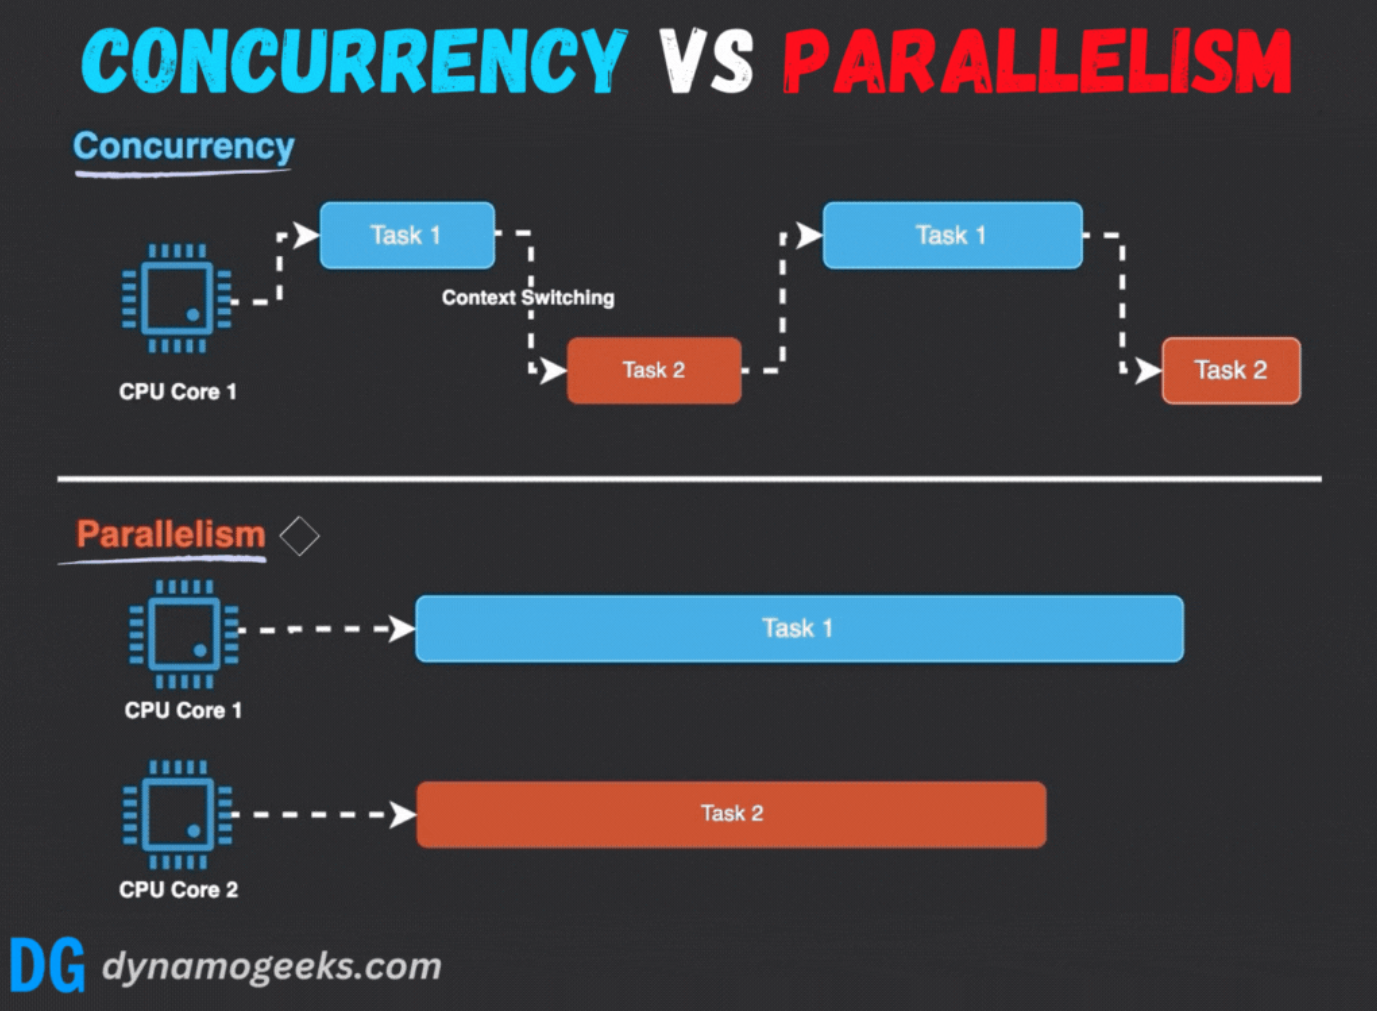
并发与并行的根本区别在于执行的时间性和资源依赖性:
- 执行模式:并行强调真正的同时执行,而并发通过任务切换营造同时进行的假象。
- 硬件依赖:并行需要多处理器或多核心支持,而并发在单核系统上即可实现。
- 目标:并行旨在加速计算,而并发注重系统响应性和多任务处理能力。
例如,在单核系统中,操作系统通过时间片轮转调度多个线程;而多核系统中,线程可以分配到不同核心并行运行。
3.实现并发
3.1 并行实现并发
在多核处理器上,任务可以分配到不同核心并行执行,从而实现高效并发。例如,Web服务器通过多线程并行处理客户端请求。
代码示例:多线程并行处理 :System.Threading.ThreadPool来创建和管理线程池,并使用ManualResetEventSlim来等待所有任务完成。
using System;
using System.Collections.Generic;
using System.Threading;
class Program
{
static void Main(string[] args)
{
List
{
new Request { Data = "Request1" },
new Request { Data = "Request2" },
new Request { Data = "Request3" }
// 添加更多请求
};
process_requests(requests);
Console.WriteLine("All requests processed.");
}
static void process_requests(List
{
int num_cores = Environment.ProcessorCount; // 获取处理器核心数
ManualResetEventSlim[] mres = new ManualResetEventSlim[requests.Count]; // 创建信号量数组
for (int i = 0; i < requests.Count; i++)
{
int index = i;
mres[index] = new ManualResetEventSlim(false); // 初始化信号量
ThreadPool.QueueUserWorkItem((state) =>
{
handle_request(requests[index]);
mres[index].Set(); // 任务完成时设置信号量
});
}
// 等待所有任务完成
ManualResetEventSlim.WaitAll(mres);
}
static void handle_request(Request request)
{
Response response = process(request); // 处理请求
send_response(response); // 发送响应
}
static Response process(Request request)
{
// 模拟请求处理逻辑
Console.WriteLine($"Processing request: {request.Data}");
Thread.Sleep(1000); // 模拟耗时操作
return new Response { Data = $"Response for {request.Data}" };
}
static void send_response(Response response)
{
// 模拟发送响应逻辑
Console.WriteLine($"Sending response: {response.Data}");
}
}
class Request
{
public string Data { get; set; }
}
class Response
{
public string Data { get; set; }
}
======================================================================================================================
使用Task.Run和Task.WhenAll来实现
using System;
using System.Collections.Generic;
using System.Threading.Tasks;
class Program
{
static async Task Main(string[] args)
{
List
{
new Request { Data = "Request1" },
new Request { Data = "Request2" },
new Request { Data = "Request3" }
// 添加更多请求
};
await process_requests(requests);
Console.WriteLine("All requests processed.");
}
static async Task process_requests(List
{
List
foreach (Request request in requests)
{
Task task = Task.Run(() => handle_request(request));
tasks.Add(task);
}
// 等待所有任务完成
await Task.WhenAll(tasks);
}
static async Task handle_request(Request request)
{
Response response = await process(request); // 处理请求
send_response(response); // 发送响应
}
static async Task
{
// 模拟请求处理逻辑
Console.WriteLine($"Processing request: {request.Data}");
await Task.Delay(1000); // 模拟耗时操作
return new Response { Data = $"Response for {request.Data}" };
}
static void send_response(Response response)
{
// 模拟发送响应逻辑
Console.WriteLine($"Sending response: {response.Data}");
}
}
class Request
{
public string Data { get; set; }
}
class Response
{
public string Data { get; set; }
}
3.2 任务调度
在单核处理器上,通过时间片轮转等调度算法实现并发。操作系统在任务间快速切换,营造同时执行的假象。
代码示例:时间片轮转调度 :示例使用了Task和CancellationToken来管理任务的时间片轮转调度。
using System;
using System.Collections.Generic;
using System.Threading;
using System.Threading.Tasks;
class Program
{
static async Task Main(string[] args)
{
List
{
run_task("Task1", 5000), // 创建一个任务,模拟总时间为5秒
run_task("Task2", 3000), // 创建一个任务,模拟总时间为3秒
run_task("Task3", 7000) // 创建一个任务,模拟总时间为7秒
};
int time_slice = 1000; // 设置时间片为1秒
await scheduler(tasks, time_slice);
Console.WriteLine("All tasks processed.");
}
static async Task scheduler(List
{
List
List
while (remainingTasks.Count > 0 || runningTasks.Count > 0)
{
// 将剩余任务中的第一个任务移到运行列表
if (remainingTasks.Count > 0)
{
runningTasks.Add(remainingTasks[0]);
remainingTasks.RemoveAt(0);
}
// 复制运行任务列表以避免在遍历过程中修改列表
List
foreach (Task task in currentRunningTasks)
{
if (!task.IsCompleted)
{
await run_task_for_time_slice(task, time_slice);
if (task.IsCompleted)
{
runningTasks.Remove(task);
}
else
{
remainingTasks.Add(task);
runningTasks.Remove(task);
}
}
}
}
}
static async Task run_task_for_time_slice(Task task, int time_slice)
{
// 创建一个取消令牌源
CancellationTokenSource cts = new CancellationTokenSource(time_slice);
try
{
// 等待任务完成或时间片用完
await task.WaitAsync(cts.Token);
}
catch (TaskCanceledException)
{
// 时间片用完,任务未完成
Console.WriteLine($"Task {task.Id} preempted after {time_slice} ms");
}
}
static Task run_task(string taskName, int total_time)
{
return Task.Run(async () =>
{
int elapsedTime = 0;
int time_slice = 1000; // 模拟内部时间片
while (elapsedTime < total_time)
{
Console.WriteLine($"{taskName} is running. Elapsed time: {elapsedTime} ms");
await Task.Delay(time_slice); // 模拟任务运行一段时间
elapsedTime += time_slice;
}
Console.WriteLine($"{taskName} is completed.");
});
}
}
3.3 多线程
多线程通过创建多个执行单元实现并发。线程共享进程资源,通过同步机制(如互斥锁)协调访问。
代码示例:多线程同步
using System;
using System.Collections.Generic;
using System.Threading;
using System.Threading.Tasks;
namespace Test.EventBus
{
public class DemoB
{
private static Mutex mutex = new Mutex(); // 创建互斥锁
private static StringBuilder sharedData = new StringBuilder(); // 初始化共享数据
public void ShowMsg(string name, string msg)
{
Console.WriteLine($"ShowMsg=> name:{name},msg:{msg}");
var eventMsg = new EventMessage
{
Name = name,
Msg = msg,
CreatedDate = DateTime.Now
};
EventPublishSubscribeUtils.PublishEvent(eventMsg, nameof(DemoB.ShowMsg));
}
public static void RunDemo()
{
List
for (int i = 0; i < 10; i++)
{
int taskId = i;
tasks.Add(Task.Run(() => thread_function($"Task{taskId}")));
}
// 等待所有任务完成
Task.WaitAll(tasks);
}
static void thread_function(string name)
{
for (int i = 0; i < 5; i++)
{
modify_shared_data(name, i);
}
}
static void modify_shared_data(string name, int iteration)
{
mutex.WaitOne(); // 加锁
try
{
// 修改共享数据
sharedData.AppendLine($"{name} is modifying shared data at iteration {iteration} on {DateTime.Now}");
Console.WriteLine($"{name} is modifying shared data at iteration {iteration} on {DateTime.Now}");
}
finally
{
mutex.ReleaseMutex(); // 解锁
}
}
}
public class EventMessage
{
public string Name { get; set; }
public string Msg { get; set; }
public DateTime CreatedDate { get; set; }
}
public static class EventPublishSubscribeUtils
{
public static void PublishEvent(EventMessage eventMsg, string eventName)
{
Console.WriteLine($"Published event: {eventName} => Name: {eventMsg.Name}, Msg: {eventMsg.Msg}, CreatedDate: {eventMsg.CreatedDate}");
}
}
class Program
{
static void Main(string[] args)
{
DemoB.RunDemo();
Console.WriteLine("All threads completed.");
}
}
}
3.4 异步编程
异步编程通过事件循环和回调函数处理I/O密集型任务,避免阻塞主线程。
代码示例:异步I/O
using System;
using System.IO;
using System.Threading.Tasks;
namespace AsyncIOExample
{
class Program
{
static async Task Main(string[] args)
{
string filePath1 = "example1.txt";
string filePath2 = "example2.txt";
// 创建模拟文件
File.WriteAllText(filePath1, "Data from example1.txt");
File.WriteAllText(filePath2, "Data from example2.txt");
// 异步读取文件并使用回调函数处理数据
await async_read(filePath1, data => callback(data, filePath1));
await async_read(filePath2, data => callback(data, filePath2));
Console.WriteLine("All asynchronous read operations completed.");
}
static async Task async_read(string file, Action
{
// 模拟事件循环添加任务
Console.WriteLine($"Starting asynchronous read for file: {file}");
string data = await read_file(file);
callback(data);
}
static async Task
{
// 模拟从磁盘读取文件
using (StreamReader reader = new StreamReader(file))
{
string data = await reader.ReadToEndAsync();
return data;
}
}
static void callback(string data, string file)
{
// 处理读取后的数据
Console.WriteLine($"Data read from {file}: {data}");
}
}
}
3.5 协程
协程通过yield和resume机制在单线程内实现并发,适用于I/O密集型任务,具有低开销优势。
代码示例:协程
using System;
using System.Collections.Generic;
using System.Threading.Tasks;
namespace CoroutineExample
{
class Program
{
static async Task Main(string[] args)
{
IAsyncEnumerable
// 创建一个异步枚举器
IAsyncEnumerator
// 启动协程
if (await enumerator.MoveNextAsync())
{
Console.WriteLine("Coroutine started.");
// 发送数据并恢复执行
await enumerator.MoveNextAsync();
enumerator.Current = "Data1";
await enumerator.MoveNextAsync();
enumerator.Current = "Data2";
await enumerator.MoveNextAsync();
enumerator.Current = "Data3";
// 结束协程
await enumerator.DisposeAsync();
}
}
static async IAsyncEnumerable
{
string data = null;
while (true)
{
// 暂停并接收数据
await Task.Delay(100); // 模拟等待
data = yield return data;
// 处理数据
process(data);
}
}
static void process(string data)
{
if (data != null)
{
Console.WriteLine($"Processed data: {data}");
}
else
{
Console.WriteLine("No data to process.");
}
}
}
}
3.6 事件驱动
事件驱动编程通过事件循环监听和处理事件,适用于GUI和网络应用。
代码示例:事件驱动
using System;
using System.Collections.Generic;
using System.Threading.Tasks;
namespace EventDrivenExample
{
class Program
{
static async Task Main(string[] args)
{
// 创建事件循环
EventLoop eventLoop = new EventLoop();
// 注册事件处理函数
eventLoop.RegisterHandler("Event1", Event1Handler);
eventLoop.RegisterHandler("Event2", Event2Handler);
// 模拟事件触发
eventLoop.TriggerEvent(new Event { Type = "Event1", Data = "Data for Event1" });
eventLoop.TriggerEvent(new Event { Type = "Event2", Data = "Data for Event2" });
// 启动事件循环
await eventLoop.Start();
Console.WriteLine("Event loop completed.");
}
static void Event1Handler(Event e)
{
Console.WriteLine($"Handling {e.Type} with data: {e.Data}");
}
static void Event2Handler(Event e)
{
Console.WriteLine($"Handling {e.Type} with data: {e.Data}");
}
}
public class Event
{
public string Type { get; set; }
public string Data { get; set; }
}
public class EventLoop
{
private Queue
private Dictionary<string, Action
private bool _running = false;
public void RegisterHandler(string eventType, Action
{
if (_handlers.ContainsKey(eventType))
{
_handlers[eventType] += handler;
}
else
{
_handlers[eventType] = handler;
}
}
public void TriggerEvent(Event e)
{
lock (_eventQueue)
{
_eventQueue.Enqueue(e);
}
}
public async Task Start()
{
_running = true;
while (_running)
{
Event e = null;
lock (_eventQueue)
{
if (_eventQueue.Count > 0)
{
e = _eventQueue.Dequeue();
}
}
if (e != null)
{
if (_handlers.TryGetValue(e.Type, out Action
{
handler(e);
}
else
{
Console.WriteLine($"No handler registered for event type: {e.Type}");
}
}
else
{
// 模拟等待事件
await Task.Delay(100); // 等待100毫秒
}
}
}
public void Stop()
{
_running = false;
}
}
}
3.7 多进程
多进程通过创建独立进程实现并发,进程间通过IPC(如管道或消息队列)通信,适用于CPU密集型任务
在C#中,多进程可以通过使用 System.Diagnostics.Process 类来创建和管理独立进程。进程间通信(IPC)可以通过多种方式实现,例如使用命名管道(System.IO.Pipes)或内存映射文件(System.IO.MemoryMappedFiles)。在这个示例中,我们将使用命名管道来进行进程间通信。
代码示例:多进程
using System;
using System.Collections.Generic;
using System.Diagnostics;
using System.IO.Pipes;
using System.Text;
using System.Threading.Tasks;
namespace MultiProcessExample
{
class Program
{
static async Task Main(string[] args)
{
int num_processes = 3; // 设置进程数量
List
List<Task
// 创建命名管道服务器
var server = new NamedPipeServerStream("testpipe", PipeDirection.In, num_processes, PipeTransmissionMode.Message, PipeOptions.Asynchronous);
// 创建并启动进程
for (int i = 0; i < num_processes; i++)
{
Process p = new Process();
p.StartInfo.FileName = "dotnet";
p.StartInfo.Arguments = $"MultiProcessExample.dll worker {i}";
p.StartInfo.UseShellExecute = false;
p.StartInfo.RedirectStandardOutput = true;
p.StartInfo.CreateNoWindow = true;
p.Start();
processes.Add(p);
// 读取子进程的输出
readTasks.Add(Task.Run(() => read_from_process(p)));
}
// 等待所有进程结束
foreach (var process in processes)
{
process.WaitForExit();
}
// 等待所有读取任务完成
string[] results = await Task.WhenAll(readTasks);
// 输出所有结果
foreach (var result in results)
{
Console.WriteLine($"Received result: {result}");
}
// 关闭命名管道服务器
server.Close();
}
static string read_from_process(Process process)
{
// 读取子进程的标准输出
string result = process.StandardOutput.ReadToEnd();
return result;
}
}
class Worker
{
static async Task Main(string[] args)
{
if (args.Length != 2 || args[0] != "worker" || !int.TryParse(args[1], out int id))
{
Console.WriteLine("Invalid arguments.");
return;
}
// 创建命名管道客户端
using (NamedPipeClientStream pipeClient = new NamedPipeClientStream(".", "testpipe", PipeDirection.Out, PipeOptions.Asynchronous))
{
try
{
// 连接到命名管道服务器
await pipeClient.ConnectAsync();
// 执行计算任务
string result = compute(id);
// 发送结果
send_result(pipeClient, result);
}
catch (Exception ex)
{
Console.WriteLine($"Error: {ex.Message}");
}
}
}
static string compute(int id)
{
// 模拟计算任务
Console.WriteLine($"Worker {id} is computing...");
Task.Delay(1000).Wait(); // 模拟耗时操作
return $"Result from Worker {id}";
}
static void send_result(NamedPipeClientStream pipeClient, string result)
{
try
{
// 将结果发送到命名管道
byte[] resultBytes = Encoding.UTF8.GetBytes(result);
pipeClient.Write(resultBytes, 0, resultBytes.Length);
pipeClient.Flush();
}
catch (Exception ex)
{
Console.WriteLine($"Error sending result: {ex.Message}");
}
}
}
}
4.实现并行的技术
4.1 多线程(Multithreading)
多线程通过在单个或多个处理器核心上运行多个线程来实现并行。在多核处理器上,线程可以真正并行执行;在单核处理器上,通过时间片切换实现伪并行。多线程适用于I/O密集型和计算密集型任务,能提高资源利用率和程序响应速度。
代码示例::使用了System.Threading.Thread来创建和管理多个线程,并使用Task来提交和等待任务的完成。
using System;
using System.Collections.Generic;
using System.Threading;
using System.Threading.Tasks;
namespace MultiThreadExample
{
class Program
{
static void Main(string[] args)
{
int N = 3; // 设置线程数量
List
List
object lockObject = new object(); // 同步锁
// 创建并启动多个线程
for (int i = 0; i < N; i++)
{
int id = i;
Thread thread = new Thread(() => task_function(id, results, lockObject));
threads.Add(thread);
thread.Start();
}
// 等待所有线程完成
foreach (Thread thread in threads)
{
thread.Join();
}
// 输出所有结果
foreach (string result in results)
{
Console.WriteLine($"Result from thread: {result}");
}
Console.WriteLine("All threads completed.");
}
static void task_function(int id, List
{
string result = perform_task(id); // 执行任务
lock (lockObject)
{
results.Add(result); // 将结果添加到共享列表并加锁
}
}
static string perform_task(int id)
{
// 模拟任务执行
Console.WriteLine($"Thread {id} is processing.");
Thread.Sleep(1000); // 模拟耗时操作
return $"Result from Thread {id}";
}
}
}
使用 Task 和 async/await 实现:
using System;
using System.Collections.Generic;
using System.Threading.Tasks;
namespace MultiThreadExample
{
class Program
{
static async Task Main(string[] args)
{
int N = 3; // 设置线程数量
List<Task
// 创建并启动多个线程
for (int i = 0; i < N; i++)
{
int id = i;
Task
tasks.Add(task);
}
// 等待所有线程完成
string[] results = await Task.WhenAll(tasks);
// 输出所有结果
foreach (string result in results)
{
Console.WriteLine($"Result from task: {result}");
}
Console.WriteLine("All tasks completed.");
}
static string task_function(int id)
{
string result = perform_task(id); // 执行任务
return result;
}
static string perform_task(int id)
{
// 模拟任务执行
Console.WriteLine($"Task {id} is processing.");
Task.Delay(1000).Wait(); // 模拟耗时操作
return $"Result from Task {id}";
}
}
}
4.2 多进程(Multiprocessing)
多进程通过创建多个独立进程实现并行,每个进程运行在不同的处理器核心上。进程间通过管道或消息队列等通信机制协调工作。多进程适用于需要高隔离性和安全性的任务,如科学计算和服务器应用。
代码示例::
using System;
using System.Collections.Generic;
using System.Diagnostics;
using System.IO.Pipes;
using System.Text;
using System.Threading.Tasks;
namespace MultiProcessExample
{
class Program
{
static async Task Main(string[] args)
{
int N = 3; // 设置进程数量
List
List<Task
// 创建命名管道服务器
using (NamedPipeServerStream pipeServer = new NamedPipeServerStream("testpipe", PipeDirection.In, N, PipeTransmissionMode.Message, PipeOptions.Asynchronous))
{
// 创建并启动多个进程
for (int i = 0; i < N; i++)
{
Process process = create_process(i);
processes.Add(process);
process.Start();
// 创建一个任务来读取子进程的结果
readTasks.Add(Task.Run(() => read_from_pipe(pipeServer)));
}
// 等待所有进程完成
foreach (var process in processes)
{
process.WaitForExit();
}
// 等待所有读取任务完成
string[] results = await Task.WhenAll(readTasks);
// 输出所有结果
foreach (var result in results)
{
Console.WriteLine($"Received result: {result}");
}
// 关闭命名管道服务器
pipeServer.Close();
}
Console.WriteLine("All processes completed.");
}
static Process create_process(int id)
{
Process process = new Process();
process.StartInfo.FileName = "dotnet";
process.StartInfo.Arguments = $"MultiProcessExample.dll worker {id}";
process.StartInfo.UseShellExecute = false;
process.StartInfo.RedirectStandardOutput = true;
process.StartInfo.CreateNoWindow = true;
return process;
}
static async Task
{
// 等待客户端连接
await pipeServer.WaitForConnectionAsync();
// 创建字节数组来接收数据
byte[] buffer = new byte[1024];
int bytesRead = await pipeServer.ReadAsync(buffer, 0, buffer.Length);
string result = Encoding.UTF8.GetString(buffer, 0, bytesRead);
// 断开连接
pipeServer.Disconnect();
return result;
}
}
}
**使用Worker类:
**
using System;
using System.IO.Pipes;
using System.Threading.Tasks;
namespace MultiProcessExample
{
class Worker
{
static async Task Main(string[] args)
{
if (args.Length != 2 || args[0] != "worker" || !int.TryParse(args[1], out int id))
{
Console.WriteLine("Invalid arguments.");
return;
}
// 创建命名管道客户端
using (NamedPipeClientStream pipeClient = new NamedPipeClientStream(".", "testpipe", PipeDirection.Out, PipeOptions.Asynchronous))
{
try
{
// 连接到命名管道服务器
await pipeClient.ConnectAsync();
// 执行计算任务
string result = compute(id);
// 发送结果
send_result(pipeClient, result);
}
catch (Exception ex)
{
Console.WriteLine($"Error: {ex.Message}");
}
}
}
static string compute(int id)
{
// 模拟计算任务
Console.WriteLine($"Worker {id} is computing...");
Task.Delay(1000).Wait(); // 模拟耗时操作
return $"Result from Worker {id}";
}
static void send_result(NamedPipeClientStream pipeClient, string result)
{
try
{
// 将结果发送到命名管道
byte[] resultBytes = Encoding.UTF8.GetBytes(result);
pipeClient.Write(resultBytes, 0, resultBytes.Length);
pipeClient.Flush();
}
catch (Exception ex)
{
Console.WriteLine($"Error sending result: {ex.Message}");
}
}
}
}
4.3 分布式计算(Distributed Computing)
分布式计算将任务分配到网络中的多台计算机上并行执行,通常使用消息传递接口(MPI)进行通信。适用于大规模数据处理和复杂计算任务,如天气预报和分布式数据库。
为了简化实现,我们可以使用一个简单的消息传递库,例如 NamedPipes 和 Task 来模拟MPI的行为。这里我们使用 NamedPipes 来进行进程间通信,并模拟主节点和工作节点之间的数据交换。
代码示例:
using System;
using System.Collections.Generic;
using System.Diagnostics;
using System.IO.Pipes;
using System.Text;
using System.Threading.Tasks;
namespace DistributedComputingExample
{
class Program
{
static async Task Main(string[] args)
{
int num_workers = 3; // 设置工作节点数量
List
List<Task
// 创建和启动工作节点
for (int i = 1; i <= num_workers; i++)
{
Process worker = create_worker_process(i);
workers.Add(worker);
worker.Start();
}
// 模拟主节点
if (args.Length == 0 || args[0] != "worker")
{
// 主节点逻辑
string data = load_data(num_workers);
Console.WriteLine("Data loaded.");
// 创建命名管道服务器来发送数据
List
for (int i = 1; i <= num_workers; i++)
{
NamedPipeServerStream sendPipe = new NamedPipeServerStream($"sendpipe_{i}", PipeDirection.Out, 1, PipeTransmissionMode.Message, PipeOptions.Asynchronous);
sendPipes.Add(sendPipe);
}
// 发送数据到每个工作节点
for (int i = 1; i <= num_workers; i++)
{
string data_chunk = data.Split('|')[i - 1];
send_data(sendPipes[i - 1], data_chunk);
}
// 创建命名管道服务器来接收结果
List
for (int i = 1; i <= num_workers; i++)
{
NamedPipeServerStream receivePipe = new NamedPipeServerStream($"receivepipe_{i}", PipeDirection.In, 1, PipeTransmissionMode.Message, PipeOptions.Asynchronous);
receivePipes.Add(receivePipe);
}
// 读取每个工作节点的结果
for (int i = 1; i <= num_workers; i++)
{
readTasks.Add(Task.Run(() => read_from_pipe(receivePipes[i - 1])));
}
// 等待所有工作节点完成
foreach (var worker in workers)
{
worker.WaitForExit();
}
// 等待所有读取任务完成
string[] results = await Task.WhenAll(readTasks);
// 聚合结果
string final_result = aggregate(results);
Console.WriteLine($"Final result: {final_result}");
}
else
{
// 工作节点逻辑
int id = int.Parse(args[1]);
Console.WriteLine($"Worker {id} started.");
// 创建命名管道客户端来接收数据
using (NamedPipeClientStream receivePipe = new NamedPipeClientStream(".", $"sendpipe_{id}", PipeDirection.In, PipeOptions.Asynchronous))
{
await receivePipe.ConnectAsync();
string data_chunk = receive_data(receivePipe);
Console.WriteLine($"Worker {id} received data: {data_chunk}");
// 处理数据
string result = process(data_chunk);
Console.WriteLine($"Worker {id} processed data: {result}");
// 创建命名管道客户端来发送结果
using (NamedPipeClientStream sendPipe = new NamedPipeClientStream(".", $"receivepipe_{id}", PipeDirection.Out, PipeOptions.Asynchronous))
{
await sendPipe.ConnectAsync();
send_result(sendPipe, result);
}
}
}
}
static Process create_worker_process(int id)
{
Process process = new Process();
process.StartInfo.FileName = "dotnet";
process.StartInfo.Arguments = $"DistributedComputingExample.dll worker {id}";
process.StartInfo.UseShellExecute = false;
process.StartInfo.RedirectStandardOutput = true;
process.StartInfo.CreateNoWindow = true;
return process;
}
static string load_data(int num_chunks)
{
// 模拟加载数据
string data = "DataChunk1|DataChunk2|DataChunk3";
return data;
}
static void send_data(NamedPipeServerStream pipe, string data)
{
try
{
byte[] dataBytes = Encoding.UTF8.GetBytes(data);
pipe.Write(dataBytes, 0, dataBytes.Length);
pipe.Flush();
pipe.Disconnect();
}
catch (Exception ex)
{
Console.WriteLine($"Error sending data: {ex.Message}");
}
}
static string receive_data(NamedPipeClientStream pipe)
{
try
{
byte[] buffer = new byte[1024];
int bytesRead = pipe.Read(buffer, 0, buffer.Length);
return Encoding.UTF8.GetString(buffer, 0, bytesRead);
}
catch (Exception ex)
{
Console.WriteLine($"Error receiving data: {ex.Message}");
return null;
}
}
static string process(string data_chunk)
{
// 模拟任务处理
Console.WriteLine($"Processing data chunk: {data_chunk}");
Task.Delay(1000).Wait(); // 模拟耗时操作
return $"Processed {data_chunk}";
}
static void send_result(NamedPipeClientStream pipe, string result)
{
try
{
byte[] resultBytes = Encoding.UTF8.GetBytes(result);
pipe.Write(resultBytes, 0, resultBytes.Length);
pipe.Flush();
}
catch (Exception ex)
{
Console.WriteLine($"Error sending result: {ex.Message}");
}
}
static async Task
{
await pipe.WaitForConnectionAsync();
byte[] buffer = new byte[1024];
int bytesRead = await pipe.ReadAsync(buffer, 0, buffer.Length);
string result = Encoding.UTF8.GetString(buffer, 0, bytesRead);
pipe.Disconnect();
return result;
}
static string aggregate(string[] results)
{
// 聚合结果
StringBuilder finalResult = new StringBuilder();
foreach (string result in results)
{
finalResult.AppendLine(result);
}
return finalResult.ToString();
}
}
}
===================================================================
使用第三方MPI库
安装MPI库:
安装 OpenMPI 或 Microsoft MPI。
using System;
using System.Collections.Generic;
using System.Threading.Tasks;
using MPI;
namespace DistributedComputingExample
{
class Program
{
static async Task Main(string[] args)
{
await MPI.StartMain(DistributedMain, args);
}
static async Task DistributedMain(string[] args)
{
int rank = MPI.Communicator.world.Rank;
int size = MPI.Communicator.world.Size;
if (rank == 0)
{
// 主节点逻辑
string data = load_data(size);
Console.WriteLine("Data loaded.");
// 分配数据块给每个工作节点
for (int i = 1; i < size; i++)
{
string data_chunk = data.Split('|')[i - 1];
send_data(data_chunk, i);
}
// 接收每个工作节点的结果
List
for (int i = 1; i < size; i++)
{
string result = receive_result(i);
results.Add(result);
}
// 聚合结果
string final_result = aggregate(results);
Console.WriteLine($"Final result: {final_result}");
}
else
{
// 工作节点逻辑
string data_chunk = receive_data(0);
Console.WriteLine($"Worker {rank} received data: {data_chunk}");
// 处理数据
string result = process(data_chunk);
Console.WriteLine($"Worker {rank} processed data: {result}");
// 发送结果到主节点
send_result(result, 0);
}
}
static string load_data(int num_chunks)
{
// 模拟加载数据
string data = "DataChunk1|DataChunk2|DataChunk3";
return data;
}
static void send_data(string data, int destination)
{
byte[] dataBytes = Encoding.UTF8.GetBytes(data);
MPI.Communicator.world.Send(dataBytes, dataBytes.Length, destination, 0);
}
static string receive_data(int source)
{
int msgSize = MPI.Communicator.world.Receive
byte[] buffer = new byte[msgSize];
MPI.Communicator.world.Receive(buffer, msgSize, source, 0);
return Encoding.UTF8.GetString(buffer);
}
static string process(string data_chunk)
{
// 模拟任务处理
Console.WriteLine($"Processing data chunk: {data_chunk}");
Task.Delay(1000).Wait(); // 模拟耗时操作
return $"Processed {data_chunk}";
}
static void send_result(string result, int destination)
{
byte[] resultBytes = Encoding.UTF8.GetBytes(result);
MPI.Communicator.world.Send(resultBytes.Length, destination, 0);
MPI.Communicator.world.Send(resultBytes, resultBytes.Length, destination, 0);
}
static string receive_result(int source)
{
int msgSize = MPI.Communicator.world.Receive
byte[] buffer = new byte[msgSize];
MPI.Communicator.world.Receive(buffer, msgSize, source, 0);
return Encoding.UTF8.GetString(buffer);
}
static string aggregate(List
{
// 聚合结果
StringBuilder finalResult = new StringBuilder();
foreach (string result in results)
{
finalResult.AppendLine(result);
}
return finalResult.ToString();
}
}
}
4.4 GPU并行计算
GPU并行计算利用图形处理单元(GPU)的多核心架构,通过CUDA或OpenCL等技术实现高度并行。适用于数据密集型任务,如图像处理和机器学习。
代码示例:
使用 CUDAfy.NET 实现GPU并行计算的示例。假设我们有一个简单的计算任务,每个线程处理一个输入元素并生成相应的输出元素。
安装 CUDAfy.NET
using System;
using Cudafy;
using Cudafy.Host;
using Cudafy.Translator;
namespace GpuParallelComputingExample
{
class Program
{
static void Main(string[] args)
{
// 加载输入数据
int[] input = { 1, 2, 3, 4, 5 };
int[] output = new int[input.Length];
// 获取GPU设备
GPGPU gpu = CudafyHost.GetDevice(eGPUType.Cuda);
// 加载CUDA代码
gpu.LoadModule(typeof(Program));
// 分配内存并复制数据到GPU
GPGPUDeviceVariable
GPGPUDeviceVariable
// 复制输入数据到GPU
gpu.CopyToDevice(input, d_input);
gpu.CopyToDevice(output, d_output);
// 启动CUDA内核
gpu.LaunchNewKernel(d_input.Size, 1, gpu_kernel, d_input, d_output);
// 从GPU复制结果到主机
gpu.CopyFromDevice(d_output, output);
// 同步GPU操作
gpu.Synchronize();
// 输出结果
Console.WriteLine("Input: " + string.Join(", ", input));
Console.WriteLine("Output: " + string.Join(", ", output));
// 释放GPU内存
d_input.Free();
d_output.Free();
gpu.FreeAll();
}
[Cudafy]
public static void gpu_kernel(GPGPUThread thread, int[] input, int[] output)
{
int tid = thread.threadIdx.x; // 获取线程ID
if (tid < input.Length)
{
output[tid] = compute(input[tid]);
}
}
[Cudafy]
public static int compute(int value)
{
// 模拟计算任务,例如简单的平方计算
return value * value;
}
}
}
如果你更倾向于使用OpenCL而不是CUDA,可以使用 Managed OpenCL 库。
using System;
using System.Collections.Generic;
using System.Linq;
using System.Text;
using System.Threading.Tasks;
using ManagedOpenCL;
namespace GpuParallelComputingExample
{
class Program
{
static void Main(string[] args)
{
// 加载输入数据
int[] input = { 1, 2, 3, 4, 5 };
int[] output = new int[input.Length];
// 获取GPU设备
CLPlatform platform = CLPlatform.GetPlatformIDs()[0];
CLDevice device = platform.GetDeviceIDs()[0];
CLContext context = CLContext.CreateContext(new[] { device });
CLCommandQueue queue = context.CreateCommandQueue(device, CLCommandQueueProperties.None);
// 创建内核
string kernelCode = @"
__kernel void gpu_kernel(__global const int* input, __global int* output)
{
int tid = get_global_id(0);
if (tid < get_global_size(0))
{
output[tid] = compute(input[tid]);
}
}
int compute(int value)
{
return value * value;
}
";
// 编译内核
CLProgram program = context.CreateProgramWithSource(new[] { kernelCode });
program.BuildProgram(new[] { device }, null, null, null);
// 创建内存缓冲区
CLMemoryBuffer
CLMemoryBuffer
// 设置内核参数
CLKernel kernel = program.CreateKernel("gpu_kernel");
kernel.SetMemoryArgument(0, d_input);
kernel.SetMemoryArgument(1, d_output);
// 启动内核
queue.EnqueueNDRangeKernel(kernel, null, new[] { (long)input.Length }, null);
// 从GPU复制结果到主机
queue.EnqueueReadBuffer(d_output, true, 0, output.Length, output);
// 同步GPU操作
queue.Finish();
// 输出结果
Console.WriteLine("Input: " + string.Join(", ", input));
Console.WriteLine("Output: " + string.Join(", ", output));
// 释放资源
d_input.Dispose();
d_output.Dispose();
queue.Dispose();
program.Dispose();
context.Dispose();
}
}
}
4.5 任务并行(Task Parallelism)
任务并行将一个大任务分解为多个独立子任务,并行执行这些子任务。适用于任务间依赖较少的场景,如编译器并行处理多个文件。
代码示例:
using System;
using System.Collections.Generic;
using System.Threading.Tasks;
namespace TaskParallelExample
{
class Program
{
static async Task Main(string[] args)
{
// 创建任务列表
List
{
task1(),
task2(),
task3()
};
// 等待所有任务完成
await Task.WhenAll(tasks);
Console.WriteLine("All tasks completed.");
}
static async Task task1()
{
Console.WriteLine($"Task1 started on thread: {Thread.CurrentThread.ManagedThreadId}");
// 模拟耗时操作
await Task.Delay(1000);
Console.WriteLine($"Task1 completed on thread: {Thread.CurrentThread.ManagedThreadId}");
}
static async Task task2()
{
Console.WriteLine($"Task2 started on thread: {Thread.CurrentThread.ManagedThreadId}");
// 模拟耗时操作
await Task.Delay(1000);
Console.WriteLine($"Task2 completed on thread: {Thread.CurrentThread.ManagedThreadId}");
}
static async Task task3()
{
Console.WriteLine($"Task3 started on thread: {Thread.CurrentThread.ManagedThreadId}");
// 模拟耗时操作
await Task.Delay(1000);
Console.WriteLine($"Task3 completed on thread: {Thread.CurrentThread.ManagedThreadId}");
}
}
}
4.6 数据并行(Data Parallelism)
数据并行将数据分割成多个部分,每个部分由不同的处理器或线程并行处理。适用于矩阵运算和图像处理等数据密集型任务。
代码示例:
using System;
using System.Collections.Generic;
using System.Linq;
using System.Threading.Tasks;
namespace DataParallelExample
{
class Program
{
static void Main(string[] args)
{
int N = 10; // 设置数据数量
List
int[] output = new int[N];
// 使用 Parallel.ForEach 实现数据并行
Parallel.ForEach(input, (i, loopState) =>
{
output[i] = compute(i);
Console.WriteLine($"Processed element {i} on thread: {Task.CurrentId}");
});
// 输出结果
Console.WriteLine("Input: " + string.Join(", ", input));
Console.WriteLine("Output: " + string.Join(", ", output));
}
static int compute(int value)
{
// 模拟计算任务,例如简单的平方计算
Console.WriteLine($"Computing value: {value} on thread: {Task.CurrentId}");
Task.Delay(100).Wait(); // 模拟耗时操作
return value * value;
}
}
}
4.7 流水线并行(Pipeline Parallelism)
流水线并行将任务分解为一系列阶段,每个阶段由不同处理器或线程处理,形成处理流水线。适用于数据流处理和视频编码等场景。
代码示例:
using System;
using System.Threading.Tasks;
namespace PipelineParallelExample
{
class Program
{
static async Task Main(string[] args)
{
string input = "Initial Data";
// 启动流水线并行
string finalOutput = await StartPipeline(input);
// 输出最终结果
Console.WriteLine($"Final Output: {finalOutput}");
}
static async Task
{
// 第一阶段
string stage1Output = await stage1(input);
// 第二阶段
string stage2Output = await stage2(stage1Output);
// 第三阶段
string finalOutput = await stage3(stage2Output);
return finalOutput;
}
static async Task
{
Console.WriteLine($"Stage 1 started with input: {input}");
// 模拟耗时操作
await Task.Delay(1000);
string intermediate1 = $"Stage1: Processed {input}";
Console.WriteLine($"Stage 1 completed with output: {intermediate1}");
return intermediate1;
}
static async Task
{
Console.WriteLine($"Stage 2 started with input: {intermediate1}");
// 模拟耗时操作
await Task.Delay(1000);
string intermediate2 = $"Stage2: Processed {intermediate1}";
Console.WriteLine($"Stage 2 completed with output: {intermediate2}");
return intermediate2;
}
static async Task
{
Console.WriteLine($"Stage 3 started with input: {intermediate2}");
// 模拟耗时操作
await Task.Delay(1000);
string output = $"Stage3: Processed {intermediate2}";
Console.WriteLine($"Stage 3 completed with output: {output}");
return output;
}
}
}
4.8 Actor模型
Actor模型是一种并发计算模型,通过将系统分解为独立执行的Actor来实现并发和并行。每个Actor可以通过消息传递与其他演员通信,避免共享内存和锁的使用。常见的Actor模型有Orleans、Akka、Erlang等。
代码示例:
using System;
using System.Threading.Tasks;
using Akka.Actor;
namespace ActorModelExample
{
class Program
{
static async Task Main(string[] args)
{
// 创建Actor系统
var system = ActorSystem.Create("ActorSystem");
// 创建Actor1和Actor2
var actor1 = system.ActorOf(Props.Create(() => new Actor1(system)), "Actor1");
var actor2 = system.ActorOf(Props.Create(() => new Actor2(system)), "Actor2");
// Actor1 发送 Ping 消息给 Actor2
actor1.Tell(new PingMessage(actor2));
// 等待一段时间以确保消息处理完成
await Task.Delay(2000);
// 停止两个Actor
actor1.Tell(new StopMessage());
actor2.Tell(new StopMessage());
// 等待一段时间以确保Actor停止完成
await Task.Delay(1000);
// 关闭Actor系统
await system.Terminate();
}
}
public class PingMessage
{
public IActorRef TargetActor { get; }
public PingMessage(IActorRef targetActor)
{
TargetActor = targetActor;
}
}
public class PongMessage
{
public IActorRef TargetActor { get; }
public PongMessage(IActorRef targetActor)
{
TargetActor = targetActor;
}
}
public class StopMessage { }
public class Actor1 : ReceiveActor
{
private readonly ActorSystem _system;
public Actor1(ActorSystem system)
{
_system = system;
Receive
{
Console.WriteLine($"Actor1 received Ping from Actor {Sender.Path}");
ping.TargetActor.Tell(new PongMessage(Self));
});
Receive
{
Console.WriteLine($"Actor1 received Pong from Actor {pong.TargetActor.Path}");
});
Receive
{
Console.WriteLine("Actor1 stopping.");
Context.Stop(Self);
});
}
}
public class Actor2 : ReceiveActor
{
private readonly ActorSystem _system;
public Actor2(ActorSystem system)
{
_system = system;
Receive
{
Console.WriteLine($"Actor2 received Ping from Actor {Sender.Path}");
ping.TargetActor.Tell(new PongMessage(Self));
});
Receive
{
Console.WriteLine("Actor2 stopping.");
Context.Stop(Self);
});
}
}
}
5 实践运用
5.1 软件开发中的并行应用
并行广泛应用于需要高计算能力的场景,包括:
- 科学模拟:天气预报、分子动力学等任务涉及大量方程求解,可通过并行化显著加速。
- 机器学习:深度神经网络训练依赖矩阵运算,TensorFlow和PyTorch等框架利用GPU并行性加速训练过程。
- 图像与视频处理:如3D渲染或视频滤镜应用,可将任务分配到多核或GPU上并行执行。
常见的并行编程模型包括:
- T- PL:TPL是.NET中用于并行编程的一个强大库
- OpenMP:基于指令的共享内存并行API,适用于C/C++和Fortran。
- MPI(消息传递接口):分布式内存并行的标准,用于高性能计算集群。
- CUDA:NVIDIA的并行计算平台,支持GPU上的细粒度并行。
5.2 软件开发中的并发应用
并发在需要处理多任务或事件的系统中至关重要,例如:
- Web服务器:如Apache和Nginx,通过多线程、多进程或事件驱动架构并发处理大量客户端请求。
- 图形用户界面(GUI):并发确保界面在执行后台任务(如数据加载)时仍能响应用户输入。
- 数据库系统:通过锁和事务等并发控制机制,管理多用户对数据的并发访问。
常见的并发模型包括:
- 多线程:C#、Java和C++提供线程库(如System.Thread、java.lang.Thread、std::thread)实现并发。
- 异步编程:Node.js和Python的asyncio支持非阻塞代码,适用于I/O密集型任务。
- Actor模型:Erlang和Akka框架通过独立的Actor单元和消息传递实现并发,避免共享内存问题。
6. 并发与并行编程的挑战
6.1 并发挑战
并发引入了多个复杂问题:
- 竞争条件(Race Conditions):多个线程同时访问共享资源,可能导致不可预测的结果。例如,未同步的计数器递增可能丢失更新。
- 死锁(Deadlocks):线程间相互等待对方释放资源,导致永久阻塞。例如,两个线程各自持有对方需要的锁。
- 活锁(Livelocks):线程不断尝试解决问题但无进展,如反复让出资源。
- 饥饿(Starvation):某些线程因调度不公而无法获得资源。
解决这些问题通常依赖同步原语(如互斥锁、信号量),但过度同步可能降低性能。
6.2 并行挑战
并行计算也有其难点:
- 负载均衡:确保所有处理器或核心均匀分担工作量,避免部分核心空闲。
- 通信开销:分布式系统中,节点间通信成本可能抵消并行收益。
- 可扩展性:随着处理器数量增加,同步开销或串行部分可能导致收益递减。
并行算法需精心设计,采用动态负载均衡或工作窃取等技术应对这些挑战。
7. 管理并行与并发的工具与技术
7.1 调试与测试
并发与并行程序的非确定性使其调试异常困难,常用工具包括:
- 静态分析:如Intel Inspector或FindBugs,可在不运行代码的情况下检测潜在问题。
- 运行时验证:Valgrind的Helgrind等工具在程序运行时监控同步错误。
- 测试框架:JUnit或pytest可扩展用于并发测试,模拟多线程场景。
7.2 设计模式
设计模式为常见问题提供解决方案:
- 线程池:管理固定数量的线程执行任务,减少创建和销毁开销。
- 生产者-消费者:生产者生成数据,消费者处理数据,通过同步队列协调。
- Map-Reduce:将任务映射到数据分片并归约结果,适用于大数据处理。
7.3 编程语言支持
现代语言内置了对并行与并发的支持:
- CSharp:通过TPL和System.Collections.Concurrent等库简化并发和并行编程。
- Go:通过goroutines和通道简化并发编程。
- Rust:通过所有权模型在编译时防止数据竞争。
- Java:提供java.util.concurrent包,包括线程池、并发集合等高级工具。
8.并行与并发的权衡
8.1 复杂度与性能
并行与并发提升性能的同时增加了代码复杂度:
- 多线程:提供细粒度控制,但易引入竞争条件。
- 异步编程:避免线程开销,但可能导致回调地狱或复杂逻辑。
8.2 共享内存与消息传递
并发模型分为两种:
- 共享内存:线程共享数据,需同步以避免冲突,效率高但易出错。
- 消息传递:通过消息通信避免共享状态,安全性高但可能引入延迟。
如何选择取决于性能、安全性和应用需求。

 浙公网安备 33010602011771号