


1.0 常用Linux指令
sudo du -hs */ | sort -rh | head -20
sudo du -h . | sort -rh | head -n30
sudo du -hcd 1 .* | sort -rh | head -50
查Disk空間
sudo docker system prune -a
刪除沒用的docker images + containers
sudo docker system df
查Docker占用Disk空間
sudo netstat -tulpn | grep LISTEN
查占用端口
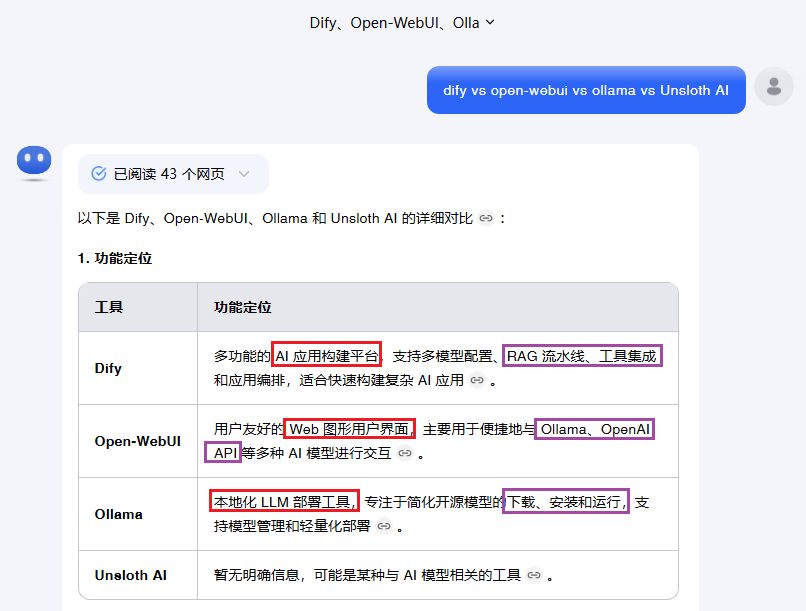
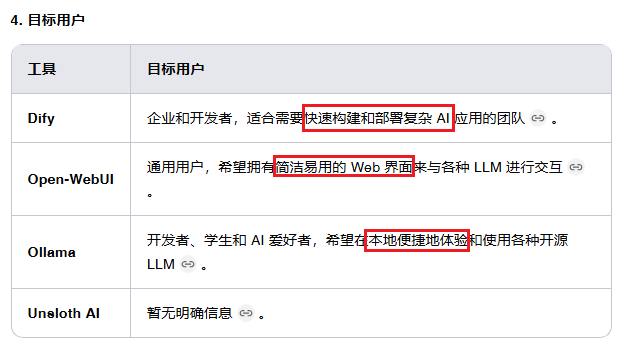
2.0 GenAI開發工具,橫向對比
在AI時代,擅用kimi來快速學習,是成功的關鍵。
3.0 ollama
docker run -d --gpus=all -v /usr/share/ollama/.ollama:/root/.ollama -p 11434:11434 --name ollama ollama/ollama
運行ollama鏡像。注意,要設置好"數據卷" -v /usr/share/ollama/.ollama
docker exec -it ollama ollama run deepseek-r1:7b
下載模型。
docker exec -it ollama ollama list
查看已下載的模型。
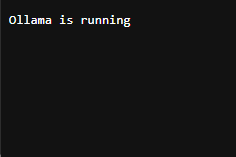
進入http://localhost:11434/,顯示Ollama is running。
3.1 download_mode.sh
#!/bin/sh
while true; do
timeout 5s docker exec -it ollama ollama run deepseek-r1:14b
done
因ollama有官方BUG,只要斷線5秒就倒帶。所以要另外用bash來執行
sudo sh download_mode.sh
執行download_mode.sh
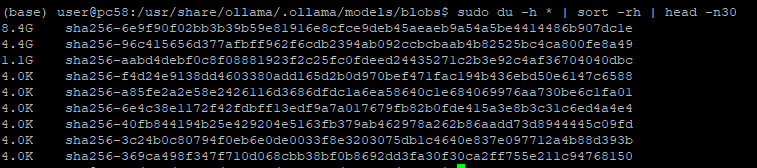
3.2 查看在DISK的已下載模型
cd /usr/share/ollama/.ollama/blobs
sudo du -h * | sort -rh | head -n30
進入ollama的模型PATH,查看模型大小。
| Model | Size |
| deepseek-r1:1.5b | 1.1G |
| deepseek-r1:7b | 4.4G |
| deepseek-r1:14b | 8.4G |
4.0 open-webui
docker run -d -p 3000:8080 --gpus all --add-host=host.docker.internal:host-gateway -v open-webui:/app/backend/data -e OLLAMA_BASE_URL=http://127.0.0.1:11434 --name open-webui --restart always ghcr.io/open-webui/open-webui:cuda
運行open-webui鏡像。
| 需修改參數 | 值 |
| -p | 8080 |
| -v | open-webui |
| OLLAMA_BASE_URL | http://127.0.0.1:11434 |
4.1 webui
進入http://127.0.0.1:3000,就能看見webui。
4.2 open-webui連接ollama
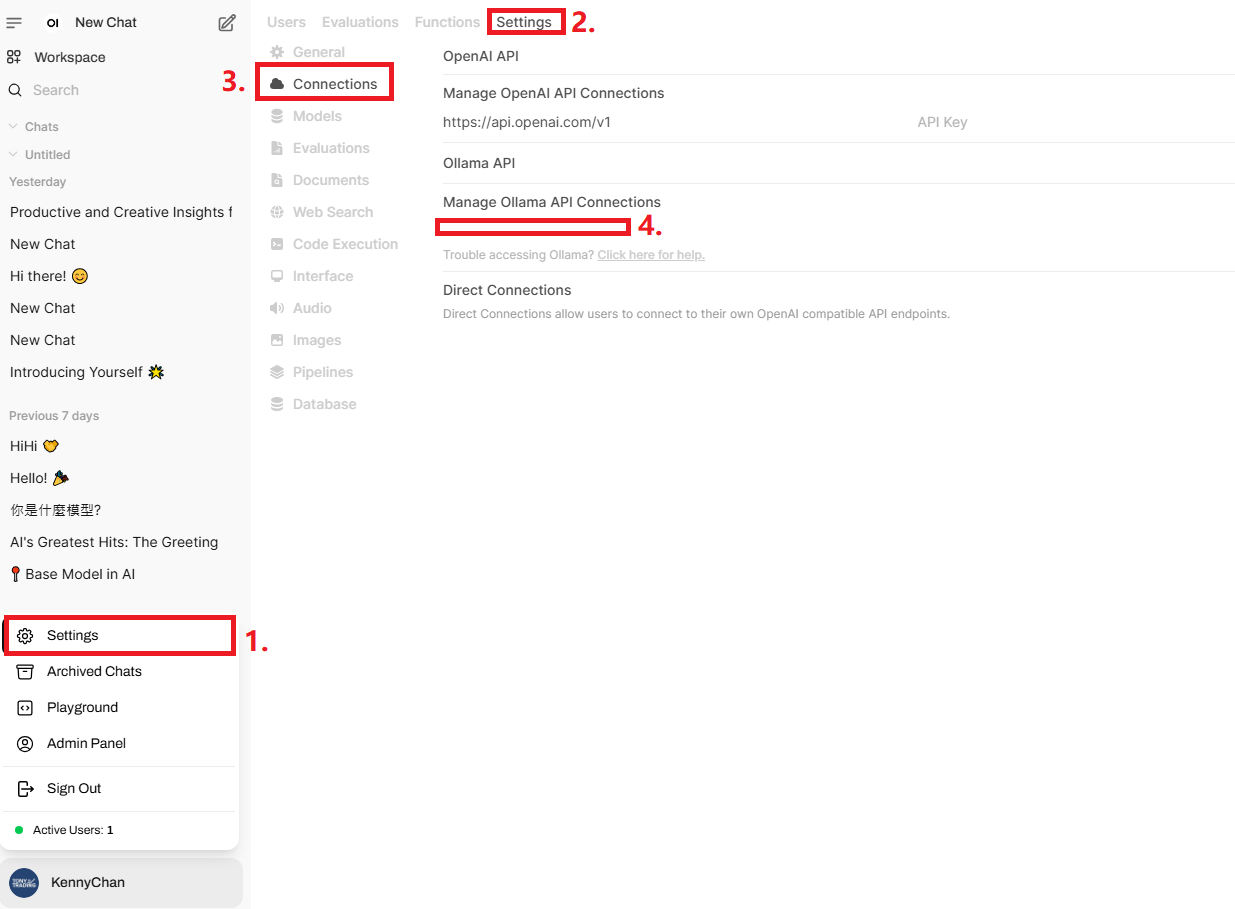
- 按"Settings"
- 按"Settings"
- 按"Connections"
- 填寫"127.0.0.1:11434",即OLLAMA_BASE_URL值。
5.0 dify
git clone -b 1.0.1 https://github.com/langgenius/dify
sudo chmod -R 777 /home/user/dify
cd /home/user/dify/docker
cp .env.example .env
sudo docker compose up -d
下載Release版本的dify,然後Build Image。
docker run --rm \
  -v $(pwd)/dify:/dify \
  alpine \
  sh -c "chown -R 1001:1001 /dify && chmod -R 755 /dify"
如沒root,把dify改成ownership是user01 (1001)。
進入http://127.0.0.1:80,正常顯示。

sudo docker ps -a
dify是一個聚合工具包,有9個containers。
5.1 dify連接ollama
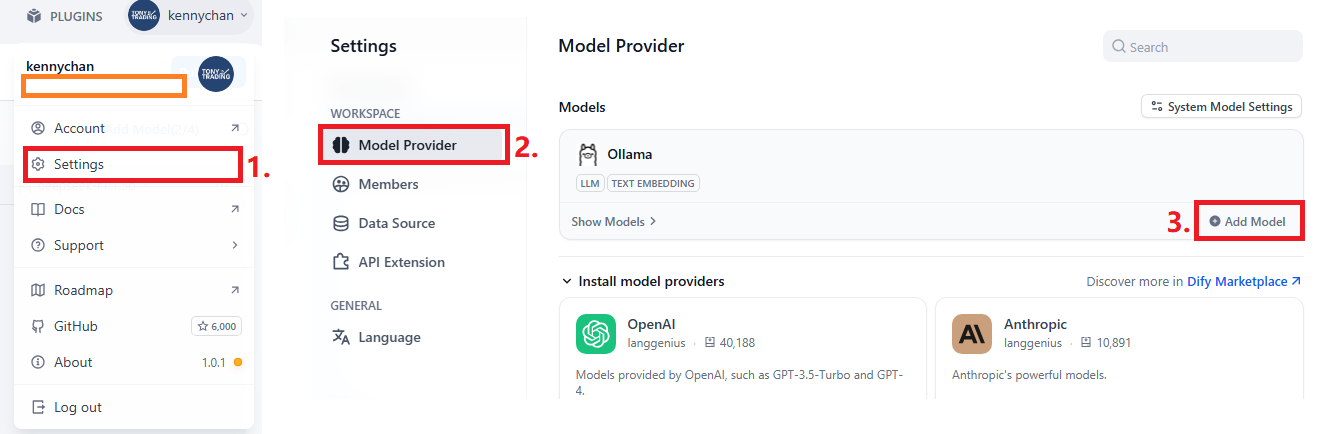
- Settings
- Model Provoder
- Add Model
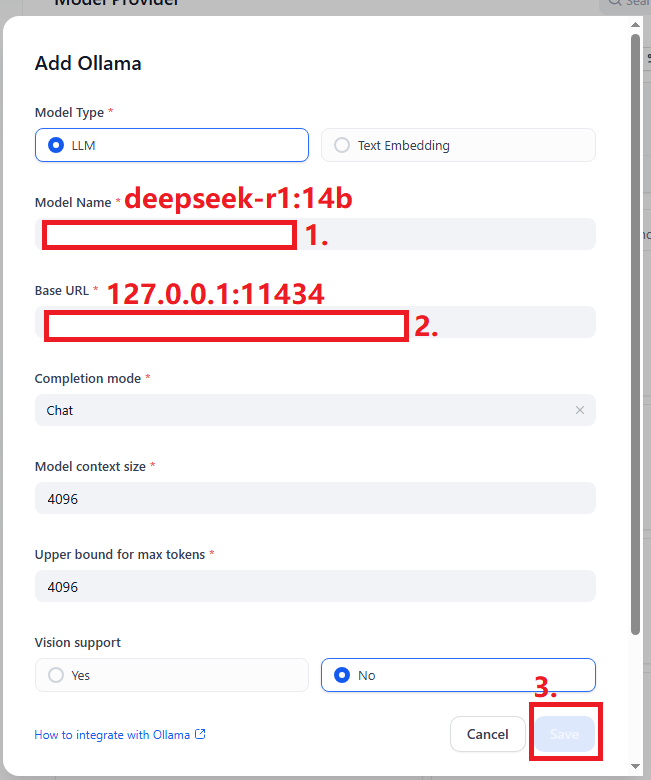
- 填寫Model Name = deepseek-r1:14b [參考: 3.0 ollama]
- 填寫Base URL = 127.0.0.1:11434
- 按"Save"
5.2 修改端口
line:853 NGINX_PORT=81
line:854 NGINX_SSL_PORT=444

line:912 EXPOSE_NGINX_PORT=81
line:913 EXPOSE_NGINX_SSL_PORT=444
./dify/docker/.env
6.0 jupyter + unsloth [Docker容器]
sudo docker run -p 8888:8888 --gpus all --name jupyter-notebook-v2 -v /home/user/modal:/home/jovyan/modal dbpower/jupyter-notebook:latest jupyter lab --allow-root --no-browser --ip=0.0.0.0 --port=8888 --NotebookApp.token='' --NotebookApp.password='' >> ~/PycharmProjects/jupyter/log/jupyter_`date +\%Y\%m\%d_\%H\%M\%S`.log 2>&1
運行dupyter鏡像。
這里有些注意事項:
| 需修改參數 | 值 | Description |
| -v | /home/user/modal:/home/jovyan/modal |
先下載unsloth的修改版DS模型到本地。 https://docs.unsloth.ai/get-started/all-our-models |
| -v | ~/PycharmProjects/jupyter/conda:/opt/conda | 在docker jupyter內pip安裝的庫,用數據卷/opt/conda |
| -v | ~/PycharmProjects/jupyter/jovyan:/home/jovyan | 在docker jupyter內dev空間,用數據卷/home/jovyan |
| image | dbpower/jupyter-notebook:latest |
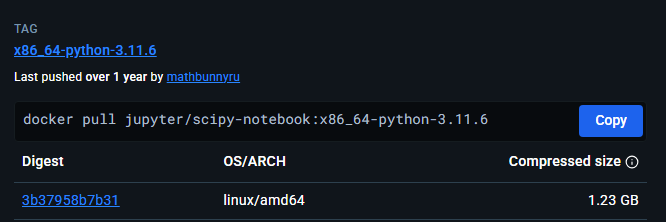
應用jupyter/scipy-notebook。unsloth是用scipy。 https://hub.docker.com/r/jupyter/scipy-notebook/tags |
6.1 下載unsloth的修改版DS模型到本地
cd /home/user/modal
git lfs clone https://huggingface.co/unsloth/DeepSeek-R1-Distill-Qwen-1.5B-unsloth-bnb-4bits
下載DeepSeek-R1-Distill-Qwen-1.5B-unsloth-bnb-4bits
6.2 unsloth SFT(supervised fine-tuning)
可參考官方demo:https://github.com/unslothai/unsloth
!pip uninstall unsloth -y && pip install --upgrade --no-cache-dir --no-deps git+https://github.com/unslothai/unsloth.git
!pip install bitsandbytes unsloth_zoo
在jupyter里下載unsloth。
PS: 其實應修改dockerfile來建立docker image。而非在docker容器內安裝。
6.3 unsloth加載本地DS模型
from unsloth import FastLanguageModel
import torch
max_seq_length = 2048 # Choose any! We auto support RoPE Scaling internally!
dtype = None # None for auto detection. Float16 for Tesla T4, V100, Bfloat16 for Ampere+
load_in_4bit = True # Use 4bit quantization to reduce memory usage. Can be False.

model, tokenizer = FastLanguageModel.from_pretrained(
    model_name = "/home/jovyan/modal/Deepseek-r1-distill-qwen-1.5b-unsloth-bnb-4bit",
    max_seq_length = max_seq_length,
    dtype = dtype,
    load_in_4bit = load_in_4bit,
    # token = "hf_....", # use one if using gated models like meta-llama/Llama-2-7b-hf
    local_files_only = True,
)
用local_files_only=True,就可加載在本地的DS模型。

6.4 unsloth SFT
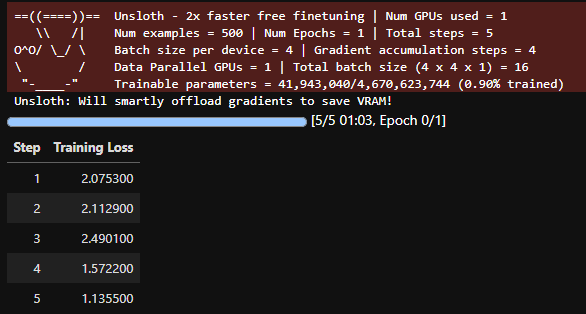
trainer_stats = trainer.train()
成功SFT
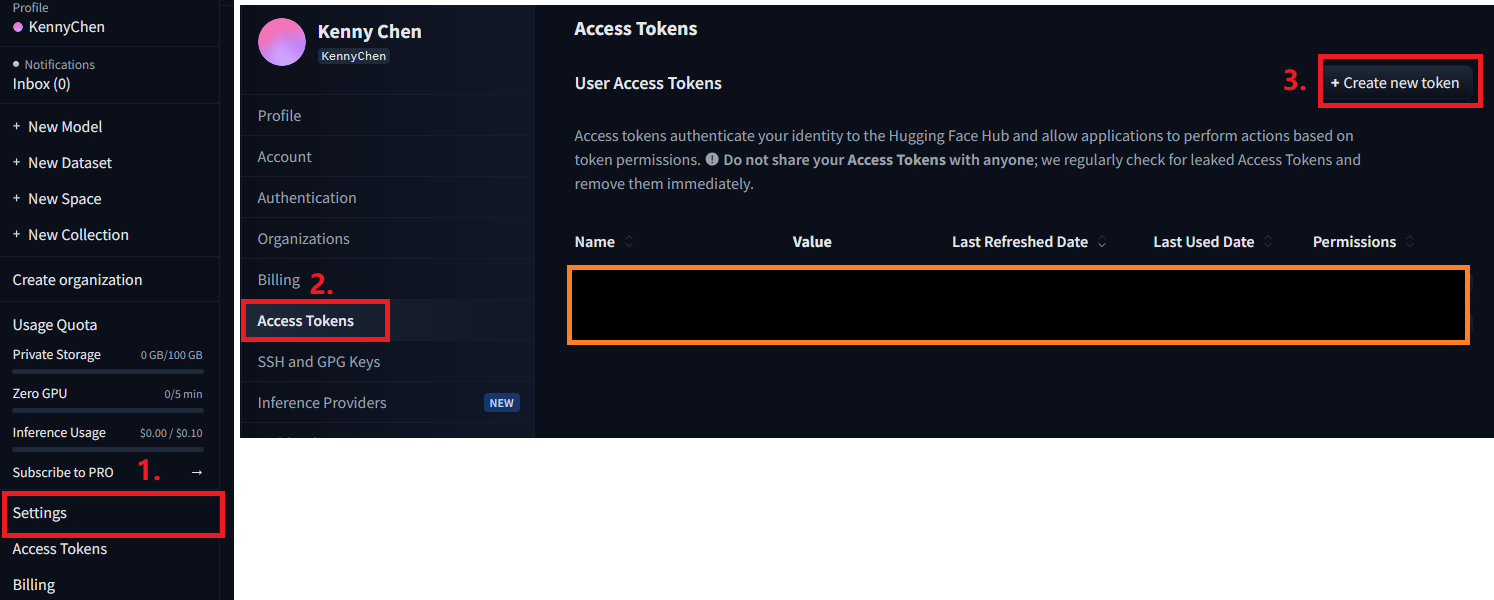
7.0 Hugging Face Access Tokens
https://huggingface.co/
8.0 ragflow
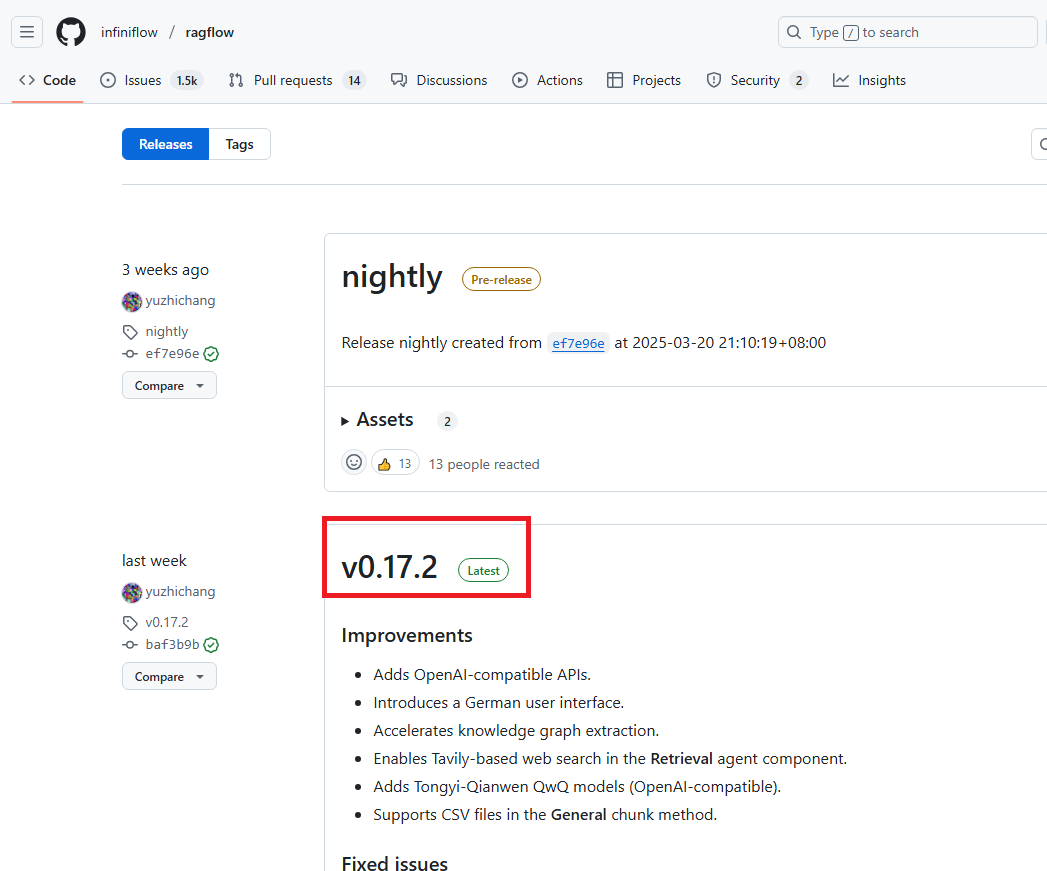
sudo git clone -b v0.17.2 https://github.com/infiniflow/ragflow
cd ragflow/docker
sudo docker-compose -f docker-compose-gpu.yml up -d
docker-compose build containers
8.1 切換docker network [錯誤]
Updated [20250327]: docker-redis-1是dify,用錯了鏡像。
sudo docker network ls
sudo docker inspect docker-redis-1
sudo docker network inspect docker_ragflow
docker-redis-1不是在docker_ragflow
sudo docker network connect docker_ragflow docker-redis-1
sudo docker logs -f docker-redis-1
把docker-redis-1 connect docker_ragflow
sudo docker rm -f ragflow-server
刪除ragflow-server鏡像。
cd ragflow/docker
sudo docker-compose -f docker-compose-gpu.yml up -d
重啟ragflow-server鏡像。
8.2 修改設置Ragflow
參考資源
- 安装ragflow后,之前部署的Dify咋不能用了?(附ragflow一键安装包dify共存版)
- 【AI】ragflow 多张 4090 GPU 初始化文档报错 NCCL Error 2: unhandled system error
8.2.1 /ragflow/docker/docker-compose-gpu.yml
    ports:
      - ${SVR_HTTP_PORT}:9380
      - 82:80
      - 446:443
lines:15~16: 修改端口,開發避免占用了80 & 443端口。
    ipc: host
    shm_size: 8g
line 23~24: 多顯卡會報錯NCCL Error 2: unhandled system error。
8.2.2 /home/user/PycharmProjects/ragflow/docker/docker-compose-base.yml
  ragflow-redis:
    # swr.cn-north-4.myhuaweicloud.com/ddn-k8s/docker.io/valkey/valkey:8
line116: 修改services名是ragflow-redis
8.2.3 /home/user/PycharmProjects/ragflow/docker/.env
REDIS_HOST=ragflow-redis
line71: 修改services名是ragflow-redis
RAGFLOW_IMAGE=infiniflow/ragflow:v0.17.2
line87: 用包含embedding models的鏡像。
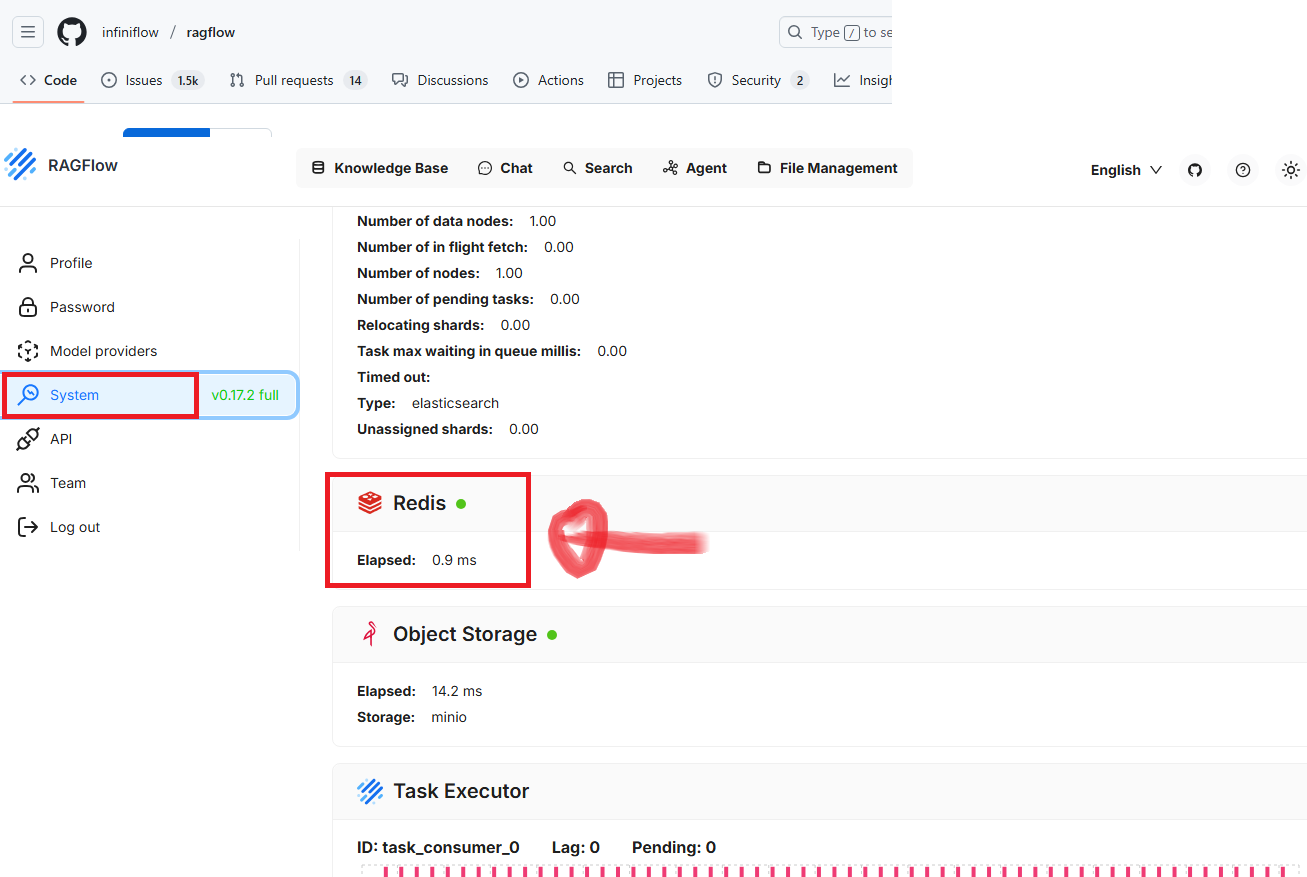
8.3 成功
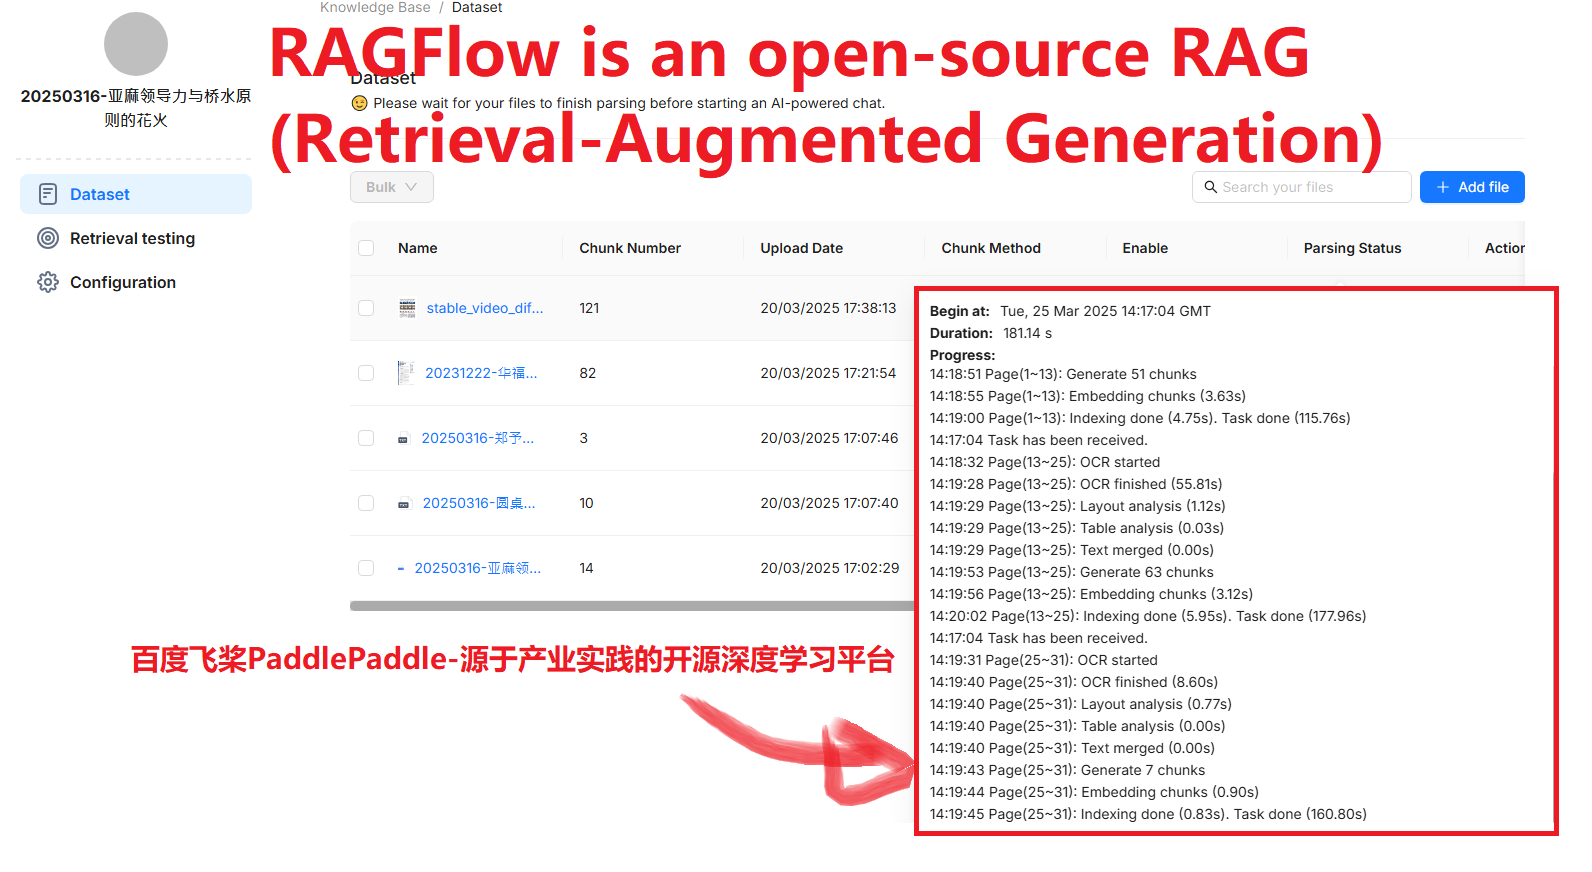
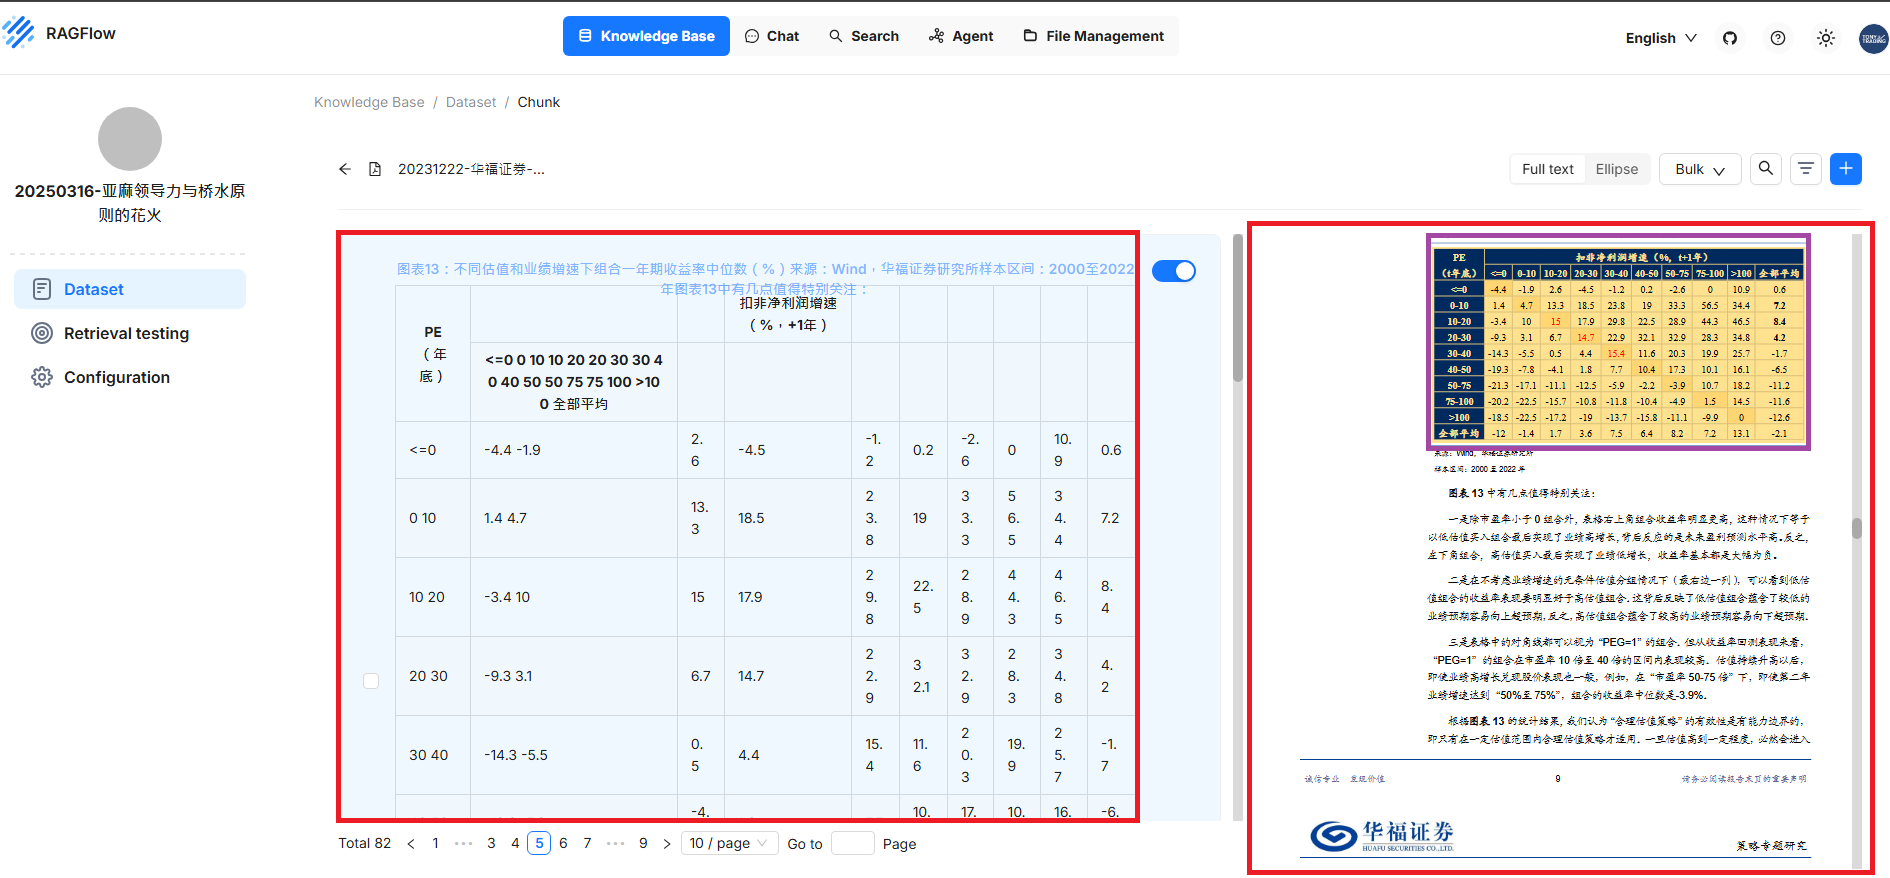
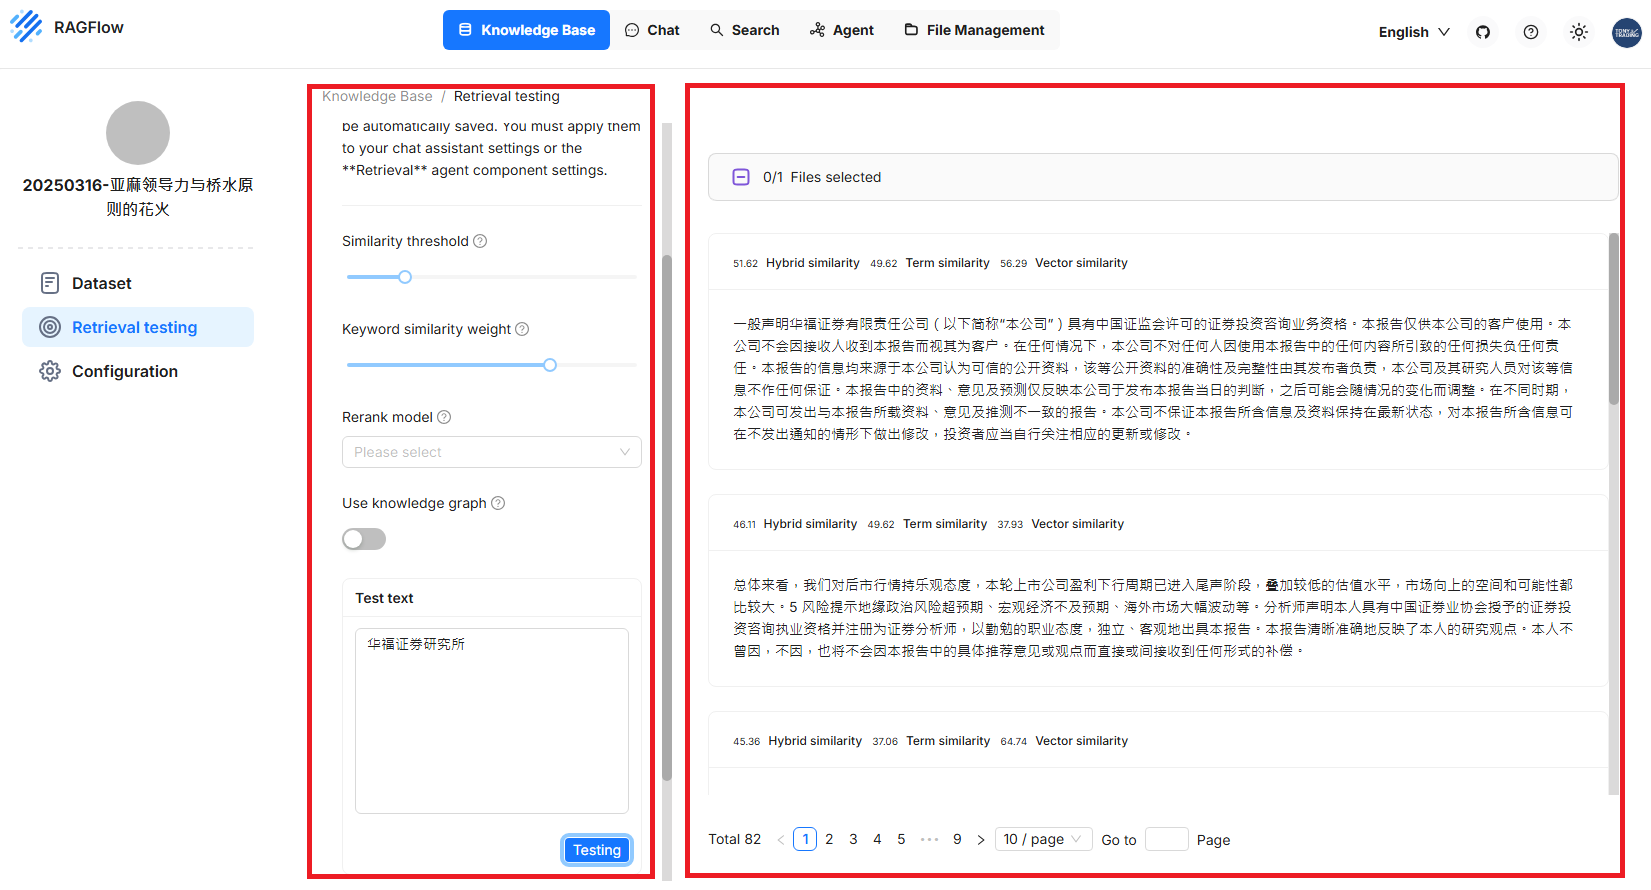
8.4 RAGFlow - Knowledge Base
8.5 Ragflow Container超過100G
cd /var/lib/
sudo chmod -R 777 docker
cd /var/lib/docker/containers/
提權。
301G    total
178G    ./a9736462ed5be3a6080f90d9297753cf8b98ac6dc6b92425acfb0d09be5c6863
Ragflow Container178G。
sudo docker rm -f ragflow-server
方法(1): remove ragflow-server。
cd /home/user/PycharmProjects/ragflow/docker
sudo docker-compose -f docker-compose-gpu.yml down
sudo docker-compose -f docker-compose-gpu.yml up -d
方法(2): 用docker compose down所有鏡像,再皇新啟動。
9.0 Brower-use
9.1 docker install
sudo git clone -b v1.6 https://github.com/browser-use/web-ui.git
sudo mkdir logs
sudo chmod -R 777 web-ui
sudo docker compose up --build >> ~/PycharmProjects/web-ui/logs/brower_use_`date +\%Y\%m\%d_\%H\%M\%S`.log 2>&1
安裝Brower-use鏡像。
| Port | Description | Password |
| http://127.0.0.1:7788/ | Web | / |
| http://127.0.0.1:6080/ | NoVNC | youvncpassword |
| http://127.0.0.1:5900/ | VNC | youvncpassword |
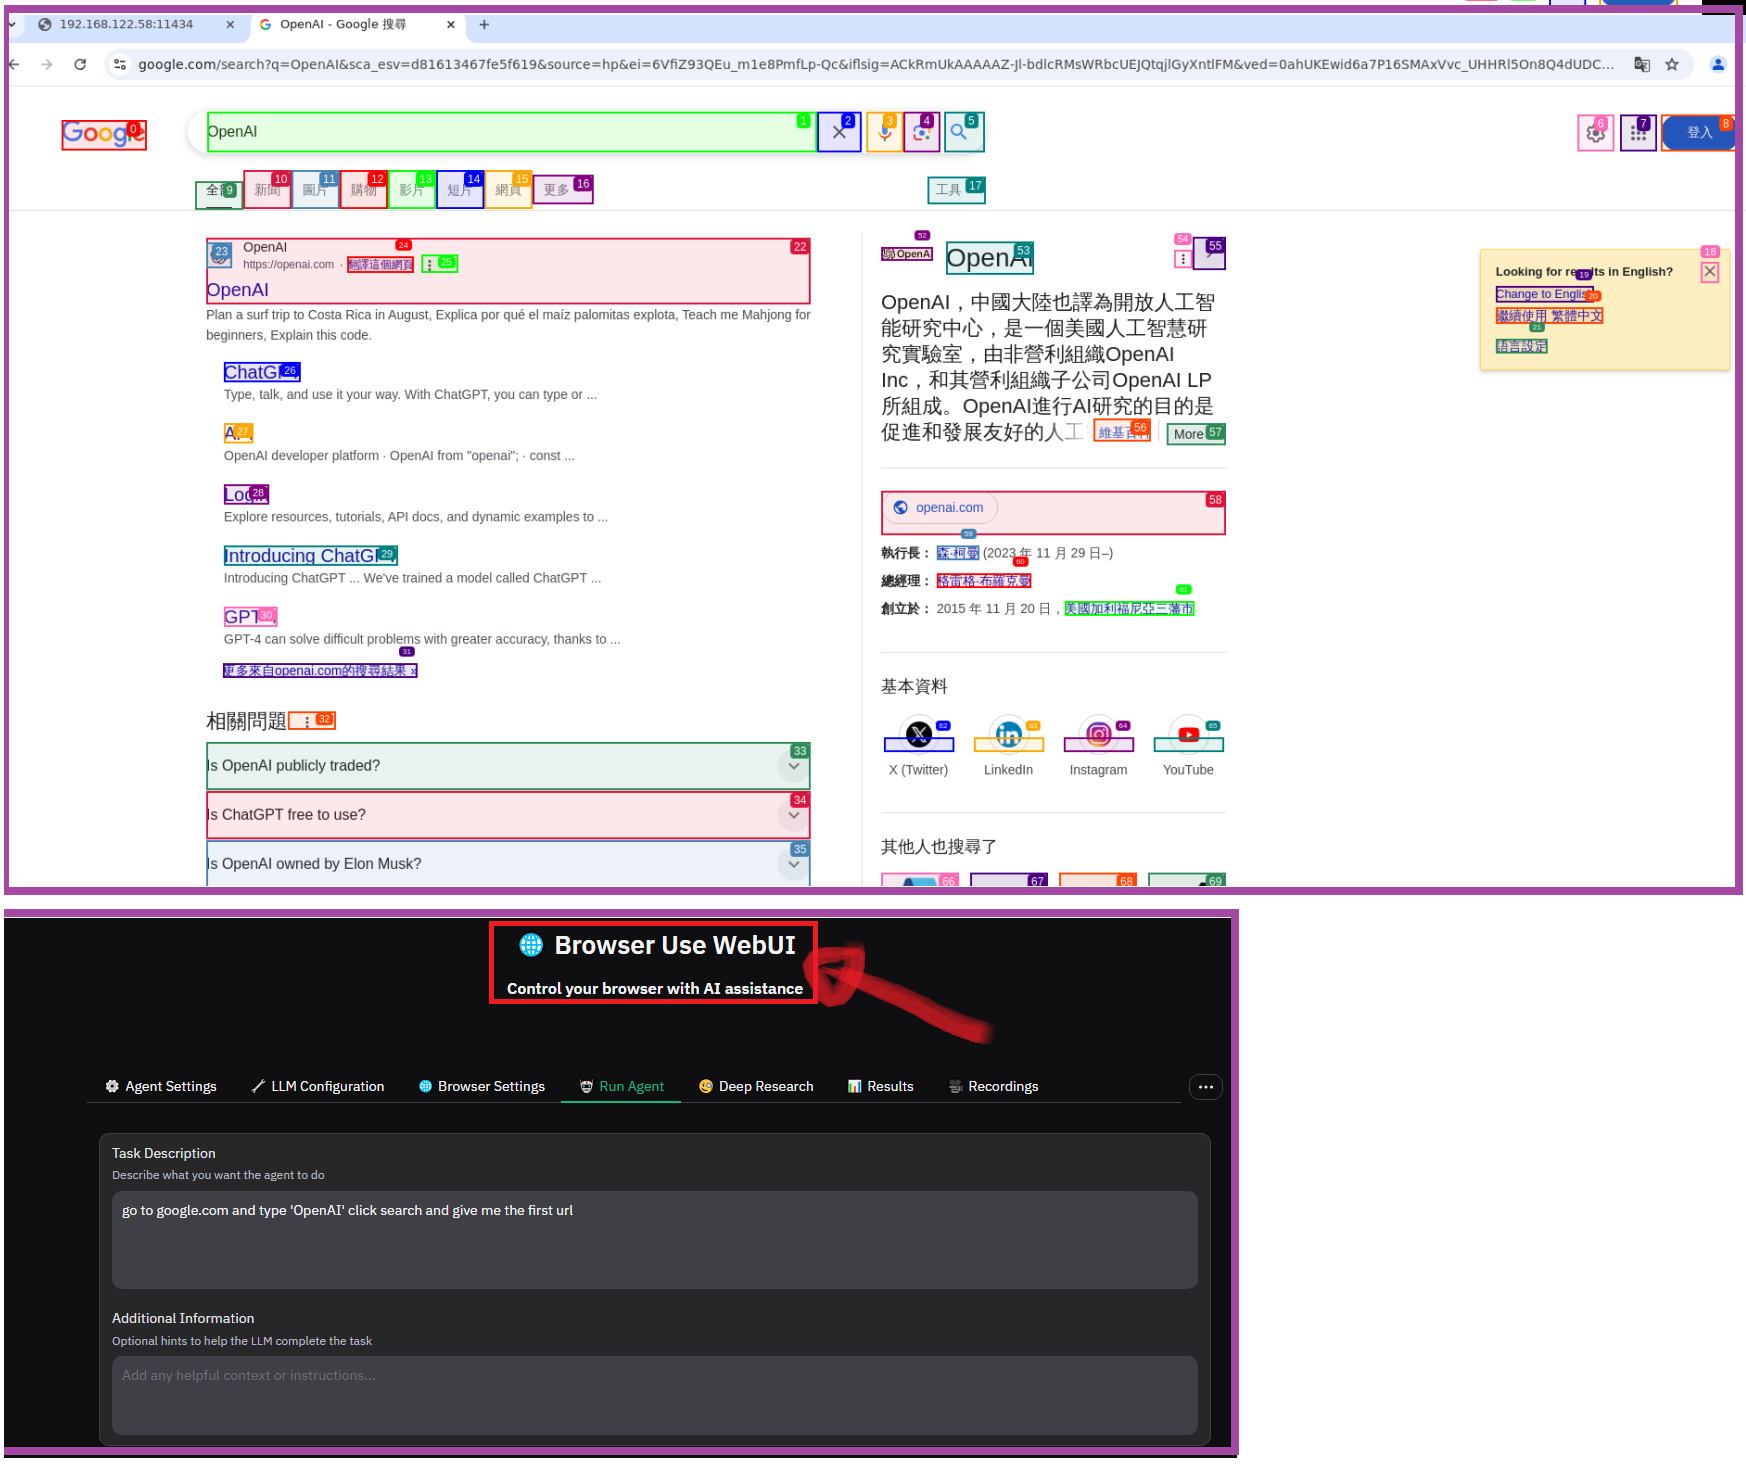
9.2 Amazon buy coffee
agenda:
[] go to https://www.amazon.com
[] search for a coffee maker
[] select the first result
[] scroll down or up until you see 'add to cart' and then click 'add to cart
[] summary the result
Amazon buy coffee

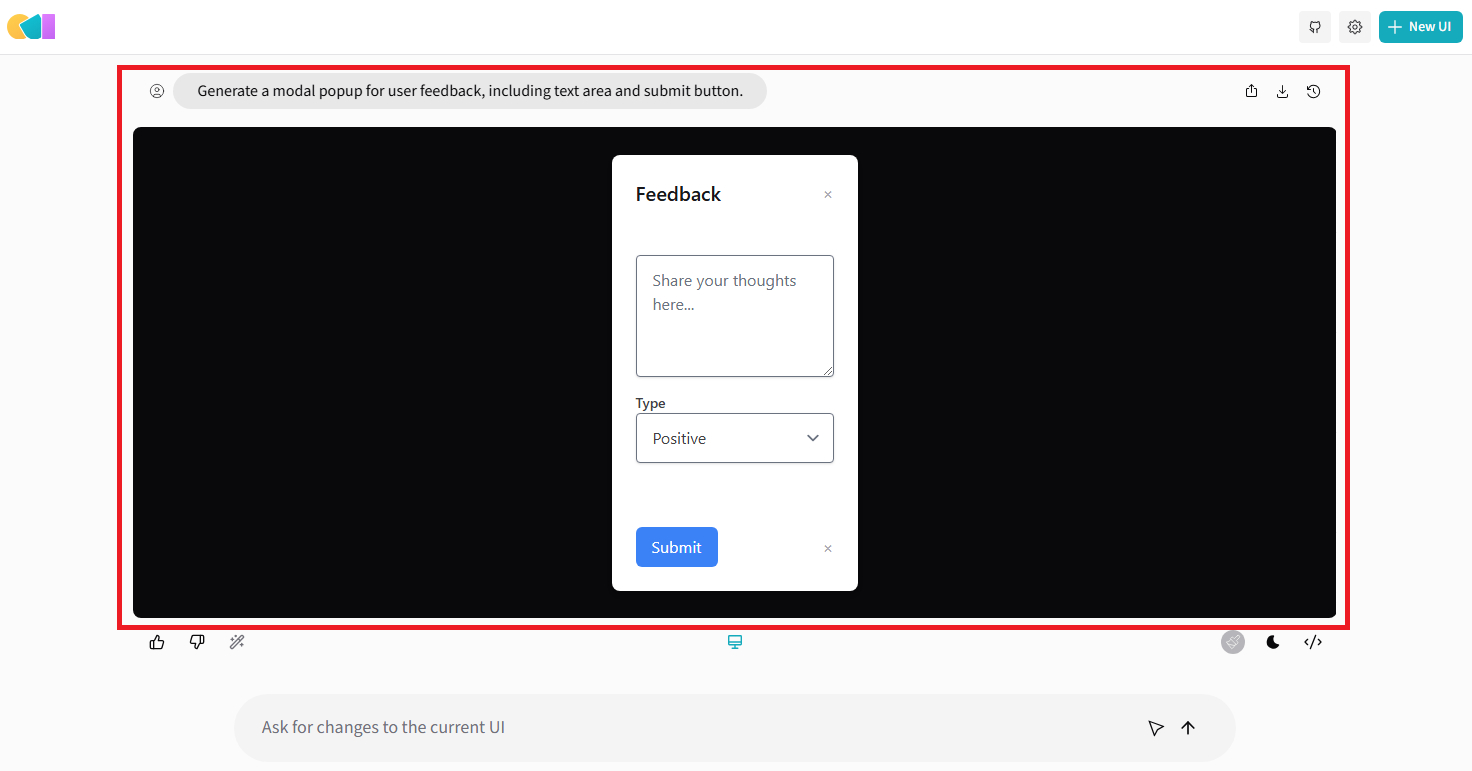
10.0 openui
openui - 讓您使用您的想像力來描述 UI,然後看到它即時呈現。
https://github.com/wandb/openui
sudo docker exec -it ollama ollama run llava:7b
下載llava基模。
sudo docker run --rm -d --name openui -p 7878:7878 -e OLLAMA_HOST=http://127.0.0.1:11434 ghcr.io/wandb/openui
運行Docker鏡像。
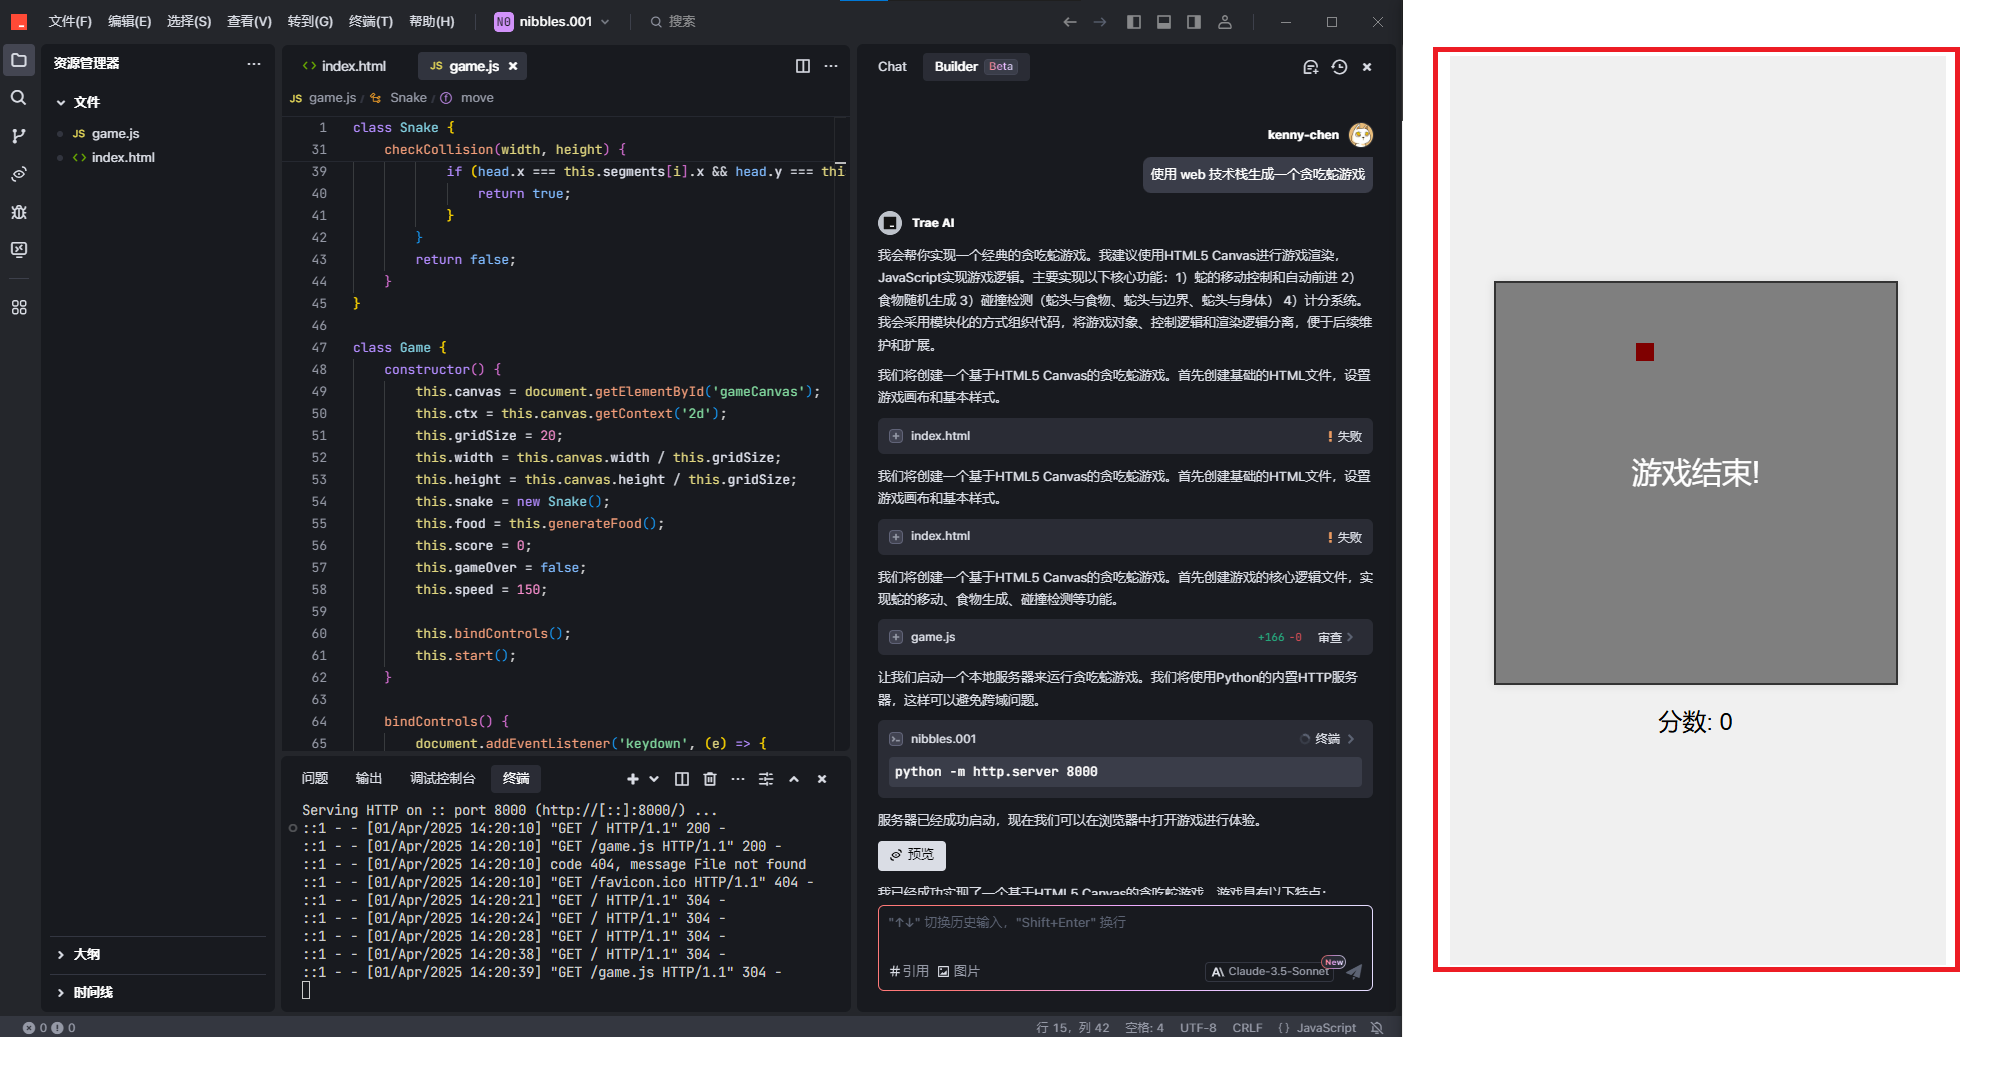
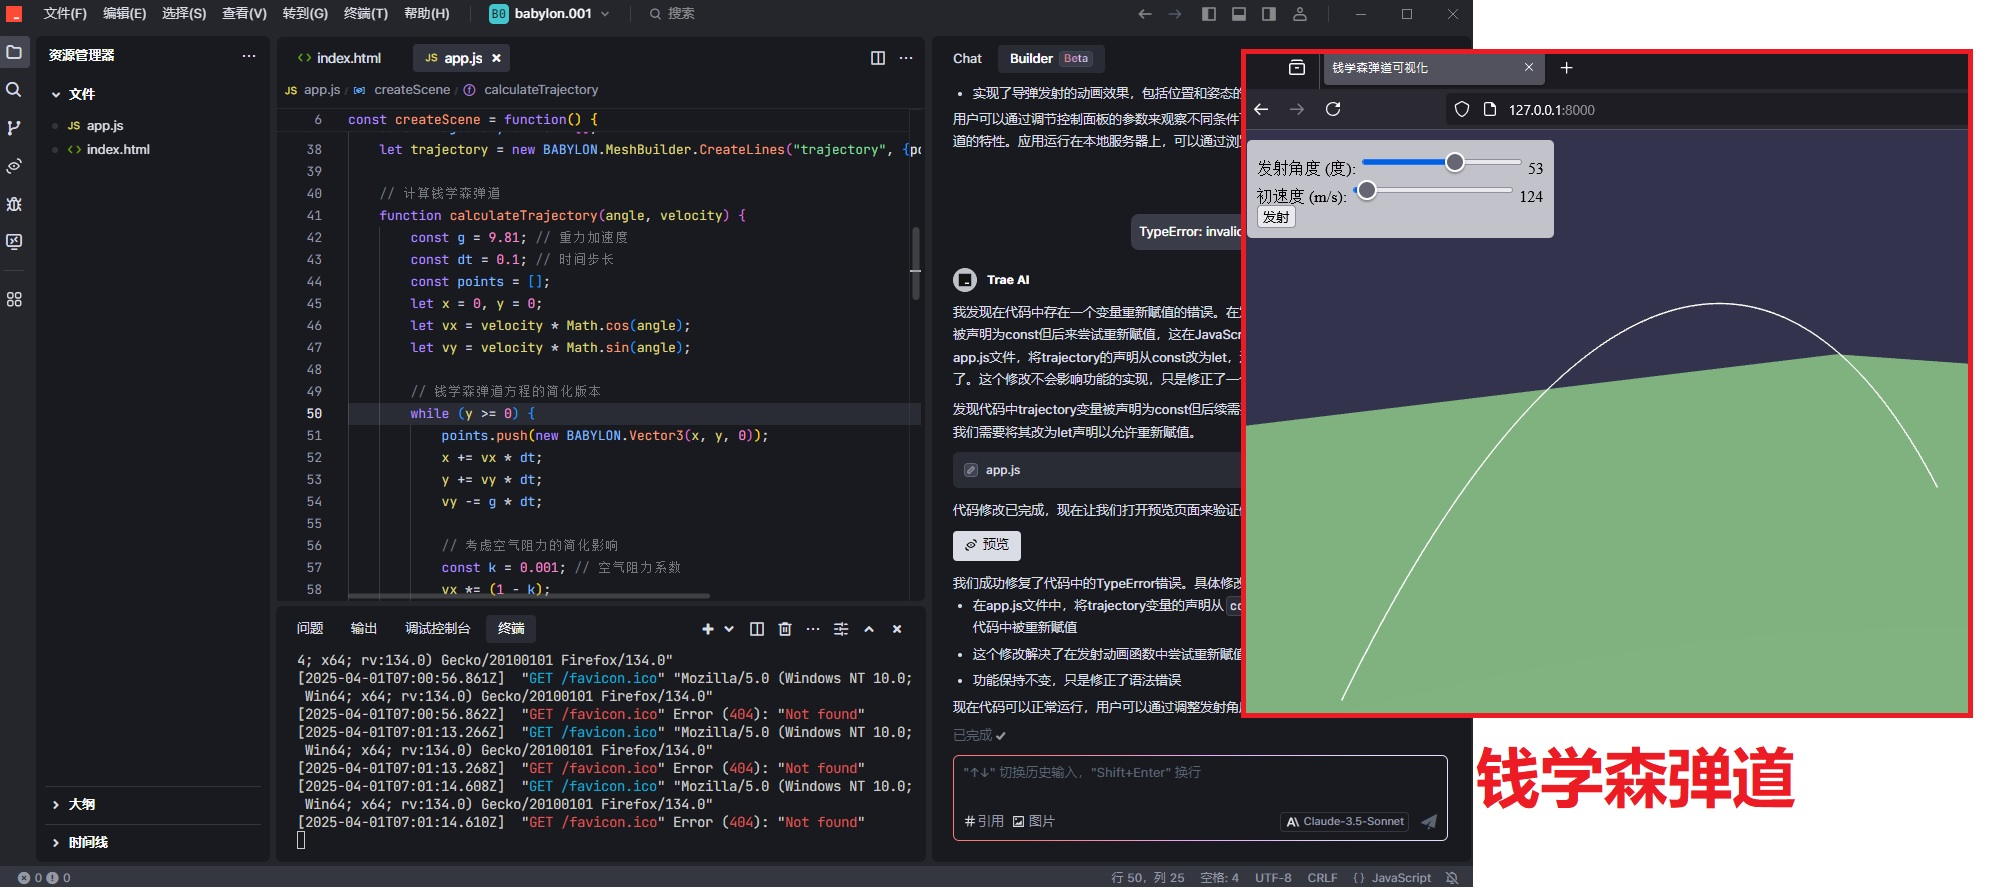
11.0 Trae
11.1 贪食蛇
11.2 钱学森弹道方程

 浙公网安备 33010602011771号