
微信小程序基础
1.准备工作
登陆微信公众平台注册账号 获取appID(这步很简单,不多说) 下载微信开发者工具 基本使用不多介绍
2.微信小程序项目结构
.json为配置文件 里面不能写注释 而且里面用双引号 不能用单引号( json格式)
.wxml 为模板文件,相当于HTML模板
.wxss 为样式文件,相当于HTML的CSS样式表
.js 为JS 脚本逻辑文件,相当于HTML的js脚本
project.config.json 为配置文件 一般不需要去更改它。 在“微信开发者工具”上做的任何配置都会写入到这个文件。
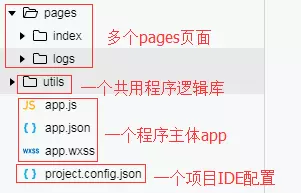
app.js 是 小程序逻辑
app.json 是 小程序公共配置 作用:对微信小程序进行全局配置,决定页面文件的路径、窗口表现、设置网络超时时间、设置多 tab 等。
app.wxss 否 小程序公共样式表
不需要每个页面编写重复的Js代码。
3.微信小程序项目配置
全局配置(pages window tabBar debug)
https://developers.weixin.qq.com/miniprogram/dev/reference/configuration/app.html 官方全局配置链接
小程序根目录下的 app.json 文件用来对微信小程序进行全局配置,决定页面文件的路径、窗口表现、设置网络超时时间、设置多 tab 等
{
  "pages": [
    "pages/index/index",
    "pages/course/course",
    "pages/weibo/weibo",
    "pages/logs/logs"
  ],
  "window": {
    "backgroundTextStyle": "dark",
    "navigationBarBackgroundColor": "#ccc",
    "navigationBarTitleText": "知了课堂",
    "navigationBarTextStyle": "black",
    "navigationStyle": "default",
    "backgroundColor": "pink",
    "enablePullDownRefresh": true
  },
  "tabBar": {
    "color": "#8a8a8a",
    "selectedColor": "#1AAD16",
    "backgroundColor": "#fff",
    "borderStyle": "white",
    "position": "top",
    "list": [
      {
        "pagePath": "pages/index/index",
        "text": "微信",
        "iconPath": "images/tabbar/tabbar1.png",
        "selectedIconPath": "images/tabbar/tabbar1_selected.png"
      },
      {
        "pagePath": "pages/course/course",
        "text": "通讯录",
        "iconPath": "images/tabbar/tabbar2.png",
        "selectedIconPath": "images/tabbar/tabbar2_selected.png"
      },
      {
        "pagePath": "pages/weibo/weibo",
        "text": "发现",
        "iconPath": "images/tabbar/tabbar3.png",
        "selectedIconPath": "images/tabbar/tabbar3_selected.png"
      },
      {
        "pagePath": "pages/logs/logs",
        "text": "我",
        "iconPath": "images/tabbar/tabbar4.png",
        "selectedIconPath": "images/tabbar/tabbar4_selected.png"
      }
    ]
  },
  "debug": false
}
页面配置
每一个小程序页面也可以使用 .json 文件来对本页面的窗口表现进行配置。页面中配置项在当前页面会覆盖 app.json 的 window 中相同的配置项。文件内容为一个 JSON 对象。
sitemap 配置
微信现已开放小程序内搜索,开发者可以通过 sitemap.json 配置,或者管理后台页面收录开关来配置其小程序页面是否允许微信索引。
慕课网微信小程序学习笔记
数据绑定概念和基础
在页面的js文件中的 page里面的data里面可以 在wxml里面通过{{ }}绑定数据
如果是在函数里面获取的后台数据 可以用setData({}) 函数 使得数据到data里
swiper里面 不这样的话就是字符串 "false"会被 认为是true
//  生命周期 监听页面加载函数
  onLoad: function (options) {
      this.setData({shujukey:movie.postList})
      // this.setData({shuju})
      //this.setData({...shuju})  用es6延展运算符 可以展开里面的所有属性
      //es6的写法  注意wx:for这儿要改成数据 而不是数据key
  },
wx:for和template模板的用法以及事件的绑定
<block></block>没有什么实际的意义 就是为了 循环出多个标签而已
template
用模板的时候 记得开头引入进来 (下面是假设路径)
<block wx:for="{{shujukey}}" wx:for-item="item1" wx:key="index">  //直接写item里面的属性 比如id 不要写出item.id *this表示item本身 如果item时唯一标识可以用
      <view bind:tap="ontapdetail" data-postid="{{item1.postId}}"> //bind:tap不能直接写在template上 data-postid是自定义属性
        <template is="postitem" data="{{...item1}}"/>  //这里用了es6的延展运算符 在template模板里面就不用写item.什么的了 避免外面的名字要跟里面一样 比如item1 里面也必须item1
        <!-- 用了...es6的扩展运算符就不用在template里面用item了 不然每个引用的页面都要用item。 -->
      </view>
 </block>
require加载和module.exports导出模块
在posts-data.js 里面末尾要导出模块 postList是导出的名字 shuju是js里 的var shuju={[],[]} 这两个名字都是自己起的
组件地自定义属性写法及获取
必须data-开头 比如做详情页地时候 data-postid="{{item1.postId}}"
注意 data-postID获取的时候也是postid大写会变小写 postID-name-age会变成postidNameAge驼峰命名
event.currentTarget.dataset.postid 和 event.currentTarget.postidNameAge
获取自定义属性的值 postid 是 data-postid 所以最后是.postid
wx.navigateTo({
url: '../posts/posts'
})
wx.redirectTo({
 url: '../posts/posts'
})
可以带参数 以做详情页为例子
wx.navigateTo({

url: 'postdetail/postdetail?id=' + postid,
})
获取的话 在生命周期函数 onLode里
onLoad: function (options) {
      // 这里是获取url传过来的id
      var postid=options.id

}
注意 以上两种不可以跳转到tabbar页面 必须用下面的一个
wx.switchTab({
url: '',
})

 浙公网安备 33010602011771号