
使用maven-pom进行依赖管理与自动构建
使用maven-pom进行依赖管理与自动构建
使用maven-pom进行依赖管理与自动构建
最后编辑于 :pencil::{docsify-updated}
一、让我们先了解一下maven
1.maven是优秀的依赖管理工具
随着开发生态环境的不断发展,几乎所有的java应用都会使用第三方的类库,尤其是在这个开源的世界里, java应用依赖管理已经很难再由人工完成——依赖管理包括解决依赖传递、版本冲突、依赖臃肿等问题。
maven通过groupId、artifactId、version形成的坐标定位系统能准确的定位每一个构件(artifact), 开发者可以通过在pom文件中列出所依赖的构件的坐标,让maven工具从maven仓库中自动下载所有需要的构件; 另一方面,通过pom文件间的依赖传递、继承等方式降低依赖管理的难度。
2.maven是优秀的构建工具
在我们的开发过程中,除了编写代码以外,有很大一部分时间是花在编译、运行单元测试、生成文档、打包和部署这些工具上, 为也提高工作效率,使开发人员能更多的将精力用于开发工作,我们需要像maven这样的工具, 如流水线般的将所有部署以自动化的方式完成。
3.maven是约定大于配置、简单易学的工具
在java开发中,常用的构建工具有Ant、maven、gradle三种。
3.1 Ant
Ant是过程式的,开发者需要显示的指定每个目标,以及完成该目标锁需要执行的任务。
Ant不仅限于对java项目进行构建,也可以对其他语言(如C语言)的项目进行构建。
<project name="MyProject" default="dist" basedir="../../../../../../../ProgramFiles/JetBrains/IntelliJ IDEA 2019.3.2/jbr/bin">
  <description>
    simple example build file
  </description>
  <!-- set global properties for this build -->
  <property name="src" location="src"/>
  <property name="build" location="build"/>
  <property name="dist" location="dist"/>

  <target name="init">
    <!-- Create the time stamp -->
    <tstamp/>
    <!-- Create the build directory structure used by compile -->
    <mkdir dir="${build}"/>
  </target>

  <target name="compile" depends="init"
        description="compile the source">
    <!-- Compile the Java code from ${src} into ${build} -->
    <javac srcdir="${src}" destdir="${build}"/>
  </target>

  <target name="dist" depends="compile"
        description="generate the distribution">
    <!-- Create the distribution directory -->
    <mkdir dir="${dist}/lib"/>

    <!-- Put everything in ${build} into the MyProject-${DSTAMP}.jar file -->
    <jar jarfile="${dist}/lib/MyProject-${DSTAMP}.jar" basedir="${build}"/>
  </target>

  <target name="clean"
        description="clean up">
    <!-- Delete the ${build} and ${dist} directory trees -->
    <delete dir="${build}"/>
    <delete dir="${dist}"/>
  </target>
</project>
与maven、gradle不同,ant本身没有对应的中央仓库,如果想使用maven一样, 通过声明的方式管理依赖,并自动处理依赖管理等问题,则使用集成ivy插件管理依赖。 但ant不支持多模块的管理方式,而maven和gradle支持。
ant的这种声明方式,使开发者可以根据自己的需要灵活配置,定制自己的项目构建流程; 另一方面,这种灵活的配置方式,也使得ant的配置相对繁琐,可读性较差,学习成本也更高 ——事实上,ant的官方网站上列出的插件就有139种,而且部分工具的官网已经404了。
3.2 maven
maven与gradle一样,都是声明式的配置方式,相对于Ant来说,配置更加方便。 同时maven有内建生命周期,约定了项目的代码结构,只须简单配置,就可以完成构建任务。
顶级pom中定义的项目结构(即默认项目结构)
项目根目录
  |-- src
  |    |-- main
  |    |    |-- java        -> 主代码文件
  |    |    |-- resources   -> 主资源文件
  |    |     -- scripts     -> 虽然在maven的默认结构里有这个目录,但官网文档中已删除了这一级目录,不建议使用
  |     -- test
  |         |-- java        -> 测试代码文件
  |          -- resources   -> 测试资源文件
-- pom.xml小提示:可通过mvn -DarchetypeCatalog=internal archetype:generate初始化标准结构的maven项目
另一方面,maven内建生命周期,使用无法更加项目的构建顺序,如果想在构建中加上一些其他处理逻辑, 则需要用编写maven插件的方式来完成,成本相对高昂。
3.3 Gradle
gradle是相对新颖的构建工具,它使用一种基于Groovy的特定领域语言(DSL)来声明项目设置, 目前也增加了基于Kotlin语言的kotlin-based DSL,抛弃了基于XML的各种繁琐配置。
gradle没有maven般的生命周期,真正起作用的是所引入的Plugin,因此相对更为灵活。
另一方面,gradle作为新生工具,无论是程序还是文档都在不断的完善中,使用和学习相对困难。 同时,由于gradle的配置是基于groovy/kotlin语法的,因此使用gradle需要掌握相应的语法知识。
gradle是对ant和maven特点折衷的结果,相对于ant其可读性更好,相对于maven其更为灵活。
二、pom基本结构
POM是project object mode的简写,maven通过pom文件对项目进行描述, 在开发者在pom文件中对项目属性和构建过程进行定义后,maven即可自动构建项目并生成站点。
1.概览
<project xmlns="http://maven.apache.org/POM/4.0.0"
         xmlns:xsi="http://www.w3.org/2001/XMLSchema-instance"
         xsi:schemaLocation="http://maven.apache.org/POM/4.0.0
                      http://maven.apache.org/xsd/maven-4.0.0.xsd">
    <modelVersion>4.0.0</modelVersion>

    <!-- The Basics -->
    <groupId>...</groupId>
    <artifactId>...</artifactId>
    <version>...</version>
    <packaging>...</packaging>
    <dependencies>...</dependencies>
    <parent>...</parent>
    <dependencyManagement>...</dependencyManagement>
    <modules>...</modules>
    <properties>...</properties>

    <!-- Build Settings -->
    <build>...</build>
    <reporting>...</reporting>

    <!-- More Project Information -->
    <name>...</name>
    <description>...</description>
    <url>...</url>
    <inceptionYear>...</inceptionYear>
    <licenses>...</licenses>
    <organization>...</organization>
    <developers>...</developers>
    <contributors>...</contributors>

    <!-- Environment Settings -->
    <issueManagement>...</issueManagement>
    <ciManagement>...</ciManagement>
    <mailingLists>...</mailingLists>
    <scm>...</scm>
    <prerequisites>...</prerequisites>
    <repositories>...</repositories>
    <pluginRepositories>...</pluginRepositories>
    <distributionManagement>...</distributionManagement>
    <profiles>...</profiles>
</project>
2.项目坐标
声明式的项目依赖管理,除了需要一个存储有所有jar包的中央仓库外,还需要一套合适的命名系统, 能够保证每个jar包都有一个唯一的名字,包括不同版本。
在maven中,jar包的坐标通过groupId、artifactId、version三个字段决定, 类似于xyz坐标系的三个轴。
<project xmlns="http://maven.apache.org/POM/4.0.0"
  xmlns:xsi="http://www.w3.org/2001/XMLSchema-instance"
  xsi:schemaLocation="http://maven.apache.org/POM/4.0.0
                      http://maven.apache.org/xsd/maven-4.0.0.xsd">
  <modelVersion>4.0.0</modelVersion>

  <groupId>org.codehaus.mojo</groupId>
  <artifactId>my-project</artifactId>
  <version>1.0</version>
</project>
2.1 groupId
通常而言,一个组织(公司、基金会等)的项目通常使用同一个groupId, 因此一般而言groupId是该组织所拥有的域名,如jacoco对应的groupId为org.jacoco, 而对应的网站为http://jacoco.org(域名的优先级顺序是反过来的),
事实上不一定严格遵循该规则,如maven的groupId为org.apache.maven, 而maven官方插件的groupId为org.apache.maven.plugins, 尽管同并不存在plugins.maven.apache.org这个四级域名, 而且他们同属于apache基金会(apache.org)下的项目。
另外也有完全和域名不相关的,如junit包的groupId为junt。
另外需要注意的一点是,虽然groupId不必与项目的包结构相对应,但是遵循这种做法是一种最佳实践, 因为这样可以有效避免包之间的类冲突。
2.2 artifactId
artifactId通常是已知项目(或项目模块)的名称,它与groupId一起构成了一个项目(或项目模块)的定位, 用于将该项目(或项目模块)与世界上其他所有项目(或项目模块)分开。
实践
虽然在groupId中就可以看到项目名称,但在artifactId中一般仍会将项目名称作为开头, 这是因为我们在沟通时通常会用 artifactId 进行交流,而不会带上 groupId , 如张三告诉李四需要在项目中引入maven-enforcer-plugin包做项目自动检查。
2.3 version
如同字面的含义,version代表的是项目(或项目模块)的版本。
groupId、artifactId、version一同定位了一个发布包的唯一位置。 如maven-enforcer-plugin-3.0.0-M3.jar在仓库中的位置为 $M2_REPO/org/apache/maven/plugins/maven-enforcer-plugin/3.0.0-M3, 而其对应的pom中的内容如下:
<parent>
  <groupId>org.apache.maven.enforcer</groupId>
  <artifactId>enforcer</artifactId>
  <version>3.0.0-M3</version>
</parent>

<groupId>org.apache.maven.plugins</groupId>
<artifactId>maven-enforcer-plugin</artifactId>parent标签我们后续会提到,parent标签下是父pom的坐标,子pom继承父pom的所有定义,包括version
3.package标签
package标签定义了构件的打包方式和使用方式,如果不指定值,默认使用jar作为打包方式。
这里只说明两个我们使用较多的打包方式:pom、jar。
3.1 打包为pom
定义打包方式为pom是有一些特殊的项目,其本身除了pom文件外,不包含其他文件, 这些项目中的pom主要是用来被其他项目引用、继承,或者用来管理项目拥有的模块。
这里的继承概念与java中类的继承概念类似,子pom拥有父pom的所有配置, 可以通过自定义的方式覆盖/复写父pom中已经存在的配置。
我们拿springboot集成中的两个打包方式为pom的项目举例说明。 在springboot的官方集成教程中,会告诉你可以使用两种方式集成,一种通过父pom继承:
<parent>
    <groupId>org.springframework.boot</groupId>
    <artifactId>spring-boot-starter-parent</artifactId>
    <version>2.1.1.RELEASE</version>
</parent>
另一种是通过引入spring-boot的依赖管理:
<dependencyManagement>
    <dependencies>
        <dependency>
            <!-- Import dependency management from Spring Boot -->
            <groupId>org.springframework.boot</groupId>
            <artifactId>spring-boot-dependencies</artifactId>
            <version>2.1.1.RELEASE</version>
            <type>pom</type>
            <scope>import</scope>
        </dependency>
    </dependencies>
</dependencyManagement>如果我们找到spring-boot-starter-parent项目,就会发现这个项目里仅仅只有pom文件 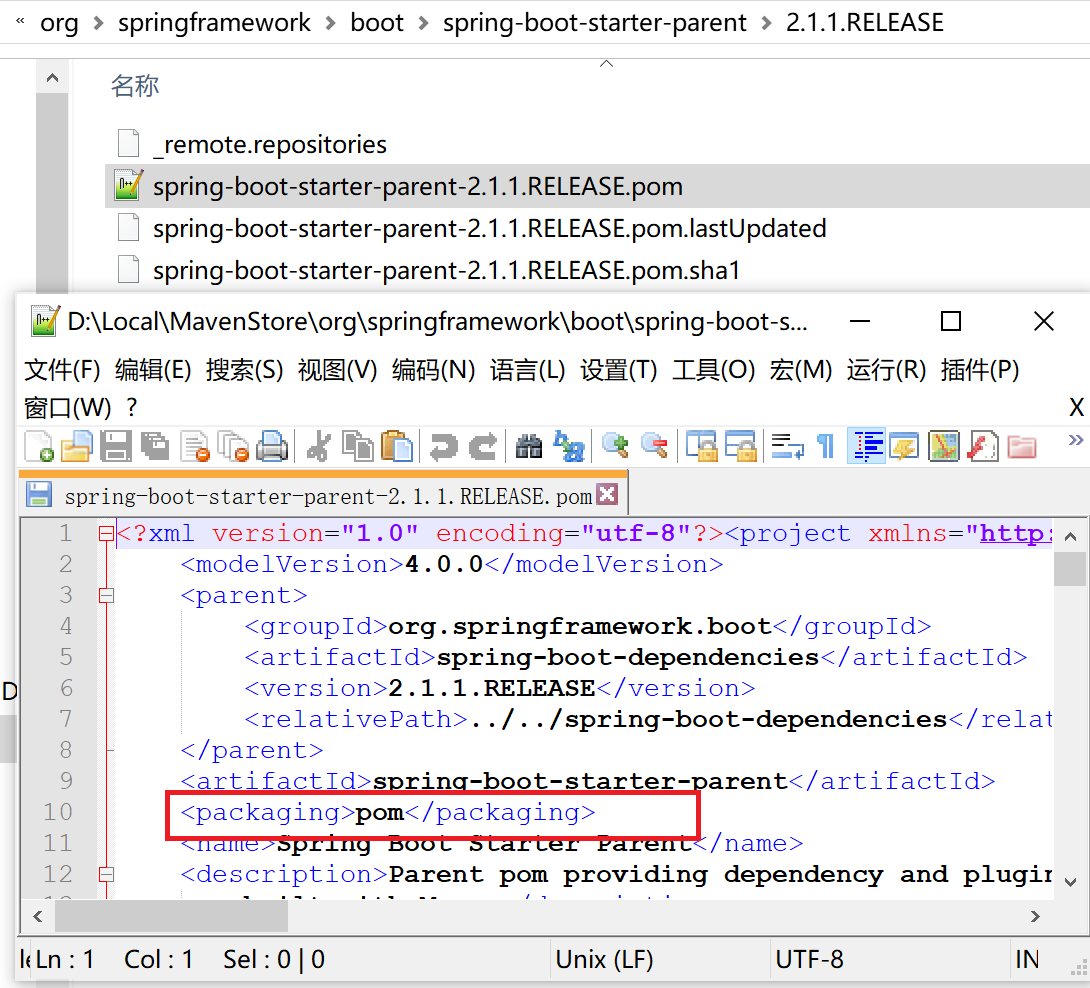
这是因为在项目中,我们通常会存在多个子模块,而这些子模块会需要一些公用的配置, 比如统一的构建流程、统一的依赖版本管理,而这些内容就以pom的形式抽取出来, 形成了这种打包方式为pom的项目。
需要注意的是,打包方式为pom的项目里,除了pom文件,其他文件不会参与构建。 事实上如果我们去看pom打包对应的默认插件配置就会发现,只有install和deploy两个生命周期有插件绑定:
<phases>
  <install>
    org.apache.maven.plugins:maven-install-plugin:2.4:install
  </install>
  <deploy>
    org.apache.maven.plugins:maven-deploy-plugin:2.7:deploy
  </deploy>
</phases>
3.2 打包为jar
jar包是java程序包常用的发布形式,其可以作为库文件被其他项目使用, 也可以通过java -jar命令直接运行。
jar包中即有静态资源,也有编译后生成的class文件,这意味着其打包流程也更为复杂:
<phases>
  <process-resources>
    org.apache.maven.plugins:maven-resources-plugin:2.6:resources
  </process-resources>
  <compile>
    org.apache.maven.plugins:maven-compiler-plugin:3.1:compile
  </compile>
  <process-test-resources>
    org.apache.maven.plugins:maven-resources-plugin:2.6:testResources
  </process-test-resources>
  <test-compile>
    org.apache.maven.plugins:maven-compiler-plugin:3.1:testCompile
  </test-compile>
  <test>
    org.apache.maven.plugins:maven-surefire-plugin:2.12.4:test
  </test>
  <package>
    org.apache.maven.plugins:maven-jar-plugin:2.4:jar
  </package>
  <install>
    org.apache.maven.plugins:maven-install-plugin:2.4:install
  </install>
  <deploy>
    org.apache.maven.plugins:maven-deploy-plugin:2.7:deploy
  </deploy>
</phases>
3.2 其他
目前maven支持这些打包方式: pom、jar、maven-plugin、ejb、war、ear、rar。 其中每种打包方式都有相应的打包插件对其进行打包,这些插件都已经被maven默认进行了绑定, 具体打包方式对应的插件配置有兴趣的可以去 官网进行查看。
4.项目间关系
在上文中我们提到了多种项目间关系,包含依赖关系、继承关系、聚合关系(上文提到的模块管理)。
4.1依赖关系
项目间依赖关系是最常用的关系,当我们项目A使用一个项目B打成的jar时,A就对B形成了依赖。
需要注意的是,如果的java项目开发已经无法离开依赖了,A所依赖的项目B,实际上也开发中也依赖了项目C。 此时就生成的依赖的传递,即如果A依赖了B,B依赖了C,那么A依赖C。
依赖传递的存在,会使得单点的依赖关系也变得复杂起来。实际在项目中,我们会依赖大量的jar包, 此时就可能存A依赖的B、C同时使用两个不同版本的D:
A
 |-B
    |-D:1.1
 |-C
    |-D:1.2
我们知道,一个项目的不同版本通常会有大量的类是重复了,如果jvm在加载同名类时,会忽略重复的类, 这样可能导致出现其中一个包只有一半代码的情况,这明显是不合理的。这种依赖的出现就叫到依赖冲突, 当出现冲突时,maven会选取其中的一个版本放入最终的打包后文件中(如jar),而忽略其他版本。
具体的选取策略可以参考这篇短文
4.2继承关系
继承关系我们在上文中已经提到,我们可以通过parent标签引入父级pom, 此时子pom拥有了父级pom中的所有定义,并可以在子pom中复写相应的定义。
由于pom的继承关系可能有多级,因此如果你想确认当前项目的最终pom结构时, 就必须要将所有的pom整合到一起,此时我们可以通过mvn help:effective-pom命令生成整合后的pom (如果使用idea,右键maven菜单下也有相应的生成操作)。
如果在一个没有父pom的项目中执行mvn help:effective-pom,你会发现最终生成的pom中, 突然出现了大量你没有定义的内容,这是因此maven自身定义了一个super pom, 所有的pom都默认继承该pom(可类比java中的Object类), 在上文中我们提到的maven项目的默认结构,就是在这里定义的。
super pom的具体内容,可以去官网查看
子pom并不会继承父pom的所有内容,仅以下内容将会被继承: - groupId - version - scm - issueManagement - ciManagement - mailingLists - properties - dependencyManagement - dependencies - repositories - pluginRepositories - build - reporting - profiles - description - url - inceptionYear - organization - licenses - developers - contributors
需要注意的是以下几个标签不会被继承: - artifactId - package - name - prerequisites
4.3聚合关系
聚合关系常常出现在有多个模块的项目中,比如项目A有三个子项目aa、ab、ac, 这时我们可以在目录A下也添加一个pom,并定义aa、ab、ac是项目A的三个子项目, 这样我们对项目A做构建(如mvn clean package)时,maven就会分别对aa、ab、ac做相应的构建操作。
A
 |-- pom.xml
 |-- aa
       |-- pom.xml
 |-- ab
       |-- pom.xml
 |-- ac
|-- pom.xml子项目的声明方式以通过modules标签进行,当我们在项目A的pom中添加如下配置, aa、ab、ac就会成为A的子项目:
<modules>
    <module>aa</module>
    <module>ab</module>
    <module>ac</module>
</modules>
aa、ab、ac并不是这三个项目的相对路径(相对于A)
在这里,可能有的人已经注意到了,这种项目层级结构,非常适合将A项目的pom作为父pom, 将aa、ab、ac的pom中相同的内容抽取至父pom中进行管理。
实际上在项目的实践中,通常也是这么处理的,但也有一些例外。比如aa、ab是springboot项目, 而ac却是老旧的spring项目,此时可能出现:A作为aa和ab的父级pom统一管理相关配置,
同时aa和ab作为子项目存在,而ac不继承A,只作为子项目存在,这样我们即能够统一管理aa和ab的配置, 也能够通过一条命令,对aa、ab、ac一起完成构建操作。
(实际实践过程中,不推荐这种模式,我们可以把ac提到与A平级的位置,这样的结构更清晰)
值得一提的是,如果aa与ab间存在依赖关系,比如aa依赖于ab,那么即使aa比ab先声明,maven在构建时, 也会很聪明的先对ab进行构建,再构建aa。
5.dependencies标签
<dependencies>
    <dependency>
      <groupId>junit</groupId>
      <artifactId>junit</artifactId>
      <version>4.12</version>
      <type>jar</type>
      <scope>test</scope>
      <optional>true</optional>
    </dependency>
</dependencies>dependencies标签下声明了当前项目所使用的依赖构件。
需要注意的是,这里声明的文件必须能够在maven仓库中找到, maven默认使用中央仓库,中央仓库中包括了所有常用的开源jar包, 但对于一些闭源的三方jar包,就无法在中央仓库中找到。
因此,公司一般都会有自己的私有仓库,我们需要修改maven的settings.xml文件, 使maven使用私服处理依赖和发布。
对于私有仓库上没有的项目,我们可能通过以下命令,将其上传至私有仓库:
shell script mvn deploy:deploy-file -Dfile=non-maven-proj.jar -DgroupId=some.group \
        -DartifactId=non-maven-proj -Dversion=1.0 -Dpackaging=jar
5.1 classifier标签
在引用依赖时,仅仅使用groupId、artifactId、version作为坐标可能还并不太足够。
考虑一下这种场景:有一个项目,该项目需要提供一个基于jre1.7的jar包, 同时还提供了一个基于jre1.8的jar包,即一套源码需要使用两种jdk打成不同的jar包。
这种情况下我们会配置两套打包方式,默认使用1.8打包,并可选择1.7打包,配置如下:
<profile>
    <id>jdk17</id>
    <properties>
        <!--使用jdk1.7打包-->
        <java.version>1.7</java.version>
    </properties>
    <build>
        <plugins>
            <plugin>
                <artifactId>maven-jar-plugin</artifactId>
                <executions>
                    <execution>
                        <phase>package</phase>
                        <goals>
                            <goal>jar</goal>
                        </goals>
                        <configuration>
                            <!--配置classifier,与1.8版本的包区分-->
                            <classifier>jdk17</classifier>
                        </configuration>
                    </execution>
                </executions>
            </plugin>
        </plugins>
    </build>
</profile>如果用1.8打包发布的jar名称为demo-1.0.jar,那么用1.7打包时, 发布的jar的名称为demo-1.0-jdk17.jar——实际场景下,classifier标签可以配置成任意字符串, 并不一定是jdk17。
而使用者在引入1.7版本的依赖时,就需要额外添加classifier标签。
<dependency>
  <groupId>some.example</groupId>
  <artifactId>demo</artifactId>
  <version>1.0</version>
  <classifier>jdk17</classifier>
</dependency>classifier标签有一处更常见的地方,是sources.jar:
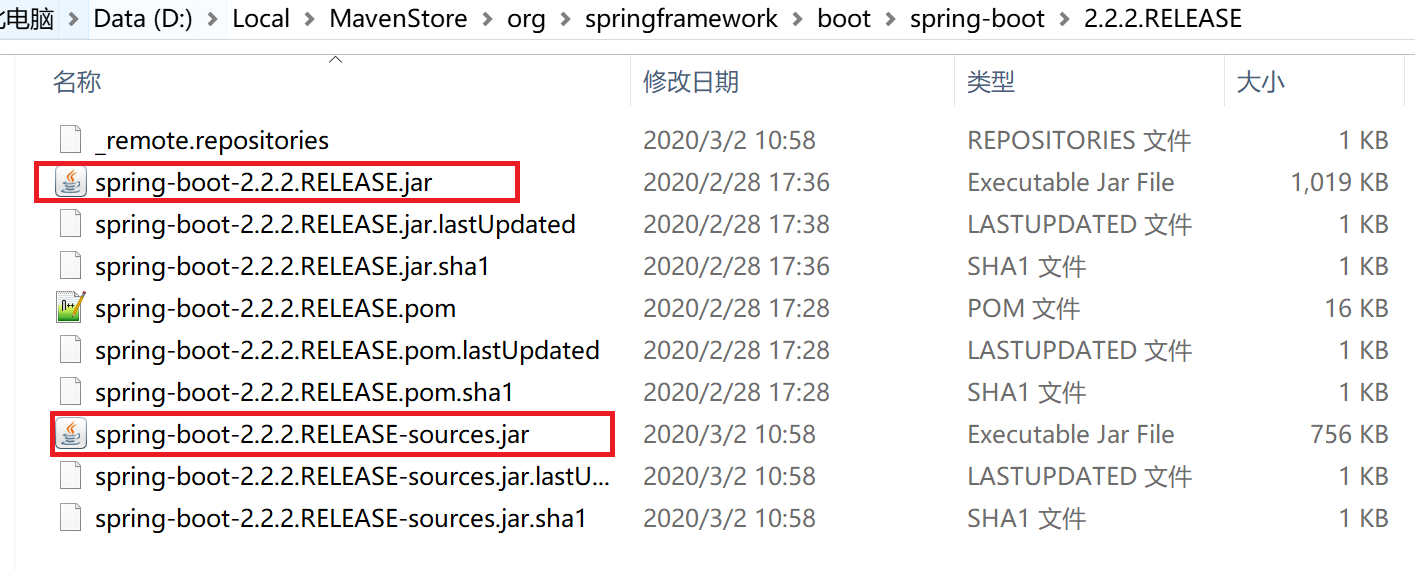
这就是我们上文中说到的一个pom,打出了两个包,源码包对应的classifier标签就是sources, 而测试源码包对应的值为test-sources。
5.2 type标签
type标签描述了依赖类型,如果不定义该值,使用默认值jar。
对于不同类型的依赖,maven的处理策略也不相同:
| type | classifier | extension | packaging | language | added to classpath | includesDependencies |
|---|---|---|---|---|---|---|
| pom | = type | = type | none | |||
| jar | = type | = type | java | true | ||
| test-jar | tests | jar | jar | java | true | |
| maven-plugin | jar | = type | java | true | ||
| ejb | jar | = type | java | true | ||
| ejb-client | client | jar | ejb | java | true | |
| war | = type | = type | java | true | ||
| ear | = type | = type | java | true | ||
| rar | = type | = type | java | true | ||
| java-source | sources | jar | = type | java | ||
| javadoc | javadoc | jar | = type | java | true |
实际开发中,我们只会用到jar和pom两种类型,大家可以注意到pom类型的依赖是不会产生依赖传递,
也不会被加入classpath中。
5.3 scope标签
该标签定义了该包在哪些阶段会被放到classpath中,另外还定义了依赖的可传递性。其聚会范围如下:
classpath即类、类库加载路径,在我们的依赖中,大多数依赖会在编译、测试、运行都用到, 但也有一些依赖可能只有在编译、测试阶段运到(比如测试相关的包),还有部分包可能在编译、测试时需要, 但实际发布时不需要(比如jdk相关的包)。
| 值 | 含义 | 是否会将该依赖向下传递 |
|---|---|---|
| compile | 该值是默认值。该依赖在所有阶段的都会放入classpath中,是最常用的值。 | 是 |
| provided | 只有在编译和测试时放入classpath中,实际打包时忽略该包 | 否 |
| runtime | 编译时不需要,只在测试和打包时需要 | 是 |
| test | 只在对测试代码做编译和执行时需要 | 否 |
| system | 手动指定所依赖包的本地存在路径 | 只传递本身 |
- compile是最常用的,一般项目引入的包在编译、测试、发布阶段都会用到。
- provided一般用于基础包,在基础包的开发过程中会依赖一些三方包, 但可能不想为使用者带来依赖冲突的负担,此时可以使用该范围,由使用者自行决定该三方包的版本
(当然需要是兼容的版本);另一种不推荐的使用方式是将该依赖作为可选依赖向下传递, 举一个例子:我们开发了一个基础工具类包,里面含有许多工具,像poi工具、时间转换工具、中文数字工具,
另外里面还包含了TapConfigUtil用来获取配置, 此时我们注意到配置中心的集成是以springboot为基础的, 而我们想让该工具包也可以被其他类型的项目使用,
这种情况下我们可以给
commons-aap-appconfig包加上provided范围。 如果某个使用者只不需要使用TapConfigUtil,那么他就不需要引入commons-aap-appconfig包。 (事实上commons-aap-appconfig包里引入spring相关的依赖里使用了provided范围) - runtime很少用到,一般情况下使用compile就可以了, 使用runtime甚至可能给IDE带来一些问题
- test用在测试相关的包上,测试代码的安全性会更低(毕竟没人会写测试代码来测试测试代码 ——对外发布的测试工具除外),使用test标记测试相关的包,可以避免被其他开发人员错误的使用。
- system需要配置
systemPath标签使用,用来指定使用仓库中没有的包。 与其相比,上传私服是一种更好的方式,因为system标记的包,并不会将其依赖的包传递给使用者, 这意味着你需要自己处理好依赖关系。
5.4 systemPath标签
仅在依赖项范围是system时使用,否则构建将失败。
systemPath标签中的路径必须是绝对路径,因此建议使用maven变量拼装路径, 例如${project.basedir}/lib。
5.5 optional标签
在上面介绍scope标签的provided取值时,我们讲了它可以实现让使用都按需决定是否引入依赖, 这样以达到避免引入不需要的依赖。
事实上provided更多的是用来要求使用方或运行时系统提供具体的包,而不是用于这种用途。
配置依赖的可选应该使用optional标签来实现。
5.6 exclusions标签
dependency标签下还存在exclusions标签,我们在前面讲到了依赖传递可能带来的依赖冲突问题, exclusions标签就是排除掉不想被传递过来的依赖。
这里需要注意的是,A->B->C时,如果你在引入依赖A的时候,将B排除,那么C也将被排除, 除非有其他地方也引入了C(有点像对“树”进行操作,排除进相当于直接剪掉了一个“子树”)
<exclusions>
    <exclusion>
        <groupId>org.objenesis</groupId>
        <artifactId>objenesis</artifactId>
    </exclusion>
</exclusions>exclusion下只有groupId与artifactId两个标签,因为只不可能同时依赖一个包的不同版本。
5.7 其他
version标签除了指定具体版本外,还可以指定范围版本,有兴趣的可以查看 官网, 不过不推荐在项目中使用。
各小版本在maven项目中的先后发布顺序可以看 这里
6.dependencyManagement标签
正如其名字所代表的含义,该标签的作用就是管理依赖。
在上面的dependency标签的介绍中,我们看到在dependency标签下有众多的子标签, 想象一下我们有多个服务,如果每个服务都在引入同一依赖时配置好所有内容,
那将是非常麻烦,而且如果需要对某个所依赖的jar包做升级时,我们不得不改每一个pom中的version信息。
可能有人已经想到,我们可以将这些依赖放到父pom里面就可以了。这是一种很好的策略, 但让我们考虑项目A、B,A中引入了a、b三个包,B中引入b、c两个包, 如果我们使用父pom管理公用依赖,将只有b会被放到父pom里,而a、c由A、B自己管理。 如果后来B项目的功能增加,也需要引入a包,那么我们就需要把a包从A项目中提到父pom中, 以保证对依赖的统一管理——因为,这种方式并不能真正实现依赖的统一管理。
现在考虑另一种方式,我们在父pom里列出项目中所有使用到的依赖包,并配置好所有内容, 但并不真正的对这些包产生依赖,仅仅是列出来。如果那个子pom真正需要用到, 那么他只需要声明一些尽可能少的信息,就可以对对应的包产生依赖 ——这种方案就是使用dependencyManagement标签。
<dependencyManagement>
    <dependencies>
        <dependency>
            <groupId>org.springframework.boot</groupId>
            <artifactId>spring-boot-dependencies</artifactId>
            <version>${spring.boot.version}</version>
            <type>pom</type>
            <scope>import</scope>
        </dependency>
        <dependency>
            <groupId>com.demo.company</groupId>
            <artifactId>someproject-commons-versions</artifactId>
            <version>1.0.0</version>
        </dependency>
    </dependencies>
</dependencyManagement>dependencyManagement标签下只有一个dependencies标签, 里面的内容和上文中的dependencies标签几乎一样,唯一不一样的是, 在dependencyManagement标签下的scope标签新增一种取值——import。
import只能用于导入package值为pom的依赖包, 当在项目A的pom中使用import导入项目B时,A、B的dependencyManagement标签下的内容将被合并。 这是一个非常有用的特性,这意味着我们可以创建一个项目专门用来做统一版本控制, 在这个项目里,我们将所有的包的version、scope等内容都定义好, 其他项目只需要在dependencyManagement下导入该包,而不需要破坏其本身的继承结构。
虽然dependencyManagement有这样的方便, 但需要注意的是dependencyManagement下的内容不仅对当前pom、子pom生效, 同样会覆盖由于依赖传递而引入的jar包。比如在项目A中,我们依赖了aa-1.0、bb-2.0, 而在bb-2.0中依赖了aa-2.0,此时,如果aa的版本是在dependencyManagement中定义, 那么aa-2.0将被放弃,aa-1.0生效,这样将导致bb-2.0可能使用了根本不存在的类和api, 最终项目构建失败。
7.Properties标签
如其字面意思——属性。properties标签下定性的属性,可以在pom的任何地方被引用, 引用方式为${属性名},其中属性名即标签名,我们可以利用这些属性管理一组依赖, 或者将一些容易变化的值集中到properties标签下管理。
<properties>
    <org.powermock.version>2.0.2</org.powermock.version>
</properties>
<dependencies>
    <dependency>
        <groupId>org.powermock</groupId>
        <artifactId>powermock-module-testng</artifactId>
        <version>${org.powermock.version}</version>
        <scope>test</scope>
    </dependency>
    <dependency>
        <groupId>org.powermock</groupId>
        <artifactId>powermock-api-mockito2</artifactId>
        <version>${org.powermock.version}</version>
        <scope>test</scope>
    </dependency>
    <dependency>
        <groupId>org.powermock</groupId>
        <artifactId>powermock-module-junit4</artifactId>
        <version>${org.powermock.version}</version>
        <scope>test</scope>
    </dependency>
</dependencies>
除了自定义属性外,maven插件也会提供一些属性,以达到对其进行配置的目的。 同时,maven还提供以下属性可以在pom文件中使用: - env.X : 以前缀env开头的属性,对应于系统环境变量, 比如通过${env.PATH}可以取到环境变量PATH的值。这里需要注意的是, maven对环境变量的大小写是敏感的,windows下的环境变量在maven中必须全部大写。 - project.X : project为前缀是属性是项目的属性值, 包括了pom中的标签——比如${project.parent.artifactId}可以获取 *<parent>* 下 *<artifactId>* 的值;除此之外还有一些其他属性,具体可参考 [官网说明](http://maven.apache.org/ref/3.6.3/maven-model-builder/#Model_Interpolation)。 值得一提是,该属性值并不是取当前pom中的标签,而是取**effective-pom**中的标签, 也就是说可以取到从父pom中继承的一些内容。 - settings.X : 与**project.X**类似,还过**settings.X**取的是**settings.xml**中的内容, 具体内容同样参考 [官网说明](http://maven.apache.org/ref/3.6.3/maven-model-builder/#Model_Interpolation)。 - java系统属性 : 所有可以通过`java.lang.System.getProperties()`方法获取的变量, 均可以在pom中获取,如**${java.home}**。具体可参考 oracle官方文档
三、配置构建任务
在上一章的内容是pom的一些基础标签的使用,灵活使用这些基础标签就可以达成项目的基本构建任务。
除了基本构建外,我们还往往在构建时需要进行打包前依赖冲突检测、发布前进码检查、 发布时同步发布源码包、自动生成并部署项目站点等任务,maven作为强大的构建工具, 通过构建插件的方式,将所有的这些任务全部沿着maven构建生命周期自动执行。
1.maven构建的生命周期
maven构建的生命周期定义了打包和发布项目时需要经历的流程,maven内置的生命周期有 clean(清理)、default(打包发布)、site(生成站点文档)三种。
这三种生命周期由一些阶段(phase)组成,三种生命周期对应的阶段如下:
1.1 clean生命周期
| Phase | Description |
|---|---|
| pre-clean | execute processes needed prior to the actual project cleaning |
| clean | remove all files generated by the previous build |
| post-clean | execute processes needed to finalize the project cleaning |
1.2 default生命周期
| Phase | Description |
|---|---|
| validate | validate the project is correct and all necessary information is available. |
| initialize | initialize build state, e.g. set properties or create directories. |
| generate-sources | generate any source code for inclusion in compilation. |
| process-sources | process the source code, for example to filter any values. |
| generate-resources | generate resources for inclusion in the package. |
| process-resources | copy and process the resources into the destination directory, ready for packaging. |
| compile | compile the source code of the project. |
| process-classes | post-process the generated files from compilation, for example to do bytecode enhancement on Java classes. |
| generate-test-sources | generate any test source code for inclusion in compilation. |
| process-test-sources | process the test source code, for example to filter any values. |
| generate-test-resources | create resources for testing. |
| process-test-resources | copy and process the resources into the test destination directory. |
| test-compile | compile the test source code into the test destination directory |
| process-test-classes | post-process the generated files from test compilation, for example to do bytecode enhancement on Java classes. |
| test | run tests using a suitable unit testing framework. These tests should not require the code be packaged or deployed. |
| prepare-package | perform any operations necessary to prepare a package before the actual packaging. This often results in an unpacked, processed version of the package. |
| package | take the compiled code and package it in its distributable format, such as a JAR. |
| pre-integration-test | perform actions required before integration tests are executed. This may involve things such as setting up the required environment. |
| integration-test | process and deploy the package if necessary into an environment where integration tests can be run. |
| post-integration-test | perform actions required after integration tests have been executed. This may including cleaning up the environment. |
| verify | run any checks to verify the package is valid and meets quality criteria. |
| install | install the package into the local repository, for use as a dependency in other projects locally. |
| deploy | done in an integration or release environment, copies the final package to the remote repository for sharing with other developers and projects. |
1.3 site生命周期
| Phase | Description |
|---|---|
| pre-site | execute processes needed prior to the actual project site generation |
| site | generate the project's site documentation |
| post-site | execute processes needed to finalize the site generation, and to prepare for site deployment |
| site-deploy | deploy the generated site documentation to the specified web server |
每个生命周期拥有的阶段互不重叠,且在构建时每个生命周期中的阶段按顺序进行。 这意味着当我们使用mvn命令构建时,如果指定了某一阶段,maven会先执行所有前置阶段, 再执行指定的阶段——这使得maven的使用相当容易,使用都只需要记住常用的几个阶段 (如clean、deploy、site)即可单独完成项目的构建和发布。
2.插件的“构建阶段”
除了maven内置的阶段外,maven允许插件自定义阶段,比如maven-dependency-plugin 插件中常用的copy-dependencies阶段。插件阶段与内置阶段一样可以使用mvn命令运行, 唯一不同的是需要在阶段前加上插件的坐标信息,如mvn dependency:copy-dependencies (使用非maven官方插件时,需要将dependency换成groupId:artifactId的形式)。
在使用这些插件前,我们需要在pom文件中引入插件:
<build>
  <plugins>
    <plugin>
      <artifactId>maven-dependency-plugin</artifactId>
      <version>2.8</version>
    </plugin>
  </plugins>
</build>事实上基本构建插件maven都有内置,super pom中甚至进行了缺少配置,不需要我们再手动添加
虽然maven允许插件自定义阶段,但不允许修改内置的生命周期,
3.build标签
build标签下定义了构建的相关信息和配置:
<build>
  <defaultGoal>install</defaultGoal>
  <directory>${basedir}/target</directory>
  <finalName>${artifactId}-${version}</finalName>
  <resources>
    <resource>
      <filtering>true</filtering>
      <directory>${basedir}/src/main/resources</directory>
      <includes>
        <include>**/application*.yml</include>
        <include>**/application*.yaml</include>
        <include>**/application*.properties</include>
      </includes>
    </resource>
    <resource>
      <targetPath>META-INF/plexus</targetPath>
      <filtering>false</filtering>
      <directory>${basedir}/src/main/plexus</directory>
      <includes>
        <include>configuration.xml</include>
      </includes>
      <excludes>
        <exclude>**/*.properties</exclude>
      </excludes>
    </resource>
  </resources>
  <testResources>
    ...
  </testResources>
  <filters>
    <filter>filters/filter1.properties</filter>
  </filters>
</build>
3.1 defaultGoal
默认构建目标(阶段),如果配置该值,在执行mvn命令时可以不指定构建阶段。
<defaultGoal>clean package</defaultGoal>3.2 directory
构建生成的相关文件的存放位置,默认配置为${project.basedir}/target。
3.3 finalName
构建生成jar包(或其他类型的包)的名称,默认为${artifactId}-${version}。
需要注意的是,finalName并非如字面意思一般是打包后的最终名称, 实际打包插件可能会在后面添加后缀:如果我们配置finalName配置为demo, 同时为打包插件配置classifier标签为jdk17(上面我们讲到过), 那么实际生成的jar名称为demo-jdk17.jar。
3.4 resources 与 testResources
resources标签用来指定资源文件的存放路径,这些文件不会参与编译,会直接拷贝到相应的路径下。
- targetPath: 拷贝目标路径,在default周期的process-resources阶段,资源将被拷贝到对应的路径下。 如果不指定,文件将被拷贝至根目录下。
- filtering: 是否启用过滤,如果启用,则允许在resource指定的文件中使用占位符替换 ,默认不启用。这里的替换范围包括所有在pom中可以使用的变量,替换方式为
${placeholder}——这是官方文档的说法,实际在spring boot项目中的有效使用格式为@placeholder@ - directory: 资源文件的源路径,默认为
${project.basedir}/src/main/resources - includes: 源路径下需要包含的文件,允许使用通配符的方式匹配
- excludes: 源路径下需要排除的文件,允许使用通配符的方式匹配
testResources中的内容与resources一致,不同的是其对应的生命周期和directory的默认值。
3.5 filter
filter可以用来引入一些properties文件,在这样文件里定义的属性, 也会加入到开启了filtering的资源文件的占位符替换范围。
3.6 plugins 与 pluginManagement
3.6.1 plugins
plugins标签用于引入和配置打包插件。
<build>
  ...
  <pluginManagement>
    <plugins>
        ...
    </plugins>
  </pluginManagement>
  <plugins>
    <plugin>
      <groupId>org.apache.maven.plugins</groupId>
      <artifactId>maven-jar-plugin</artifactId>
      <version>2.6</version>
      <extensions>false</extensions>
      <inherited>true</inherited>
      <configuration>
        <classifier>test</classifier>
      </configuration>
      <dependencies>...</dependencies>
      <executions>...</executions>
    </plugin>
  </plugins>
</build>- extensions: 是否加载该插件拥有的扩展包(后方会讲到),默认为false
- inherited: 是否允许子级pom继承,默认为true
- configuration: configuration下的内容较为特殊,maven并未约束其子级标签的范围。 实际上子标签对应是的插件的可配置属性,因此configuration下的内容需要通过阅读插件的使用文档来进行配置 这里需要注意的是,无论configuration出现在父级pom还是在pluginManagement中, 其中的定义属性最终会在合并后传递给插件。 (合并策略参考官方网站)
- dependencies: 与项目的dependencies结构一致,不同的是这些依赖不作用于项目,而是作用的插件, 通过指定依赖,我们可以用来指定插件依赖的包的版本等信息。
- executions: 对插件提供的maven阶段进行配置,该标签下的内容较为复杂,实际使用也比较多,值得单独一讲
executions下包含的是execution列表,每个execution可以理解为一个任务。
<plugin>
  <artifactId>maven-antrun-plugin</artifactId>
  <version>1.1</version>
  <executions>
    <execution>
      <id>echodir</id>
      <goals>
        <goal>run</goal>
      </goals>
      <phase>verify</phase>
      <inherited>false</inherited>
      <configuration>
        <tasks>
          <echo>Build Dir: ${project.build.directory}</echo>
        </tasks>
      </configuration>
    </execution>
  </executions>
</plugin>- id: 任务的id,用来区分不同的execution,该值会在该任务执行时打印出来, 格式:[plugin:goal (id)]
- goals: 需要插件执行的构建目标(阶段),每个插件具体提供的构建目标可以参考官方文档, 或者通过maven-help-plugin查看插件的信息:
mvn help:describe -Dplugin=com.github.spotbugs:spotbugs-maven-plugin:3.1.12.2 - phase: 指定需要绑定的maven内置构建阶段。在这里需要注意,插件的构建阶段为goal, 内置构建阶段为phase,因为插件的阶段是没有生命周期的。phase标签的作用, 就是将execution对应的任务绑定到maven的某个内置构建阶段,在maven生命周期时, 当执行到该phase时,会自动运行该execution下的goals,从而对maven构建进行扩展。 比如我们可以将pmd插件的
pmd、check关联到verfiy阶段,这样当我们运行mvn verify时, 会自动进行代码问题的检查。 - inherited: 是否允许该execution被子pom继承,默认为true
- configuration: 与外层的configuration内容一致,不过仅对该execution生效
3.6.2 pluginManagement
pluginManagement的作用与dependencyManagement的作用类似,我们可以在父pom里配置所有插件, 但不实际引入插件,子pom按需在plugins标签下引入具体插件,这样就可以达到插件配置集中管理的效果 —— 同dependencies下引入dependencyManagement中的依赖一样, plugins下引入pluginManagement中的插件只需要声明groupId与artifactId。
<build>
  <pluginManagement>
    <plugins>
      <plugin>
        <artifactId>maven-antrun-plugin</artifactId>
        <version>1.1</version>
        <executions>
          <execution>
            <id>echodir</id>
            <goals>
              <goal>run</goal>
            </goals>
            <phase>verify</phase>
            <inherited>false</inherited>
            <configuration>
              <tasks>
                <echo>Build Dir: ${project.build.directory}</echo>
              </tasks>
            </configuration>
          </execution>
        </executions>
      </plugin>
    </plugins>
  </pluginManagement>
  <plugins>
    <plugin>
      <artifactId>maven-antrun-plugin</artifactId>
    </plugin>
  </plugins>
</build>
4.profiles标签
profiles允许我们定义多个profile,并设置每个profile的激活条件,以达到自如切换多套配置的目的。
<profiles>
  <profile>
    <id>test</id>
    <activation>...</activation>
    <build>...</build>
    <modules>...</modules>
    <repositories>...</repositories>
    <pluginRepositories>...</pluginRepositories>
    <dependencies>...</dependencies>
    <reporting>...</reporting>
    <dependencyManagement>...</dependencyManagement>
    <distributionManagement>...</distributionManagement>
  </profile>
</profiles>
4.1 id
如字面意思,即套profile的标识,我们可以通过mvn命令的-P选项直接通过id激活对应的profile: mvn -P test clean deploy
4.2 activation
profile的自动激活条件。
除了通过手动指定profile外,还可以根据一些条件,自动激活profile。
<profile>
  <id>test</id>
  <activation>
    <activeByDefault>false</activeByDefault>
    <jdk>1.5</jdk>
    <os>
      <name>Windows XP</name>
      <family>Windows</family>
      <arch>x86</arch>
      <version>5.1.2600</version>
    </os>
    <property>
      <name>sparrow-type</name>
      <value>African</value>
    </property>
    <file>
      <exists>${basedir}/file2.properties</exists>
      <missing>${basedir}/file1.properties</missing>
    </file>
  </activation>
</profile>其中activeByDefault表示是否为默认激活,默认值为false。如果配置为true, 当没有配置文件被激活时,激活该配置文件
其他的标签是一些具体激活条件,在maven3.2.2版本只要满足一项激活条件就成立(或关系), 在maven3.2.2以后必须满足所有项激活条件才成立(与关系): - jdk: 指定构建时的jdk版本,除了指定具体版本外,也可以指定范围 - os: 操作系统信息,具体约束条件内容可查看这里 - property: 将该属性的key-value满足条件时该项成立。这里的属性的范围与pom文件一致。 - file: 文件存在或缺失,配置路径须为绝对路径。该项需要注意的是,file标签下的属性替换, 只允许出现basedir、系统变量、maven命令传递变量这三种。
在我们配置好profiles,如果想知道在当前环境下哪个配置将被激活, 可以通过mvn help:active-profiles查看。
4.3其他标签
modules、dependencies、dependencyManagement标签我们在前文中已经讲过, profile下这些标签的可配置内容与其在根标签(project)下的一致, profile下的配置可以覆盖根标签下的配置。
repositories、pluginRepositories、reporting、distributionManagement 这些标签在根标签下也存在,只是我们还没有聊到,与上面的这些标签一样, 这些标签的可配置内容与其在根标签下的一致,profile下的配置可以覆盖根标签下的配置。
build标签较为特殊,其在profile下的可配置内容只包含前文中我们提到的所有内容, 但在根标签下的build标签还有一些独占内容我们没有提到。
5.project标签下的build标签
在project标签下的build标签下还有几个标签,这些标签仅出现在project标签下的build中, 无法在profile中的内容配置。
这些标签包括目录结构标签——sourceDirectory、sourceDirectory、testSourceDirectory、 outputDirectory、testOutputDirectory,以及extensions标签。
5.1 *Directory标签
这些标签定义了项目的目录结构,标签的含义和其英文名字一致,标签的值必须为绝对路径 (一般使用`${project.basedir}进行拼接)。
这样需要注意的是除了上述的几个标签外,我们还可以找到一个scriptSourceDirectory标签, 该标签实际没有用处,已经被官宣废弃。
5.2 extensions标签
extensions下可以引入一些jar对maven能力进行扩展,比如引入wagon-ssh添加对ssh协议的支持, 与plugins中的插件不同,扩展程序不需要提供构建目标(gloas),只是提供能力基础, 因此需要另行引入插件配合使用。
我们举一个利用ssh协议进行包自动部署的例子:
<build>
  <extensions>
    <groupId>org.apache.maven.wagon</groupId>
    <artifactId>wagon-ssh</artifactId>
    <version>2.10</version>
  </extensions>
  <plugins>
    <plugin>
      <groupId>org.codehaus.mojo</groupId>
      <artifactId>wagon-maven-plugin</artifactId>
      <version>1.0</version>
      <configuration>
        <serverId>devServerRoot</serverId>
        <formFile>target/demo.jar</formFile>
        <url>scp://root@x.x.x.x:/root/applications/demo</url>
        <commands>
          <command>/root/applications/demo/restart.sh</command>
        </commands>
        <desplayCommandOutputs>true</desplayCommandOutputs>
      </configuration>
    </plugin>
  </plugins>
</build>其中serverId中的的devServerRoot于server标签中的id, server标签下可以定义服务器的账号密码信息,一般在settings.xml中配置,也可以在pom中配置。
<server>
  <id>devServerRoot</id>
  <username>root</username>
  <password>password</password>
</server>
5.Reporting标签
reporting下的内容与site生命周期相关,reporting标签下可以定义一些插件用于生成报告文档, 比如javadoc。
与build类似,reporting也提供了插件的配置能力,与build不同的是, reporting下的插件无法被绑定到指定的maven阶段(默认绑定site阶段)
<reporting>
  <plugins>
    <excludeDefaults>false</excludeDefaults>
    <outputDirectory>${basedir}/target/site</outputDirectory>
    <plugin>
      <groupId>org.apache.maven.plugins</groupId>
      <artifactId>maven-javadoc-plugin</artifactId>
      <version>3.1.1</version>
      <reportSets>
        <reportSet>
          <id>sunlink</id>
          <reports>
            <report>javadoc</report>
          </reports>
          <inherited>true</inherited>
          <configuration>
            <links>
              <link>http://java.sun.com/j2se/1.5.0/docs/a
              </link>
            </links>
          </configuration>
        </reportSet>
      </reportSets>
    </plugin>
  </plugins>
</reporting>- excludeDefaults: 是否禁用默认报告信息,默认为false。这里的默认报告信息指的是 maven-project-info-reports-plugin,该插件会生成项目信息以及左侧的导航栏。
- outputDirectory: 报告生成位置。与build下的outputDirectory不同,报告的默认生成位置为 ${basedir}/site
- plugins: 引入报告生成插件并对其进行配置。
6.1 plugins中的reportSet标签
与build下的plugin相比,reporting下的配置就相对较为简单,只有一个类似于executions 的reportSets标签——两者均定义了插件在某一maven阶段的构建任务。
- id: 构建任务的id,与execution类似,会在构建时打印出来
- reports: 类似于execution的goals,但实际上插件会将其构建目标做出区分, 报告相关的目标只可以出现在reportSet中(比如javadoc:javadoc),而不允许出现在execution中
- inherited: 是否允许子pom继承
- configuration: 与execution中的配置类似,对该次任务的插件进行配置
有一点需要注意的是,同样的插件可以同时出现在build下和reporting下, 虽然我们可以用pluginManagement统一管理版本, 但build下的相关配置(configuration)不会传递到reporting中

 浙公网安备 33010602011771号