记自签ssl证书在Chrome下无法访问
最近捣鼓了自签ssl证书,按照以前的记录进行配置,发现IE下正常,Chrome下却无法访问。经过多方查找发现是高版本chrome需要配置subjectAltName,故做此记录。
一、配置openssl.cnf
 1 [root@localhost ca]# openssl version -a
 2 OpenSSL 1.0.2k-fips  26 Jan 2017
 3 built on: reproducible build, date unspecified
 4 platform: linux-x86_64
 5 options:  bn(64,64) md2(int) rc4(16x,int) des(idx,cisc,16,int) idea(int) blowfish(idx)
 6 compiler: gcc -I. -I.. -I../include  -fPIC -DOPENSSL_PIC -DZLIB -DOPENSSL_THREADS -D_REENTRANT -DDSO_DLFCN -DHAVE_DLFCN_H -DKRB5_MIT -m64 -DL_ENDIAN -Wall -O2 -g -pipe -Wall -Wp,-D_FORTIFY_SOURCE=2 -fexceptions -fstack-protector-strong --param=ssp-buffer-size=4 -grecord-gcc-switches   -m64 -mtune=generic -Wa,--noexecstack -DPURIFY -DOPENSSL_IA32_SSE2 -DOPENSSL_BN_ASM_MONT -DOPENSSL_BN_ASM_MONT5 -DOPENSSL_BN_ASM_GF2m -DRC4_ASM -DSHA1_ASM -DSHA256_ASM -DSHA512_ASM -DMD5_ASM -DAES_ASM -DVPAES_ASM -DBSAES_ASM -DWHIRLPOOL_ASM -DGHASH_ASM -DECP_NISTZ256_ASM
 7 OPENSSLDIR: "/etc/pki/tls"
 8 engines:  rdrand dynamic
 9 [root@localhost ca]# ll /etc/pki/tls/openssl.cnf
10 -rw-r--r--. 1 root root 10923 Aug  6  2019 /etc/pki/tls/openssl.cnf
11
12 [root@localhost ca]# vim /etc/pki/tls/openssl.cnf
13 # 打开加载v3_req
14 req_extensions = v3_req # The extensions to add to a certificate request
15
16 [ v3_req ]
17 # Extensions to add to a certificate request
18 basicConstraints = CA:FALSE
19 keyUsage = nonRepudiation, digitalSignature, keyEncipherment
20 #在v3_req下面新增以下三行
21 subjectAltName = @alt_names
22 [ alt_names ]
23 DNS.1 = *.my.devv
二、生成证书
 1 [root@localhost ca]# openssl genrsa -out ca.key 2048
 2 Generating RSA private key, 2048 bit long modulus
 3 ...................................+++
 4 ......................................................................+++
 5 e is 65537 (0x10001)
 6 [root@localhost ca]# openssl req -new -subj "/CN=local" -key ca.key -out ca.csr
 7 [root@localhost ca]# openssl rsa -in ca.key -out server.key
 8 writing RSA key
 9 [root@localhost ca]# openssl req -new -subj "/CN=*.my.devv" -x509 -days 3650 -key server.key -out server.crt -config /etc/pki/tls/openssl.cnf -extensions v3_req
10 [root@localhost ca]# ll
11 total 16
12 -rw-r--r--. 1 root root  972 Mar 30 11:39 ca.csr
13 -rw-r--r--. 1 root root 1679 Mar 30 11:39 ca.key
14 -rw-r--r--. 1 root root 1050 Mar 30 11:39 server.crt
15 -rw-r--r--. 1 root root 1679 Mar 30 11:39 server.key
三、配置nginx
 1 [root@localhost ca]# cp server.crt /datas/soft/openresty/nginx/conf/server.crt
 2 [root@localhost ca]# cp server.key /datas/soft/openresty/nginx/conf/server.key
 3 [root@localhost ca]# vim /datas/soft/openresty/nginx/conf/vhosts/my.conf
 4 server  {
 5     listen 80;
 6     listen 443 ssl;
 7     server_name  *.my.devv;
 8     index index.html index.htm index.php;
 9     root  /datas/www/root/;
10
11     ssl on;
12     ssl_certificate  server.crt;
13     ssl_certificate_key  server.key;
14
15     location ~ .*\.(php|php5)?$
16     {
17         fastcgi_pass  php56;
18         fastcgi_index index.php;
19         include fcgi.conf;
20     }
21
22     access_log /datas/logs/nginx/mydev_access.log tpynormal;
23     error_log  /datas/logs/nginx/mydev_error.log;
24 }
25 [root@localhost ca]# systemctl reload openresty
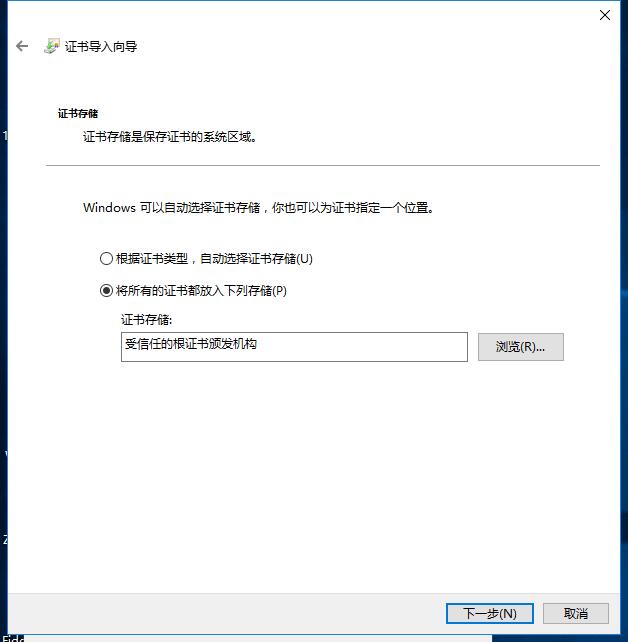
四、下载server.crt到Windows,并双击安装到“受信任的根证书颁布机构”(左图),之后打开 certmgr.msc 确认(右图)

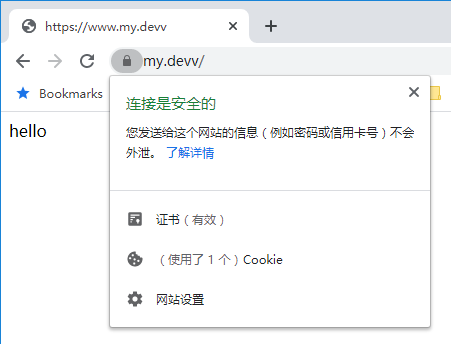
五、查看访问
六、参考链接
https://www.jianshu.com/p/781b3e27793c
https://www.jianshu.com/p/7aa3b1680daa
https://www.iteye.com/blog/a52071453-2195699
https://cloud.tencent.com/developer/ask/47746
https://www.liaoxuefeng.com/article/990311924891552
https://v2ex.com/t/356659
https://blog.csdn.net/zssai2015/article/details/85049905

 浙公网安备 33010602011771号