Java8新特性的使用(一)
Lambda表达式
Lambda 表达式使用函数式接口匹配Java的类型系统
//匿名类
new Thread(new Runnable(){
    @Override
    public void run(){
        System.out.println("hello1");
    }
}).start();
//Lambda表达式
new Thread(() -> System.out.println("hello2")).start();
函数式接口及其用法
//Predicate接口是输入一个参数,返回布尔值。我们通过and方法组合两个Predicate条件,判断是否值大于0并且是偶数
Predicate<Integer> positiveNumber = i -> i > 0;
Predicate<Integer> evenNumber = i -> i % 2 == 0;
assertTrue(positiveNumber.and(evenNumber).test(2));

//Consumer接口是消费一个数据。我们通过andThen方法组合调用两个Consumer,输出两行abcdefg
Consumer<String> println = System.out::println;
println.andThen(println).accept("abcdefg");

//Function接口是输入一个数据,计算后输出一个数据。我们先把字符串转换为大写,然后通过andThen组合另一个Function实现字符串拼接
Function<String, String> upperCase = String::toUpperCase;
Function<String, String> duplicate = s -> s.concat(s);
assertThat(upperCase.andThen(duplicate).apply("test"), is("TESTTEST"));

//Supplier是提供一个数据的接口。这里我们实现获取一个随机数
Supplier<Integer> random = ()->ThreadLocalRandom.current().nextInt();
System.out.println(random.get());

//BinaryOperator是输入两个同类型参数,输出一个同类型参数的接口。这里我们通过方法引用获得一个整数加法操作,通过Lambda表达式定义一个减法操作,然后依次调用
BinaryOperator<Integer> add = Integer::sum;
BinaryOperator<Integer> subtraction = (a, b) -> a - b;
assertThat(subtraction.apply(add.apply(1, 2), 3), is(0));
Predicate、Function 等函数式接口,还使用 default 关键字实现了几个默认方法。这样一来,它们既可以满足函数式接口只有一个抽象方法,又能为接口提供额外的功能:
@FunctionalInterface
public interface Function<T, R> {
    R apply(T t);
    default <V> Function<V, R> compose(Function<? super V, ? extends T> before) {
        Objects.requireNonNull(before);
        return (V v) -> apply(before.apply(v));
    }
    default <V> Function<T, V> andThen(Function<? super R, ? extends V> after) {
        Objects.requireNonNull(after);
        return (T t) -> after.apply(apply(t));
    }
}
使用 Java 8 简化代码
使用 Stream 简化集合操作;
用例:
//把整数列表转换为 Point2D 列表;
//遍历 Point2D 列表过滤出 Y 轴 >1 的对象;
//计算 Point2D 点到原点的距离;
//累加所有计算出的距离,并计算距离的平均值。

private static double calc(List<Integer> ints) {
    //临时中间集合
    List<Point2D> point2DList = new ArrayList<>();
    for (Integer i : ints) {
        point2DList.add(new Point2D.Double((double) i % 3, (double) i / 3));
    }
    //临时变量,纯粹是为了获得最后结果需要的中间变量
    double total = 0;
    int count = 0;

    for (Point2D point2D : point2DList) {
        //过滤
        if (point2D.getY() > 1) {
            //算距离
            double distance = point2D.distance(0, 0);
            total += distance;
            count++;
        }
    }
    //注意count可能为0的可能
    return count >0 ? total / count : 0;
}
Java8简化
//map 方法传入的是一个 Function,可以实现对象转换;
//filter 方法传入一个 Predicate,实现对象的布尔判断,只保留返回 true 的数据;
//mapToDouble 用于把对象转换为 double;
//通过 average 方法返回一个 OptionalDouble,代表可能包含值也可能不包含值的可空 double。

List<Integer> ints = Arrays.asList(1, 2, 3, 4, 5, 6, 7, 8);
double average = calc(ints);
double streamResult = ints.stream()
        .map(i -> new Point2D.Double((double) i % 3, (double) i / 3))
        .filter(point -> point.getY() > 1)
        .mapToDouble(point -> point.distance(0, 0))
        .average()
        .orElse(0);
//如何用一行代码来实现,比较一下可读性
assertThat(average, is(streamResult));
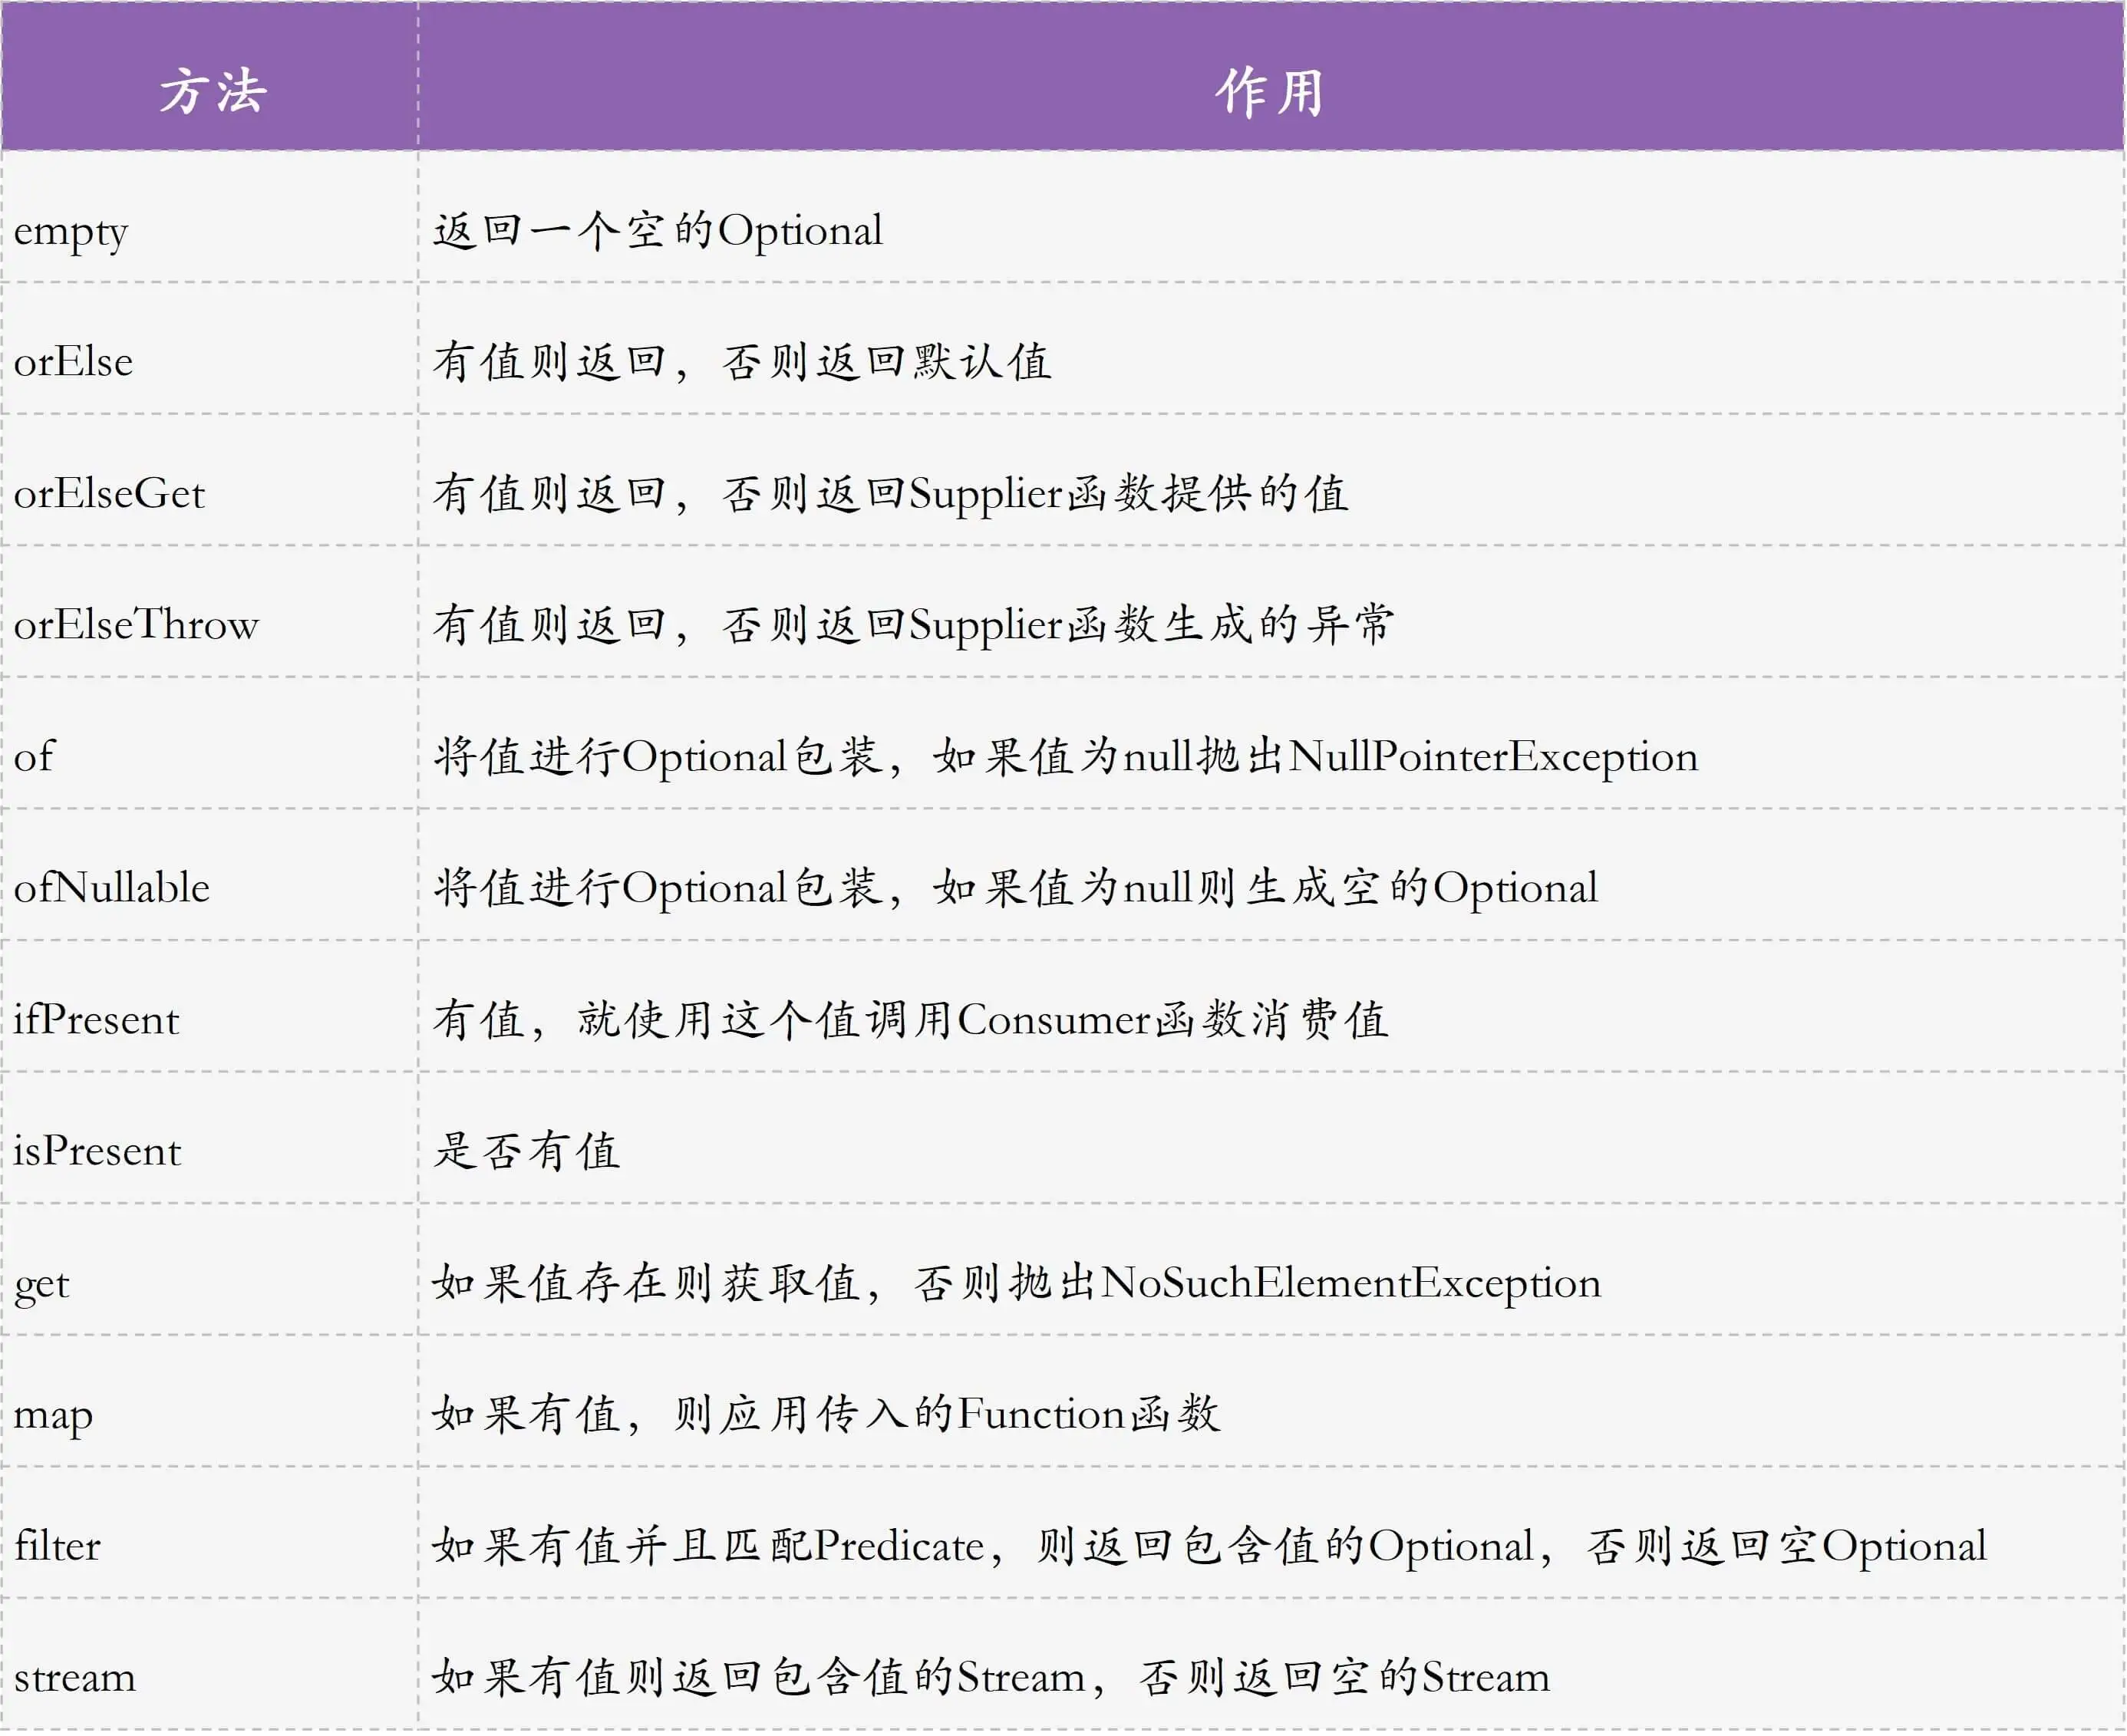
使用 Optional 简化判空逻辑;
使用 Optional,不仅可以避免使用 Stream 进行级联调用的空指针问题,提供了一些实用的方法帮我们避免判空逻辑。以及使用它的 fluent API 简化冗长的 if-else 判空逻辑
@Test(expected = IllegalArgumentException.class)
public void optional() {
    //通过get方法获取Optional中的实际值
    assertThat(Optional.of(1).get(), is(1));
    //通过ofNullable来初始化一个null,通过orElse方法实现Optional中无数据的时候返回一个默认值
    assertThat(Optional.ofNullable(null).orElse("A"), is("A"));
    //OptionalDouble是基本类型double的Optional对象,isPresent判断有无数据
    assertFalse(OptionalDouble.empty().isPresent());
    //通过map方法可以对Optional对象进行级联转换,不会出现空指针,转换后还是一个Optional
    assertThat(Optional.of(1).map(Math::incrementExact).get(), is(2));
    //通过filter实现Optional中数据的过滤,得到一个Optional,然后级联使用orElse提供默认值
    assertThat(Optional.of(1).filter(integer -> integer % 2 == 0).orElse(null), is(nullValue()));
    //通过orElseThrow实现无数据时抛出异常
    Optional.empty().orElseThrow(IllegalArgumentException::new);
}

JDK8 结合 Lambda 和 Stream 对各种类的增强。
函数式功能,如通过HashMap实现一个缓存的操作,getProductAndCache方法:先判断缓存中是否有值;如果没有值,就从数据库搜索取值;最后,把数据加入缓存。
private Map<Long, Product> cache = new ConcurrentHashMap<>();

private Product getProductAndCache(Long id) {
    Product product = null;
    //Key存在,返回Value
    if (cache.containsKey(id)) {
        product = cache.get(id);
    } else {
        //不存在,则获取Value
        //需要遍历数据源查询获得Product
        for (Product p : Product.getData()) {
            if (p.getId().equals(id)) {
                product = p;
                break;
            }
        }
        //加入ConcurrentHashMap
        if (product != null)
            cache.put(id, product);
    }
    return product;
}

@Test
public void notcoolCache() {
    getProductAndCache(1L);
    getProductAndCache(100L);

    System.out.println(cache);
    assertThat(cache.size(), is(1));
    assertTrue(cache.containsKey(1L));
}
利用ConcurrentHashMap的computeIfAbsent方法,用一行代码就可以实现
private Product getProductAndCacheCool(Long id) {
    return cache.computeIfAbsent(id, i -> //当Key不存在的时候提供一个Function来代表根据Key获取Value的过程
            Product.getData().stream()
                    .filter(p -> p.getId().equals(i)) //过滤
                    .findFirst() //找第一个,得到Optional<Product>
                    .orElse(null)); //如果找不到Product,则使用null
}

@Test
public void coolCache()
{
    getProductAndCacheCool(1L);
    getProductAndCacheCool(100L);

    System.out.println(cache);
    assertThat(cache.size(), is(1));
    assertTrue(cache.containsKey(1L));
}
computeIfAbsent方法逻辑上相当于:
if (map.get(key) == null) {
  V newValue = mappingFunction.apply(key);
  if (newValue != null)
    map.put(key, newValue);
}
利用 Files.walk 返回一个 Path 的流,通过两行代码就能实现递归搜索 +grep 的操作。整个逻辑是:递归搜索文件夹,查找所有的.java 文件;然后读取文件每一行内容,用正则表达式匹配 public class 关键字;最后输出文件名和这行内容。
@Test
public void filesExample() throws IOException {
    //无限深度,递归遍历文件夹
    try (Stream<Path> pathStream = Files.walk(Paths.get("."))) {
        pathStream.filter(Files::isRegularFile) //只查普通文件
                .filter(FileSystems.getDefault().getPathMatcher("glob:**/*.java")::matches) //搜索java源码文件
                .flatMap(ThrowingFunction.unchecked(path ->
                        Files.readAllLines(path).stream() //读取文件内容,转换为Stream<List>
                        .filter(line -> Pattern.compile("public class").matcher(line).find()) //使用正则过滤带有public class的行
                        .map(line -> path.getFileName() + " >> " + line))) //把这行文件内容转换为文件名+行
                .forEach(System.out::println); //打印所有的行
    }
}
因为 Files.readAllLines 方法会抛出一个受检异常(IOException),所以使用一个自定义的函数式接口,用 ThrowingFunction 包装这个方法,把受检异常转换为运行时异常,让代码更清晰:
@FunctionalInterface
public interface ThrowingFunction<T, R, E extends Throwable> {
    static <T, R, E extends Throwable> Function<T, R> unchecked(ThrowingFunction<T, R, E> f) {
        return t -> {
            try {
                return f.apply(t);
            } catch (Throwable e) {
                throw new RuntimeException(e);
            }
        };
    }

    R apply(T t) throws E;
}
并行流
Stream 操作都是串行 Stream,操作只是在一个线程中执行,此外 Java 8 还提供了并行流的功能:通过 parallel 方法,一键把 Stream 转换为并行操作提交到线程池处理。
//比如,如下代码通过线程池来并行消费处理 1 到 100:

IntStream.rangeClosed(1,100).parallel().forEach(i->{
    System.out.println(LocalDateTime.now() + " : " + i);
    try {
        Thread.sleep(1000);
    } catch (InterruptedException e) { }
});
使用 threadCount 个线程对某个方法总计执行 taskCount 次操作的案例。用于演示并发情况下的多线程问题或多线程处理性能。除了会用到并行流,我们有时也会使用线程池或直接使用线程进行类似操作。
五种操作方式的场景
使用20个线程(threadCount)以并行方式总计执行 10000 次(taskCount)操作。因为单个任务单线程执行需要 10 毫秒(任务代码如下),也就是每秒吞吐量是 100 个操作,那 20 个线程 QPS 是 2000,执行完 10000 次操作最少耗时 5 秒。
private void increment(AtomicInteger atomicInteger) {
    atomicInteger.incrementAndGet();
    try {
        TimeUnit.MILLISECONDS.sleep(10);
    } catch (InterruptedException e) {
        e.printStackTrace();
    }
}
方式一:使用线程。直接把任务按照线程数均匀分割,分配到不通的线程执行,使用CountDownLatch来阻塞主线程,直到所有线程都完成操作。这种方式需要自己分割任务:
private int thread(int taskCount, int threadCount) throws InterruptedException {
    //总操作次数计数器
    AtomicInteger atomicInteger = new AtomicInteger();
    //使用CountDownLatch来等待所有线程执行完成
    CountDownLatch countDownLatch = new CountDownLatch(threadCount);
    //使用IntStream把数字直接转为Thread
    IntStream.rangeClosed(1, threadCount).mapToObj(i -> new Thread(() -> {
        //手动把taskCount分成taskCount份,每一份有一个线程执行
        IntStream.rangeClosed(1, taskCount / threadCount).forEach(j -> increment(atomicInteger));
        //每一个线程处理完成自己那部分数据之后,countDown一次
        countDownLatch.countDown();
    })).forEach(Thread::start);
    //等到所有线程执行完成
    countDownLatch.await();
    //查询计数器当前值
    return atomicInteger.get();
}
方式二:使用Executors.newFixedThreadPool来获得固定线程数的线程池,使用execute提交所有任务到线程池执行,最后关闭线程池等待所有任务执行完成:
private int threadpool(int taskCount, int threadCount) throws InterruptedException {
    //总操作次数计数器
    AtomicInteger atomicInteger = new AtomicInteger();
    //初始化一个线程数量=threadCount的线程池
    ExecutorService executorService = Executors.newFixedThreadPool(threadCount);
    //所有任务直接提交到线程池处理
    IntStream.rangeClosed(1, taskCount).forEach(i -> executorService.execute(() -> increment(atomicInteger)));
    //提交关闭线程池申请,等待之前所有任务执行完成
    executorService.shutdown();
    executorService.awaitTermination(1, TimeUnit.HOURS);
    //查询计数器当前值
    return atomicInteger.get();
}
方式三:使用ForkJoinPool而不是普通线程池执行任务
ForkJoinPool 和传统的 ThreadPoolExecutor 区别在于,前者对于 n 并行度有 n 个独立队列,后者是共享队列。如果有大量执行耗时比较短的任务,ThreadPoolExecutor 的单队列就可能会成为瓶颈。这时,使用 ForkJoinPool 性能会更好。
因此,ForkJoinPool 更适合大任务分割成许多小任务并行执行的场景,而 ThreadPoolExecutor 适合许多独立任务并发执行的场景。
private int forkjoin(int taskCount, int threadCount) throws InterruptedException {
    //总操作次数计数器
    AtomicInteger atomicInteger = new AtomicInteger();
    //自定义一个并行度=threadCount的ForkJoinPool
    ForkJoinPool forkJoinPool = new ForkJoinPool(threadCount);
    //所有任务直接提交到线程池处理
    forkJoinPool.execute(() -> IntStream.rangeClosed(1, taskCount).parallel().forEach(i -> increment(atomicInteger)));
    //提交关闭线程池申请,等待之前所有任务执行完成
    forkJoinPool.shutdown();
    forkJoinPool.awaitTermination(1, TimeUnit.HOURS);
    //查询计数器当前值
    return atomicInteger.get();
}
方式四:直接使用并行流,并行流使用公共的ForkJoinPool,也就是ForkJoinPool.commonPool()
公共的 ForkJoinPool 默认的并行度是 CPU 核心数 -1,原因是对于 CPU 绑定的任务分配超过 CPU 个数的线程没有意义。由于并行流还会使用主线程执行任务,也会占用一个 CPU 核心,所以公共 ForkJoinPool 的并行度即使 -1 也能用满所有 CPU 核心。
//通过配置强制指定(增大)了并行数,但因为使用的是公共 ForkJoinPool,所以可能会存在干扰,线程池混用产生的问题
private int stream(int taskCount, int threadCount) {
    //设置公共ForkJoinPool的并行度
System.setProperty("java.util.concurrent.ForkJoinPool.common.parallelism", String.valueOf(threadCount));
    //总操作次数计数器
    AtomicInteger atomicInteger = new AtomicInteger();
    //由于我们设置了公共ForkJoinPool的并行度,直接使用parallel提交任务即可
    IntStream.rangeClosed(1, taskCount).parallel().forEach(i -> increment(atomicInteger));
    //查询计数器当前值
    return atomicInteger.get();
}
方式五:使用CompletableFuture来实现。CompletableFuture.runAsync方法指定一个线程池,一般会在使用CompletableFuture的时候用到:
private int completableFuture(int taskCount, int threadCount) throws InterruptedException, ExecutionException {
    //总操作次数计数器
    AtomicInteger atomicInteger = new AtomicInteger();
    //自定义一个并行度=threadCount的ForkJoinPool
    ForkJoinPool forkJoinPool = new ForkJoinPool(threadCount);
    //使用CompletableFuture.runAsync通过指定线程池异步执行任务
    CompletableFuture.runAsync(() -> IntStream.rangeClosed(1, taskCount).parallel().forEach(i -> increment(atomicInteger)), forkJoinPool).get();
    //查询计数器当前值
    return atomicInteger.get();
}
一般而言,使用线程池(第二种)和直接使用并行流(第四种)的方式在业务代码中比较常用。另外例子中一定是先运行 stream 方法再运行 forkjoin 方法,对公共 ForkJoinPool 默认并行度的修改才能生效。
这是因为 ForkJoinPool 类初始化公共线程池是在静态代码块里,加载类时就会进行的,如果 forkjoin 方法中先使用了 ForkJoinPool,即便 stream 方法中设置了系统属性也不会起作用。因此建议是,设置 ForkJoinPool 公共线程池默认并行度的操作,应该放在应用启动时设置。
原文链接:https://time.geekbang.org/column/intro/100047701


 浙公网安备 33010602011771号