

LangGraph学习记录1:入门篇
0. 写在前面
想搭建一个多智能体框架,已经设计好了,之前了解和使用过OpenAI早期的多智能体框架Swarm(主打轻量原生),huggingface的smolagent(侧重agent的行动是执行代码),还有魔改的openmanus。现在回归正规军,准备学习一下LangGraph的使用,并搭建解决我的领域特定任务的多智能体系统。
1. 安装
新建虚拟环境 python版本 > 3.10(langchain的要求)
pip install -U langchain
pip install -U langgraph
2. 入门一:第一个demo
这个demo是官方文档提供的,我改成openrouter的模型来使用。对于初学者来说这个其实不是特别好懂(也许是因为我太菜了),和我之前接触的框架搭建逻辑很不一样。可以先在AI辅助下理解这个demo,也可以先看下一部分入门二的demo我感觉更好懂。
# Step 1: Define tools and model
from langchain.tools import tool
from langchain_openai import ChatOpenAI
from dotenv import load_dotenv
import os
load_dotenv()
model = ChatOpenAI(
model="anthropic/claude-sonnet-4.5",
temperature=0,
base_url="https://openrouter.ai/api/v1",
api_key=os.getenv("OPENROUTER_API_KEY")
)
# Define tools
@tool
def multiply(a: int, b: int) -> int:
"""Multiply `a` and `b`.
Args:
a: First int
b: Second int
"""
return a * b
@tool
def add(a: int, b: int) -> int:
"""Adds `a` and `b`.
Args:
a: First int
b: Second int
"""
return a + b
@tool
def divide(a: int, b: int) -> float:
"""Divide `a` and `b`.
Args:
a: First int
b: Second int
"""
return a / b
# Augment the LLM with tools
tools = [add, multiply, divide]
tools_by_name = {tool.name: tool for tool in tools}
model_with_tools = model.bind_tools(tools)
# Step 2: Define state
from langchain.messages import AnyMessage
from typing_extensions import TypedDict, Annotated
import operator
class MessagesState(TypedDict):
messages: Annotated[list[AnyMessage], operator.add]
llm_calls: int
# Step 3: Define model node
from langchain.messages import SystemMessage
def llm_call(state: dict):
"""LLM decides whether to call a tool or not"""
return {
"messages": [
model_with_tools.invoke(
[
SystemMessage(
content="You are a helpful assistant tasked with performing arithmetic on a set of inputs."
)
]
+ state["messages"]
)
],
"llm_calls": state.get('llm_calls', 0) + 1 #字典取值,不存在则返回0
}
# Step 4: Define tool node
from langchain.messages import ToolMessage
def tool_node(state: dict):
"""Performs the tool call"""
result = []
for tool_call in state["messages"][-1].tool_calls:
tool = tools_by_name[tool_call["name"]]
observation = tool.invoke(tool_call["args"])
result.append(ToolMessage(content=observation, tool_call_id=tool_call["id"]))
return {"messages": result}
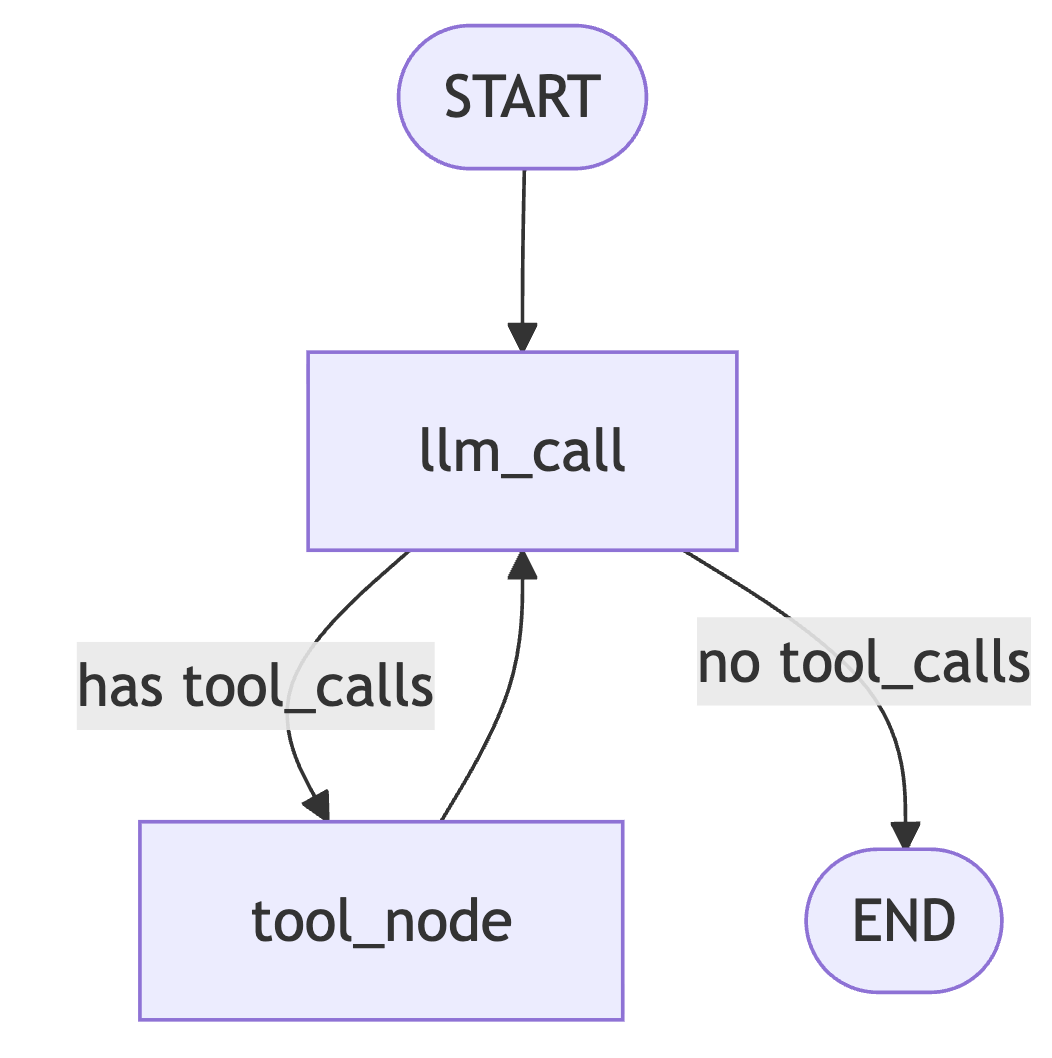
# Step 5: Define logic to determine whether to end
from typing import Literal
from langgraph.graph import StateGraph, START, END
# Conditional edge function to route to the tool node or end based upon whether the LLM made a tool call
def should_continue(state: MessagesState) -> Literal["tool_node", END]:
"""Decide if we should continue the loop or stop based upon whether the LLM made a tool call"""
messages = state["messages"]
last_message = messages[-1]
# If the LLM makes a tool call, then perform an action
if last_message.tool_calls:
return "tool_node"
# Otherwise, we stop (reply to the user)
return END
# Step 6: Build agent
# Build workflow
agent_builder = StateGraph(MessagesState)
# Add nodes
agent_builder.add_node("llm_call", llm_call)
agent_builder.add_node("tool_node", tool_node)
# Add edges to connect nodes
agent_builder.add_edge(START, "llm_call")
agent_builder.add_conditional_edges(
"llm_call",
should_continue,
["tool_node", END]
)
agent_builder.add_edge("tool_node", "llm_call")
# Compile the agent
agent = agent_builder.compile()
from IPython.display import Image, display
# Show the agent and write the graph to disk for later viewing
agent_graph = agent.get_graph(xray=True)
agent_png_bytes = agent_graph.draw_mermaid_png()
with open("agent_graph.png", "wb") as f:
f.write(agent_png_bytes)
display(Image(data=agent_png_bytes))
# Invoke
from langchain.messages import HumanMessage
messages = [HumanMessage(content="Add 3 and 4.")]
messages = agent.invoke({"messages": messages}) #返回最终的全局状态字典
for m in messages["messages"]:
m.pretty_print()
3.入门二:三阶段搭建agent
这里是参考这篇文章点击查看,这位佬分三个阶段(基础,加工具,加内存)渐进实现agent,更加好懂一些。

 浙公网安备 33010602011771号