Maven+TestNG+ReportNG/Allure接口自动化测试框架初探(上)
转载:http://www.51testing.com/html/58/n-3721258.html
先前的自动化测试框架完全是用Java纯手工编写,核心交易接口代码、测试脚本、测试数据都进行了抽象和分离,测试报告也是自己设计的html模版输出,如果项目仅仅本地实施运行,也完全能满足目前的自动化测试需求。
但为了自动化测试变得更加高大上,并配合公司实施持续集成的工作开展,决定将现有的接口自动化测试框架改造成Maven+TestNG方式,代码由SVN进行版本管理,项目由Jenkins构建运行。
听说TestNG已很久,遗憾一直未尝试过,但最近学习实践了一把,这体验那叫一个字:超爽。单元测试、注解、组概念、套件、异常、参数化、依赖等等测试思想的加入,让TestNG服务于接口自动化测试大放异彩。
本篇文章分5部分介绍:
--1 Maven+TestNG的测试框架搭建
--2 使用ReportNG来优化测试报告
--3 测试案例的数据调度设计
--4 使用Jenkins来调度构建运行
--5 让报告更高大上—Allure报告插件使用
由于篇幅问题,后两节会放在下一篇。
1、Maven+TestNG的测试框架搭建
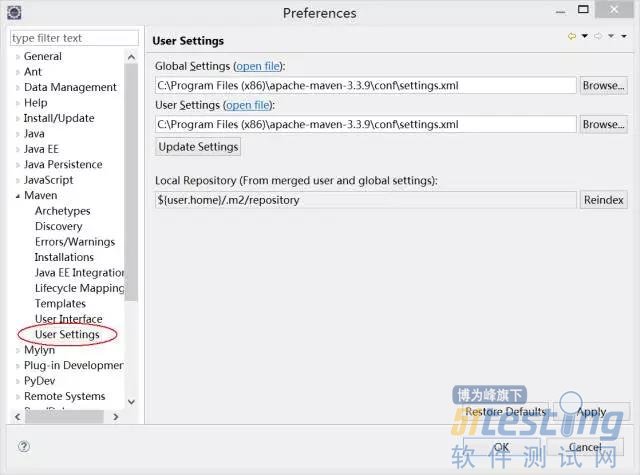
准备条件
1、Eclipse及其Maven插件、TestNG插件的安装请自行找度娘;
2、本地需安装Maven,并配置好环境变量;
3、Eclipse中的Maven-settings配置。
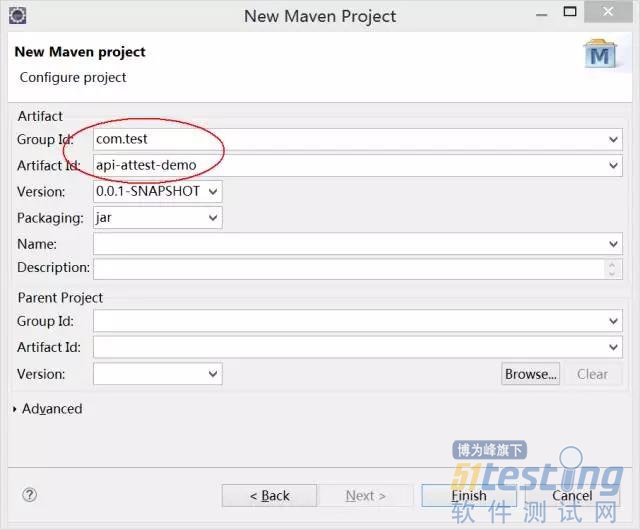
创建Maven项目
为了便于管理自动化项目中依赖的jar包、项目构建运行等,我们选择Maven来创建项目。由于对Maven研究不多,在自动化项目中遇到无法构建引入本地jar包的尴尬,但没找到解决方法,只好通过避免引入本地jar包来搞定。留待以后再研究怎么引入本地jar包的方法。

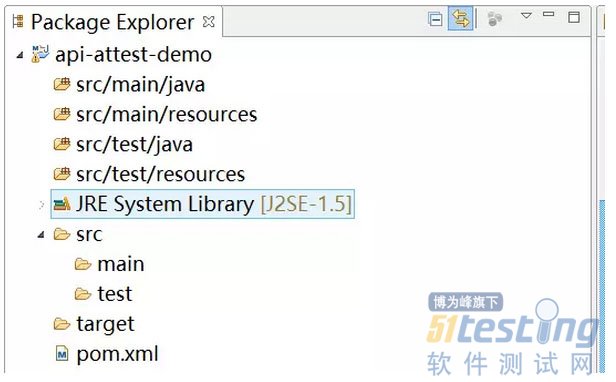
Maven项目创建完后,如下目录结构:
POM文件配置
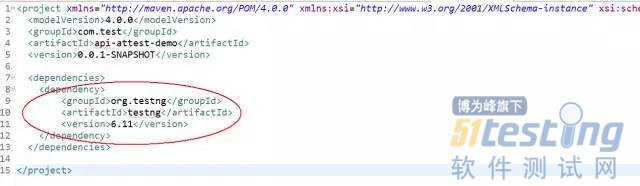
1、添加testNG的依赖包
有两种方式:
一种使用下面截图的方式,当然这种方式依赖于你的Maven插件,有时候搜索不到你想要的依赖包;
还有一种是直接用下面的配置代码。
|
<dependency>
<groupId>org.testng</groupId>
<artifactId>testng</artifactId>
<version>6.11</version>
</dependency>
|

添加完成后查看pom文件内容
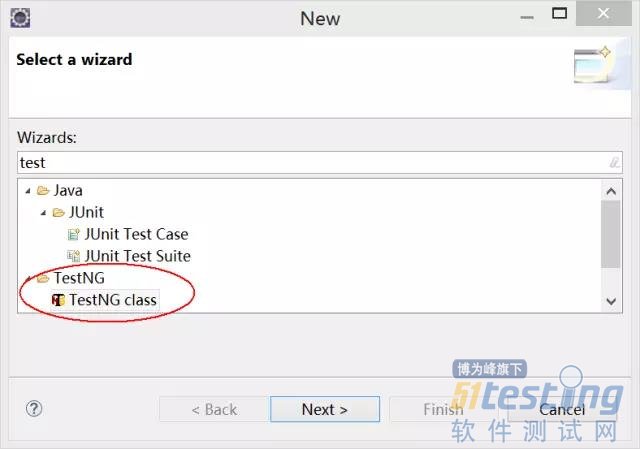
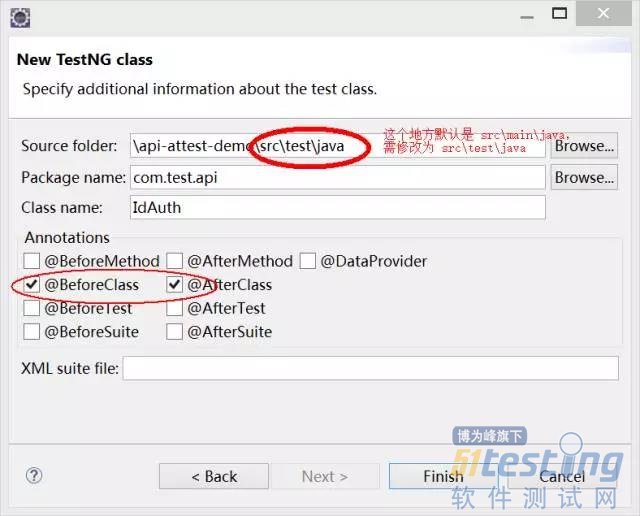
创建TestNG-Class类
选中 src/test/java目录,右键创建包,

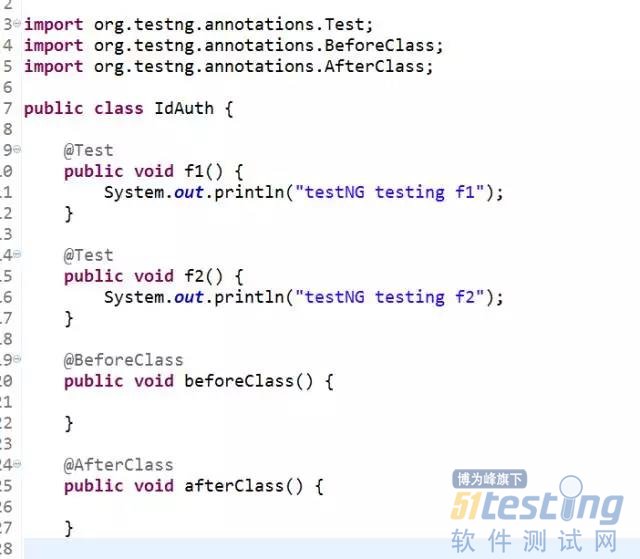
然后在创建好的包上创建TestNG类, 类名:IdAuth,同时添加上@BeforeClass 和 @AfterClass:

代码中通过@Test注解的就是一个测试案例。
注:如果没有在pom.xml文件中配置testng的依赖jar包,代码中会有报错。
当前对于BeforeClass和AfterClass代码为空,在后面的内容会使用到。
此时可以使用TestNG来运行类,邮件Run As —> TestNG Test 方式运行,结果如下:
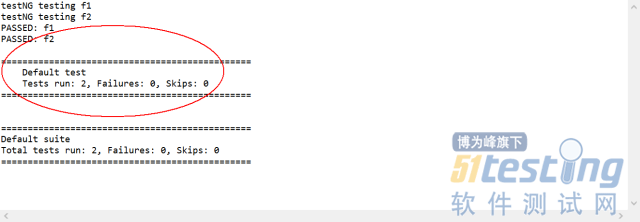
以上就完成了TestNG类创建并使用TestNG 运行测试类。
接下来学习使用Maven来运行项目。
使用Maven运行项目
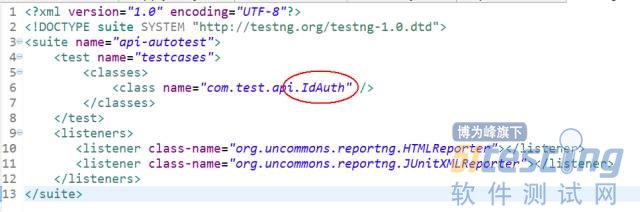
首先创建testng.xml配置文件(src\test\resources目录下创建),testng.xml中配置需要运行的TestNG类名(可以配置多个),配置内容如下:
然后用Maven运行项目很简单,选中项目然后右键Run As,会出现很多Maven ***的选项,使用Maven Test选项来运行TestNG类。
当然也可以在DOS窗口中,进入到项目来执行 mvn test。
运行完成后,在项目根目录中,会出现2个新文件夹:

其中:target是maven生成一些类文件,暂时不用管
test-output是生成testNG类执行的结果:
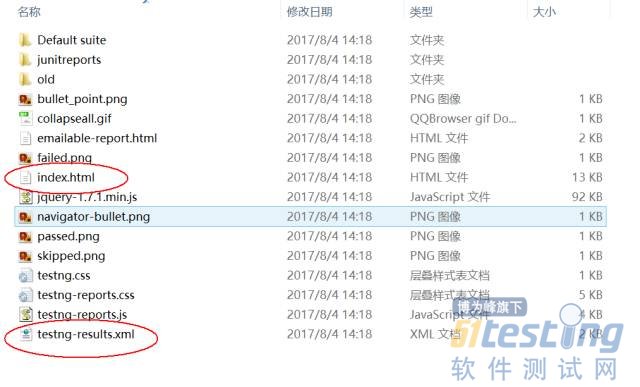
提供了2种查看执行结果的方式,1个是xml查看,1个是html查看,因为xml友好性不高,咱们直接看html的方式,结果报告中会显示执行了哪些测试案例,成功数和失败数,以及每个测试案例执行的时长。

但是,大家看到这个报告的第一感觉是什么?是不是觉得很Low?
我的感觉是简直Low爆了!!!宇宙第二Low的报告!!!
接下来的内容咱们就来优化报告。
2、使用ReportNG插件来优化测试报告
Pom.xml文件配置更新
1、属性配置
|
<properties>
<project.build.sourceEncoding>UTF-8</project.build.sourceEncoding>
<xmlFileName>testng.xml</xmlFileName>
</properties>
|
2、依赖包管理配置
|
<!-- testNG依赖管理 -->
<dependency>
<groupId>org.testng</groupId>
<artifactId>testng</artifactId>
<version>6.11</version>
</dependency>
<dependency>
<groupId>org.apache.maven.reporting</groupId>
<artifactId>maven-reporting-api</artifactId>
<version>2.0.9</version>
<scope>test</scope>
<exclusions>
<exclusion>
<groupId>org.testng</groupId>
<artifactId>testng</artifactId>
</exclusion>
</exclusions>
</dependency>
<!-- 依赖Guice -->
<dependency>
<groupId>com.google.inject</groupId>
<artifactId>guice</artifactId>
<version>3.0</version>
<scope>test</scope>
</dependency>
<dependency>
<groupId>org.uncommons</groupId>
<artifactId>reportng</artifactId>
<version>1.1.4</version>
</dependency>
<dependency>
<groupId>org.apache.maven.plugins</groupId>
<artifactId>maven-surefire-plugin</artifactId>
<version>2.18.1</version>
<type>maven-plugin</type>
</dependency>
<dependency>
<groupId>com.beust</groupId>
<artifactId>jcommander</artifactId>
<version>1.64</version>
</dependency>
<dependency>
<groupId>net.sourceforge.jexcelapi</groupId>
<artifactId>jxl</artifactId>
<version>2.6.10</version>
</dependency>
|
3、Build及插件配置
|
<build>
<plugins>
<plugin>
<groupId>org.apache.maven.plugins</groupId>
<artifactId>maven-surefire-plugin</artifactId>
<version>2.18.1</version>
<configuration>
<suiteXmlFiles>
<suiteXmlFile>
src/test/resources/${xmlFileName}
</suiteXmlFile>
</suiteXmlFiles>
</configuration>
</plugin>
<plugin>
<groupId>org.apache.maven.plugins</groupId>
<artifactId>maven-surefire-plugin</artifactId>
<version>2.18.1</version>
<configuration>
<properties>
<property>
<name>usedefaultlisteners</name>
<value>false</value>
</property>
<property>
<name>listener</name>
<value>org.uncommons.reportng.HTMLReporter, org.uncommons.reportng.JUnitXMLReporter</value>
</property>
</properties>
<workingDirectory>target/</workingDirectory>
<forkMode>always</forkMode>
<!-- 解决报告中中文乱码 -->
<argLine>-Dfile.encoding=UTF-8</argLine>
</configuration>
</plugin>
</plugins>
</build>
|
运行查看报告
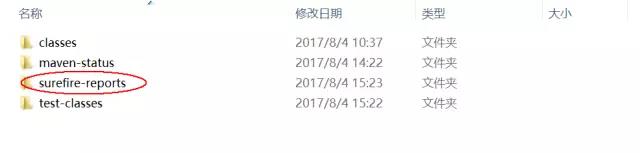
用Maven Test运行完成后,可以发现target/目录下出现新的文件夹
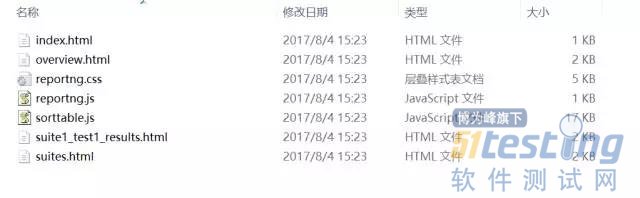
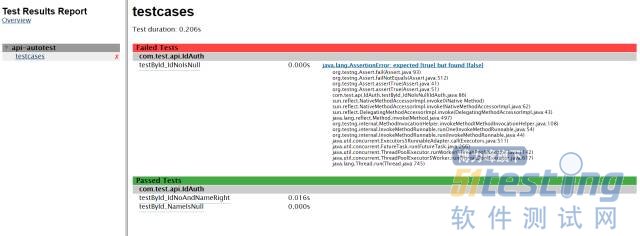
进入这个目录,打开html/index.html文件可以查看测试报告,如下图:

这样的页面是不是比刚才的美观了很多。
如果就这样的报告,肯定不饱满,那我们需要给测试案例添加测试数据获取,业务逻辑,断言以及多个测试类等等。
3、测试案例的参数化设计
参数化设计逻辑图

项目详细的目录结构
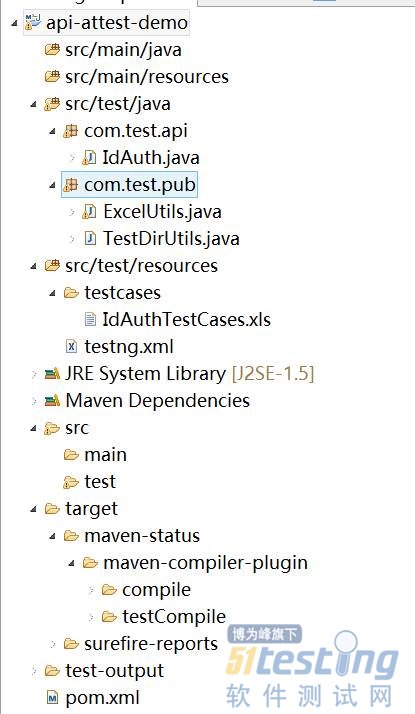
ExcelUtils处理类
(代码未经优化,有些地方可能写得不合理,请见谅!)
|
package com.test.pub;
import java.io.File;
import java.util.HashMap;
import java.util.Map;
import jxl.Workbook;
import jxl.Sheet;
import jxl.Cell;
public class ExcelUtils {
public static Map <String, HashMap> excelToHashMapByFirstSheet(String fPath, String sheetName){
try{
File fExcel = getExcelFileObj(fPath);
Workbook wb = Workbook.getWorkbook(fExcel);
Sheet sht = wb.getSheet(sheetName);
int rowCount = sht.getRows();
int colCount = sht.getColumns();
Cell cel = null;
Map <String, HashMap> excelContents = new HashMap();
if(rowCount<=2){
System.out.println("无测试案例");
return null;
}else{
//检查是否存在空行
String rowContents = "";
for(int i=2;i<rowCount;i++){
if(sht.getCell(0, i).getContents().toString().length()==0){
System.out.println("测试案例文件中存在空行");
return null;
}else{
for(int j=0;j<colCount;j++){
rowContents = rowContents + sht.getCell(j, i).getContents().toString();
}
if (rowContents.length()<20){
System.out.println("测试案例文件中存在空行");
return null;
}
}
}
}
//开始读取内容
for(int rowIndex=2;rowIndex<rowCount;rowIndex++){
HashMap<String, String> rowMap = new HashMap();
String testCaseCode = sht.getCell(0, rowIndex).getContents().toString();
for(int colIndex=1;colIndex<colCount;colIndex++){
rowMap.put(sht.getCell(colIndex, 1).getContents().toString(), sht.getCell(colIndex, rowIndex).getContents().toString());
}
excelContents.put(testCaseCode, rowMap);
}
wb.close();
//HashMap<String, String> tmpMap = new HashMap();
//tmpMap.put("count", "" + (rowCount-2));
//excelContents.put("testsCount", tmpMap);
return excelContents;
}catch (Exception e){
System.out.println("发生异常:" + e);
}
return null;
}
public static File getExcelFileObj(String fPath){
try{
File fExl = new File(fPath);
return fExl;
}catch (Exception e){
System.out.println(e);
}
return null;
}
}
|
BeforeClass的处理
(代码未经优化,有些地方可能写得不合理,请见谅!)
//所有测试案例变量
public Map<String, HashMap> allIdAuthTestCases;
//测试案例文件路径--excel作为存储
public String testCasePath = new TestDirUtils().getTestCasesDir() + "/IdAuthTestCases.xls";
@BeforeClass
public void beforeClass() {
try{
allIdAuthTestCases = ExcelUtil.excelToHashMapByFirstSheet(testCasePath, "身份证鉴权");
}catch(Exception e){
e.printStackTrace();
}
}
@Test测试方法的处理

IdAuth.java类代码
(代码未经优化,有些地方可能写得不合理,请见谅!)
package com.test.api;
import static org.testng.Assert.assertFalse;
import java.util.HashMap;
import java.util.Map;
import org.testng.Assert;
import org.testng.annotations.Test;
import org.testng.annotations.BeforeClass;
import org.testng.annotations.AfterClass;
import com.test.pub.*;
public class IdAuth {
//所有测试案例变量
public Map<String, HashMap> allIdAuthTestCases;
//测试案例文件路径--excel作为存储
public String testCasePath = new TestDirUtils().getTestCasesDir() + "/IdAuthTestCases.xls";
@BeforeClass
public void beforeClass() {
try{
allIdAuthTestCases = ExcelUtils.excelToHashMapByFirstSheet(testCasePath, "身份证鉴权");
}catch(Exception e){
e.printStackTrace();
}
System.out.println("allIdAuthTestCases:" + allIdAuthTestCases);
}
/*
* ***************************** 身份证鉴权 *******************************
*/
/*
* 姓名为空
*/
@Test(timeOut=10000, description="姓名为空")
public void testById_NameIsNull() {
//测试案例编号
String testCaseCode = "ById_NameIsNull";
//测试数据
HashMap<String, String> testCaseData = new HashMap();
System.out.println("allIdAuthTestCases——>" + allIdAuthTestCases);
System.out.println(allIdAuthTestCases.containsKey(testCaseCode));
//判断是否存在当前案例数据
try {
if (allIdAuthTestCases.containsKey(testCaseCode)) {
testCaseData = allIdAuthTestCases.get(testCaseCode);
//执行测试案例
//断言测试结果
Assert.assertTrue(true);
} else {
Assert.fail("不存在当前测试方法的案例,请检查测试案例文件!");
}
} catch(Exception e) {
e.printStackTrace();
Assert.fail("测试案例获取失败");
}
}
/*
* 证件号为空
*/
@Test(timeOut=10000, description="证件号为空")
public void testById_IdNoIsNull() {
//测试案例编号
String testCaseCode = "ById_IdNoIsNull";
//测试数据
HashMap<String, String> testCaseData = new HashMap();
//判断是否存在当前案例数据
try {
if (allIdAuthTestCases.containsKey(testCaseCode)) {
testCaseData = allIdAuthTestCases.get(testCaseCode);
//执行测试案例
//断言测试结果
Assert.assertTrue(false);
} else {
Assert.fail("不存在当前测试方法的案例,请检查测试案例文件!");
}
} catch(Exception e) {
e.printStackTrace();
Assert.fail("测试案例获取失败");
}
}
/*
* 姓名与证件号均正确
*/
@Test(timeOut=10000, description="姓名与证件号均正确")
public void testById_IdNoAndNameRight() {
//测试案例编号
String testCaseCode = "ById_IdNoAndNameRight";
//测试数据
HashMap<String, String> testCaseData = new HashMap();
//判断是否存在当前案例数据
try {
if (allIdAuthTestCases.containsKey(testCaseCode)) {
testCaseData = allIdAuthTestCases.get(testCaseCode);
//执行测试案例
//断言测试结果
Assert.assertTrue(true);
} else {
Assert.fail("不存在当前测试方法的案例,请检查测试案例文件!");
}
} catch(Exception e) {
e.printStackTrace();
Assert.fail("测试案例获取失败");
}
}
@AfterClass
public void afterClass() {
}
}
包com.test.pub下的TestDirUtils类代码
(代码未经优化,有些地方可能写得不合理,请见谅!)
package com.test.pub;
public class TestDirUtils {
// 获取主目录
public String getMainDir() {
String userDir = System.getProperty("user.dir");
if (userDir.indexOf("target")>0) {
userDir = userDir.split("target")[0];
}
int userDirLen = userDir.length();
String subUserDir = userDir.substring(userDirLen-1, userDirLen);
if (subUserDir.equals("/")) {
userDir = userDir.substring(0, userDirLen-1);
}
return userDir;
}
// 获取用例目录路径
public String getTestCasesDir() {
String testCasesDir = getMainDir();
if (testCasesDir.indexOf("target")>0) {
testCasesDir = testCasesDir.split("target")[0];
}
int userDirLen = testCasesDir.length();
String subUserDir = testCasesDir.substring(userDirLen-1, userDirLen);
if (subUserDir.equals("/")) {
testCasesDir = testCasesDir.substring(0, userDirLen-1);
}
return testCasesDir + "/src/test/resources/testcases";
}
}
运行结果:
OK, 大功告成,基本实现一个简单的Maven+TestNG自动化测试框架。

 浙公网安备 33010602011771号