auto-sklearn
autosklearn初步
auto-sklearn是基于sklearn库,因此会有惊艳强大的模型库和数据/特征预处理库,专业出身的设定。
1.autosklearn可理解为sklearn的自动版,内置自动搜索机制以寻找模型/模型集的最佳参数
2.autosklearn目前不支持windows下的使用,详情可参看官方文档,基本意思是普通人不用费力折腾win了,极客有几个方法可以尝试(反正我没成)
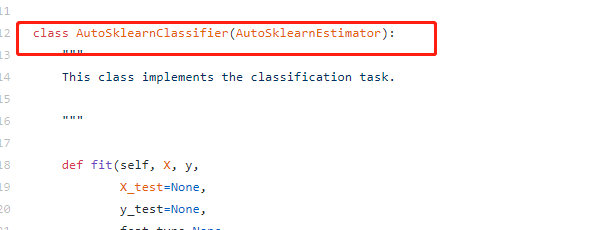
3.autosklearn主要包括两部分:estimator和automl
其中,
estimator主要处理上下文运行环境、处理流程;
automl是处理实体,模型的具体信息也在其中,但官方实现没太暴露细节信息(比如 automl._automl 还是个私有对象,automl.show_models()等信息来源都是_automl,要想拿到结构化的模型信息,还需挖掘源码)
- 16 classifiers(可以被指定或者筛选,include_estimators=[“random_forest”, ])
- adaboost, bernoulli_nb, decision_tree, extra_trees, gaussian_nb, gradient_boosting, k_nearest_neighbors, lda, liblinear_svc, libsvm_svc, multinomial_nb, passive_aggressive, qda, random_forest, sgd, xgradient_boosting
- 13 regressors(可以被指定或者筛选,exclude_estimators=None)
- adaboost, ard_regression, decision_tree, extra_trees, gaussian_process, gradient_boosting, k_nearest_neighbors, liblinear_svr, libsvm_svr, random_forest, ridge_regression, sgd, xgradient_boosting
- 18 feature preprocessing methods(这些过程可以被手动关闭全部或者部分,include_preprocessors=[“no_preprocessing”, ])
- densifier, extra_trees_preproc_for_classification, extra_trees_preproc_for_regression, fast_ica,feature_agglomeration, kernel_pca, kitchen_sinks, liblinear_svc_preprocessor, no_preprocessing, nystroem_sampler, pca, polynomial, random_trees_embedding, select_percentile, select_percentile_classification, select_percentile_regression, select_rates, truncatedSVD
- 5 data preprocessing methods(这些过程不能被手动关闭)
- balancing, imputation, one_hot_encoding, rescaling, variance_threshold(看到这里已经有点惊喜了!点进去有不少内容)
- more than 110 hyperparameters
其中参数include_estimators,要搜索的方法,exclude_estimators:为不搜索的方法.与参数include_estimators不兼容
而include_preprocessors,可以参考手册中的内容
如何使用 auto-sklearn
- 适用系统:Linux
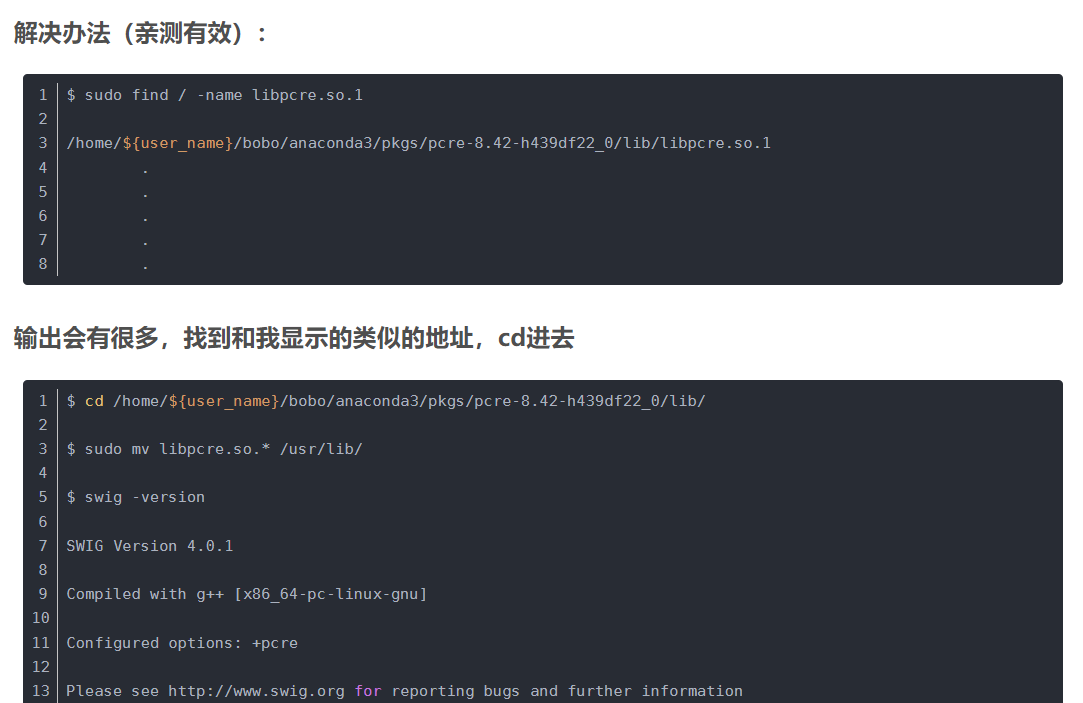
- 确保正确安装swig
swig -version
-
swig: error while loading shared libraries: libpcre.so.1: cannot open..
![]()
-
https://www.cnblogs.com/no-tears-girl/p/10456738.html
- ** Cannot --enable-pcregrep-libbz2 because bzlib.h was not found
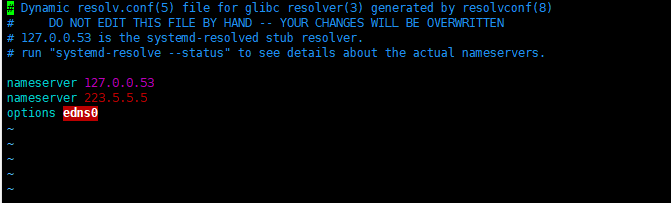
- ubuntu中,apt-get update 失败 Temporary failure resolving 'mirrors.aliyun.com'
- 解决:dns配置 vim /etc/resolv.conf
![]()
- 依次执行
- apt-get install zlib1g
- apt-get install libbz2-dev
- apt-get install libboost-all-dev
- ** Cannot --enable-pcregrep-libbz2 because bzlib.h was not found
- pip install auto-sklearn
- pip install liac-arff
出错:if arff_dict["attributes"][0][0].upper() != "INSTANCE_ID": TypeError: 'gener
解决方案:1、pip uninstall arff 2、pip install liac-arff
案例:
import sklearn.datasets
import autosklearn.classification

X, y = sklearn.datasets.load_breast_cancer(return_X_y=True)
X_train, X_test, y_train, y_test = \
    sklearn.model_selection.train_test_split(X, y, random_state=1)

automl = autosklearn.classification.AutoSklearnClassifier(
time_left_for_this_task=120, per_run_time_limit=120,
include_estimators=["random_forest", ], exclude_estimators=None,
include_preprocessors=["no_preprocessing", ], exclude_preprocessors=None)

automl.fit(X_train, y_train)
predictions = automl.predict(X_test)
print(predictions )
https://github.com/automl/auto-sklearn/blob/master/autosklearn/estimators.py
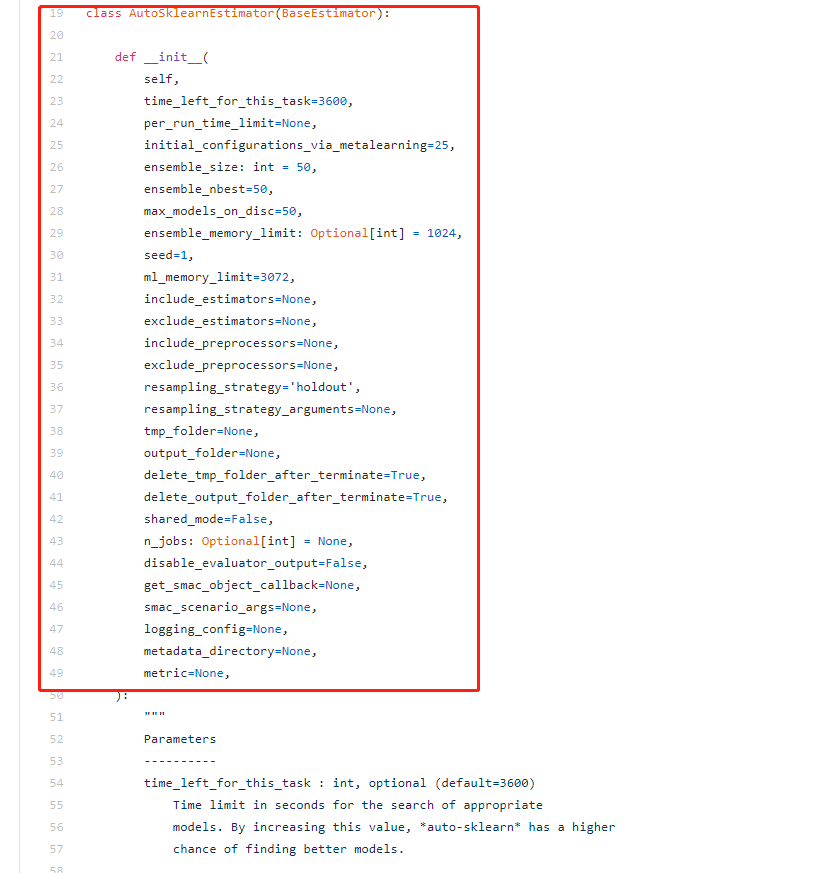
fit()方法默认的总是时间为time_left_for_this_task=3600,单位为秒
每个算法的自动调优时间为per_run_time_limit=360,默认为time_left_for_this_task的十分之一
官方建议的时间为24个小时,即time_left_for_this_task=86400,
每个模型的计算时间为一个小时,即为:per_run_time_limit=3600
其中参数include_estimators,要搜索的方法,
exclude_estimators:为不搜索的方法.与参数include_estimators不兼容
而include_preprocessors,可以参考手册中的内容
预处理在 auto-sklearn中共 分为数据预处理和 特征预处理功能两个功能。 数据预处理包括一个对分类特征的独热编码,对缺失值的处理,以及对特征和样本的归一化处理,这些步骤目前是无法关闭的.特征预处理则是一个单一的transformer(sklearn中对特征处理算法的称呼与机器学习算法 估计器estimator相对应),其实现了特征选择与将特征转换到不同空间(PCA).如前面的代码所示,这可以通过 include_preprocessors=[“no_preprocessing”, ]来关闭.
exclude_preprocessors作用与exclude_estimators相似,含义就是不使用的预处理方式.与include_preprocessors不兼容
保存运算数据
由之前的例子我们可知,autosklearn在运算会产生两个文件夹,其中保存着运行的文件,而且这两个文件的存储位置有我们设定,但是因为在运算完之后这两个文件夹默认就会被删除,所以假如我们想要看到这两个文件夹中的文件,我们需要对我们的参数进行设置:
# 第一个例子保存数据 automl = autosklearn.classification.AutoSklearnClassifier(
time_left_for_this_task=120, per_run_time_limit=120,
tmp_folder='/home/fonttian/Data/Auto-sklearn/tmp/example_output_example_tmp',
output_folder='/home/fonttian/Data/Auto-sklearn/tmp/example_output_example_out',
delete_tmp_folder_after_terminate=False, delete_output_folder_after_terminate=False)
如上图所示,必须设置两个文件夹的位置,然后设置,delete_tmp_folder_after_terminate=False, delete_output_folder_after_terminate=False两个参数为False,这两个参数的作用是设置两个对应文件在运算完毕后删除
在以上参数的情况下,你还可以设置SMAC共享模型,参数为shared_mode=True,
保存模型
根据官网首页的说法,模型的持久化方式与sklearn相似.我们确实可以采取相似的办法进行处理.
# 第二个例子:存储模型,并加载import pickle s = pickle.dumps(automl) with open('example_output_pickle.pkl', 'wb') as f: f.write(s) with open('example_output_pickle.pkl', 'rb') as f: s2 = f.read() clf = pickle.loads(s2) predictions = clf.predict(X_test) print("Accuracy score", sklearn.metrics.accuracy_score(y_test, predictions))
或者使用joblib进行模型的存储与加载,两者效果差距不大,但是似乎joblib更好一些,但是有一点是同样的就是随着版本的改变同一个pkl文件不一定能够被不同的版本加载并使用:
# 第三个例子:joblib 存储模型并加载from sklearn.externals import joblib joblib.dump(automl, 'example_output_joblib.pkl') clf = joblib.load('example_output_joblib.pkl')

 浙公网安备 33010602011771号