
06-Vue基础-购物车实战
购物车实战
1. 商品列表
商品信息:
- 商品名称
- 商品单价
- 购买数量
- 操作信息
2. 购物车功能
功能:
- 购买数量可以增加和减少
- 每种商品可以从购物车移除
代码规划:
- index.html (引入资源以及模板)
- index.js (Vue 实例以及业务逻辑)
- style.css (样式)
3. 开发步骤
- 先在
index.html中引入Vue.js和相关资源,创建一个根元素来挂载Vue实例:
<!DOCTYPE html>
<html lang="en">
  <head>
    <meta charset="UTF-8" />
    <meta name="viewport" content="width=device-width, initial-scale=1.0" />
    <meta http-equiv="X-UA-Compatible" content="ie=edge" />
    <title>购物车</title>
    <link rel="stylesheet" href="./style.css" type="text/css" />
  </head>
  <body>
    <div id="app">
      <h1>Root</h1>
    </div>
    <!-- Vue 生产环境版本库-->
    <script src="https://cdn.jsdelivr.net/npm/vue@2.6.11"></script>
    <!-- 自定义js,放在底部,触发创建Vue实例 -->
    <script src="./index.js"></script>
  </body>
</html>
- 初始化
Vue实例
var app = new Vue({
  el: "#app",
  data: {
    // 模拟数据
    good_list: [
      {
        id: 1,
        name: "iPhone7",
        price: 4188,
        count: 1
      },
      {
        id: 2,
        name: "MacBook Pro",
        price: 13000,
        count: 1
      },
      {
        id: 3,
        name: "iPhoneX",
        price: 6188,
        count: 1
      }
    ]
  },
  computed: {},
  methods: {}
});
- 数据构建之后,我们可以在
index.html展示我们的数据
<!DOCTYPE html>
<html lang="en">
<head>
<meta charset="UTF-8" />
<meta name="viewport" content="width=device-width, initial-scale=1.0" />
<meta http-equiv="X-UA-Compatible" content="ie=edge" />
<title>购物车</title>
<link rel="stylesheet" href="./style.css" type="text/css" />
</head>
<body>
<div id="app" v-cloak>
<template v-if="good_list.length">
<table>
<thead>
<tr>
<th></th>
<th>商品名称</th>
<th>商品单价</th>
<th>购买数量</th>
<th>操作</th>
</tr>
</thead>
<tbody></tbody>
</table>
<div>总价:¥ {{ totalPrice }}</div>
</template>
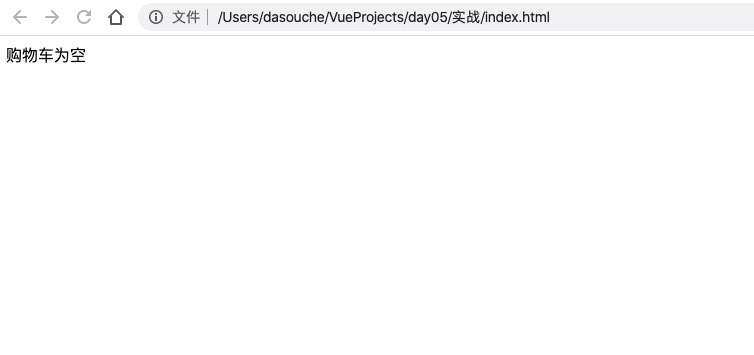
<div v-else>购物车为空</div>
</div>
<!-- Vue 生产环境版本库-->
<script src="https://cdn.jsdelivr.net/npm/vue@2.6.11"></script>
<!-- 自定义js,放在底部,触发创建Vue实例 -->
<script src="./index.js"></script>
</body>
</html>
总价totalPrice我们可以使用计算属性去获取:
computed: {
    totalPrice: function() {
        var total = 0;
        for (var i=0; i<this.good_list.length; i++) {
            var item = this.good_list[i];
            total += item.price * item.count;
        }
        // replace中的参数是正则,详情请查询js的正则部分
        return total.toString().replace(/\B(?=(\d{3})+$)/g, ',');
    }
}
剩下的就是列表渲染部分了:
<tbody>
  <tr v-for="(item, index) in good_list" :key="index">
    <td>{{ index + 1 }}</td>
    <td>{{ item.name }}</td>
    <td>{{ item.price }}</td>
    <td>{{ item.count }}</td>
    <td>
      <!-- 减去商品数量 -->
      <button @click="handleReduce(index)" :disabled="item.count === 1">-</button>
      <!-- 添加商品数量 -->
      <button @click="handleAdd(index)">+</button>
      <!-- 移除商品 -->
      <button @click="handleRemove(index)">删除</button>
    </td>
  </tr>
</tbody>
剩下的就是在index.js的methods选项中完成三个函数:
methods: {
    handleReduce: function (index) {
        if (this.good_list[index].count === 1) return;
        this.good_list[index].count--;
    },
    handleAdd: function (index) {
        this.good_list[index].count++;
    },
    handleRemove: function (index) {
        this.good_list.splice(index, 1);
    }
}
接下来是样式,css样式如下:
[v-cloak] {
  display: none;
}
table {
  border: 1px solid #e9e9e9;
  border-collapse: collapse;
  border-spacing: 0;
  empty-cells: show;
}
th,
td {
  padding: 8px 16px;
  border: 1px solid #e9e9e9;
  text-align: left;
}
th {
  background: #f7f7f7;
  color: #5c6b77;
  font-weight: 600;
  white-space: nowrap;
}
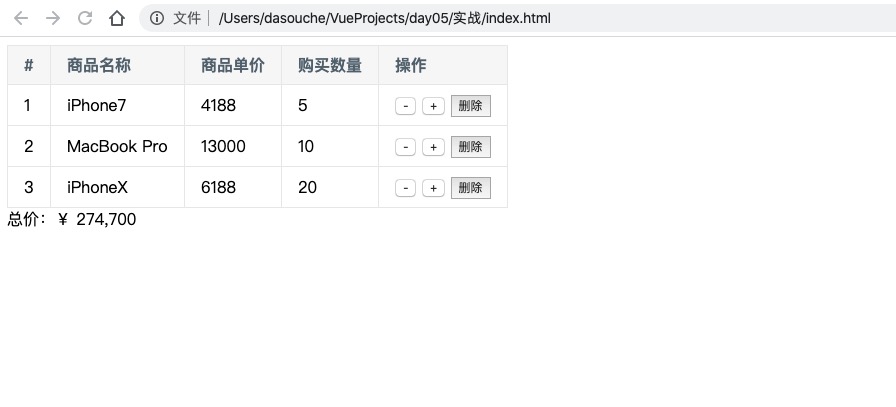
最后贴上成品图:
当你的才华撑不起自己的野心,那就努力学习吧!

 浙公网安备 33010602011771号