具身智能-OpenVLA-模型结构-02
OpenVLA: An Open-Source Vision-Language-Action Model
https://arxiv.org/abs/2406.09246
https://openvla.github.io/
https://github.com/openvla/openvla
一、总体架构
OpenVLA 是一个 Vision-Language-Action (VLA) 模型,它将视觉-语言模型 (VLM) 扩展到机器人动作预测领域。整体架构基于 Prismatic VLM,采用 三阶段 设计:
┌─────────────────────────────────────────────────────────────┐
│                     OpenVLA 模型结构                          │
│                                                               │
│  ┌──────────────┐      ┌──────────┐      ┌───────────────┐  │
│  │ Vision       │      │ MLP      │      │ Language      │  │
│  │ Backbone     │ ───► │ Projector│ ───► │ Model (LLM)   │  │
│  │              │      │          │      │               │  │
│  │ (DINOv2 +    │      │ 2-3 Layer│      │ (Llama-2 7B)  │  │
│  │  SigLIP)     │      │ MLP      │      │               │  │
│  └──────────────┘      └──────────┘      └───────────────┘  │
│         ↓                                        ↓            │
│    Image Patches                           Action Tokens     │
│    (257 tokens                            (7 tokens for      │
│     per backbone)                          7-DoF actions)    │
└─────────────────────────────────────────────────────────────┘
1.1 核心组件
| 组件 | 功能 | 输出维度 |
|---|---|---|
| Vision Backbone | 提取图像特征 | [batch, 514, 1536] |
| Projector | 将视觉特征映射到 LLM 空间 | [batch, 514, 4096] |
| LLM Backbone | 生成动作 token | [batch, seq_len, vocab_size] |
| Action Tokenizer | 离散化/去离散化动作 | [batch, 7] |
二、各组件详细说明
2.1 Vision Backbone: DINOv2 + SigLIP (融合视觉编码器)
架构: OpenVLA-7b 使用 dinosiglip-vit-so-224px,这是一个融合的视觉backbone。
# 两个独立的 Vision Transformer
DINOv2:  vit_large_patch14_reg4_dinov2.lvd142m
SigLIP:  vit_so400m_patch14_siglip_224

# 配置
- 图像分辨率: 224×224
- Patch 大小: 14×14
- DINOv2 输出: [batch, 257, 1024]  # 16×16 patches + 1 CLS token
- SigLIP 输出:  [batch, 257, 1152]
- 融合输出:     [batch, 257, 2176]  # 1024 + 1152 = 2176
融合输出: [batch, 257, 2176] # 1024 + 1152 = 2176,1024来自DINOv2 1152来自SigLIP
# 输入:RGB 图像
image = PIL.Image.open("robot_view.jpg")  # 任意尺寸

# 1. 图像预处理 (DinoSigLIPImageTransform)
processed = {
    "dino": [3, 224, 224],    # DINOv2 分支
    "siglip": [3, 224, 224]   # SigLIP 分支
}

# 2. 特征提取
dino_features = self.dino_featurizer(processed["dino"])
# Shape: [batch, 257, 1024]
#   - 257 = 16×16 patches + 1 CLS token
#   - 提取倒数第二层的特征

siglip_features = self.siglip_featurizer(processed["siglip"])
# Shape: [batch, 257, 1152]

# 3. 特征融合(沿特征维度拼接)
fused_features = torch.cat([dino_features, siglip_features], dim=2)
# Shape: [batch, 257, 2176]
2.2 Projector: MLP 映射层
将视觉特征维度映射到 LLM 的嵌入空间。
# 对于融合的 vision backbone (DINOv2 + SigLIP)
class PrismaticProjector(nn.Module):
    def __init__(self):
        # 三层 MLP with GELU 激活
        self.fc1 = nn.Linear(2176, 4*2176)      # 2176 -> 8704
        self.act_fn1 = nn.GELU()
        self.fc2 = nn.Linear(4*2176, 4096)      # 8704 -> 4096
        self.act_fn2 = nn.GELU()
        self.fc3 = nn.Linear(4096, 4096)        # 4096 -> 4096

    def forward(self, vision_features):
        # vision_features: [batch, 257, 2176]
        x = self.fc1(vision_features)           # [batch, 257, 8704]
        x = self.act_fn1(x)
        x = self.fc2(x)                         # [batch, 257, 4096]
        x = self.act_fn2(x)
        x = self.fc3(x)                         # [batch, 257, 4096]
        return x

# 输出与 LLM 嵌入维度对齐
projected_features: [batch, 257, 4096]
2.3 LLM Backbone: Llama-2 7B
基于 Llama-2 的因果语言模型,负责理解指令并生成动作。
# 模型配置
Model: "meta-llama/Llama-2-7b-chat-hf"
Parameters: ~7B
Hidden Size: 4096
Num Layers: 32
Num Heads: 32
Vocab Size: 32000 (原始) + 256 (动作tokens) = 32256

# 训练时冻结/解冻策略
Stage 1 (align):      Vision ❄️  | Projector 🔥 | LLM ❄️
Stage 2 (finetune):   Vision ❄️  | Projector 🔥 | LLM 🔥
Full finetune:        Vision 🔥  | Projector 🔥 | LLM 🔥
2.4 Action Tokenizer: 动作离散化
将连续动作空间离散化为 token,反之亦然。
class ActionTokenizer:
    def __init__(self, bins=256, min_action=-1, max_action=1):
        # 创建 256 个均匀 bin
        self.bins = np.linspace(-1, 1, 256)
        # Bin 中心
        self.bin_centers = (self.bins[:-1] + self.bins[1:]) / 2.0

        # 使用词汇表的最后 256 个 token
        # Token IDs: [32000, 32001, ..., 32255]
        self.action_token_begin_idx = 32000

    def encode(self, action):
        """连续动作 -> Token IDs"""
        # action: [7] float values in [-1, 1]
        # 例如: [0.5, -0.3, 0.1, 0.2, -0.1, 0.4, 0.8]

        # 1. Clip 到 [-1, 1]
        action = np.clip(action, -1, 1)

        # 2. 离散化到 bins
        discretized = np.digitize(action, self.bins)
        # discretized: [192, 90, 138, 154, 118, 180, 230] (范围 [1, 256])

        # 3. 转换为 token IDs
        token_ids = 32256 - discretized
        # token_ids: [32064, 32166, 32118, 32102, 32138, 32076, 32026]

        return token_ids

    def decode(self, token_ids):
        """Token IDs -> 连续动作"""
        # token_ids: [32064, 32166, 32118, 32102, 32138, 32076, 32026]

        # 1. 转换回 bin indices
        discretized = 32256 - token_ids  # [192, 90, 138, 154, 118, 180, 230]

        # 2. 映射到 bin 中心
        discretized = np.clip(discretized - 1, 0, 254)
        actions = self.bin_centers[discretized]
        # actions: [0.5, -0.3, 0.1, 0.2, -0.1, 0.4, 0.8]

        return actions
三、完整的输入输出流程
3.1 输入格式
# ========== 输入示例 ==========

# 1. 图像输入
image = Image.open("robot_camera.jpg")
# 原始图像,任意尺寸,例如 640×480×3

# 2. 语言指令
instruction = "pick up the red block"

# 3. 构建 VLA 提示词
prompt = "What action should the robot take to pick up the red block?"

# ========== 处理后的输入 ==========

# Tokenized text
input_ids = tokenizer(prompt).input_ids
# 例如: [1, 1724, 3158, 881, 278, 19964, 2125, 304, 5839, 701, ...]
# Shape: [1, 18]  # 提示词长度 ~18 tokens

# Processed image
pixel_values = {
    "dino": Tensor[1, 3, 224, 224],
    "siglip": Tensor[1, 3, 224, 224]
}

# 完整模型输入
model_input = {
    "input_ids": Tensor[1, 18],        # 文本 tokens
    "pixel_values": Dict[str, Tensor],  # 图像 pixels
    "attention_mask": Tensor[1, 18],    # 注意力掩码
}
3.2 前向传播流程
# ========== 详细前向传播 ==========

# 1. Vision Encoding
vision_features = vision_backbone(pixel_values)
# DINOv2: [1, 257, 1024]
# SigLIP:  [1, 257, 1152]
# Fused:   [1, 257, 2176]

# 2. Projection
projected_features = projector(vision_features)
# Shape: [1, 257, 4096]

# 3. Text Embedding
text_embeddings = llm.embed_tokens(input_ids)
# Shape: [1, 18, 4096]

# 4. Multimodal Fusion (在序列维度拼接)
#    格式: [BOS] + [Image Patches] + [Text Tokens]
multimodal_embeddings = torch.cat([
    text_embeddings[:, :1, :],      # BOS token: [1, 1, 4096]
    projected_features,              # Image:     [1, 257, 4096]
    text_embeddings[:, 1:, :]       # Text:      [1, 17, 4096]
], dim=1)
# Shape: [1, 275, 4096]  # 1 + 257 + 17 = 275

# 5. LLM Generation (自回归生成)
generated_ids = llm.generate(
    inputs_embeds=multimodal_embeddings,
    max_new_tokens=7,  # 生成 7 个 action tokens
    do_sample=False    # 贪心解码
)
# Shape: [1, 275 + 7] = [1, 282]

# 6. 提取动作 tokens
action_token_ids = generated_ids[0, -7:]
# 例如: [32064, 32166, 32118, 32102, 32138, 32076, 32180]
generated_ids Shape: [1, 275 + 7] = [1, 282] 275是词汇 7是action
3.3 输出格式
# ========== 原始输出 (训练时) ==========

# Logits from LLM
output = {
    "logits": Tensor[1, 275, 32256],  # 每个位置的 vocab 概率
    "loss": Tensor[1],                 # 交叉熵损失(仅在动作tokens上)
}

# ========== 推理输出 ==========

# 1. 生成的 Action Token IDs
action_token_ids = [32064, 32166, 32118, 32102, 32138, 32076, 32180]

# 2. 解码为归一化动作 (在 [-1, 1] 范围内)
normalized_actions = action_tokenizer.decode(action_token_ids)
# Shape: [7]
# 例如: [0.502, -0.298, 0.102, 0.196, -0.094, 0.396, 0.698]

# 3. 反归一化为真实动作
action_stats = model.norm_stats["bridge_orig"]["action"]
# action_stats = {
#     "q01": [-0.031, -0.032, -0.034, -0.121, -0.120, -0.125, 0.0],
#     "q99": [ 0.031,  0.032,  0.034,  0.121,  0.120,  0.125, 1.0]
# }

# 反归一化公式
action_low = action_stats["q01"]   # 1% 分位数
action_high = action_stats["q99"]  # 99% 分位数

actions = 0.5 * (normalized_actions + 1) * (action_high - action_low) + action_low

# 最终输出
actions = [0.0155, -0.0095, 0.0017, 0.0119, -0.0056, 0.0247, 0.849]
# 解释:
# [0]: ΔX = +0.0155 m  (向右移动 1.55 cm)
# [1]: ΔY = -0.0095 m  (向前移动 0.95 cm)
# [2]: ΔZ = +0.0017 m  (向上移动 0.17 cm)
# [3]: ΔRoll = +0.0119 rad
# [4]: ΔPitch = -0.0056 rad
# [5]: ΔYaw = +0.0247 rad
# [6]: Gripper = 0.849  (接近打开状态,1.0 = 完全打开)
3.4 具体数值示例
# ========== 完整示例:抓取红色积木 ==========

# 输入
image: [640, 480, 3] RGB image of a table with objects
instruction: "pick up the red block"

# 中间表示
Vision Features:     [1, 257, 2176]
Projected Features:  [1, 257, 4096]
Text Embeddings:     [1, 18, 4096]
Fused Embeddings:    [1, 275, 4096]  # 1 + 257 + 17

# LLM 输出 (token IDs)
Generated: [1, ..., 32180, 32090, 32140, 32110, 32130, 32080, 32200]
                    ^^^^^^^^^^^^^^^^^^^^^^^^^^^^^^^^^^^^^^^^^^^^^^
                    这 7 个是动作 tokens

# 解码后的动作 (归一化)
Normalized: [ 0.29, -0.65,  0.45,  0.57, -0.49,  0.69,  0.22]

# 反归一化 (Bridge 数据集)
Final Action:
  ΔX:      +0.009 m   (向右)
  ΔY:      -0.021 m   (向前)
  ΔZ:      +0.015 m   (向上)
  ΔRoll:   +0.069 rad (转动)
  ΔPitch:  -0.059 rad (俯仰)
  ΔYaw:    +0.086 rad (偏航)
  Gripper: 0.22       (准备闭合以抓取)
四、训练数据格式
4.1 输入输出对
# ========== 训练样本 ==========

sample = {
    # 输入
    "observation": {
        "image_primary": [224, 224, 3],    # 主相机
        "image_wrist": [224, 224, 3],      # 腕部相机 (可选)
    },
    "task": {
        "language_instruction": "pick up the red block"
    },

    # 输出 (ground truth action)
    "action": [7],  # 连续动作向量
}

# ========== 模型处理 ==========

# 1. 构建对话
conversation = [
    {
        "from": "human",
        "value": "What action should the robot take to pick up the red block?"
    },
    {
        "from": "gpt",
        "value": "29871 32180 32090 32140 32110 32130 32080 32200"
        # 动作被离散化为 tokens
    }
]

# 2. Tokenize
input_ids = [1, 1724, 3158, ..., 29871, 32180, 32090, 32140, 32110, 32130, 32080, 32200]
#            ^^^ prompt tokens ^^^       ^^^^^^^^^^^^^^^ action tokens ^^^^^^^^^^^^^^^

# 3. 创建 labels (只在动作部分计算损失)
labels = [-100, -100, -100, ..., -100, 32180, 32090, 32140, 32110, 32130, 32080, 32200]
#         ^^^ IGNORE_INDEX ^^^         ^^^^^^^^^^^^^^ only compute loss here ^^^^^^^^^^^

# 4. 训练目标
loss = CrossEntropyLoss(logits[:, -8:-1], labels[:, -7:])
# 预测下一个 token,只在动作 tokens 上计算损失
五、模型变体对比
| 模型 | Vision Backbone | LLM | 训练数据 | 参数量 |
|---|---|---|---|---|
| openvla-7b | DINOv2 + SigLIP | Llama-2 7B | OXE Magic Soup++ (970K traj) | 7.4B |
| openvla-v01-7b | SigLIP only | Vicuña v1.5 7B | OXE Magic Soup (800K traj) | 7.2B |
6.1 动作空间
# 7-DoF 动作空间
Action = [
    ΔX, ΔY, ΔZ,              # 位置增量 (m)
    ΔRoll, ΔPitch, ΔYaw,     # 姿态增量 (rad)
    Gripper                   # 夹爪状态 [0, 1]
]

# 归一化范围: [-1, 1] (除了 gripper 不归一化)
# 离散化: 256 bins per dimension
# Token 映射: 词汇表的最后 256 个 tokens
6.2 序列长度
# 训练时
Total Sequence Length = 1 (BOS) + 257 (image patches) + ~15 (text) + 7 (actions)
                      ≈ 280 tokens

# 推理时 (生成阶段)
# 使用 KV-cache,逐 token 生成
# 每次只处理 1 个新 token
6.3 特殊 Token 处理
# Llama-2 特殊 tokens
<s>      # BOS (Beginning of Sequence)  ID: 1
</s>     # EOS (End of Sequence)        ID: 2
<PAD>    # Padding                       ID: 32000
29871    # 空格 token (特殊处理)

# Action tokens 占用词汇表尾部
# Original vocab: 32000
# + PAD token: 1
# + Action tokens: 256
# Total: 32257 (实际实现中可能对齐到 32256 或 32320)
七、推理代码示例
from transformers import AutoModelForVision2Seq, AutoProcessor
from PIL import Image
import torch

# 1. 加载模型
processor = AutoProcessor.from_pretrained("openvla/openvla-7b", trust_remote_code=True)
vla = AutoModelForVision2Seq.from_pretrained(
    "openvla/openvla-7b",
    torch_dtype=torch.bfloat16,
    trust_remote_code=True
).to("cuda:0")

# 2. 准备输入
image = Image.open("robot_view.jpg")
instruction = "pick up the red block"
prompt = f"What action should the robot take to {instruction.lower()}?"

# 3. 预测动作
inputs = processor(prompt, image).to("cuda:0", dtype=torch.bfloat16)
action = vla.predict_action(**inputs, unnorm_key="bridge_orig", do_sample=False)

# 4. 输出
print(f"Predicted Action: {action}")
# Output: [0.0155, -0.0095, 0.0017, 0.0119, -0.0056, 0.0247, 0.849]

# 5. 执行动作
robot.move_delta(
    position=action[:3],    # [ΔX, ΔY, ΔZ]
    orientation=action[3:6], # [ΔRoll, ΔPitch, ΔYaw]
    gripper=action[6]        # Gripper state
)
OpenVLA 整个模型巧妙地将视觉理解、语言理解和机器人控制统一到一个端到端的框架中,通过动作离散化实现了语言模型到连续控制的桥梁。
推理代码:
# Install minimal dependencies:
# pip install -r https://raw.githubusercontent.com/openvla/openvla/main/requirements-min.txt
from transformers import AutoModelForVision2Seq, AutoProcessor
from PIL import Image
import torch
# 1️⃣ 加载 Processor 和 模型
processor = AutoProcessor.from_pretrained("/data3/stephen/openvla/weight/openvla-7b", trust_remote_code=True)
vla = AutoModelForVision2Seq.from_pretrained(
"/data3/stephen/openvla/weight/openvla-7b",
attn_implementation="flash_attention_2", # 可选:需要安装 flash_attn
torch_dtype=torch.bfloat16,
low_cpu_mem_usage=True,
trust_remote_code=True
).to("cuda:0")
# 2️⃣ 读取你自己的图片
# 假设图片路径为 ./my_image.jpg
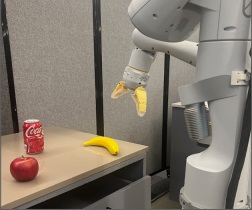
image = Image.open("banana.jpg").convert("RGB")
# 3️⃣ 准备提示词
instruction = "pick up the red apple" # <-- 你可以修改成自己的任务
prompt = f"In: What action should the robot take to {instruction}?\nOut:"
# 4️⃣ 编码输入
inputs = processor(prompt, image).to("cuda:0", dtype=torch.bfloat16)
# 5️⃣ 推理得到动作 (7-DoF)
action = vla.predict_action(**inputs, unnorm_key="bridge_orig", do_sample=False)
# 6️⃣ 执行动作(示意)
print("Predicted action:", action)
# robot.act(action)
输出:
root@38518564c2dd:/data3/stephen/openvla# python eval_banana.py
You are attempting to use Flash Attention 2.0 with a model not initialized on GPU. Make sure to move the model to GPU after initializing it on CPU with `model.to('cuda')`.
You are attempting to use Flash Attention 2.0 without specifying a torch dtype. This might lead to unexpected behaviour
Loading checkpoint shards: 100%|█████████████████████████████████████████████████████████████████████████████████████████████████████████████████████████████████████████████| 3/3 [00:00<00:00,  6.36it/s]
Predicted action: [-0.00222186  0.00799363  0.01586792 -0.04164751 -0.04231221 -0.15963472
  0.99607843]

 浙公网安备 33010602011771号