
[Tutorial] How to build a GUI in ROS with Qt / C++?
Overview
A graphical user interface or GUI enables people especially end users to interactive with ROS through graphical icons and visual indicators.
In fact, there has been multiple tools which can be used in Linux or Ubuntu to make a GUI, such as Qt, Gambas, GTK+ and Perl. Also in Github, there are a number of examples of ROS GUI, while most of them are written in Python, which drives us to find an easy way to create a ROS GUI for C++ developers.
A light weight and easy-to-build tool to write a GUI would be perfectly saving developers’ time and energy and helps better focusing on the original technical topic, which is ROS here. Among those above, Qt highlights itself for its broad use in different platforms and plenty of open-sourced resources.
Establish a Qt development environment in ROS
Qt is a cross-platform application framework that is widely used for developing application software that can be run on various software and hardware platforms with little or no change in the underlying codebase, while having the power and speed of native applications.
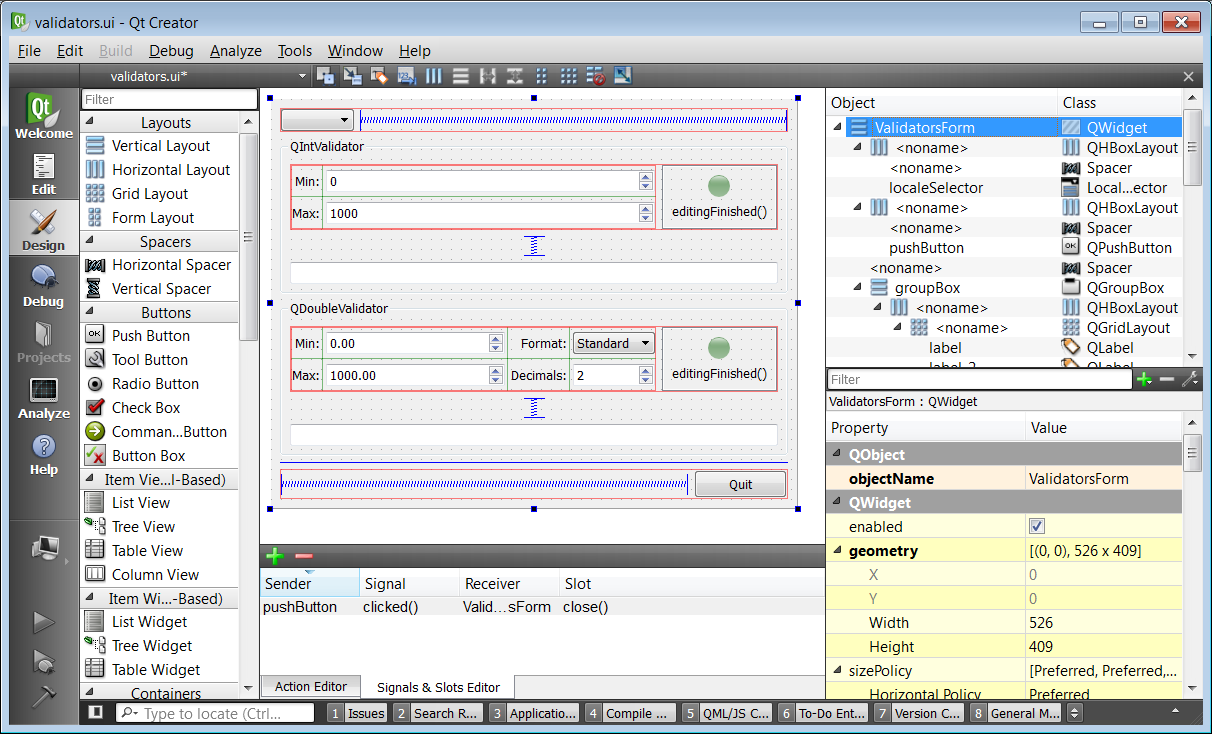
An example GUI created by Qt is shown as following,
1) Qt SDK Installation
The newly updated version of Qt is Qt 5.5.1 ( http://www.qt.io/download-open-source/#section-2 ), though you can still follow this tutorial,
http://www.wikihow.com/Install-Qt-SDK-on-Ubuntu-Linux,
which shows a step by step tutorial to install Qt SDK 4.8 and Qt SDK 5.0 on Ubuntu.
2) First Qt program
For those who are new to use Qt, this tutorial may help you quickly develop a simple hello world program,
http://www.wikihow.com/Create-Your-First-Qt-Program-on-Ubuntu-Linux,
which is enough to make you familiar with the wedgets and qmake use in Qt.
3) make QtCreator runnable in Ubuntu terminal
In Step 1), it has shown us how to make "qmake" runnable in terminals. Similarly, we can set qtcreator runnable in Ubuntu terminal.
Note, we can simply install a qtcreator package with a command,
$ sudo apt-get install qtcreator
Then it perfectly runs in terminals, like
$ qtcreator
However, this qtcreator installed in this way may not be the latest version.
What we need here is only to put a soft link to the qtcreator we have just installed. Here are some simple precedures.
-
Once the Qt program is installed, open up a terminal and use a text editor such as nano or gedit to edit your /etc/profile.
- Type/Copy/Paste: sudo -s nano /etc/profile
- or
- Type/Copy/Paste: sudo -s gedit /etc/profile
-
Scroll down to the end of the /etc/profile file and enter the following text below. You want to add this line below to your /etc/profile system wide file so that you will have the option to compile Qt programs from the terminal line.
-
Type/Copy/Paste:
export PATH=/opt/Qt5.7.0/Tools/QtCreator/bin:$PATH -
The above number highlighted in bold denotes the version number of the Qt SDK so make sure you enter the correct version number of the Qt SDK. The Qt SDK is always improving with new version changes. So make sure you are mindful of your Qt SDK version number.
- For example, we are using Qt version 5.7.0 in this example, therefore the version number in the /etc/profile would reflect as 5.7.0
-
Save the /etc/profile file and exit
-
Reload the /etc/profile file by issuing the following command
- Type/Copy/Paste: . /etc/profile
- Make sure you enter a . and then a space in order to reload your /etc/profile file
-
Once the /etc/profile file is reloaded issue the following command you can type the following commands to make sure your Ubuntu Linux system recognizes that the Qt SDK has been accepted by the system PATH.
-
Type/Copy/Paste: which qmake
- You should receive a response such as the one below
- /opt/Qt5.7.0/Tools/QtCreator/bin/qtcreator
-
Also type the following command below:
- Type/Copy/Paste: qtcreator -version
-
You should receive a response similar to this:
- Qt Creator 4.0.2 based on Qt 5.7.0
-
This lets you know that you are able to run qtcreator programs from the command line.
4) Qt Dependances needed in ROS
Also, install another two packages for ROS (here Indigo version), which will be used in 3 to create a ROS GUI template in C++. From now on, Qt’s journey in ROS has just started.
$ sudo apt-get install ros-indigo-qt-create
$ sudo apt-get install ros-indigo-qt-build
5) Import an existing ROS project to QtCreator
The steps are
-
Click “File->Open File or Project”
-
Choose “CMakeLists.txt” in ros package folder
-
Choose or create a build directory for building and running
Note: Not all the files in the ros package folder will be automatically imported to QtCreator, such as “include” folder. You might need to import them manually.
Create a Qt ROS GUI template
ROS has been very friendly to Qt by providing a package, catkin_create_qt_pkg, to help building Qt environment in ROS, which you can refer to ROS WIKI at http://wiki.ros.org/qt_create/Tutorials/Qt%20App%20Templates
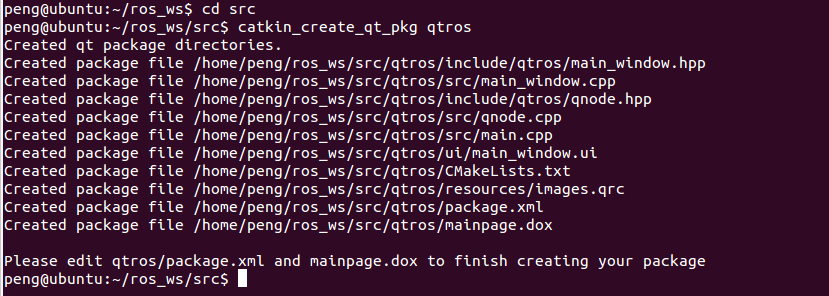
To build a Qt ROS GUI template using that , in your workspace, type
$ cd src
$ catkin_create_qt_create qtros
where “qtros” is the package name you created.
Normally, it will show you as
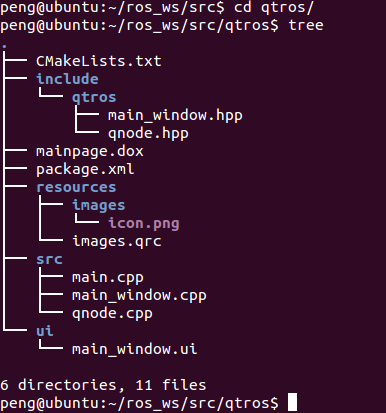
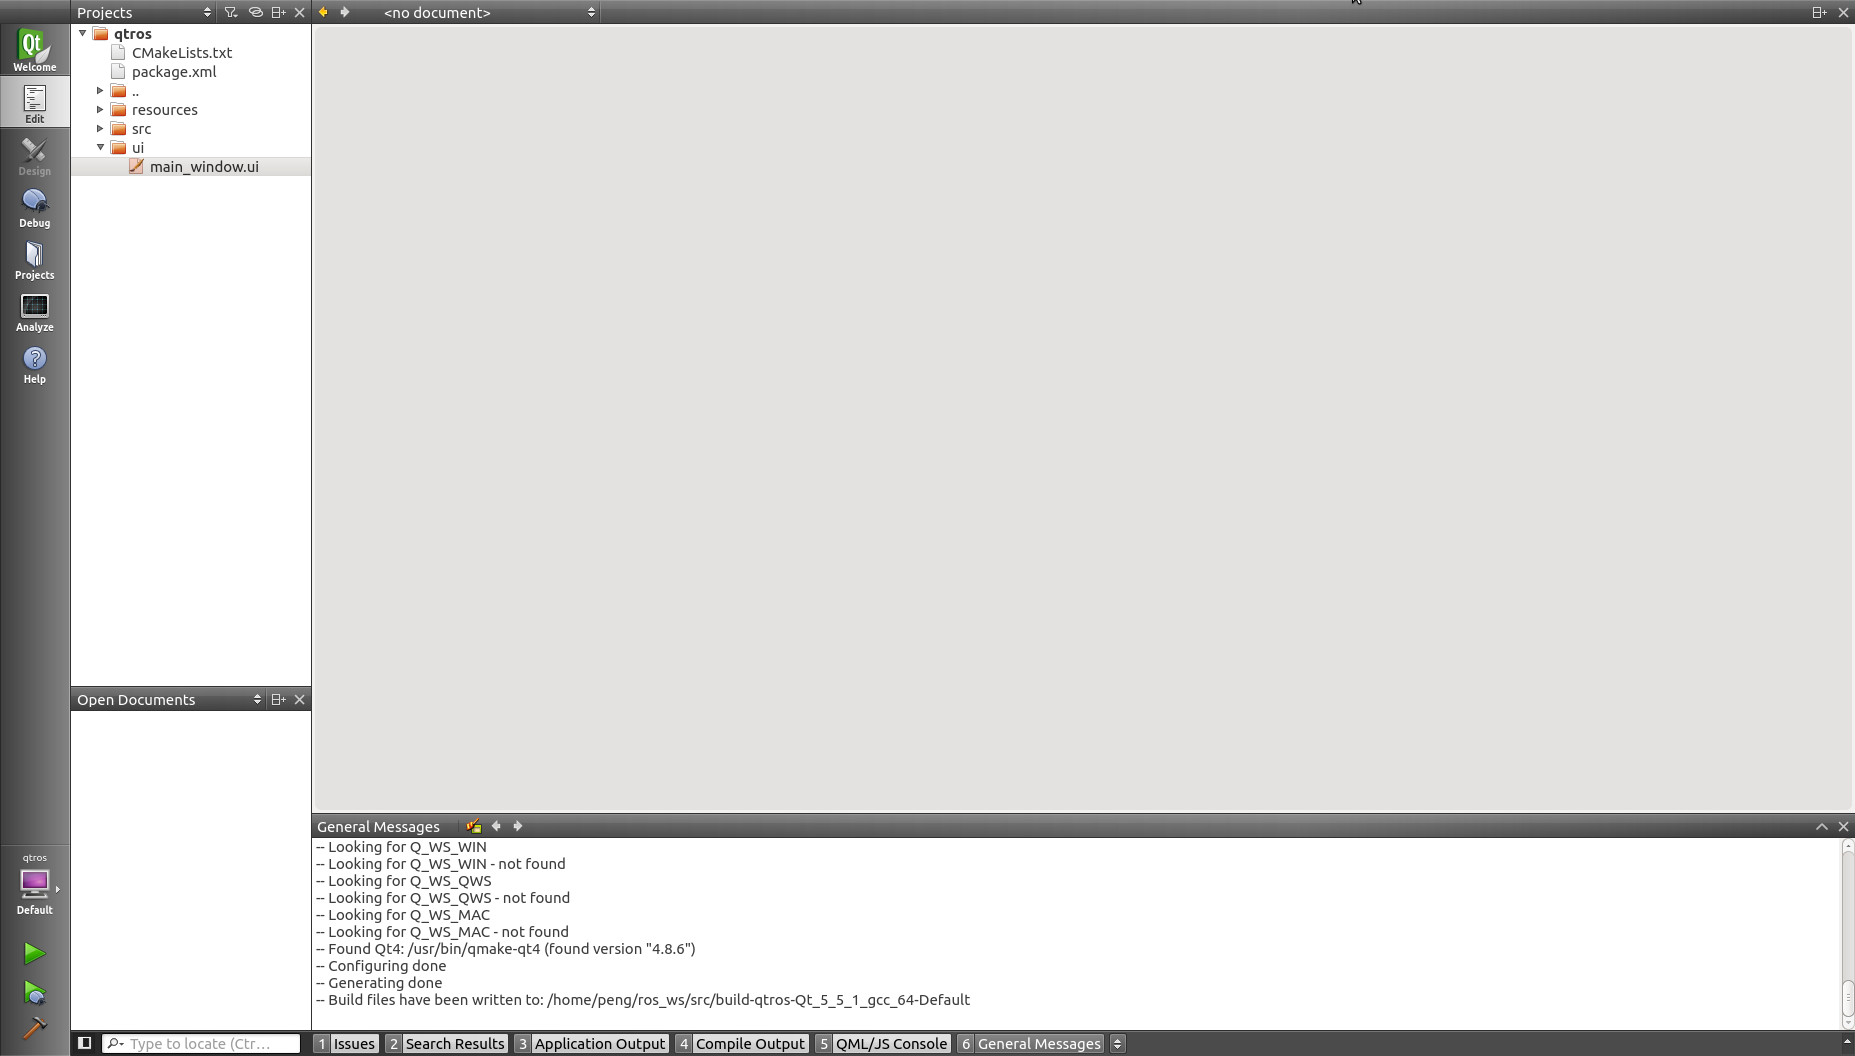
Through command “tree”, you can take a look at what has been generated for you and their structure.
Enter the QtCreator from the terminal by typing
$ qtcreator
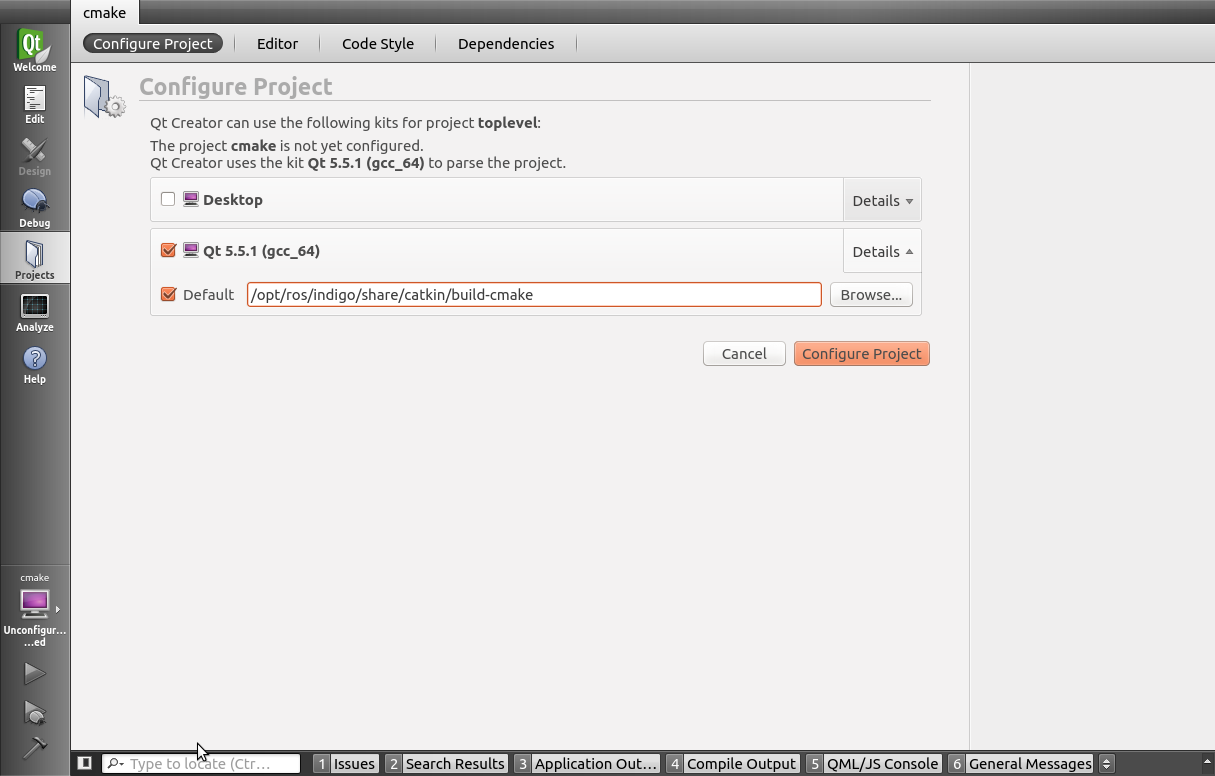
Click “Configure Project”, then it will automatically compile the “qtros” project for you.
After that, once you modified your code you can switch to use “catkin_make” to compile in terminal window,
$ ~/ros_ws
$ catkin_make
$ rosrun qtros qtros
which you might be more familiar, while the generated build and run files are in “~/ros_ws/build” and “~/ros_ws/devel”, which is different from that in QtCreator.
Note: I am not sure if we can put “~/ros_ws/build” as its building directory when building and running in QtCreator, which I have tried but not successfully, because it will cause conflicts with catkin_make files. Luckily, it doesn’t seem to be an issue since we can simply choose a different directory. That is why we still need to compile again in the terminal after compiling in QtCreator. This pre-compiling is necessary only for the first time.
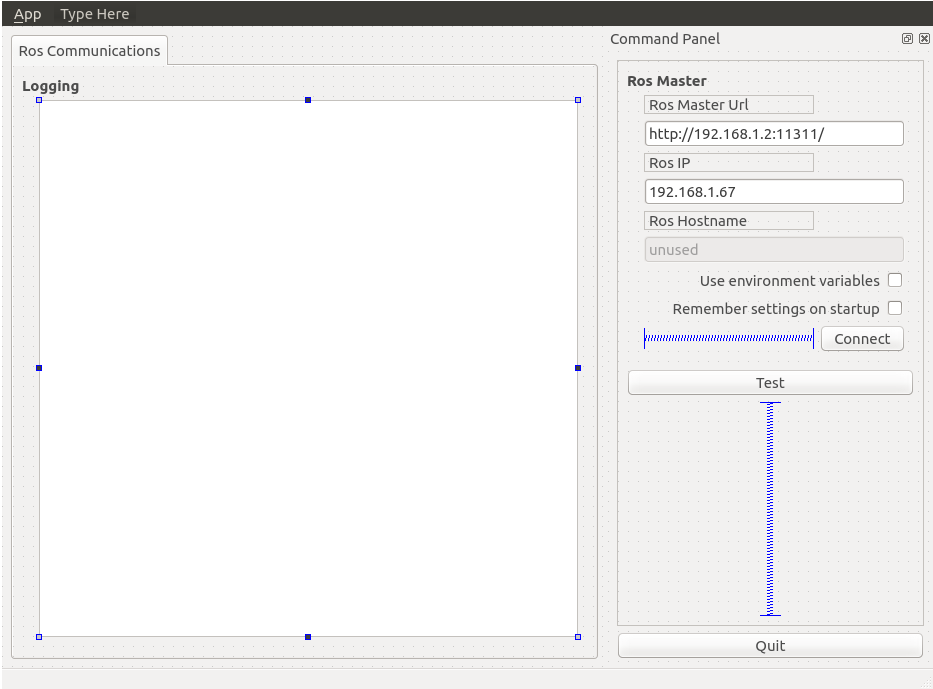
Once compiled and running, you can a GUI window like

which includes three main features,
-
A ROS master chooser
-
Separate UI and ROS node classes
-
ROS node class has connections for gui logging and a spinner
Next, you can
-
Affect GUI changes in main_window.ui with Qt Designer.
-
Modify Qt code in main_window.hpp/main_window.cpp.
-
Do ROS topics and services in qnode.hpp/qnode.cpp.
Add a Wedget into the GUI
As a strong example, we now try to add new button into the “main_window” and check how it works.
Checking the existing button “Connect” and “Quit”, I was puzzled by whether they are automatically connected with the C++ functions or by other explicit link or calling. After two tests following, I found them both right.
a. button test 1
i) Using “qtros” project created in 3, open “main_window.ui” in UI mode.
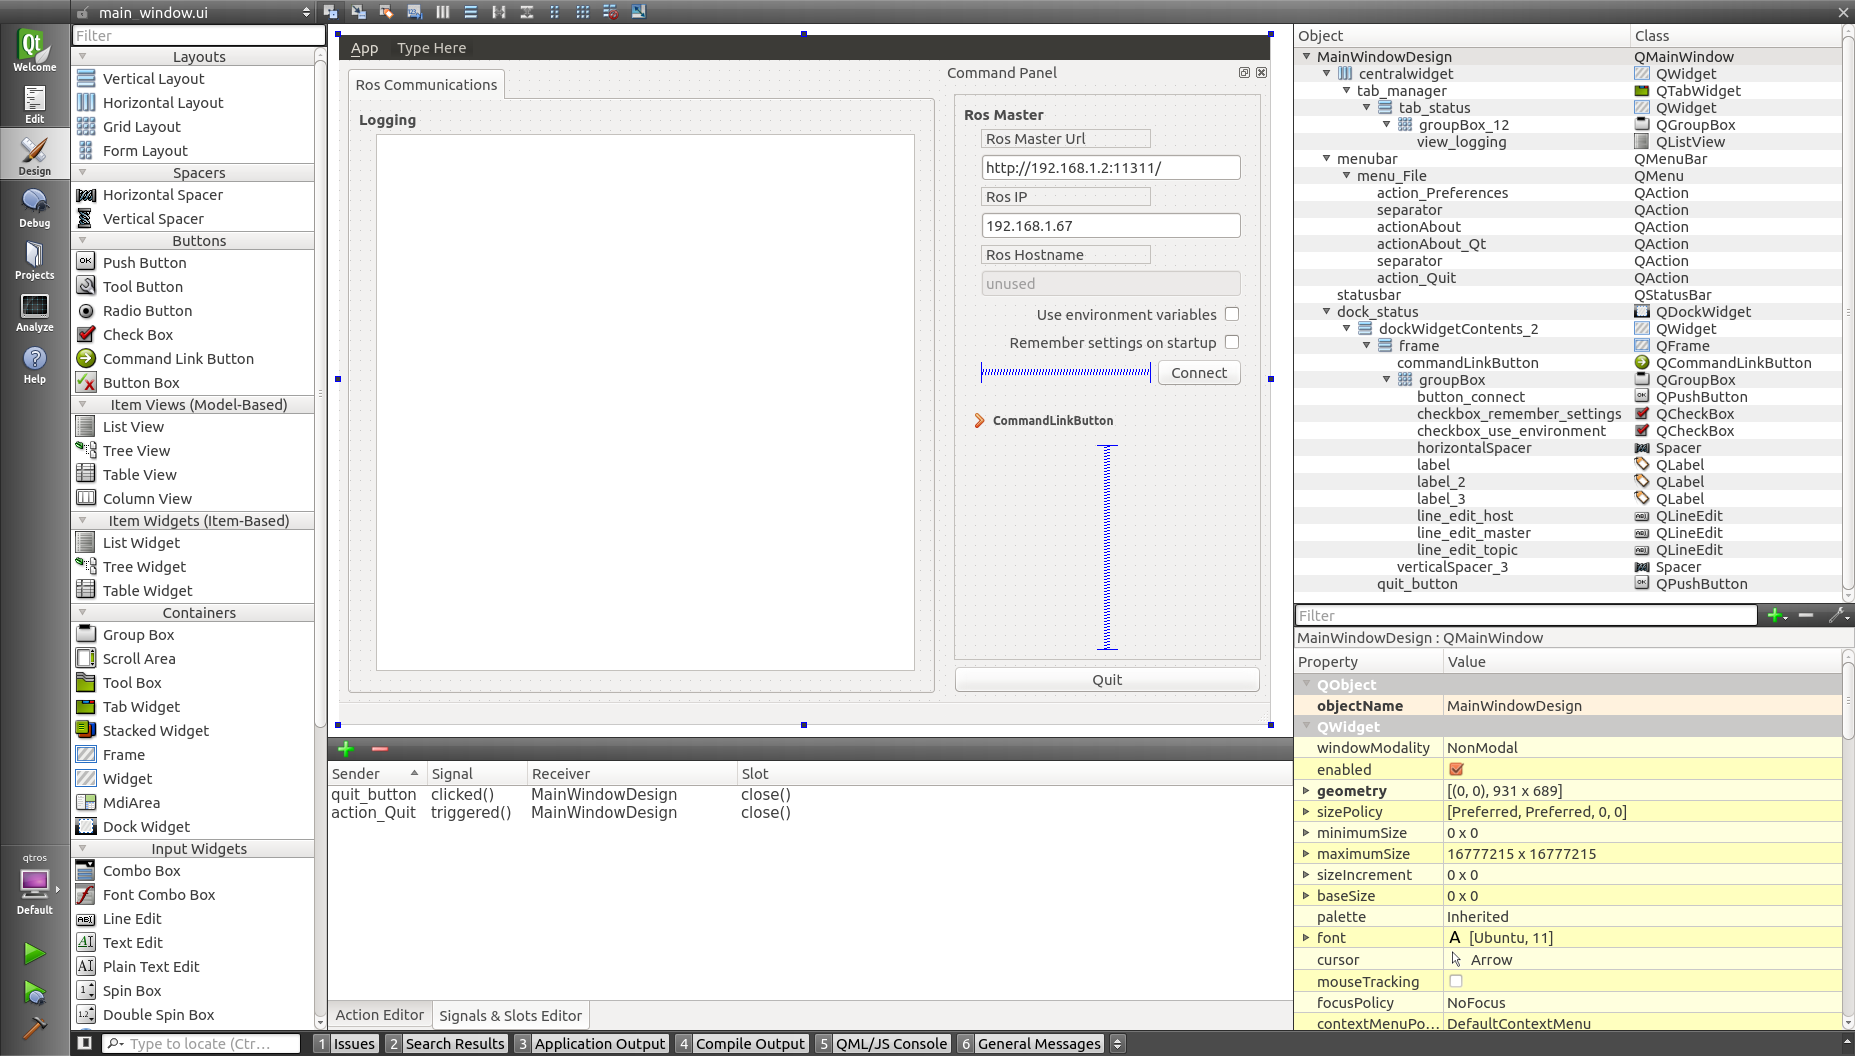
ii) Drag a “Push Button” into the ui and replace its text name and object name as “Test” and “button_test”, which is in the same way with “button_connect”.
iii) Open the file “main_window.hpp” and “main_window.cpp” and create two new functions associated with this button test by imitating from the “button_connect” working.
In main_window.hpp
public:

…

void showNoButtonTestMessage();


public Q_SLOTS:

/******************************************

** Auto-connections (connectSlotsByName())

*******************************************/

…

void on_button_test_clicked(bool check);


In main_window.cpp:


/*****************************************************************************

** Implementation [Slots]

*****************************************************************************/

…


void MainWindow::showButtonTestMessage() {

QMessageBox msgBox;

msgBox.setText("Button test ...");

msgBox.exec();

close();

}

…

void MainWindow::on_button_test_clicked(bool check ) {

showTestButtonMessage();

}

…
iv) Compile and run
We see a new button named “Test”. Then we click it and a message box shows up, which proves the button “Test” is automatically connected by name.

b. button test 2
We notice that the “Quit” button is explicitly connected with a callback function “close()” in Signals & Slots Editor in ui mode.

Also, in “main_window.cpp”, there exists some lines seeming to link the wedgets and callback functions together, like
QObject::connect(ui.actionAbout_Qt, SIGNAL(triggered(bool)), qApp, SLOT(aboutQt())); // qApp is a global variable for the application


QObject::connect(&qnode, SIGNAL(rosShutdown()), this, SLOT(close()));


QObject::connect(&qnode, SIGNAL(loggingUpdated()), this, SLOT(updateLoggingView()));
1) Create two new buttons, “Left” and “Right”, to output something different with each other in the logging window
2) Create two callback functions to be called by the two buttons
In main_window.cpp
…


QStringListModel logging_model;


MainWindow::MainWindow(int argc, char** argv, QWidget *parent)

: QMainWindow(parent)

, qnode(argc,argv)

{

…


/*******************************

** Button test - explicit way

********************************/

QObject::connect(ui.left, SIGNAL(clicked()), this, SLOT(moveLeft()));

QObject::connect(ui.right, SIGNAL(clicked()), this, SLOT(moveRight()));

}


void MainWindow::moveLeft() {

…

}


void MainWindow::moveRight() {

…

}
3) Compile and run
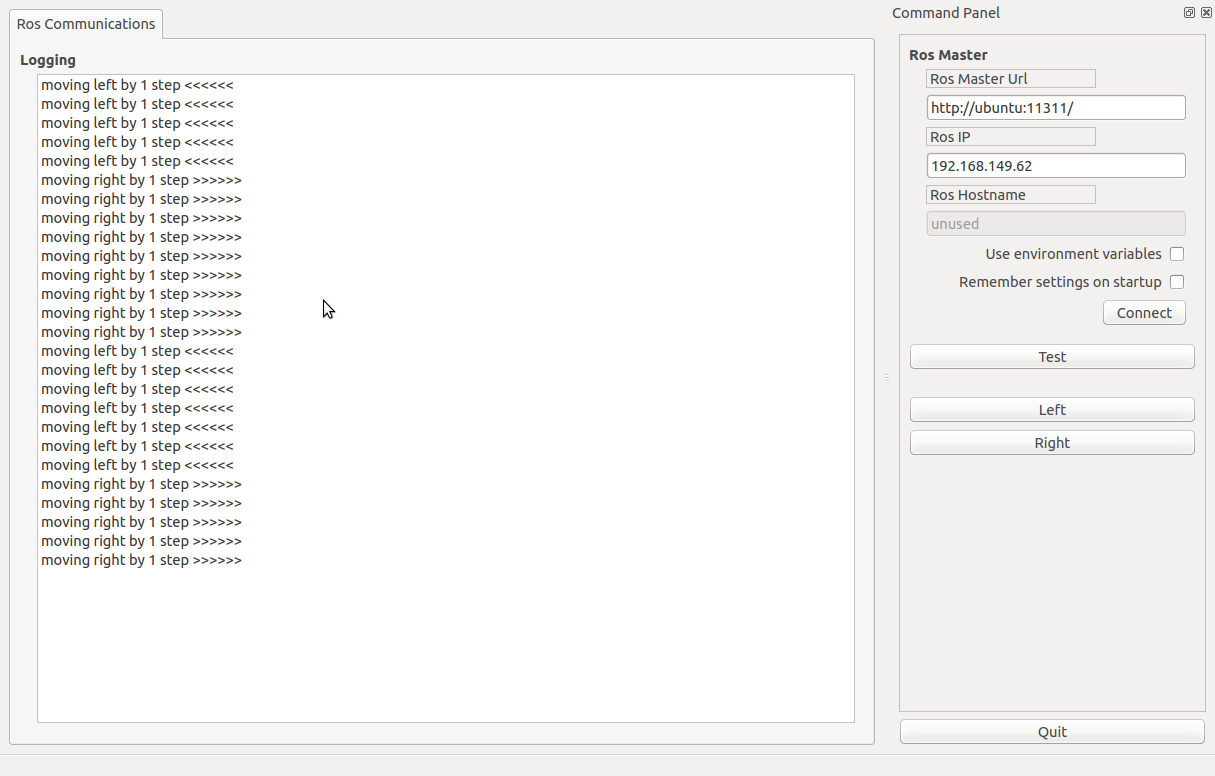
Once the button “left” is clicked, it will show “moving left by 1 step <<<<<<”.
Once the button “left” is clicked, it will show “moving right by 1 step >>>>>>”.
This test proved a explicit way to link callback function to according wedget. The key is the line
QObject::connect(&qnode, SIGNAL(signal()), this, SLOT(slot()));
So basically Qt is using a signal and slot mechanism, which is a central feature of Qt and probably the part that differs most from the features provided by other frameworks. You can refer to
http://doc.qt.io/qt-4.8/signalsandslots.html
for more detail.
A Publisher and Subscriber example
Populate the qnode.cpp with ROS topics and we can easily build a number of Qt GUI applications in ROS. Here is an example.
By filling in QNode::rosrun() with publisher and subscriber, we can use two nodes to communicate with each other and show everything in logging windows.
Create two separated packagas named “my_gui_publisher” and “my_gui_subsriber”.
In my_gui_publisher/src/qnode.cpp
…

chatter_publisher = n.advertise<std_msgs::Float64>("chatter", 1000);

…
In my_gui_subscriber/src/qnode.cpp
…

chatter_subscriber = n.subscribe("chatter", 1000, &QNode::myCallback, this);

…
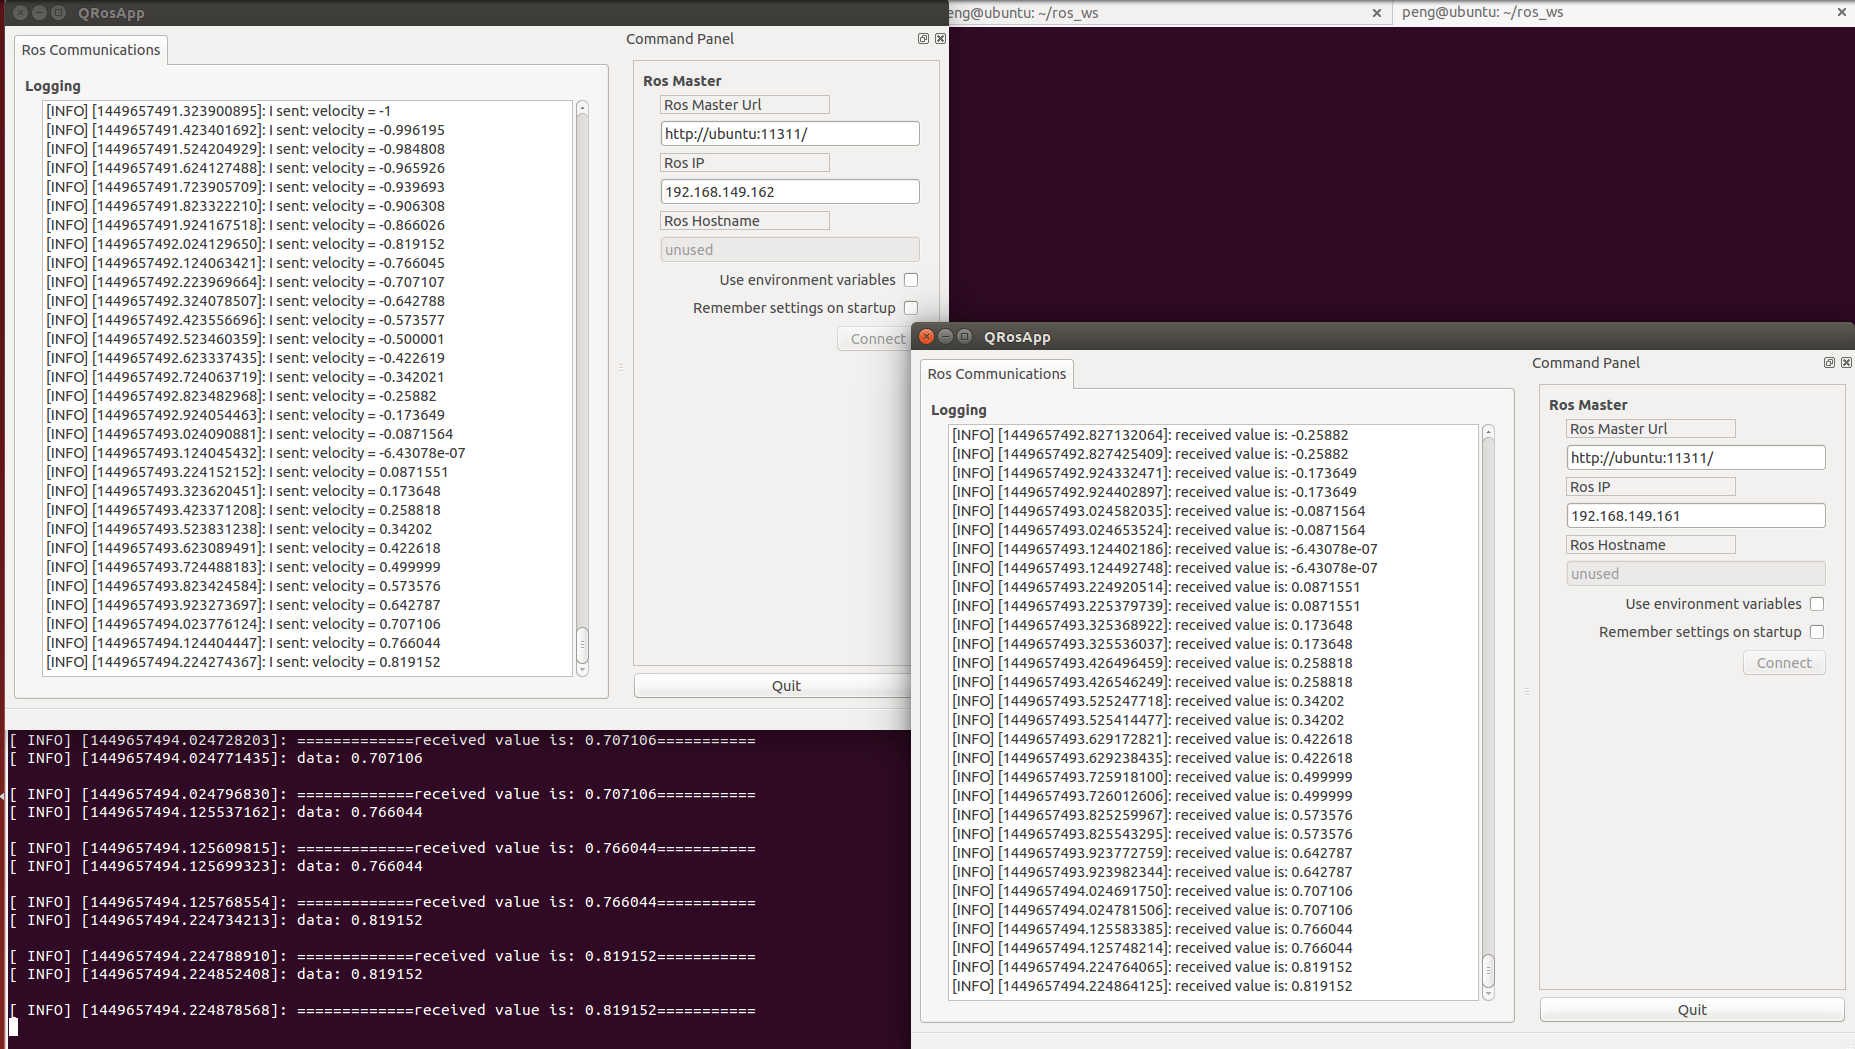
Note: You can use “$ roscore” to check your local ROS MASTER URI and use ”$ ifconfig” to inquire your IP address.
Conclusion
This report gives some basic steps to start with C++ GUI in ROS. Following these procedures, I believe we can build more interactive GUI programs by just focusing on modifying the qnode files which has been a pure ROS problem.
Github Link
The source code of button tests in 3 and publisher and subscriber test in 4 can be referred to my github,
https://github.com/xpharry/ROSCppGUI/tree/master/QtROS_GUI.
Please feel free to download.

 浙公网安备 33010602011771号