harbor私有镜像仓库的搭建与使用与主从复制
harbor私有镜像仓库,
私有仓库有两种,一种是harbor,一种是小型的私有仓库,harbor有两种模式,一种是主
从,一种是高可用仓库,
项目需求,需要两台服务器,都有docker。
ldap权限统一管理,
harbor可以基于角色的访问控制来管理,
harbor可以图形化用户界面,用户可以通过浏览器,检索当前docker镜像仓库,管理项目
和命名空间
harbor可以审计管理,所有针对镜像仓库的操作,都可以被记录追溯,用于审计管理
基于英语与中文语言进行了本地化。可以最佳更多的语言支持。
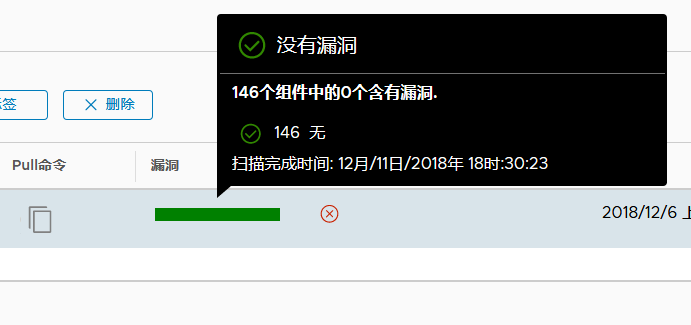
harbor可以自动启动clair漏洞扫描
harbor最低配置2cpu4gmem
操作系统7.5
首先需要做一个ca认证的问题,
通过openssl没有的yum安装一个
步骤
mkdir -p /data/ssl
cd /data/ssl
openssl req -newkey rsa:4096 -nodes -sha256 -keyout ca.key -x509 -days 365 -out ca.crt
会出现一些的字样
[root@bogon ssl]# openssl req -newkey rsa:4096 -nodes -sha256 -keyout ca.key -x509 -days 365 -out ca.crt
Generating a 4096 bit RSA private key
..............................................................................
...........................++
..............................................................................
............................++
writing new private key to 'ca.key'
-----
You are about to be asked to enter information that will be incorporated
into your certificate request.
What you are about to enter is what is called a Distinguished Name or a DN.
There are quite a few fields but you can leave some blank
For some fields there will be a default value,
If you enter '.', the field will be left blank.
-----
Country Name (2 letter code) [XX]:CN(国家的名字,输入CN)
State or Province Name (full name) []:Beijing(输入城市)
Locality Name (eg, city) [Default City]:Beijing
Organization Name (eg, company) [Default Company Ltd]:yunjisuan(公司的名)
Organizational Unit Name (eg, section) []:yunjisuan(公司的名字)
Common Name (eg, your name or your server's hostname) []:www.yunjisuan.com(域
名,绑定地址)
Email Address []:(email可以不写)
以上的操作完成ca证书就出来了
然后生成域名证书
openssl req -newkey rsa:4096 -nodes -sha256 -keyout www.yunjisuan.com.key -out
www.yunjisuan.com.csr

Generating a 4096 bit RSA private key
......++
..................................................................++
writing new private key to 'www.yunjisuan.com.key'
-----
You are about to be asked to enter information that will be incorporated
into your certificate request.
What you are about to enter is what is called a Distinguished Name or a DN.
There are quite a few fields but you can leave some blank
For some fields there will be a default value,
If you enter '.', the field will be left blank.
-----
Country Name (2 letter code) [XX]:CN(国家)
State or Province Name (full name) []:Beijing(地区)
Locality Name (eg, city) [Default City]:Beijing(城市)
Organization Name (eg, company) [Default Company Ltd]:yunjisuan(公司名)
Organizational Unit Name (eg, section) []:yunjisuan(公司名)
Common Name (eg, your name or your server's hostname) []:www.yunjisuan.com(域
名)
Email Address []:(email)

Please enter the following 'extra' attributes
to be sent with your certificate request
A challenge password []:(登陆密码,可以不写)
An optional company name []:

完成以上就完成了域名证书

[root@bogon ssl]# ls
ca.crt ca.key www.yunjisuan.com.csr www.yunjisuan.com.key

然后生成域名的crt证书
openssl x509 -req -days 365 -in www.yunjisuan.com.csr -CA ca.crt -CAkey ca.key
-CAcreateserial -out www.yunjisuan.com.crt
会出现一些的结果
Signature ok
subject=/C=CN/ST=Beijing/L=Beijing/O=yunjisuan/OU=yunjisuan/CN=www.yunjisuan.c
om
Getting CA Private Key
[root@bogon ssl]# ls
ca.crt ca.key ca.srl www.yunjisuan.com.crt www.yunjisuan.com.csr
www.yunjisuan.com.key
这样所有的证书就签发完了,我们开始分发证书
先让本机信任证书,将证书复制到证书的目录里
[root@bogon ssl]# cp www.yunjisuan.com.crt /etc/pki/ca-trust/source/anchors/
然后让它立即生效
[root@bogon ssl]# update-ca-trust enable
[root@bogon ssl]# update-ca-trust extract
然后看下selinux关没有
sestatus
关闭防火墙和selinux命令
[root@bogon ssl]# setenforce 0
[root@bogon ssl]# systemctl stop firewalld
重启docker
[root@bogon ssl]# systemctl restart docker
接下了下载并安装harbor
先创建一个harbor的目录,等下要连接到软件
[root@bogon ssl]# mkdir -p /etc/ssl/harbor
将证书复制过去
[root@bogon ssl]# cp www.yunjisuan.com.crt www.yunjisuan.com.key
/etc/ssl/harbor/
创建安装目录
[root@bogon ~]# mkdir -p /data/install
[root@bogon ~]# cd /data/install/
下载安装包
wget http://harbor.orientsoft.cn/harbor-v1.5.0/harbor-offline-installer-
v1.5.0.tgz
如果有直接解压过去就好
[root@bogon ~]# tar xf harbor-offline-installer-v1.5.0.tgz -C /data/install/
解压完了看一下
[root@bogon install]# ll harbor/
total 854960
drwxr-xr-x. 3 root root 23 Dec 11 17:26 common (模板目录)
-rw-r--r--. 1 root root 1185 May 2 2018 docker-compose.clair.yml(漏洞
扫描)
-rw-r--r--. 1 root root 1725 May 2 2018 docker-compose.notary.yml(镜像
签名)
-rw-r--r--. 1 root root 3596 May 2 2018 docker-compose.yml(接口文件)
drwxr-xr-x. 3 root root 156 May 2 2018 ha(高可用模式)
-rw-r--r--. 1 root root 6687 May 2 2018 harbor.cfg(harbor配置文件)
-rw-r--r--. 1 root root 875401338 May 2 2018 harbor.v1.5.0.tar.gz
-rwxr-xr-x. 1 root root 5773 May 2 2018 install.sh(安装脚本)
-rw-r--r--. 1 root root 10771 May 2 2018 LICENSE
-rw-r--r--. 1 root root 482 May 2 2018 NOTICE
-rwxr-xr-x. 1 root root 27379 May 2 2018 prepare
然后备份配置文件,修改配置文件
[root@bogon harbor]# pwd
/data/install/harbor
[root@bogon harbor]# cp harbor.cfg{,.bak}
然后修改配置文件
(7行) hostname = www.yunjisuan.com(之前注册的域名)
(11行) ui_url_protocol = https(改成https)
(23行) ssl_cert = /etc/ssl/harbor/www.yunjisuan.com.crt(之前复制过去证书的
位置)
(24行) ssl_cert_key = /etc/ssl/harbor/www.yunjisuan.com.key(之前复制过去证
书的位置)
其余的不用下载
然后下载安装docker-compose
如果有就直接给x权限移动到/usr/bin下就可以了
[root@bogon ~]# chmod +x docker-compose
[root@bogon ~]# ls
anaconda-ks.cfg docker-compose harbor-offline-installer-v1.5.0.tgz
[root@bogon ~]# mv docker-compose /usr/bin/
[root@bogon ~]# which docker-compose
/usr/bin/docker-compose
[root@bogon ~]# docker-compose --version
docker-compose version 1.21.2, build a133471
接下来就可以去离线安装harbor了
[root@bogon ~]# cd /data/install/harbor/
[root@bogon harbor]# ls
common docker-compose.notary.yml ha
harbor.cfg.bak install.sh NOTICE
docker-compose.clair.yml docker-compose.yml harbor.cfg
harbor.v1.5.0.tar.gz LICENSE prepare
然后启动安装脚本
[root@bogon harbor]# ./install.sh --with-notary --with-clair
(--with-notary启用镜像签名,--with-clair启用漏洞扫描)
安装完了是一下的样子

✔ ----Harbor has been installed and started successfully.----

Now you should be able to visit the admin portal at https://www.yunjisuan.com.
For more details, please visit https://github.com/vmware/harbor .

[root@bogon harbor]# echo $?
0
[root@bogon harbor]# docker images
REPOSITORY TAG IMAGE ID CREATED
SIZE
centos 7 1e1148e4cc2c 5 days
ago 202MB
vmware/redis-photon v1.5.0 7c03076402d9 7 months
ago 207MB
vmware/clair-photon v2.0.1-v1.5.0 7ae4e0670a3f 7 months
ago 301MB
vmware/notary-server-photon v0.5.1-v1.5.0 0b2b23300552 7 months
ago 211MB
vmware/notary-signer-photon v0.5.1-v1.5.0 67c41b4a1283 7 months
ago 209MB
vmware/registry-photon v2.6.2-v1.5.0 3059f44f4b9a 7 months
ago 198MB
vmware/nginx-photon v1.5.0 e100456182fc 7 months
ago 135MB
vmware/harbor-log v1.5.0 62bb6b8350d9 7 months
ago 200MB
vmware/harbor-jobservice v1.5.0 aca9fd2e867f 7 months
ago 194MB
vmware/harbor-ui v1.5.0 1055166068d0 7 months
ago 212MB
vmware/harbor-adminserver v1.5.0 019bc4544829 7 months
ago 183MB
vmware/harbor-db v1.5.0 82354dcf564f 7 months
ago 526MB
vmware/mariadb-photon v1.5.0 403e7e656499 7 months
ago 526MB
vmware/postgresql-photon v1.5.0 35c891dea9cf 7 months
ago 221MB
vmware/harbor-migrator v1.5.0 466c57ab0dc3 7 months
ago 1.16GB
vmware/photon 1.0 4b481ecbef2a 7 months
ago 130MB
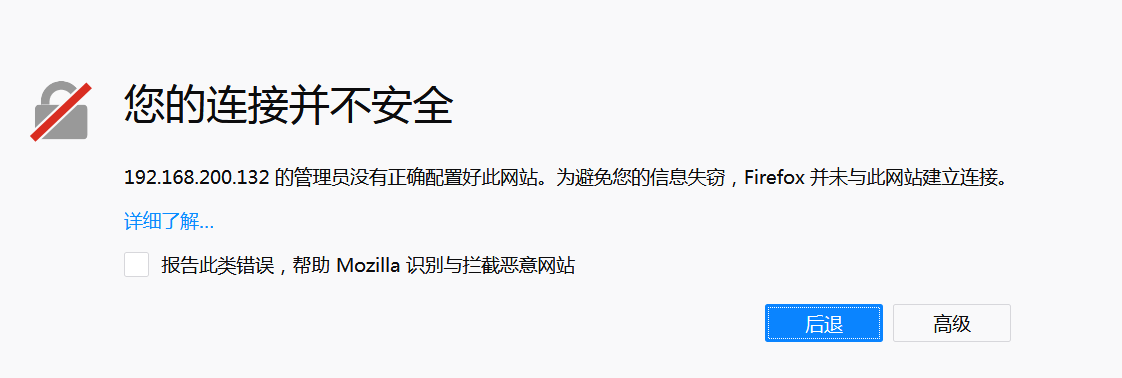
编译成功后使用浏览器登陆,唯一可以用的浏览器是火狐浏览器,
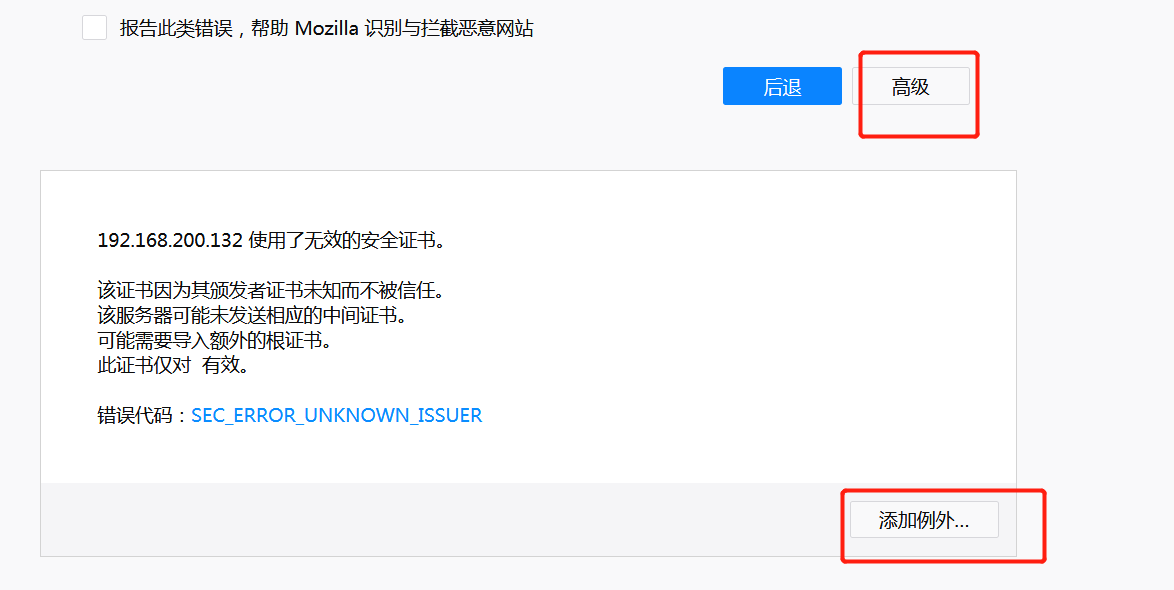
点击添加例外直接确认就可以进去了
安全管理
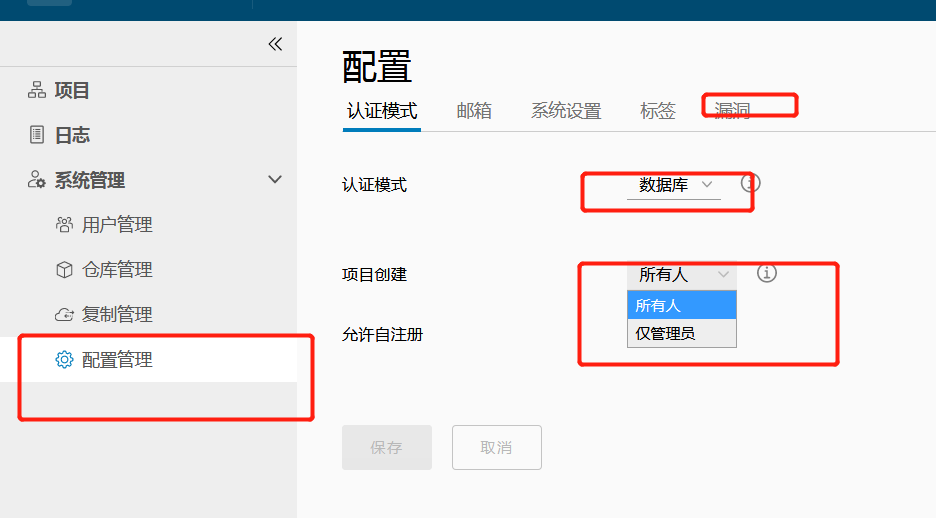
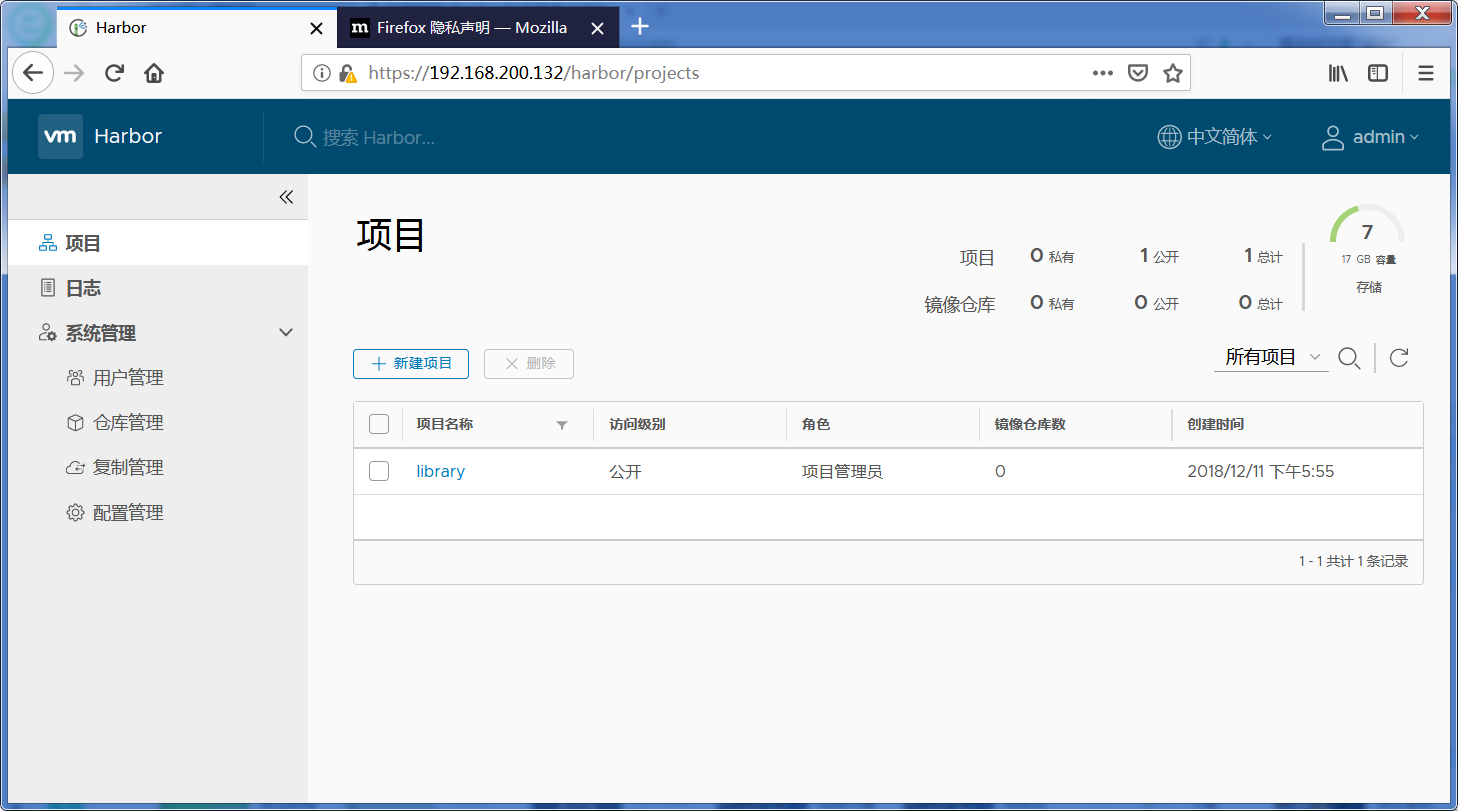
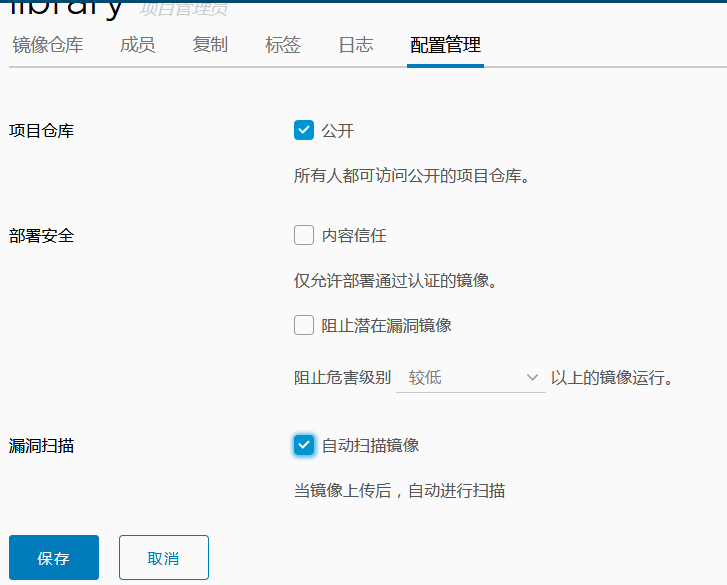
点击项目进入如图勾选保存
在服务器上做映射、
[root@bogon harbor]#
[root@bogon harbor]# echo "192.168.200.132 www.yunjisuan.com" >> /etc/hosts
服务器登陆了
root@bogon harbor]# docker login -uadmin -pHarbor12345 www.yunjisuan.com
WARNING! Using --password via the CLI is insecure. Use --password-stdin.
WARNING! Your password will be stored unencrypted in /root/.docker/config.json.
Configure a credential helper to remove this warning. See
https://docs.docker.com/engine/reference/commandline/login/#credentials-store

Login Succeeded
警告不用理会
上传镜像到私有仓库,必须前缀带公司名例如:www.yunjisuan.com/library/centos:v1
[root@bogon harbor]# docker tag centos:7 www.yunjisuan.com/library/centos:v1 (实验是拿公网下载的镜像的,所以要先改下名字)
[root@bogon harbor]# docker push www.yunjisuan.com/library/centos:v1(上传)
The push refers to repository [www.yunjisuan.com/library/centos]
071d8bd76517: Pushed
v1: digest: sha256:365fc7f33107869dfcf2b3ba220ce0aa42e16d3f8e8b3c21d72af1ee622f0cf0 size: 529
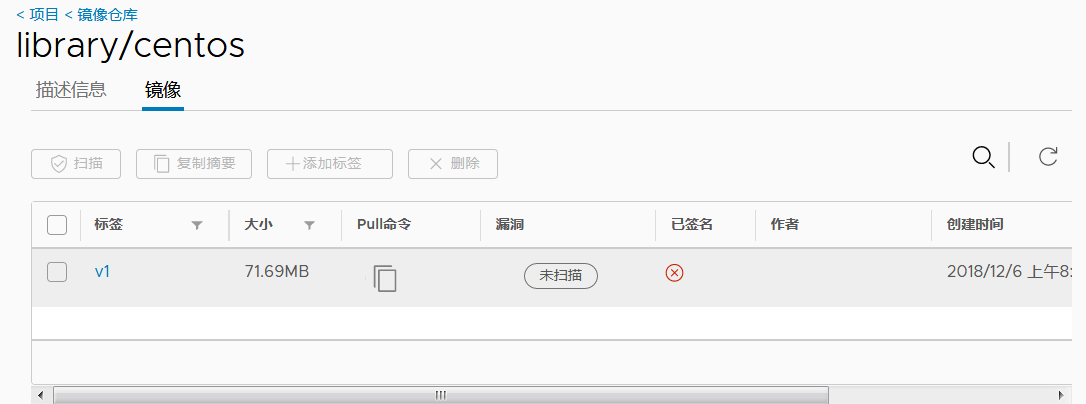
在浏览器上查看
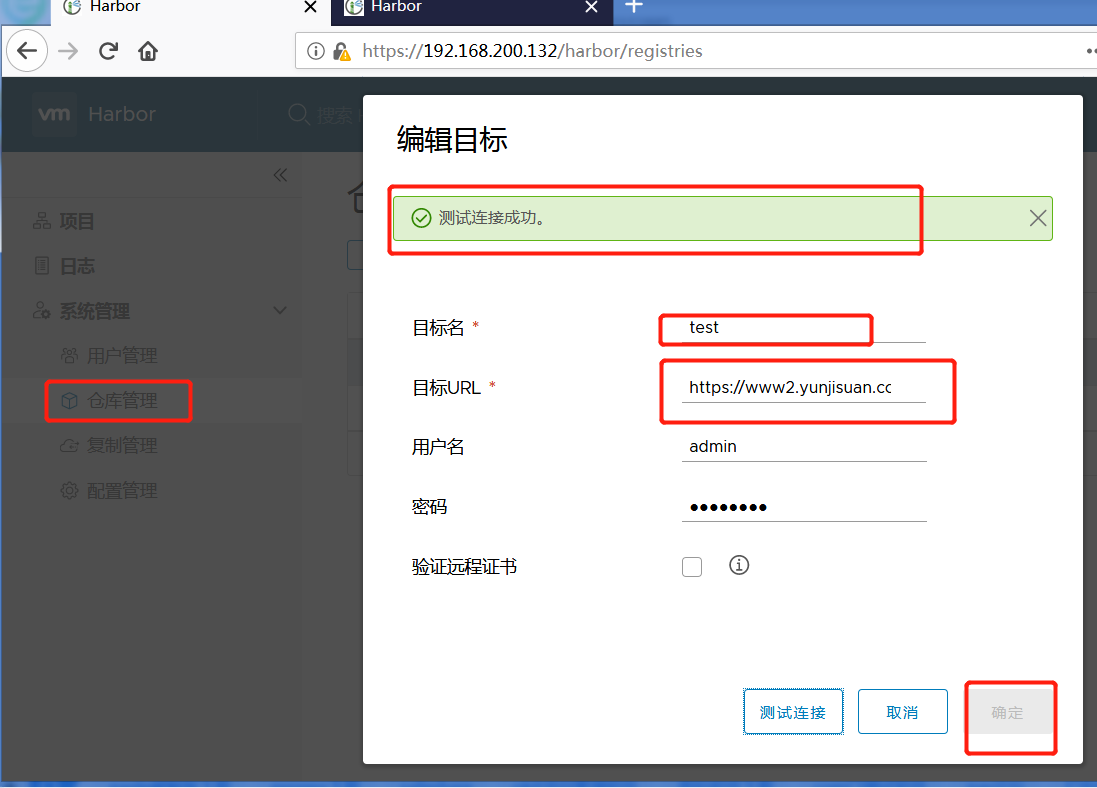
远程分发证书到别的服务器
[root@bogon ssl]# ls
ca.crt  ca.key  ca.srl  www.yunjisuan.com.crt  www.yunjisuan.com.csr  www.yunjisuan.com.key
[root@bogon ssl]# pwd
/data/ssl
[root@bogon ssl]# scp www.yunjisuan.com.crt 192.168.200.146:/etc/pki/ca-trust/source/anchors/
The authenticity of host '192.168.200.146 (192.168.200.146)' can't be established.
ECDSA key fingerprint is SHA256:gm/RhqGrfDo5Rgcr/LmBAaqPv6tmni7cRpXjGEWZQpg.
ECDSA key fingerprint is MD5:ae:f6:0b:6e:80:96:67:cf:bd:e8:f5:b5:c4:e0:da:11.
Are you sure you want to continue connecting (yes/no)? yes
Warning: Permanently added '192.168.200.146' (ECDSA) to the list of known hosts.
root@192.168.200.146's password:
www.yunjisuan.com.crt 100% 1931 201.7KB/s 00:00
然后在146服务器上立即生效并关闭selinux和防火墙,重启docker
[root@bogon ~]# update-ca-trust enable
[root@bogon ~]# update-ca-trust extract
[root@bogon ~]# setenforce 0
[root@bogon ~]# systemctl stop firewalld
[root@bogon ~]# systemctl restart docker
这样就146的服务器就可以推镜像了,146也需要做映射,
推的方法跟132的一样
[root@bogon ~]# echo "192.168.200.132 www.yunjisuan.com" >> /etc/hosts
[root@bogon ~]# docker images
REPOSITORY          TAG                 IMAGE ID            CREATED             SIZE
centos              7                   75835a67d134        2 months ago        200MB
[root@bogon ~]# docker login -uadmin -pHarbor12345 www.yunjisuan.com
WARNING! Using --password via the CLI is insecure. Use --password-stdin.
WARNING! Your password will be stored unencrypted in /root/.docker/config.json.
Configure a credential helper to remove this warning. See
https://docs.docker.com/engine/reference/commandline/login/#credentials-store

Login Succeeded
[root@bogon ~]# docker tag centos:7 www.yunjisuan.com/library/centos:v2
[root@bogon ~]# docker push www.yunjisuan.com/library/centos:v2
The push refers to repository [www.yunjisuan.com/library/centos]
f972d139738d: Pushed
v2: digest: sha256:dc29e2bcceac52af0f01300402f5e756cc8c44a310867f6b94f5f7271d4f3fec size: 529

主从复制,要将证书签发在从库上从新做一遍,将域名修改即可,别的都不用变,还要将自己的信任证书发个主一份,让其立即生效
并且从起docker,然后在从的在安装一遍harbor,在两边都要映射
在主的里边要在/etc/ssl/harbor/目录里用docker-compose down 关以下,在从起docker
在/etc/ssl/harbor/目录里输入./prepare 从新认证下文件。在重启./install.sh --with-clair
然后在dns服务器上搭建dns
yum -y install bind bind-chroot bind-utils
cd /etc
cp named.conf{,.bak}
修改配置文件
[root@bogon etc]# vim named.conf

//
// named.conf
//
// Provided by Red Hat bind package to configure the ISC BIND named(8) DNS
// server as a caching only nameserver (as a localhost DNS resolver only).
//
// See /usr/share/doc/bind*/sample/ for example named configuration files.
//
// See the BIND Administrator's Reference Manual (ARM) for details about the
// configuration located in /usr/share/doc/bind-{version}/Bv9ARM.html

options {
listen-on port 53 { 192.168.200.147; };
// listen-on-v6 port 53 { ::1; };
directory "/var/named";
dump-file "/var/named/data/cache_dump.db";
statistics-file "/var/named/data/named_stats.txt";
memstatistics-file "/var/named/data/named_mem_stats.txt";
recursing-file "/var/named/data/named.recursing";
secroots-file "/var/named/data/named.secroots";
allow-query { any; };
forwarders { 192.168.200.2; };

/*
- If you are building an AUTHORITATIVE DNS server, do NOT enable
recursion.
- If you are building a RECURSIVE (caching) DNS server, you need to
enable
recursion.
- If your recursive DNS server has a public IP address, you MUST
enable access
control to limit queries to your legitimate users. Failing to do so
will
cause your server to become part of large scale DNS amplification
attacks. Implementing BCP38 within your network would greatly
reduce such attack surface
*/
recursion yes;

dnssec-enable no;
dnssec-validation no;

/* Path to ISC DLV key */
bindkeys-file "/etc/named.iscdlv.key";

managed-keys-directory "/var/named/dynamic";

pid-file "/run/named/named.pid";
session-keyfile "/run/named/session.key";
};

logging {
channel default_debug {
file "data/named.run";
severity dynamic;
};
};

zone "." IN {
type hint;
file "named.ca";
};

zone "yunjisuan.com" IN {
type master;
file "yunjisuan.com.zone";
};
include "/etc/named.rfc1912.zones";
include "/etc/named.root.key";

检查配置文件是否正确
[root@bogon etc]# named-checkconf /etc/named.conf
什么都不出就ok

在去/var/named/复制一份空的点的解析文件修改
[root@bogon named]# cp -p named.empty yunjisuan.com.zone
[root@bogon named]# vim yunjisuan.com.zone
修改成一下的样子
$TTL 3H
@ IN SOA yunjisuan.com. root.ns1.yunjisuan.com. (
0 ; serial
1D ; refresh
1H ; retry
1W ; expire
3H ) ; minimum
NS ns1.yunjisuan.com.
ns1 A 192.168.200.147
www A 192.168.200.132
www2 A 192.168.200.146
检查配置文件是否正确
[root@bogon named]# named-checkzone yunjisuan.com yunjisuan.com.zone
zone yunjisuan.com/IN: loaded serial 0
OK
然后启动域名解析服务
[root@bogon etc]# systemctl start named
[root@bogon etc]# ss -antup | grep named
udp UNCONN 0 0 *:21253 *:*
users:(("named",pid=5898,fd=514))
tcp LISTEN 0 128 127.0.0.1:953 *:*
users:(("named",pid=5898,fd=21))
tcp LISTEN 0 128 ::1:953 :::*
users:(("named",pid=5898,fd=22))
然后零时修改网关,修改成自己
[root@bogon etc]# vim /etc/resolv.conf

把另外的两个服务器都修改了零时网关
检查dns解析
[root@bogon etc]# nslookup www.yunjisuan.com
Server:        192.168.200.147
Address:    192.168.200.147#53

Name:    www.yunjisuan.com
Address: 192.168.200.132
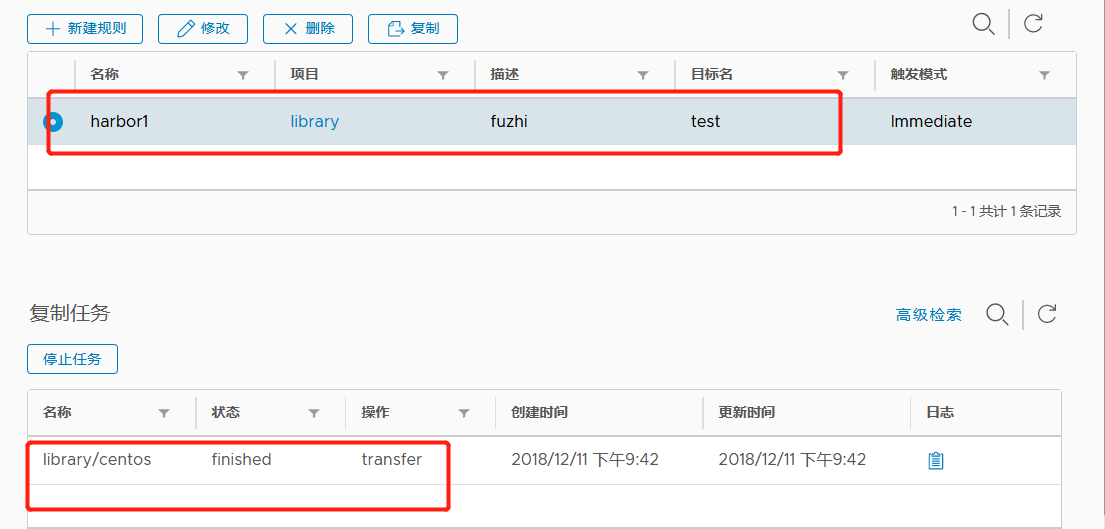
在浏览器上做主从复制就可以了


 浙公网安备 33010602011771号