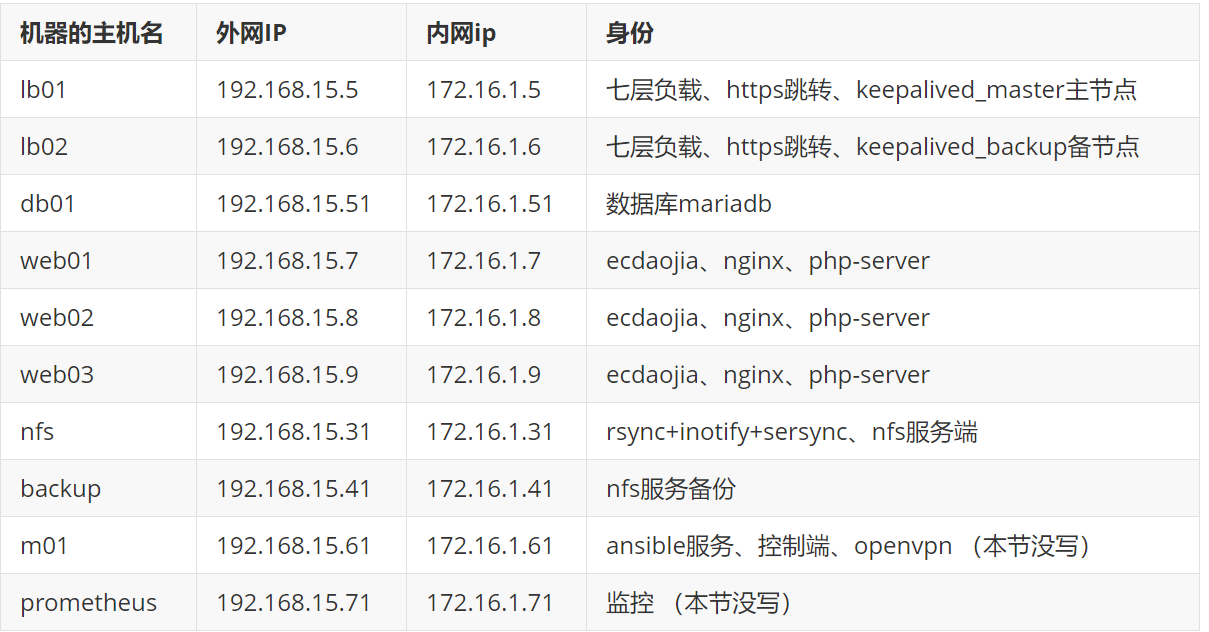
1、环境准备
![]()
2、优化所有的机器
1) 优化服务器的脚本
[root@web01 ~]# vim youhua.sh
#!/bin/bash

mv /etc/yum.repos.d/CentOS-Base.repo /etc/yum.repos.d/CentOS-Base.repo.backup

curl -o /etc/yum.repos.d/CentOS-Base.repo http://mirrors.aliyun.com/repo/Centos-7.repo

curl -o /etc/yum.repos.d/epel.repo http://mirrors.aliyun.com/repo/epel-7.repo

yum update -y

yum -y install python-setuptools python-pip gcc gcc-c++ autoconf libjpeg libjpeg-devel libpng libpng-devel freetype freetype-devel libxml2 libxml2-devel zlib zlib-devel glibc glibc-devel glib2 glib2-devel bzip2 bzip2-devel zipqunzip ncurses ncurses-devel curl curl-devel e2fsprogs e2fsprogs-devel krb5-devel libidn libidn-devel openssl openssh openssl-develnss_ldap openldap openldap-devel openldap-clients openldap-servers libxslt-devel libevent-devel ntp libtool-ltdl bison libtool vim-enhanced python wget lsof iptraf strace lrzsz kernel-devel kernel-headers pam-devel tcl tk cmake ncurses-devel bisonsetuptool popt-devel net-snmp screen perl-devel pcre-devel net-snmp screen tcpdump rsync sysstat man iptables sudo libconfiggit bind-utils tmux elinks numactl iftop bwm-ng net-tools expect

setenforce 0

sed 's#SELINUX=enforcing#SELINUX=disabled#g' /etc/selinux/config

systemctl disable --now firewalld

echo '#Timing synchronization time' >>/var/spool/cron/root

echo '0 */1 * * * /usr/sbin/ntpdate ntp1.aliyun.com &>/dev/null' >>/var/spool/cron/root

cat >>/etc/sysctl.conf <<EOF
net.ipv4.tcp_fin_timeout = 2
net.ipv4.tcp_tw_reuse = 1
net.ipv4.tcp_tw_recycle = 1
net.ipv4.tcp_syncookies = 1
net.ipv4.tcp_keepalive_time = 600
net.ipv4.ip_local_port_range = 4000    65000
net.ipv4.tcp_max_syn_backlog = 16384
net.ipv4.tcp_max_tw_buckets = 36000
net.ipv4.route.gc_timeout = 100
net.ipv4.tcp_syn_retries = 1
net.ipv4.tcp_synack_retries = 1
net.core.somaxconn = 16384
net.core.netdev_max_backlog = 16384
net.ipv4.tcp_max_orphans = 16384
net.ipv4.ip_forward = 1
EOF

sysctl -p

sed -i 's/#UseDNS yes/UseDNS no/g' /etc/ssh/sshd_config
sed -i 's/GSSAPIAuthentication yes/GSSAPIAuthentication no/g' /etc/ssh/sshd_config
systemctl restart sshd

groupadd miao -g 777
useradd miao -u777 -g777

systemctl disable abrt-ccpp.service
systemctl disable abrt-oops.service
systemctl disable abrt-vmcore.service
systemctl disable abrt-xorg.service
systemctl disable abrtd.service
systemctl disable accounts-daemon.service
systemctl disable atd.service
systemctl disable auditd.service
systemctl disable autovt@.service
systemctl disable avahi-daemon.service
systemctl disable bluetooth.service
systemctl disable cups.service
systemctl disable dbus-org.bluez.service
systemctl disable dbus-org.fedoraproject.FirewallD1.service
systemctl disable dbus-org.freedesktop.Avahi.service
systemctl disable dbus-org.freedesktop.ModemManager1.service
systemctl disable dbus-org.freedesktop.NetworkManager.service
systemctl disable dbus-org.freedesktop.nm-dispatcher.service
systemctl disable display-manager.service
systemctl disable dmraid-activation.service
systemctl disable firewalld.service
systemctl disable gdm.service
systemctl disable irqbalance.service
systemctl disable iscsi.service
systemctl disable ksm.service
systemctl disable ksmtuned.service
systemctl disable libstoragemgmt.service
systemctl disable libvirtd.service
systemctl disable lvm2-monitor.service
systemctl disable mcelog.service
systemctl disable mdmonitor.service
systemctl disable microcode.service
systemctl disable ModemManager.service
systemctl disable multipathd.service
systemctl disable NetworkManager-dispatcher.service
systemctl disable NetworkManager.service
systemctl disable postfix.service
systemctl disable qemu-guest-agent.service
systemctl disable rngd.service
systemctl disable rtkit-daemon.service
systemctl disable smartd.service
systemctl disable spice-vdagentd.service
systemctl disable systemd-readahead-collect.service
systemctl disable systemd-readahead-drop.service
systemctl disable systemd-readahead-replay.service
systemctl disable tuned.service
systemctl disable vgauthd.service
systemctl disable vmtoolsd.service
2) web集群安装nginx和php以及优化配置文件
# 安装nginx官方源
[root@web01 ~]# vim /etc/yum.repos.d/nginx.repo
[nginx-stable]
name=nginx stable repo
baseurl=http://nginx.org/packages/centos/$releasever/$basearch/
gpgcheck=1
enabled=1
gpgkey=https://nginx.org/keys/nginx_signing.key
module_hotfixes=true

[nginx-mainline]
name=nginx mainline repo
baseurl=http://nginx.org/packages/mainline/centos/$releasever/$basearch/
gpgcheck=1
enabled=0
gpgkey=https://nginx.org/keys/nginx_signing.key
module_hotfixes=true
[root@web01 ~]# yum clean all
[root@web01 ~]# yum makecache

# 安装nginx
[root@web01 ~]# yum install -y nginx

#写优化配置文件
[root@web01 ~]# cat etc/nginx/nginx.conf
user miao;
worker_processes auto;
worker_cpu_affinity auto;
error_log /var/log/nginx/error.log warn;
pid /run/nginx.pid;
worker_rlimit_nofile 35535;

events {
    use epoll;
    worker_connections 10240;
}

http {
    include         mime.types;
    default_type      application/octet-stream;
    charset utf-8;

 	log_format access_json '{"@timestamp":"$time_iso8601",'
                           '"host":"$server_addr",'
                           '"clientip":"$remote_addr",'
                           '"size":$body_bytes_sent,'
                           '"responsetime":$request_time,'
                           '"upstreamtime":"$upstream_response_time",'
                           '"upstreamhost":"$upstream_addr",'
                           '"http_host":"$host",'
                           '"url":"$uri",'
                           '"domain":"$host",'
                           '"xff":"$http_x_forwarded_for",'
                           '"referer":"$http_referer",'
                           '"status":"$status"}';

    access_log  /var/log/nginx/access.log  access_json;
    server_tokens off;
    client_max_body_size 200m;
    sendfile            on;
    tcp_nopush          on;
    keepalive_timeout   65;
    gzip on;
    gzip_disable "MSIE [1-6]\.";
    gzip_http_version 1.1;
    gzip_comp_level 4;
    gzip_buffers 16 8k;
    gzip_min_length 1024;
    gzip_types text/plain text/css application/json application/x-javascript text/xml application/xml application/xml+rss text/javascript image/jpeg;
    include /etc/nginx/conf.d/*.conf;
}

# 启动
[root@web01 ~]# systemctl enable --now nginx
# 安装php官方源
[root@web01 ~]# vim /etc/yum.repos.d/php.repo
[php-webtatic]
name = PHP Repository
baseurl = http://us-east.repo.webtatic.com/yum/el7/x86_64/
gpgcheck = 0
[root@web01 ~]# yum clean all
[root@web01 ~]# yum makecache
[root@web01 ~]# yum remove php-mysql-5.4 php php-fpm php-common
[root@web01 ~]# yum -y install php71w php71w-cli php71w-common php71w-devel php71w-embedded php71w-gd php71w-mcrypt php71w-mbstring php71w-pdo php71w-xml php71w-fpm php71w-mysqlnd php71w-opcache php71w-pecl-memcached php71w-pecl-redis php71w-pecl-mongodb

# 修改配置文件
[root@web01 ~]# vim /etc/php-fpm.d/www.conf
user = miao
group = miao
;php_value[session.save_handler] = files
;php_value[session.save_path]    = /var/lib/php/session

#php配置文件优化
[root@web01 ~]# vim /etc/php.ini
... ...
#原配置
#session.save_handler = files
session.save_handler = redis
#;session.save_path = "/tmp"
session.save_path = "tcp://172.16.1.51:6379"

expose_php = Off
display_error = Off
error_reporting = E_ALL
log_errors = On
error_log = /var/log/php_error.log
date.timezone = Asia/Shanghai

file_uploads = On
upload_max_filesize = 300M
post_max_size = 300M
max_file_uploads = 20
memory_limit = 128M

# 启动php
[root@web01 ~]# systemctl enable --now php-fpm.service
3、搭建backup服务器
# 安装rsync
[root@backup ~]#  yum install rsync -y

# 编写配置文件(前端代码仓库、数据库备份、上传文件的备份)
[root@backup ~]# vim /etc/rsyncd.conf
uid=miao
gid=miao
port=873
fake super=yes
use chroot=no
max connection=200
timeuot=600
ignore errors
read only=false
list=false
auth users=dan
secrets file=/etc/rsync.passwd
log file=/var/log/rsyncd/log
###################################
[web]
comment="前端代码仓库"
path=/backup/web
[database]
comment="数据库备份"
path=/backup/database
[conf]
comment="上传文件备份"
path=/backup/conf

# 创建仓库真实目录
[root@backup ~]# mkdir -p /backup/{web,database,conf}

# 授权
[root@backup ~]# chown miao.miao -R /backup/

# 创建密码文件
[root@backup ~]# echo "dan:111" > /etc/rsync.passwd
[root@backup ~]# chmod 600 /etc/rsync.passwd

# 启动
[root@backup ~]# systemctl enable --now rsyncd
4、开启NFS服务
# 安装软件  nfs-utils rpcbind
[root@nfs ~]# yum install nfs-utils rpcbind -y

# 创建挂载点
[root@nfs ~]# mkdir -p /nfs/{web,database,conf}

# 授权
[root@nfs ~]# chown miao.miao -R /nfs/

# 设置挂载点
[root@nfs ~]# vim /etc/exports
/nfs/web      172.16.1.0/20(rw,sync,all_squash,anonuid=777,anongid=777)
/nfs/database 172.16.1.0/20(rw,sync,all_squash,anonuid=777,anongid=777)
/nfs/conf     172.16.1.0/20(rw,sync,all_squash,anonuid=777,anongid=777)

# 启动
[root@nfs ~]# systemctl enable --now nfs-server.service
Created symlink from /etc/systemd/system/multi-user.target.wants/nfs-server.service to /usr/lib/systemd/system/nfs-server.service.

# 检测
[root@nfs ~]# showmount -e
ok

#下载sersync
##修改sersync的配置文件
[root@m01 sersync2]# cat confxml.xml
...
    <inotify>
	<delete start="true"/>
	<createFolder start="true"/>
	<createFile start="true"/>
	<closeWrite start="true"/>
	<moveFrom start="true"/>
	<moveTo start="true"/>
	<attrib start="true"/>
	<modify start="true"/>
    </inotify>

    <sersync>
	<localpath watch="/data_wp"> # 另外一台 /data_web
	    <remote ip="172.16.1.41" name="data"/>
	    <!--<remote ip="192.168.8.39" name="tongbu"/>-->
	    <!--<remote ip="192.168.8.40" name="tongbu"/>-->
	</localpath>
	<rsync>
	    <commonParams params="-az"/>
	    <auth start="true" users="rsync_mm" passwordfile="/etc/rsync.passwd"/>
[root@m01 sersync2]# /usr/local/sersync/sersync2 -dro /usr/local/sersync/confxml.xml
挂载nfs(web集群)
[root@web02 ~]# mkdir /code
[root@web02 ~]# chown -R miao.miao /code/
[root@web02 ~]# mount  -t nfs 172.16.1.31:/nfs/web /code
[root@web02 ~]# mount -t nfs 172.16.1.31:/nfs/conf /etc/nginx/conf.d/
[root@web02 ~]# systemctl restart nginx
搭建ec
[root@web02 opt]# 上传包 并解压到/code,改名ec
[root@web02 ~]# vim /etc/nginx/conf.d/ec.conf
server {
        listen 80;
        server_name ec.com;
        root /code/ecjia-daojia;

        location / {
                index index.php;
        }
        location ~* \.php$ {
                fastcgi_pass 127.0.0.1:9000;
                fastcgi_param SCRIPT_FILENAME $document_root$fastcgi_script_name;
                include fastcgi_params;
        }
}
[root@web02 ~]# systemctl restart nginx
5、搭建数据库(mariadb)
# 安装软件
[root@db01 ~]# yum install mariadb* -y

# 启动
[root@db01 ~]# systemctl enable --now mariadb

# 创建密码并登陆数据库
[root@db01 ~]# mysqladmin -uroot password '123'
[root@db01 ~]# mysql -uroot -p123

# 创建用户给予web以及其它网站使用(授权)
MariaDB [mysql]>create database ec;

MariaDB [mysql]> grant all privileges on *.* to dan@'%' identified by '123';
Query OK, 0 rows affected (0.01 sec)

#重载数据库
MariaDB [mysql]> flush privileges;
Query OK, 0 rows affected (0.00 sec)

#备份数据库
[root@db01 ~]# mysqldump -uroot -p123 --all-databases --single-transaction > mysql-all.sql

# 编写每天备份脚本
[root@db01 ~]# vim mysql_dump.sh
#!/bin/bash
DATE=`date +%F`
BACKUP="/database"
cd $BACKUP
mysqldump -uroot -p123 --all-databases --single-transaction > mysql-all-${DATE}.sql
tar -czf mysql-all-${DATE}.tar.gz mysql-all-${DATE}.sql
rm -rf mysql-all-${DATE}.sql

[root@db01 ~]# chmod 600 mysql_dump.sh   #授权
[root@db01 ~]# mkdir /database          #创建目录
[root@db01 ~]# chown miao.miao /database/
[root@db01 ~]# mount -t nfs 172.16.1.31:/nfs/database /database/
# 脚本加入定时任务
[root@db01 ~]# crontab -e
01 00 * * *  /database/mysql_dump.sh
6、数据备份与同步
#上传实时备份软件sersync
[root@nfs opt]# rz -E
rz waiting to receive.
[root@nfs opt]# tar -xf sersync.gz -C /usr/local
[root@nfs opt]# cd /usr/local
[root@nfs local]# cd GNU-Linux-x86/
[root@nfs GNU-Linux-x86]# vim confxml1.xml
... ...
    <inotify>
	<delete start="true"/>
	<createFolder start="true"/>
	<createFile start="true"/>
	<closeWrite start="true"/>
	<moveFrom start="true"/>
	<moveTo start="true"/>
	<attrib start="true"/>
	<modify start="true"/>
    </inotify>

    <sersync>
	<localpath watch="/nfs/conf">
	    <remote ip="172.16.1.41" name="conf"/>
	    <!--<remote ip="192.168.8.39" name="tongbu"/>-->
	    <!--<remote ip="192.168.8.40" name="tongbu"/>-->
	</localpath>
	<rsync>
	    <commonParams params="-artuz"/>
	    <auth start="true" users="dan" passwordfile="/etc/rsync.passwd"/>
... ...
[root@nfs GNU-Linux-x86]# vim confxml2.xml
... ...
    <inotify>
	<delete start="true"/>
	<createFolder start="true"/>
	<createFile start="true"/>
	<closeWrite start="true"/>
	<moveFrom start="true"/>
	<moveTo start="true"/>
	<attrib start="true"/>
	<modify start="true"/>
    </inotify>

    <sersync>
	<localpath watch="/nfs/web">
	    <remote ip="172.16.1.41" name="web"/>
	    <!--<remote ip="192.168.8.39" name="tongbu"/>-->
	    <!--<remote ip="192.168.8.40" name="tongbu"/>-->
	</localpath>
	<rsync>
	    <commonParams params="-artuz"/>
	    <auth start="true" users="dan" passwordfile="/etc/rsync.passwd"/>
... ...
[root@nfs GNU-Linux-x86]# echo "111"> /etc/rsync.passwd
[root@nfs GNU-Linux-x86]# ./sersync2 -dro confxml1.xml
[root@nfs GNU-Linux-x86]# ./sersync2 -dro confxml2.xml
配置https
[root@web01 ~]# nginx -V
--with-http_ssl_module
[root@web01 ~]# mkdir /etc/nginx/ssl_key
[root@web01 ~]# cd /etc/nginx/ssl_key/
[root@web01 ssl_key]# openssl genrsa -idea -out server.key 2048
[root@web01 ssl_key]# openssl req -days 36500 -x509 -sha256 -nodes -newkey rsa:2048 -keyout server.key -out server.crt
使用redis实现session共享
[root@db01 ~]# yum install -y redis
[root@db01 ~]# vim /etc/redis.conf
bind 127.0.0.1 172.16.1.51
[root@db01 ~]# systemctl start redis

# web集群
[root@web01 conf.d]# vim /etc/php.ini
#原内容 session.save_handler = files
session.save_handler = redis
#原内容 ;session.save_path = "/tmp"
session.save_path = "tcp://172.16.1.51:6379"

[root@web01 conf.d]# vim /etc/php-fpm.d/www.conf
#注释原内容
;php_value[session.save_handler] = files
;php_value[session.save_path]    = /var/lib/php/session

systemctl restart php-fpm
7、配置keepalived
1)先配置七层负载均衡
# 配置 负载均衡两个端的配置文件
[root@lb01 ~]# vim /etc/nginx/conf.d/ec.conf
upstream ec_http {
    server 192.168.15.7;
    server 192.168.15.8;
    server 192.168.15.9;
}

server {
    listen 80;
    server_name ec.com;

    rewrite (.*) http://$server_name$1;
}
     server {
    listen 443 ssl;
    server_name ec.com;
    ssl_certificate /etc/nginx/ssl_key/server.crt;
    ssl_certificate_key /etc/nginx/ssl_key/server.key;

    location / {
        proxy_pass http://ec_http;
        include proxy_params;
    }
}

#配置代理的优化文件,lb1与lb2同步
[root@lb01 ~]# cat /etc/nginx/proxy_params
proxy_set_header Host $http_host;
proxy_set_header X-Real-IP $remote_addr;
proxy_set_header X-Forwarded-For $proxy_add_x_forwarded_for;

proxy_connect_timeout 30;
proxy_send_timeout 60;
proxy_read_timeout 60;

proxy_buffering on;
proxy_buffer_size 32k;
proxy_buffers 4 128k;
2)配置keepalived
#安装软件
[root@lb01 ~]# yum install -y keepalived
[root@lb02 ~]# yum install -y keepalived

#配置主节点的文件
[root@lb01 ~]# vim /etc/keepalived/keepalived.conf
global_defs {
    router_id lb01
}

vrrp_instance VI_1 {
    state MASTER
    interface eth0
    virtual_router_id 50
    priority 100
    advert_int 1
    authentication {
        auth_type PASS
        auth_pass 1111
    }
    virtual_ipaddress {
        192.168.15.3
    }
}

# 配置备节点
[root@lb02 ~]# vim /etc/keepalived/keepalived.conf
global_defs {
    router_id lb02
}

vrrp_instance VI_1 {
    state BACKUP
    interface eth0
    virtual_router_id 50
    priority 90
    advert_int 1
    authentication {
        auth_type PASS
        auth_pass 1111
    }
    virtual_ipaddress {
        192.168.15.3
    }
}

#启动服务
[root@lb01 ~]# systemctl start keepalived.service
[root@lb02 ~]# systemctl start keepalived.service

# keepalived开启日志
[root@lb01 ~]# vim /etc/sysconfig/keepalived
KEEPALIVED_OPTIONS="-D -d -S 0"         # 大S

#配置rsyslog抓取日志
[root@lb01 ~]# vim /etc/rsyslog.conf
local0.*		/var/log/keepalived.log
#!local0 ,0代表是配置日志里面的KEEPALIVED_OPTIONS="-D -d -S 0"末尾的数字。数字要对应

#重启服务
[root@lb01 ~]# systemctl restart keepalived.service rsyslog

 浙公网安备 33010602011771号